Quick Start Guide
Page 16
... 29, 2005 1:22 PM Getting Assistance View the User's Manual on the Main page of the HP Image Zone software CD. Additional Assistance • For tips and tools to help with the HP Image Zone software, see the HP Image Zone online manual. • For an interactive learning experience (in English) ...support is your camera more . Get award winning assistance 24x7 at www.hp.com/support. • For help you through the most-used features of your software CD. 16 HP Photosmart E217/E317 Quick Start Guide Insert the HP Image Zone software CD into the CD drive of your camera and provide...
... 29, 2005 1:22 PM Getting Assistance View the User's Manual on the Main page of the HP Image Zone software CD. Additional Assistance • For tips and tools to help with the HP Image Zone software, see the HP Image Zone online manual. • For an interactive learning experience (in English) ...support is your camera more . Get award winning assistance 24x7 at www.hp.com/support. • For help you through the most-used features of your software CD. 16 HP Photosmart E217/E317 Quick Start Guide Insert the HP Image Zone software CD into the CD drive of your camera and provide...

User's Manual
Page 5
... the Language 13 5 Set the Date and Time 14 6 Install and Format a Memory Card (Optional 15 7 Install the Software 17 Windows 17 Macintosh 18 User's Manual on the CD 18 Camera Parts 19 Back of the Camera 19 Top of the Camera 21 Front, Left Side, and Bottom of the Camera...
... the Language 13 5 Set the Date and Time 14 6 Install and Format a Memory Card (Optional 15 7 Install the Software 17 Windows 17 Macintosh 18 User's Manual on the CD 18 Camera Parts 19 Back of the Camera 19 Top of the Camera 21 Front, Left Side, and Bottom of the Camera...

User's Manual
Page 6
... 67 Date & Time 68 USB Configuration 69 Language 70 Move Images to Card 71 Reset Settings 72 6 Troubleshooting and Support 73 Resetting the Camera 74 HP Image Zone Software 75 System Requirements (Windows Only 75 HP Image Zone Express (Windows Only) . . . . 76 6 HP Photosmart E217 User's Manual
... 67 Date & Time 68 USB Configuration 69 Language 70 Move Images to Card 71 Reset Settings 72 6 Troubleshooting and Support 73 Resetting the Camera 74 HP Image Zone Software 75 System Requirements (Windows Only 75 HP Image Zone Express (Windows Only) . . . . 76 6 HP Photosmart E217 User's Manual
User's Manual
Page 8
C Caring for Your Camera 123 Basic Camera Care 123 Cleaning the Camera 125 Cleaning the Camera Lens 125 Cleaning the Camera Body and Image Display 126 D Specifications 127 Memory Capacity 131 8 HP Photosmart E217 User's Manual
C Caring for Your Camera 123 Basic Camera Care 123 Cleaning the Camera 125 Cleaning the Camera Lens 125 Cleaning the Camera Body and Image Display 126 D Specifications 127 Memory Capacity 131 8 HP Photosmart E217 User's Manual
User's Manual
Page 9
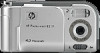
See page 61. • Direct print-Print directly from your camera to your choice. This manual explains camera features you can use to your camera to any PictBridge-certified printer without having to connect to ensure great results while enjoying .... Getting Started 9 See page 62. • Internal memory or memory card-Store images in your camera's internal memory or on your purchase of the HP Photosmart E217 digital camera and welcome to the world of your computer. See page 15. 1 Getting Started Congratulations on an optional memory card of digital photography! Some...
See page 61. • Direct print-Print directly from your camera to your choice. This manual explains camera features you can use to your camera to any PictBridge-certified printer without having to connect to ensure great results while enjoying .... Getting Started 9 See page 62. • Internal memory or memory card-Store images in your camera's internal memory or on your purchase of the HP Photosmart E217 digital camera and welcome to the world of your computer. See page 15. 1 Getting Started Congratulations on an optional memory card of digital photography! Some...

User's Manual
Page 10
Setup To locate a part on your camera (such as a button or a light) while following the instructions in this section, see Camera Parts on the side of the camera as shown. 10 HP Photosmart E217 User's Manual Attach the Wrist Strap Attach the wrist strap to the wrist strap mount on page 19. 1.
Setup To locate a part on your camera (such as a button or a light) while following the instructions in this section, see Camera Parts on the side of the camera as shown. 10 HP Photosmart E217 User's Manual Attach the Wrist Strap Attach the wrist strap to the wrist strap mount on page 19. 1.
User's Manual
Page 12
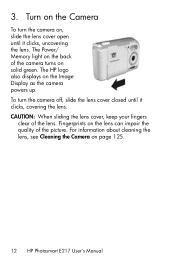
.../ Memory light on the back of the camera turns on the Image Display as the camera powers up. The HP logo also displays on solid green. Fingerprints on page 125. 12 HP Photosmart E217 User's Manual For information about cleaning the lens, see Cleaning the Camera on the lens can impair the quality of the...
.../ Memory light on the back of the camera turns on the Image Display as the camera powers up. The HP logo also displays on solid green. Fingerprints on page 125. 12 HP Photosmart E217 User's Manual For information about cleaning the lens, see Cleaning the Camera on the lens can impair the quality of the...

User's Manual
Page 14
... your computer. Adjust the value of the highlighted selection using the buttons. 3. Press the buttons to move to set the correct date and time. 14 HP Photosmart E217 User's Manual A confirmation screen appears, asking if the correct date and time have entered the proper values for the date and time. The Date & Time screen...
... your computer. Adjust the value of the highlighted selection using the buttons. 3. Press the buttons to move to set the correct date and time. 14 HP Photosmart E217 User's Manual A confirmation screen appears, asking if the correct date and time have entered the proper values for the date and time. The Date & Time screen...
User's Manual
Page 16
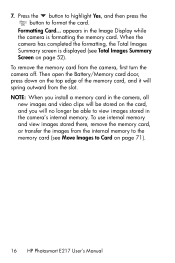
... card (see Total Images Summary Screen on the top edge of the memory card, and it will no longer be stored on page 71). 16 HP Photosmart E217 User's Manual appears in the camera's internal memory. Formatting Card...
... card (see Total Images Summary Screen on the top edge of the memory card, and it will no longer be stored on page 71). 16 HP Photosmart E217 User's Manual appears in the camera's internal memory. Formatting Card...
User's Manual
Page 18
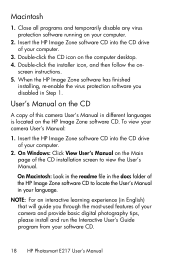
... screen to locate the User's Manual in English) that will guide you disabled in different languages is located on the CD A copy of your software CD. 18 HP Photosmart E217 User's Manual Insert the HP Image Zone software CD into the CD drive of the HP Image Zone software CD to view... the User's Manual. Double-click the installer icon, and then follow the on the computer desktop....
... screen to locate the User's Manual in English) that will guide you disabled in different languages is located on the CD A copy of your software CD. 18 HP Photosmart E217 User's Manual Insert the HP Image Zone software CD into the CD drive of the HP Image Zone software CD to view... the User's Manual. Double-click the installer icon, and then follow the on the computer desktop....
User's Manual
Page 20
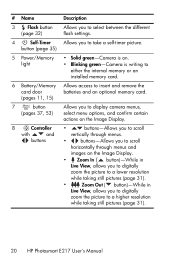
... taking still pictures (page 31). • Zoom Out ( button)-While in Live View, allows you to a higher resolution while taking still pictures (page 31). 20 HP Photosmart E217 User's Manual
... taking still pictures (page 31). • Zoom Out ( button)-While in Live View, allows you to a higher resolution while taking still pictures (page 31). 20 HP Photosmart E217 User's Manual
User's Manual
Page 22
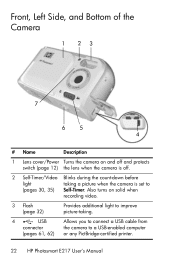
... camera is off and protects switch (page 12) the lens when the camera is set to a USB-enabled computer or any PictBridge-certified printer. 22 HP Photosmart E217 User's Manual Also turns on and off . 2 Self-Timer/Video Blinks during the count-down before light taking . 4 USB connector (pages 61, 62) Allows you to...
... camera is off and protects switch (page 12) the lens when the camera is set to a USB-enabled computer or any PictBridge-certified printer. 22 HP Photosmart E217 User's Manual Also turns on and off . 2 Self-Timer/Video Blinks during the count-down before light taking . 4 USB connector (pages 61, 62) Allows you to...
User's Manual
Page 24
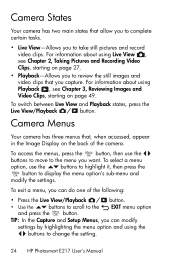
...; Use the buttons to scroll to the EXIT menu option and press the button. For information about using the buttons to change the setting. 24 HP Photosmart E217 User's Manual
...; Use the buttons to scroll to the EXIT menu option and press the button. For information about using the buttons to change the setting. 24 HP Photosmart E217 User's Manual
User's Manual
Page 28
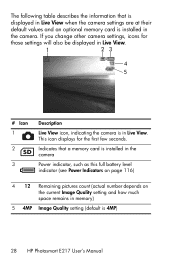
... seconds. Indicates that is displayed in Live View when the camera settings are at their default values and an optional memory card is 4MP) 28 HP Photosmart E217 User's Manual The following table describes the information that a memory card is installed in the camera Power indicator, such as this full battery level indicator (see...
... seconds. Indicates that is displayed in Live View when the camera settings are at their default values and an optional memory card is 4MP) 28 HP Photosmart E217 User's Manual The following table describes the information that a memory card is installed in the camera Power indicator, such as this full battery level indicator (see...
User's Manual
Page 30
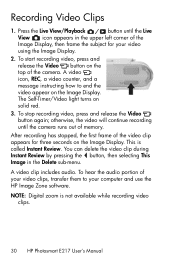
... Delete sub-menu. Recording Video Clips 1. A video clip includes audio. A video icon, REC, a video counter, and a message instructing how to your computer and use the HP Image Zone software. You can delete the video clip during Instant Review by pressing the button, then selecting This Image in the upper left corner... appears for your video clips, transfer them to end the video appear on the Image Display. This is not available while recording video clips. 30 HP Photosmart E217 User's Manual To start recording video, press and release the Video button on solid red. 3.
... Delete sub-menu. Recording Video Clips 1. A video clip includes audio. A video icon, REC, a video counter, and a message instructing how to your computer and use the HP Image Zone software. You can delete the video clip during Instant Review by pressing the button, then selecting This Image in the upper left corner... appears for your video clips, transfer them to end the video appear on the Image Display. This is not available while recording video clips. 30 HP Photosmart E217 User's Manual To start recording video, press and release the Video button on solid red. 3.

User's Manual
Page 32
... the default Auto Flash setting, the icon for a description of red-eye reduction, see Red Eye on the camera. This is turned off . 32 HP Photosmart E217 User's Manual The new setting remains in Sunset mode nor is it is changed again or until the desired setting appears on the camera. Red-Eye The...
... the default Auto Flash setting, the icon for a description of red-eye reduction, see Red Eye on the camera. This is turned off . 32 HP Photosmart E217 User's Manual The new setting remains in Sunset mode nor is it is changed again or until the desired setting appears on the camera. Red-Eye The...
User's Manual
Page 34
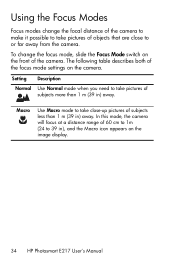
... make it possible to take pictures of 60 cm to 1m (24 to 39 in), and the Macro icon appears on the image display. 34 HP Photosmart E217 User's Manual Setting Description Normal Use Normal mode when you need to take pictures of subjects less than 1 m (39 in) away. Using the Focus Modes Focus...
... make it possible to take pictures of 60 cm to 1m (24 to 39 in), and the Macro icon appears on the image display. 34 HP Photosmart E217 User's Manual Setting Description Normal Use Normal mode when you need to take pictures of subjects less than 1 m (39 in) away. Using the Focus Modes Focus...

User's Manual
Page 36
Place the camera on a steady surface or a tripod, frame your picture, then press the Shutter button all the way down and remove your shaking the camera when you can use the self-timer setting to avoid blurry images caused by camera shake. TIP: If you are taking the image, eliminating any possibility of your hands from the camera. The camera will wait 10 seconds before taking still images in low light with or without a tripod, you press the Shutter button. 36 HP Photosmart E217 User's Manual
Place the camera on a steady surface or a tripod, frame your picture, then press the Shutter button all the way down and remove your shaking the camera when you can use the self-timer setting to avoid blurry images caused by camera shake. TIP: If you are taking the image, eliminating any possibility of your hands from the camera. The camera will wait 10 seconds before taking still images in low light with or without a tripod, you press the Shutter button. 36 HP Photosmart E217 User's Manual

User's Manual
Page 38
... following table explains the Shooting Mode settings in normal situations. NOTE: The shooting mode does not apply when you want to stop motion. 38 HP Photosmart E217 User's Manual Press the button to save the setting and return to stop the action. Use Action mode to capture sporting events, moving cars, or any scene...
... following table explains the Shooting Mode settings in normal situations. NOTE: The shooting mode does not apply when you want to stop motion. 38 HP Photosmart E217 User's Manual Press the button to save the setting and return to stop the action. Use Action mode to capture sporting events, moving cars, or any scene...

User's Manual
Page 40
... you capture with your camera. Images will be full resolution and have the lowest compression. The following table explains the Image Quality settings in ). 40 HP Photosmart E217 User's Manual Image Quality This setting allows you to set the resolution and JPEG compression of 210 by 297 mm (8.5 by 17 in).
... you capture with your camera. Images will be full resolution and have the lowest compression. The following table explains the Image Quality settings in ). 40 HP Photosmart E217 User's Manual Image Quality This setting allows you to set the resolution and JPEG compression of 210 by 297 mm (8.5 by 17 in).

