Quick Start Guide
Page 12
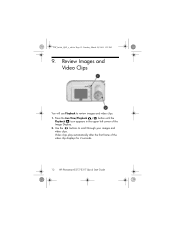
Press the Live View/Playback button until the Playback icon appears in the upper left corner of the video clip displays for 2 seconds. 12 HP Photosmart E217/E317 Quick Start Guide Review Images and Video Clips You will use Playback to scroll through your images and video clips. Use the buttons to review images and video clips. 1. Video clips play automatically after the first frame of the Image Display. 2. Lee_Jackie_QSG_e_ok.fm Page 12 Tuesday, March 29, 2005 1:22 PM 9.
Press the Live View/Playback button until the Playback icon appears in the upper left corner of the video clip displays for 2 seconds. 12 HP Photosmart E217/E317 Quick Start Guide Review Images and Video Clips You will use Playback to scroll through your images and video clips. Use the buttons to review images and video clips. 1. Video clips play automatically after the first frame of the Image Display. 2. Lee_Jackie_QSG_e_ok.fm Page 12 Tuesday, March 29, 2005 1:22 PM 9.

User's Manual
Page 6
Image Quality 40 Date & Time Imprint 42 EV Compensation 44 White Balance 45 ISO Speed 47 3 Reviewing Images and Video Clips 49 Using Playback 49 Total Images Summary Screen 52 Using the Playback Menu 53 Delete 55 Viewing Thumbnails 56 Magnifying Images ... 67 Date & Time 68 USB Configuration 69 Language 70 Move Images to Card 71 Reset Settings 72 6 Troubleshooting and Support 73 Resetting the Camera 74 HP Image Zone Software 75 System Requirements (Windows Only 75 HP Image Zone Express (Windows Only) . . . . 76 6 HP Photosmart E217 User's Manual
Image Quality 40 Date & Time Imprint 42 EV Compensation 44 White Balance 45 ISO Speed 47 3 Reviewing Images and Video Clips 49 Using Playback 49 Total Images Summary Screen 52 Using the Playback Menu 53 Delete 55 Viewing Thumbnails 56 Magnifying Images ... 67 Date & Time 68 USB Configuration 69 Language 70 Move Images to Card 71 Reset Settings 72 6 Troubleshooting and Support 73 Resetting the Camera 74 HP Image Zone Software 75 System Requirements (Windows Only 75 HP Image Zone Express (Windows Only) . . . . 76 6 HP Photosmart E217 User's Manual
User's Manual
Page 19
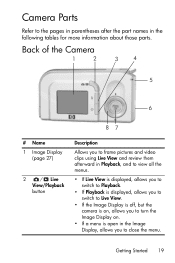
... of the Camera 1 2 3 4 5 6 8 7 # Name 1 Image Display (page 27) 2 Live View/Playback button Description Allows you to frame pictures and video clips using Live View and review them afterward in Playback, and to view all the menus. • If Live View is displayed, allows you to switch to Playback. • If Playback...
... of the Camera 1 2 3 4 5 6 8 7 # Name 1 Image Display (page 27) 2 Live View/Playback button Description Allows you to frame pictures and video clips using Live View and review them afterward in Playback, and to view all the menus. • If Live View is displayed, allows you to switch to Playback. • If Playback...
User's Manual
Page 24
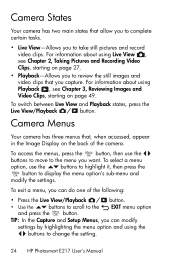
...To access the menus, press the button, then use the buttons to highlight it, then press the button to change the setting. 24 HP Photosmart E217 User's Manual For information about using the buttons to display the menu option's sub-menu and modify the settings. To switch between Live... complete certain tasks. • Live View-Allows you can modify settings by highlighting the menu option and using Live View , see Chapter 3, Reviewing Images and Video Clips, starting on the back of the following: • Press the Live View/Playback button. • Use the buttons ...
...To access the menus, press the button, then use the buttons to highlight it, then press the button to change the setting. 24 HP Photosmart E217 User's Manual For information about using the buttons to display the menu option's sub-menu and modify the settings. To switch between Live... complete certain tasks. • Live View-Allows you can modify settings by highlighting the menu option and using Live View , see Chapter 3, Reviewing Images and Video Clips, starting on the back of the following: • Press the Live View/Playback button. • Use the buttons ...
User's Manual
Page 29
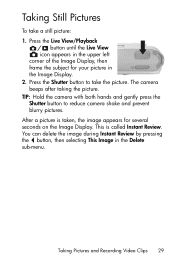
..., then frame the subject for several seconds on the Image Display. The camera beeps after taking the picture. You can delete the image during Instant Review by pressing the button, then selecting This Image in the Image Display. 2. Taking Still Pictures To take the picture. After a picture is called Instant...
..., then frame the subject for several seconds on the Image Display. The camera beeps after taking the picture. You can delete the image during Instant Review by pressing the button, then selecting This Image in the Image Display. 2. Taking Still Pictures To take the picture. After a picture is called Instant...
User's Manual
Page 30
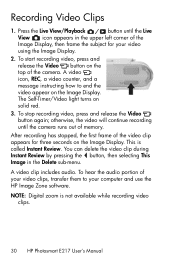
...and release the Video button on the Image Display. NOTE: Digital zoom is called Instant Review. A video icon, REC, a video counter, and a message instructing how to your computer and use the HP Image Zone software. Recording Video Clips 1. The Self-Timer/Video light turns on the Image...while recording video clips. 30 HP Photosmart E217 User's Manual To stop recording video, press and release the Video button again; Press the Live View/Playback button until the camera runs out of the camera. You can delete the video clip during Instant Review by pressing the button, ...
...and release the Video button on the Image Display. NOTE: Digital zoom is called Instant Review. A video icon, REC, a video counter, and a message instructing how to your computer and use the HP Image Zone software. Recording Video Clips 1. The Self-Timer/Video light turns on the Image...while recording video clips. 30 HP Photosmart E217 User's Manual To stop recording video, press and release the Video button again; Press the Live View/Playback button until the camera runs out of the camera. You can delete the video clip during Instant Review by pressing the button, ...
User's Manual
Page 49
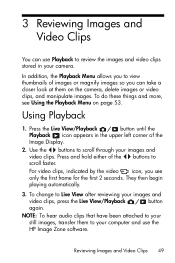
...your images and video clips, press the Live View/Playback button again. Use the buttons to scroll through your computer and use Playback to review the images and video clips stored in the upper left corner of the buttons to scroll faster. Press and hold either of the Image ...to your still images, transfer them on page 53. To change to Live View after reviewing your camera. Using Playback 1. For video clips, indicated by the video icon, you can use the HP Image Zone software. 3 Reviewing Images and Video Clips You can take a closer look at them to your images and...
...your images and video clips, press the Live View/Playback button again. Use the buttons to scroll through your computer and use Playback to review the images and video clips stored in the upper left corner of the buttons to scroll faster. Press and hold either of the Image ...to your still images, transfer them on page 53. To change to Live View after reviewing your camera. Using Playback 1. For video clips, indicated by the video icon, you can use the HP Image Zone software. 3 Reviewing Images and Video Clips You can take a closer look at them to your images and...
User's Manual
Page 51
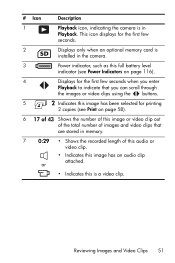
... video clips that are stored in memory. 7 0:29 • Shows the recorded length of this audio or video clip. • Indicates this is in Playback. Reviewing Images and Video Clips 51 # Icon Description 1 Playback icon, indicating the camera is a video clip. or • Indicates this image has an audio clip attached...
... video clips that are stored in memory. 7 0:29 • Shows the recorded length of this audio or video clip. • Indicates this is in Playback. Reviewing Images and Video Clips 51 # Icon Description 1 Playback icon, indicating the camera is a video clip. or • Indicates this image has an audio clip attached...
User's Manual
Page 53
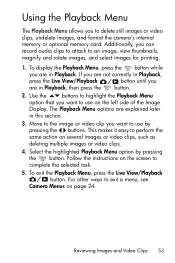
... or optional memory card. Select the highlighted Playback Menu option by pressing the buttons. To exit the Playback Menu, press the Live View/Playback button. Reviewing Images and Video Clips 53 To display the Playback Menu, press the button while you to highlight the Playback Menu option that you are explained...
... or optional memory card. Select the highlighted Playback Menu option by pressing the buttons. To exit the Playback Menu, press the Live View/Playback button. Reviewing Images and Video Clips 53 To display the Playback Menu, press the button while you to highlight the Playback Menu option that you are explained...
User's Manual
Page 55
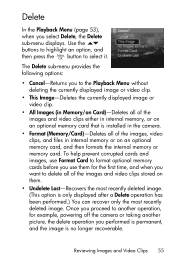
... proceed to delete all of the images and video clips stored on an optional memory card, and then formats the internal memory or memory card. Reviewing Images and Video Clips 55 Use the buttons to highlight an option, and then press the button to the Playback Menu without deleting the currently...
... proceed to delete all of the images and video clips stored on an optional memory card, and then formats the internal memory or memory card. Reviewing Images and Video Clips 55 Use the buttons to highlight an option, and then press the button to the Playback Menu without deleting the currently...

User's Manual
Page 57
To increase magnification to normal magnification. 4. Press the button again to return to 4x, press the button. Magnifying Images In the Playback Menu (page 53), when you select Magnify, the currently displayed image is displayed. 1. Press the button to exit Magnify and return to Playback. In the Playback Menu, select Magnify. 2. video clips cannot be magnified. To pan around the magnified image, use the and buttons. 3. Reviewing Images and Video Clips 57 NOTE: You can only magnify still images; The center portion of the magnified image is automatically magnified 2x.
To increase magnification to normal magnification. 4. Press the button again to return to 4x, press the button. Magnifying Images In the Playback Menu (page 53), when you select Magnify, the currently displayed image is displayed. 1. Press the button to exit Magnify and return to Playback. In the Playback Menu, select Magnify. 2. video clips cannot be magnified. To pan around the magnified image, use the and buttons. 3. Reviewing Images and Video Clips 57 NOTE: You can only magnify still images; The center portion of the magnified image is automatically magnified 2x.
User's Manual
Page 59
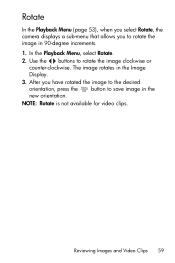
The image rotates in the new orientation. After you to rotate the image clockwise or counter-clockwise. Rotate In the Playback Menu (page 53), when you select Rotate, the camera displays a sub-menu that allows you have rotated the image to the desired orientation, press the button to save image in the Image Display. 3. NOTE: Rotate is not available for video clips. Use the buttons to rotate the image in 90-degree increments. 1. Reviewing Images and Video Clips 59 In the Playback Menu, select Rotate. 2.
The image rotates in the new orientation. After you to rotate the image clockwise or counter-clockwise. Rotate In the Playback Menu (page 53), when you select Rotate, the camera displays a sub-menu that allows you have rotated the image to the desired orientation, press the button to save image in the Image Display. 3. NOTE: Rotate is not available for video clips. Use the buttons to rotate the image in 90-degree increments. 1. Reviewing Images and Video Clips 59 In the Playback Menu, select Rotate. 2.

User's Manual
Page 93
I cannot transfer images from the camera to review images. Problem Possible Cause Solution The camera responds very sluggishly when... times. The computer is unable to act as a Disk Drive (see Using Your Camera without Installing the HP Image Zone Software on page 131 for tips about memory cards. Troubleshooting and Support 93 A slow optional memory... may be processing an image. Set your camera to understand the Picture Transfer Protocol (PTP) standard. The HP Image Zone software is installed or too many images on the computer. See Storage on page 129 and Memory...
I cannot transfer images from the camera to review images. Problem Possible Cause Solution The camera responds very sluggishly when... times. The computer is unable to act as a Disk Drive (see Using Your Camera without Installing the HP Image Zone Software on page 131 for tips about memory cards. Troubleshooting and Support 93 A slow optional memory... may be processing an image. Set your camera to understand the Picture Transfer Protocol (PTP) standard. The HP Image Zone software is installed or too many images on the computer. See Storage on page 129 and Memory...
User's Manual
Page 106
Review the troubleshooting section of the support process, and support phone numbers. Access the HP Customer Support website for support. Visit the HP website for product help by visiting www.hp.com/hpinfo/community/accessibility/prodserv. HP Photosmart Website Visit www.hp.com/photosmart for the ...you can get help , drivers, and software updates at www.hp.com/support. 106 HP Photosmart E217 User's Manual Getting Assistance This section contains support information for your digital camera. HP Accessibility Website Customers with disabilities can obtain a wide range of information...
Review the troubleshooting section of the support process, and support phone numbers. Access the HP Customer Support website for support. Visit the HP website for product help by visiting www.hp.com/hpinfo/community/accessibility/prodserv. HP Photosmart Website Visit www.hp.com/photosmart for the ...you can get help , drivers, and software updates at www.hp.com/support. 106 HP Photosmart E217 User's Manual Getting Assistance This section contains support information for your digital camera. HP Accessibility Website Customers with disabilities can obtain a wide range of information...
User's Manual
Page 134
... Controller with arrow buttons, description 20 customer support 106 D darkening an image 44 Date & Time Imprint 42 Date & Time, setting 14, 68 delete during Instant Review 29, 30 Delete, using 55 digital zoom 31 direct print printing images from camera to printer or computer 62 disk drive, camera as 69 Display... F flash description 22 settings 32 using 32 working range 127 Flash button 20 f-number 127 focus mode settings 34 switch 23 focus range 127 134 HP Photosmart E217 User's Manual
... Controller with arrow buttons, description 20 customer support 106 D darkening an image 44 Date & Time Imprint 42 Date & Time, setting 14, 68 delete during Instant Review 29, 30 Delete, using 55 digital zoom 31 direct print printing images from camera to printer or computer 62 disk drive, camera as 69 Display... F flash description 22 settings 32 using 32 working range 127 Flash button 20 f-number 127 focus mode settings 34 switch 23 focus range 127 134 HP Photosmart E217 User's Manual
User's Manual
Page 137
... NiMH batteries 117 record audio clips 60 video clips 30 red-eye reduction 33 remaining pictures count 28, 52 reset camera 74 Reset Settings 72 reviewing images 49 rotate images 59 S safety precautions for NiMH batteries 112 Self-Timer light 22 settings 35 Timer button 20 settings reset 72 Setup Menu...
... NiMH batteries 117 record audio clips 60 video clips 30 red-eye reduction 33 remaining pictures count 28, 52 reset camera 74 Reset Settings 72 reviewing images 49 rotate images 59 S safety precautions for NiMH batteries 112 Self-Timer light 22 settings 35 Timer button 20 settings reset 72 Setup Menu...
