
Maintenance and Service Guide
Page 3
... LAN Mini PCI Card 2-7 Removing the Hard Disk Drive...2-9 Recovering the Factory Software...2-11 Replacing Small Parts ...2-12 Removing the Keyboard Cover...2-13 Removing the Speaker Assembly ...2-15 Removing the Keyboard ...2-16 Removing the Switchboard PCA ...2-19 Removing the CD/DVD Drive...2-20 Removing the Display Assembly...2-23 Removing the Top Case...
... LAN Mini PCI Card 2-7 Removing the Hard Disk Drive...2-9 Recovering the Factory Software...2-11 Replacing Small Parts ...2-12 Removing the Keyboard Cover...2-13 Removing the Speaker Assembly ...2-15 Removing the Keyboard ...2-16 Removing the Switchboard PCA ...2-19 Removing the CD/DVD Drive...2-20 Removing the Display Assembly...2-23 Removing the Top Case...
Maintenance and Service Guide
Page 4
... Floppy Drive 2-35 Figure 2-24. Removing the Motherboard 2-51 Figure 2-35. Figures Figure 1-1. Bottom View...1-10 Figure 1-4. Resetting the Notebook ...1-17 Figure 1-8. Disconnecting the Speaker Cable 2-14 Figure 2-11. Removing the Top Case Screws 2-30 Figure 2-21. AMD CPU Module... Removing the CD/DVD Drive 2-21 Figure 2-16. Removing the I/R PCA...2-37 Figure 2-25. Disassembly Flow...2-3 Figure 2-2. Removing the Keyboard Cover 2-14 Figure 2-10. Removing the Top Case...2-27 Figure 2-19. Removing the Battery ...2-4 Figure 2-3. Removing the Heat Sink (...
... Floppy Drive 2-35 Figure 2-24. Removing the Motherboard 2-51 Figure 2-35. Figures Figure 1-1. Bottom View...1-10 Figure 1-4. Resetting the Notebook ...1-17 Figure 1-8. Disconnecting the Speaker Cable 2-14 Figure 2-11. Removing the Top Case Screws 2-30 Figure 2-21. AMD CPU Module... Removing the CD/DVD Drive 2-21 Figure 2-16. Removing the I/R PCA...2-37 Figure 2-25. Disassembly Flow...2-3 Figure 2-2. Removing the Keyboard Cover 2-14 Figure 2-10. Removing the Top Case...2-27 Figure 2-19. Removing the Battery ...2-4 Figure 2-3. Removing the Heat Sink (...
Maintenance and Service Guide
Page 5
...View ...4-2 Figure 4-2. Specifications...1-18 Table 1-7. Required Equipment ...2-2 Table 2-3. Part Number Reference...4-12 Table 5-1. Example of notebook 1-15 Table 1-4. Exploded View ...4-3 Tables Table 1-1. Main Status Lights (front of Serial Number Label 2-59 Figure ... Comparisons...1-1 Table 1-2. Removing Components...2-63 Table 3-1. POST Messages ...3-24 Table 3-6. Accessory Replaceable Parts 4-11 Table 4-3. Keyboard Status Lights...1-15 Table 1-5. LCD Guidelines ...5-4 Service Manual v Replacing Small Parts ...2-12 Table 2-5. Figure 2-36. Scope...
...View ...4-2 Figure 4-2. Specifications...1-18 Table 1-7. Required Equipment ...2-2 Table 2-3. Part Number Reference...4-12 Table 5-1. Example of notebook 1-15 Table 1-4. Exploded View ...4-3 Tables Table 1-1. Main Status Lights (front of Serial Number Label 2-59 Figure ... Comparisons...1-1 Table 1-2. Removing Components...2-63 Table 3-1. POST Messages ...3-24 Table 3-6. Accessory Replaceable Parts 4-11 Table 4-3. Keyboard Status Lights...1-15 Table 1-5. LCD Guidelines ...5-4 Service Manual v Replacing Small Parts ...2-12 Table 2-5. Figure 2-36. Scope...
Maintenance and Service Guide
Page 14
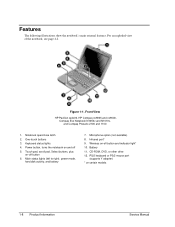
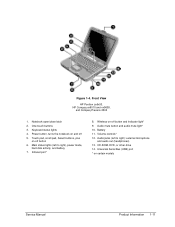
...* 10. Wireless on -off 5. Features The following illustrations show the notebook's main external features. Front View HP Pavilion ze4x00, HP Compaq nx9005 and nx9000, Compaq Evo Notebook N1050v and N1010v, and Compaq Presario 2100 and 1100 1. Microphone option (not available) 8. One-touch buttons 3. Battery 11. PS/2 keyboard or PS/2 mouse port (supports Y adapter) * on and off...
...* 10. Wireless on -off 5. Features The following illustrations show the notebook's main external features. Front View HP Pavilion ze4x00, HP Compaq nx9005 and nx9000, Compaq Evo Notebook N1050v and N1010v, and Compaq Presario 2100 and 1100 1. Microphone option (not available) 8. One-touch buttons 3. Battery 11. PS/2 keyboard or PS/2 mouse port (supports Y adapter) * on and off...
Maintenance and Service Guide
Page 17
... latch 2. Power button, turns the notebook on certain models Service Manual Product Information 1-11 Battery 11. CD-ROM, DVD, or other drive 14. Universal Serial Bus (USB) port * on and off 5. ... button and indicator light* 9. Touch pad, scroll pad, Select buttons, plus on -off button 6. Audio mute button and audio mute light* 10. Volume controls* 12. Keyboard status lights 4. Front View HP Pavilion ze5x00, HP Compaq nx9010 and nx9008, and Compaq Presario 2500 1.
... latch 2. Power button, turns the notebook on certain models Service Manual Product Information 1-11 Battery 11. CD-ROM, DVD, or other drive 14. Universal Serial Bus (USB) port * on and off 5. ... button and indicator light* 9. Touch pad, scroll pad, Select buttons, plus on -off button 6. Audio mute button and audio mute light* 10. Volume controls* 12. Keyboard status lights 4. Front View HP Pavilion ze5x00, HP Compaq nx9010 and nx9008, and Compaq Presario 2500 1.

Maintenance and Service Guide
Page 18
LAN port* 18. S-Video port* 22. Modem port* 24. PCMCIA card and CardBus slot and button 26. External monitor port 21. IEEE 1394 port* 25. Floppy drive* * on certain models 1-12 Product Information Service Manual Back View HP Pavilion 5x00, HP Compaq nx9010, and nx9008 and Compaq Presario 2500 15. External keyboard/mouse port 19. Kensington lock cable slot (security connector) 23. Figure 1-5. Two universal Serial Bus (USB) ports 17. AC adapter jack 16. Parallel port (LPT1), use this port for a parallel printer or other parallel device 20.
LAN port* 18. S-Video port* 22. Modem port* 24. PCMCIA card and CardBus slot and button 26. External monitor port 21. IEEE 1394 port* 25. Floppy drive* * on certain models 1-12 Product Information Service Manual Back View HP Pavilion 5x00, HP Compaq nx9010, and nx9008 and Compaq Presario 2500 15. External keyboard/mouse port 19. Kensington lock cable slot (security connector) 23. Figure 1-5. Two universal Serial Bus (USB) ports 17. AC adapter jack 16. Parallel port (LPT1), use this port for a parallel printer or other parallel device 20.
Maintenance and Service Guide
Page 21
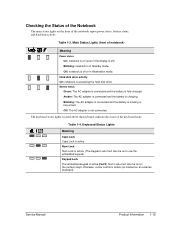
...(Fn+F8). Amber: The AC adapter is connected and the battery is missing or has a fault. The keyboard status lights, located above the keyboard, indicate the states of the notebook report power status, battery status, and hard disk activity. otherwise, cursor control is not connected. Table 1-4. ...adapter is active (as marked on (even if the display is fully charged. Main Status Lights (front of notebook) Meaning Power status On: notebook is on an external keyboard). Battery status Green: The AC adapter is connected and the battery is off or in Standby mode. Keypad...
...(Fn+F8). Amber: The AC adapter is connected and the battery is missing or has a fault. The keyboard status lights, located above the keyboard, indicate the states of the notebook report power status, battery status, and hard disk activity. otherwise, cursor control is not connected. Table 1-4. ...adapter is active (as marked on (even if the display is fully charged. Main Status Lights (front of notebook) Meaning Power status On: notebook is on an external keyboard). Battery status Green: The AC adapter is connected and the battery is off or in Standby mode. Keypad...
Maintenance and Service Guide
Page 22
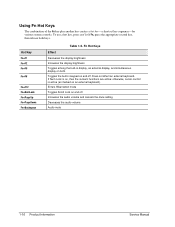
Enters Hibernation mode Toggles Scroll Lock on and off . otherwise, cursor control is on an external keyboard). Toggles the built-in display, an external display, and simultaneous display on and off Increases the audio volume and cancels the mute setting Decreases the ... Hot Keys Effect Decreases the display brightness Increases the display brightness Toggles among the built-in keypad on both keys. Does not affect an external keyboard. If Num Lock is active (as marked on , then the numeric functions are active; To use a hot key, press and hold Fn, press the appropriate...
Enters Hibernation mode Toggles Scroll Lock on and off . otherwise, cursor control is on an external keyboard). Toggles the built-in display, an external display, and simultaneous display on and off Increases the audio volume and cancels the mute setting Decreases the ... Hot Keys Effect Decreases the display brightness Increases the display brightness Toggles among the built-in keypad on both keys. Does not affect an external keyboard. If Num Lock is active (as marked on , then the numeric functions are active; To use a hot key, press and hold Fn, press the appropriate...
Maintenance and Service Guide
Page 26
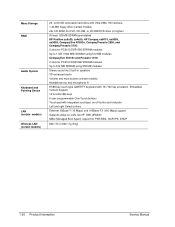
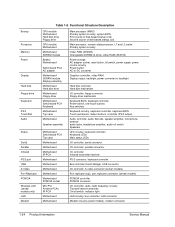
...Keyboard and Pointing Device LAN (certain models) Wireless LAN (certain models) 20- to 60-GB removable hard drive with Ultra-DMA 100 interface 1.44-MB floppy drive (certain models) 24x CD-ROM, 8x DVD, CD-RW, or CD-RW/DVD drive (or higher) At least 128 MB SDRAM preinstalled HP Pavilion ze5x00, ze4x00, HP... via 2 built-in speakers 3D-enhanced audio Volume and mute buttons (certain models) Headphone-out and microphone-in 87/88-key touch-type QWERTY keyboard with integrated scroll pad, on-off button and indicator Left and right Select buttons Ethernet 10Base-T (10 Mbps) and 100Base-TX (100 Mbps)...
...Keyboard and Pointing Device LAN (certain models) Wireless LAN (certain models) 20- to 60-GB removable hard drive with Ultra-DMA 100 interface 1.44-MB floppy drive (certain models) 24x CD-ROM, 8x DVD, CD-RW, or CD-RW/DVD drive (or higher) At least 128 MB SDRAM preinstalled HP Pavilion ze5x00, ze4x00, HP... via 2 built-in speakers 3D-enhanced audio Volume and mute buttons (certain models) Headphone-out and microphone-in 87/88-key touch-type QWERTY keyboard with integrated scroll pad, on-off button and indicator Left and right Select buttons Ethernet 10Base-T (10 Mbps) and 100Base-TX (100 Mbps)...
Maintenance and Service Guide
Page 30
...AC adapter Motherboard SDRAM module Display assembly Motherboard Hard disk drive Motherboard Floppy drive Motherboard Switchboard PCA Keyboard Motherboard Top case Motherboard Speaker assembly Motherboard Switchboard PCA Top case Motherboard Motherboard Motherboard IR PCA ... backlight Hard disk controller Hard disk mechanism I/O controller, floppy connector Floppy drive mechanism Keyboard BIOS, keyboard controller Power switch, one-touch buttons Key switches Keyboard circuitry, keyboard controller, keyboard BIOS Touch pad sensor, Select buttons, controller (PS/2 output) Audio controller, audio...
...AC adapter Motherboard SDRAM module Display assembly Motherboard Hard disk drive Motherboard Floppy drive Motherboard Switchboard PCA Keyboard Motherboard Top case Motherboard Speaker assembly Motherboard Switchboard PCA Top case Motherboard Motherboard Motherboard IR PCA ... backlight Hard disk controller Hard disk mechanism I/O controller, floppy connector Floppy drive mechanism Keyboard BIOS, keyboard controller Power switch, one-touch buttons Key switches Keyboard circuitry, keyboard controller, keyboard BIOS Touch pad sensor, Select buttons, controller (PS/2 output) Audio controller, audio...
Maintenance and Service Guide
Page 31
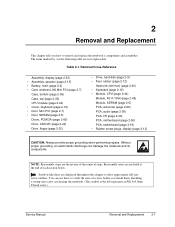
...(page 2-4) • Card, wireless LAN Mini PCI (page 2-7) Case, bottom (page 2-59) Case, top (page 2-26) CPU module (page 2-44) • Cover, keyboard (page 2-16) • Door, Mini PCI (page 2-7) • Door, SDRAM (page 2-5) Doors, PCMCIA (page 2-60) Drive, CD/DVD (page 2-20) Drive, ...2-19) • Rubber screw plugs, display (page 2-12) CAUTION: Always provide proper grounding when performing repairs. You can damage the notebook and its components. 2 Removal and Replacement This chapter tells you install them. Service Manual Removal and Replacement 2-1 Symbols like these to show ...
...(page 2-4) • Card, wireless LAN Mini PCI (page 2-7) Case, bottom (page 2-59) Case, top (page 2-26) CPU module (page 2-44) • Cover, keyboard (page 2-16) • Door, Mini PCI (page 2-7) • Door, SDRAM (page 2-5) Doors, PCMCIA (page 2-60) Drive, CD/DVD (page 2-20) Drive, ...2-19) • Rubber screw plugs, display (page 2-12) CAUTION: Always provide proper grounding when performing repairs. You can damage the notebook and its components. 2 Removal and Replacement This chapter tells you install them. Service Manual Removal and Replacement 2-1 Symbols like these to show ...
Maintenance and Service Guide
Page 43
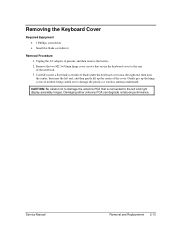
... hinges. Service Manual Removal and Replacement 2-13 Damaging either antenna PCA can degrade notebook performance. CAUTION: Be careful not to damage the antenna PCA that secure the keyboard cover to damage the plastics or wireless antenna underneath. Removing the Keyboard Cover Required Equipment • 1 Phillips screwdriver • Small flat-blade screwdriver Removal Procedure...
... hinges. Service Manual Removal and Replacement 2-13 Damaging either antenna PCA can degrade notebook performance. CAUTION: Be careful not to damage the antenna PCA that secure the keyboard cover to damage the plastics or wireless antenna underneath. Removing the Keyboard Cover Required Equipment • 1 Phillips screwdriver • Small flat-blade screwdriver Removal Procedure...
Maintenance and Service Guide
Page 44
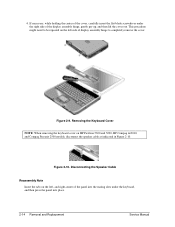
...the panel into the mating slots under the right side of display assembly hinge to be repeated on the left - Removing the Keyboard Cover NOTE: When removing the keyboard cover on the left side of the display assembly hinge, gently pry up, and then lift the cover out. and right-... Manual This procedure might need to completely remove the cover. Figure 2-10. 4. Figure 2-9. Disconnecting the Speaker Cable Reassembly Note Insert the tabs on HP Pavilion 5300 and 5200, HP Compaq nx9010, and Compaq Presario 2500 models, disconnect the speaker cable as indicated in Figure 2-10.
...the panel into the mating slots under the right side of display assembly hinge to be repeated on the left - Removing the Keyboard Cover NOTE: When removing the keyboard cover on the left side of the display assembly hinge, gently pry up, and then lift the cover out. and right-... Manual This procedure might need to completely remove the cover. Figure 2-10. 4. Figure 2-9. Disconnecting the Speaker Cable Reassembly Note Insert the tabs on HP Pavilion 5300 and 5200, HP Compaq nx9010, and Compaq Presario 2500 models, disconnect the speaker cable as indicated in Figure 2-10.
Maintenance and Service Guide
Page 45
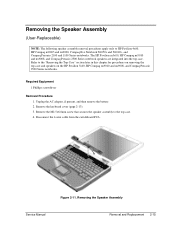
Required Equipment 1 Phillips screwdriver Removal Procedure 1. Remove the keyboard cover (page 2-13). 3. Unplug the AC adapter, if present, and then remove the battery. 2. Removing the Speaker Assembly Service Manual Removal and Replacement 2-...the M2.5×6.0mm screw that secures the speaker assembly to HP Pavilion 4x00, HP Compaq nx9005 and nx9000, Compaq Evo Notebook N1050v and N1010v, and Compaq Presario 2100 and 1100 Series notebooks. The HP Pavilion ze5x00, HP Compaq nx9010 and nx9008, and Compaq Presario 2500 Series notebook speakers are integrated into the top case. Refer to the ...
Required Equipment 1 Phillips screwdriver Removal Procedure 1. Remove the keyboard cover (page 2-13). 3. Unplug the AC adapter, if present, and then remove the battery. 2. Removing the Speaker Assembly Service Manual Removal and Replacement 2-...the M2.5×6.0mm screw that secures the speaker assembly to HP Pavilion 4x00, HP Compaq nx9005 and nx9000, Compaq Evo Notebook N1050v and N1010v, and Compaq Presario 2100 and 1100 Series notebooks. The HP Pavilion ze5x00, HP Compaq nx9010 and nx9008, and Compaq Presario 2500 Series notebook speakers are integrated into the top case. Refer to the ...

Maintenance and Service Guide
Page 46
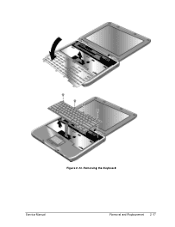
... Equipment 1 Phillips screwdriver Removal Procedure 1. Lift up on the bottom of its normal position, and then reconnect the keyboard cable. • Slide the metal tabs on the keyboard at the switchboard PCA end, and then pull it toward the display assembly to the top case. 4. Unplug the... AC adapter, if present, and then remove the battery. 2. Remove the keyboard. Reassembly Notes CAUTION: Do not excessively bend or fold the keyboard cable. Remove the keyboard cover (page 2-13). 3. Remove the four M2.5×4.0mm screws that secure the...
... Equipment 1 Phillips screwdriver Removal Procedure 1. Lift up on the bottom of its normal position, and then reconnect the keyboard cable. • Slide the metal tabs on the keyboard at the switchboard PCA end, and then pull it toward the display assembly to the top case. 4. Unplug the... AC adapter, if present, and then remove the battery. 2. Remove the keyboard. Reassembly Notes CAUTION: Do not excessively bend or fold the keyboard cable. Remove the keyboard cover (page 2-13). 3. Remove the four M2.5×4.0mm screws that secure the...
Maintenance and Service Guide
Page 47
Figure 2-12. Removing the Keyboard Service Manual Removal and Replacement 2-17
Figure 2-12. Removing the Keyboard Service Manual Removal and Replacement 2-17
Maintenance and Service Guide
Page 48
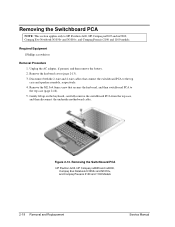
... 2-16). 5. Gently lift up on the keyboard, carefully remove the switchboard PCA from the top case, and then disconnect the underside motherboard cable. Removing the Switchboard PCA HP Pavilion 4x00, HP Compaq nx9005 and nx9000, Compaq Evo Notebook N1050v and N1010v, and Compaq Presario 2100 and...4-wire cables that secures the keyboard, and then switchboard PCA to the top case and speaker assembly, respectively. 4. Figure 2-13. Removing the Switchboard PCA NOTE: This section applies only to HP Pavilion 4x00, HP Compaq nx9005 and nx9000, Compaq Evo Notebook N1050v and N1010v, and Compaq...
... 2-16). 5. Gently lift up on the keyboard, carefully remove the switchboard PCA from the top case, and then disconnect the underside motherboard cable. Removing the Switchboard PCA HP Pavilion 4x00, HP Compaq nx9005 and nx9000, Compaq Evo Notebook N1050v and N1010v, and Compaq Presario 2100 and...4-wire cables that secures the keyboard, and then switchboard PCA to the top case and speaker assembly, respectively. 4. Figure 2-13. Removing the Switchboard PCA NOTE: This section applies only to HP Pavilion 4x00, HP Compaq nx9005 and nx9000, Compaq Evo Notebook N1050v and N1010v, and Compaq...
Maintenance and Service Guide
Page 49
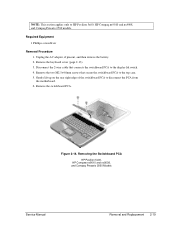
.... 4. Remove the switchboard PCA. NOTE: This section applies only to disconnect the PCA from the motherboard. 6. Remove the keyboard cover (page 2-13). 3. Gently lift up on the rear right edge of the switchboard PCA to HP Pavilion 5x00, HP Compaq nx9010 and nx9008, and Compaq Presario 2500 models. Figure 2-14. Removing the Switchboard PCA...
.... 4. Remove the switchboard PCA. NOTE: This section applies only to disconnect the PCA from the motherboard. 6. Remove the keyboard cover (page 2-13). 3. Gently lift up on the rear right edge of the switchboard PCA to HP Pavilion 5x00, HP Compaq nx9010 and nx9008, and Compaq Presario 2500 models. Figure 2-14. Removing the Switchboard PCA...

Maintenance and Service Guide
Page 50
... then remove the battery. 2. Make sure these additional assemblies: • Keyboard cover (page 2-13) • Keyboard (page 2-16) 3. Removing the CD/DVD Drive HP Pavilion 4x00, HP Compaq nx9005 and nx9000, Compaq Evo Notebook N1050v and N1010v, and Compaq Presario 2100 and 1100 Models 2-20 Removal ... locations when reinstalling the CD/DVD drive. 4. NOTE: The screws that secure the CD/DVD drive to HP Pavilion 4x00, HP Compaq nx9005 and nx9000, Compaq Evo Notebook N1050v and N1010v, and Compaq Presario 2100 and 1100 models. Remove these screws are 2 different sizes. Figure...
... then remove the battery. 2. Make sure these additional assemblies: • Keyboard cover (page 2-13) • Keyboard (page 2-16) 3. Removing the CD/DVD Drive HP Pavilion 4x00, HP Compaq nx9005 and nx9000, Compaq Evo Notebook N1050v and N1010v, and Compaq Presario 2100 and 1100 Models 2-20 Removal ... locations when reinstalling the CD/DVD drive. 4. NOTE: The screws that secure the CD/DVD drive to HP Pavilion 4x00, HP Compaq nx9005 and nx9000, Compaq Evo Notebook N1050v and N1010v, and Compaq Presario 2100 and 1100 models. Remove these screws are 2 different sizes. Figure...
Maintenance and Service Guide
Page 51
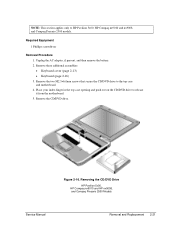
... the top case and motherboard. 4. Removing the CD/DVD Drive HP Pavilion 5x00, HP Compaq nx9010 and HP nx9008, and Compaq Presario 2500 Models Service Manual Removal and Replacement 2-21 Remove the CD/DVD drive. Remove these additional assemblies: • Keyboard cover (page 2-13) • Keyboard (page 2-16) 3. Place your index finger in the top case...
... the top case and motherboard. 4. Removing the CD/DVD Drive HP Pavilion 5x00, HP Compaq nx9010 and HP nx9008, and Compaq Presario 2500 Models Service Manual Removal and Replacement 2-21 Remove the CD/DVD drive. Remove these additional assemblies: • Keyboard cover (page 2-13) • Keyboard (page 2-16) 3. Place your index finger in the top case...


