
HP USB Digital Drive
Page 2
An SD memory card 2 may not be used with any HP authorized reseller. The Digital Drive can purchase one (in various storage capacities) from any computer that is a pocket-sized SD (Secure Digital) memory drive for storing and transferring files such as digital pictures, music, video, and data. User Guide 1 You can be included. However, you will need an SD memory card to operate the Digital Drive. The HP USB Digital Drive 1 is running Microsoft Windows XP Home, Windows XP Pro, or Windows 2000.
An SD memory card 2 may not be used with any HP authorized reseller. The Digital Drive can purchase one (in various storage capacities) from any computer that is a pocket-sized SD (Secure Digital) memory drive for storing and transferring files such as digital pictures, music, video, and data. User Guide 1 You can be included. However, you will need an SD memory card to operate the Digital Drive. The HP USB Digital Drive 1 is running Microsoft Windows XP Home, Windows XP Pro, or Windows 2000.

HP USB Digital Drive
Page 3
If the SD memory card does not slide in properly, gently pull it out and reinsert it. 2 User Guide Insert the SD memory card into the SD slot 2 with the notched corner positioned on the lower left as shown. Remove the cap 1 of the Digital Drive. 2. Installing the SD Memory Card 1.
If the SD memory card does not slide in properly, gently pull it out and reinsert it. 2 User Guide Insert the SD memory card into the SD slot 2 with the notched corner positioned on the lower left as shown. Remove the cap 1 of the Digital Drive. 2. Installing the SD Memory Card 1.
HP USB Digital Drive
Page 4
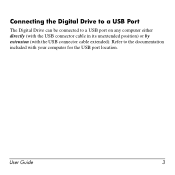
Refer to a USB port on any computer either directly (with the USB connector cable in its unextended position) or by extension (with your computer for the USB port location. User Guide 3 Connecting the Digital Drive to a USB Port The Digital Drive can be connected to the documentation included with the USB connector cable extended).
Refer to a USB port on any computer either directly (with the USB connector cable in its unextended position) or by extension (with your computer for the USB port location. User Guide 3 Connecting the Digital Drive to a USB Port The Digital Drive can be connected to the documentation included with the USB connector cable extended).
HP USB Digital Drive
Page 5
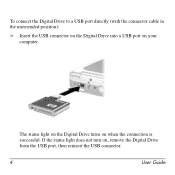
If the status light does not turn on your computer. To connect the Digital Drive to a USB port directly (with the connector cable in the unextended position): » Insert the USB connector on the Digital Drive into a USB port on , remove the Digital Drive from the USB port, then reinsert the USB connector. 4 User Guide The status light on the Digital Drive turns on when the connection is successful.
If the status light does not turn on your computer. To connect the Digital Drive to a USB port directly (with the connector cable in the unextended position): » Insert the USB connector on the Digital Drive into a USB port on , remove the Digital Drive from the USB port, then reinsert the USB connector. 4 User Guide The status light on the Digital Drive turns on when the connection is successful.

HP USB Digital Drive
Page 6
User Guide 5 Rotate the USB connector cable out of its extended position): 1. To connect the Digital Drive to a USB port by extension (with the USB cable in its track gently until it is fully extended.
User Guide 5 Rotate the USB connector cable out of its extended position): 1. To connect the Digital Drive to a USB port by extension (with the USB cable in its track gently until it is fully extended.
HP USB Digital Drive
Page 7
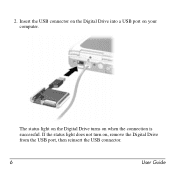
Insert the USB connector on the Digital Drive into a USB port on when the connection is successful. 2. The status light on the Digital Drive turns on your computer. If the status light does not turn on, remove the Digital Drive from the USB port, then reinsert the USB connector. 6 User Guide
Insert the USB connector on the Digital Drive into a USB port on when the connection is successful. 2. The status light on the Digital Drive turns on your computer. If the status light does not turn on, remove the Digital Drive from the USB port, then reinsert the USB connector. 6 User Guide
HP USB Digital Drive
Page 8
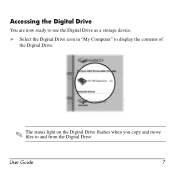
Accessing the Digital Drive You are now ready to use the Digital Drive as a storage device. » Select the Digital Drive icon in "My Computer" to display the contents of the Digital Drive. ✎ The status light on the Digital Drive flashes when you copy and move files to and from the Digital Drive. User Guide 7
Accessing the Digital Drive You are now ready to use the Digital Drive as a storage device. » Select the Digital Drive icon in "My Computer" to display the contents of the Digital Drive. ✎ The status light on the Digital Drive flashes when you copy and move files to and from the Digital Drive. User Guide 7

HP USB Digital Drive
Page 9
Gently unplug the Digital Drive from the USB port. ✎ If the USB connector cable is flashing. 1. Select the "Safely Remove Hardware" icon on your screen. 3. Select the Digital Drive and wait until the "Safe to remove the Digital Drive when the status light on the Digital Drive is in the extended position, return it on its track for safe storage. 8 User Guide A dialog box displays a list of connected devices. 2. Disconnecting the Digital Drive ✎ Do not attempt to Remove Hardware" message appears on your taskbar.
Gently unplug the Digital Drive from the USB port. ✎ If the USB connector cable is flashing. 1. Select the "Safely Remove Hardware" icon on your screen. 3. Select the Digital Drive and wait until the "Safe to remove the Digital Drive when the status light on the Digital Drive is in the extended position, return it on its track for safe storage. 8 User Guide A dialog box displays a list of connected devices. 2. Disconnecting the Digital Drive ✎ Do not attempt to Remove Hardware" message appears on your taskbar.
HP USB Digital Drive
Page 10
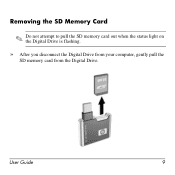
Removing the SD Memory Card ✎ Do not attempt to pull the SD memory card out when the status light on the Digital Drive is flashing. » After you disconnect the Digital Drive from your computer, gently pull the SD memory card from the Digital Drive. User Guide 9
Removing the SD Memory Card ✎ Do not attempt to pull the SD memory card out when the status light on the Digital Drive is flashing. » After you disconnect the Digital Drive from your computer, gently pull the SD memory card from the Digital Drive. User Guide 9
HP USB Digital Drive
Page 11
... as a guest, or register as a user and submit your country or region. When you call technical support, have the following items available: ■ The HP USB Digital Drive ■ Conditions under which the problem occurred ■ Error messages that have occurred ■ Hardware and software you are available on the Internet through...
... as a guest, or register as a user and submit your country or region. When you call technical support, have the following items available: ■ The HP USB Digital Drive ■ Conditions under which the problem occurred ■ Error messages that have occurred ■ Hardware and software you are available on the Internet through...
HP USB Digital Drive
Page 112
© 2003 Hewlett-Packard Development Company, L.P. and/or other countries. The information contained herein is a trademark. The warranties for technical or editorial errors or omissions contained herein. HP shall not be liable for HP products and services are trademarks of Microsoft Corporation in the express warranty statements accompanying such products and services. User Guide HP USB Digital Drive First Edition July 2003 SD Logo is subject to change without notice. Microsoft and Windows are set forth in the U.S.
© 2003 Hewlett-Packard Development Company, L.P. and/or other countries. The information contained herein is a trademark. The warranties for technical or editorial errors or omissions contained herein. HP shall not be liable for HP products and services are trademarks of Microsoft Corporation in the express warranty statements accompanying such products and services. User Guide HP USB Digital Drive First Edition July 2003 SD Logo is subject to change without notice. Microsoft and Windows are set forth in the U.S.
Modem and Local Area Network - Windows Vista
Page 7
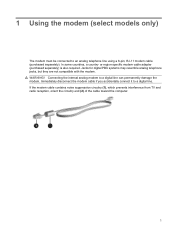
1 Using the modem (select models only) The modem must be connected to a digital line. In some countries, a country- Jacks for digital PBX systems may resemble analog telephone jacks, but they are not compatible with the modem. or region-specific modem cable adapter ...connect it to an analog telephone line using a 6-pin, RJ-11 modem cable (purchased separately). WARNING! Connecting the internal analog modem to a digital line can permanently damage the modem. If the modem cable contains noise suppression circuitry (1), which prevents interference from TV and radio reception, orient the...
1 Using the modem (select models only) The modem must be connected to a digital line. In some countries, a country- Jacks for digital PBX systems may resemble analog telephone jacks, but they are not compatible with the modem. or region-specific modem cable adapter ...connect it to an analog telephone line using a 6-pin, RJ-11 modem cable (purchased separately). WARNING! Connecting the internal analog modem to a digital line can permanently damage the modem. If the modem cable contains noise suppression circuitry (1), which prevents interference from TV and radio reception, orient the...
Modem and Local Area Network - Windows Vista
Page 12
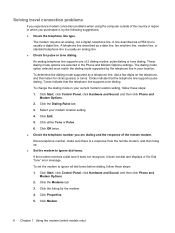
...Check for clicks (pulses) or tones. The dialing mode option selected must match the dialing mode supported by a telephone line, dial a few digits on the telephone, and then listen for pulse or tone dialing. Click Edit. 5. Click Properties. 5. Click Start, click Control Panel, ...Rules tab. 3. Select your current modem location setting, follow these steps: 1. Dial a telephone number, make sure there is usually a digital line. Clicks indicate that the telephone line supports tone dialing. To set the modem to ignore dial tones. Click the listing for the modem...
...Check for clicks (pulses) or tones. The dialing mode option selected must match the dialing mode supported by a telephone line, dial a few digits on the telephone, and then listen for pulse or tone dialing. Click Edit. 5. Click Properties. 5. Click Start, click Control Panel, ...Rules tab. 3. Select your current modem location setting, follow these steps: 1. Dial a telephone number, make sure there is usually a digital line. Clicks indicate that the telephone line supports tone dialing. To set the modem to ignore dial tones. Click the listing for the modem...

External Media Cards - Windows Vista
Page 5
Table of contents 1 Using Digital Media Slot cards (select models only) Inserting a digital card ...2 Stopping and removing a digital card 3 2 Using ExpressCards Configuring an ExpressCard ...4 Inserting an ExpressCard ...5 Stopping and removing an ExpressCard 6 Index ...7 v
Table of contents 1 Using Digital Media Slot cards (select models only) Inserting a digital card ...2 Stopping and removing a digital card 3 2 Using ExpressCards Configuring an ExpressCard ...4 Inserting an ExpressCard ...5 Stopping and removing an ExpressCard 6 Index ...7 v

External Media Cards - Windows Vista
Page 7
The Digital Media Slot supports the following digital card formats: ● Memory Stick (MS) ● Memory Stick Pro (MSP) ● MultiMediaCard (MMC) ● Secure Digital (SD) Memory Card ● xD-Picture Card (XD) ● xD-Picture Card (XD) Type H ● xD-Picture Card (XD) Type M 1 These cards are often used with digital media-equipped cameras and PDAs as well as with other computers. 1 Using Digital Media Slot cards (select models only) Optional digital cards provide secure data storage and convenient data sharing.
The Digital Media Slot supports the following digital card formats: ● Memory Stick (MS) ● Memory Stick Pro (MSP) ● MultiMediaCard (MMC) ● Secure Digital (SD) Memory Card ● xD-Picture Card (XD) ● xD-Picture Card (XD) Type H ● xD-Picture Card (XD) Type M 1 These cards are often used with digital media-equipped cameras and PDAs as well as with other computers. 1 Using Digital Media Slot cards (select models only) Optional digital cards provide secure data storage and convenient data sharing.

External Media Cards - Windows Vista
Page 8
You will hear a sound when the device has been detected, and a menu of adapter into the Digital Media Slot until the card is seated. Gently slide the card into the Digital Media Slot. Hold the digital card label-side up, with the connectors facing the computer. 2. Inserting a digital card CAUTION: To avoid damaging the digital card or the computer, do not insert any type of available options may be displayed. 2 Chapter 1 Using Digital Media Slot cards (select models only) CAUTION: To prevent damage to the digital card connectors, use minimal force to insert a digital card. 1.
You will hear a sound when the device has been detected, and a menu of adapter into the Digital Media Slot until the card is seated. Gently slide the card into the Digital Media Slot. Hold the digital card label-side up, with the connectors facing the computer. 2. Inserting a digital card CAUTION: To avoid damaging the digital card or the computer, do not insert any type of available options may be displayed. 2 Chapter 1 Using Digital Media Slot cards (select models only) CAUTION: To prevent damage to the digital card connectors, use minimal force to insert a digital card. 1.

External Media Cards - Windows Vista
Page 9
Save your information and close all programs associated with the digital card. NOTE: To display the Safely Remove Hardware icon, click the Show Hidden Icons icon (< or NOTE: To stop a digital card before removing it. 1. Double-click the Safely Remove Hardware icon in the operating system Copying window. 2. Stop the digital card: a. Stopping and removing a digital card CAUTION: To prevent loss of data or an unresponsive system, stop a data transfer, click Cancel in the notification area, at the far right of the taskbar.
Save your information and close all programs associated with the digital card. NOTE: To display the Safely Remove Hardware icon, click the Show Hidden Icons icon (< or NOTE: To stop a digital card before removing it. 1. Double-click the Safely Remove Hardware icon in the operating system Copying window. 2. Stop the digital card: a. Stopping and removing a digital card CAUTION: To prevent loss of data or an unresponsive system, stop a data transfer, click Cancel in the notification area, at the far right of the taskbar.

External Media Cards - Windows Vista
Page 13
Index C configuring ExpressCards 4 D digital card defined 1 inserting 2 removing 3 stopping 3 E ExpressCard configuring 4 defined 4 inserting 5 removing 6 removing insert 5 stopping 6 Index 7
Index C configuring ExpressCards 4 D digital card defined 1 inserting 2 removing 3 stopping 3 E ExpressCard configuring 4 defined 4 inserting 5 removing 6 removing insert 5 stopping 6 Index 7

Notebook Tour - Windows Vista
Page 15
...: The optical drive is being accessed. Left-side components Component (1) Power connector (2) ExpressCard slot (3) Digital Media Slot (4) Digital Media Slot light (5) Optical drive (6) Optical drive light Description Connects an AC adapter. Supports the following optional digital card formats: Secure Digital (SD) Memory Card, MultiMediaCard (MMC), Memory Stick (MS), Memory Stick Pro (MSP), xD-Picture...
...: The optical drive is being accessed. Left-side components Component (1) Power connector (2) ExpressCard slot (3) Digital Media Slot (4) Digital Media Slot light (5) Optical drive (6) Optical drive light Description Connects an AC adapter. Supports the following optional digital card formats: Secure Digital (SD) Memory Card, MultiMediaCard (MMC), Memory Stick (MS), Memory Stick Pro (MSP), xD-Picture...
Notebook Tour - Windows Vista
Page 24
... additional hardware 16 bottom 10 display 11 front 5 left-side 9 rear 7 right-side 8 top 3 connectors, power 9 convertible hinge, identifying 11 cord, power 16 D Digital Media Slot light, identifying 9 Digital Media Slot, identifying 9 display release latch, identifying 5, 11 display switch, identifying 11 drive light, identifying 12 drives, hard 10 DVD button, identifying 13...
... additional hardware 16 bottom 10 display 11 front 5 left-side 9 rear 7 right-side 8 top 3 connectors, power 9 convertible hinge, identifying 11 cord, power 16 D Digital Media Slot light, identifying 9 Digital Media Slot, identifying 9 display release latch, identifying 5, 11 display switch, identifying 11 drive light, identifying 12 drives, hard 10 DVD button, identifying 13...


