
End User License Agreement
Page 2
...the end user receiving the transferred product must agree to all component parts, media, printed materials, this EULA. 5. You shall not remove any Microsoft operating system software contained in the form of the Software Product to United States copyright, trade secret, and trademark law,...a. b. This EULA will prevail. 4. Third Party. You may make a one-time transfer of a hard disk drive-based solution, an external media-based recovery solution (e.g. entirely by HP as eligible for the upgrade. This EULA applies to updates or supplements to comply with /for which the ...
...the end user receiving the transferred product must agree to all component parts, media, printed materials, this EULA. 5. You shall not remove any Microsoft operating system software contained in the form of the Software Product to United States copyright, trade secret, and trademark law,...a. b. This EULA will prevail. 4. Third Party. You may make a one-time transfer of a hard disk drive-based solution, an external media-based recovery solution (e.g. entirely by HP as eligible for the upgrade. This EULA applies to updates or supplements to comply with /for which the ...
Upgrading and Servicing Guide
Page 6
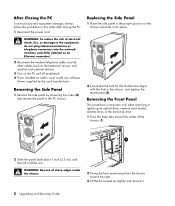
... Panel This procedure is necessary only when removing or replacing an optical drive, memory card reader, diskette drive, or the hard disk drive. 1 Press the three tabs toward the right. 3 Lift the front panel up slightly and remove it off the unit. WARNING: Beware of sharp edges inside the chassis. 2 Swing ...2 Reconnect the modem/telephone cable, and all other cables (such as the keyboard, mouse, and monitor) and external devices. 3 Turn on the PC and all peripherals. 4 If you installed an add-in card, install any software drivers supplied by loosening the screw (D) that the hole for the ...
... Panel This procedure is necessary only when removing or replacing an optical drive, memory card reader, diskette drive, or the hard disk drive. 1 Press the three tabs toward the right. 3 Lift the front panel up slightly and remove it off the unit. WARNING: Beware of sharp edges inside the chassis. 2 Swing ...2 Reconnect the modem/telephone cable, and all other cables (such as the keyboard, mouse, and monitor) and external devices. 3 Turn on the PC and all peripherals. 4 If you installed an add-in card, install any software drivers supplied by loosening the screw (D) that the hole for the ...
Upgrading and Servicing Guide
Page 7
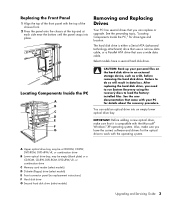
... a CD-ROM, CD-RW, DVD-ROM, DVD+RW/+R, or combination drive C Memory card reader (select models) D Diskette (floppy) drive (select models) E Front connector panel (no replacement instructions) F Hard disk drive G Second hard disk drive (select models) Upgrading and Servicing Guide 3 Removing and Replacing Drives Your PC has several drives that came with the Microsoft® Windows® XP operating system.
... a CD-ROM, CD-RW, DVD-ROM, DVD+RW/+R, or combination drive C Memory card reader (select models) D Diskette (floppy) drive (select models) E Front connector panel (no replacement instructions) F Hard disk drive G Second hard disk drive (select models) Upgrading and Servicing Guide 3 Removing and Replacing Drives Your PC has several drives that came with the Microsoft® Windows® XP operating system.
Upgrading and Servicing Guide
Page 8
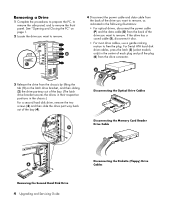
... data cable (D) from the back of the drive you want to remove. See "Opening and Closing the PC" on the latch drive bracket, and then sliding (2) the drive partway out of the bay. (The latch drive bracket secures the drives in their respective positions in the chassis.) For a second hard disk drive, remove the two screws (3) and then slide the...
... data cable (D) from the back of the drive you want to remove. See "Opening and Closing the PC" on the latch drive bracket, and then sliding (2) the drive partway out of the bay. (The latch drive bracket secures the drives in their respective positions in the chassis.) For a second hard disk drive, remove the two screws (3) and then slide the...
Upgrading and Servicing Guide
Page 9
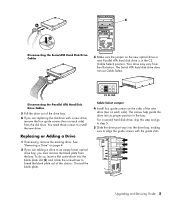
...(C) and rotate the screwdriver to an empty lower optical drive bay, you must remove the blank plate from the illustration. CS SL MA Disconnecting the Parallel ATA Hard Disk Drive Cables 5 Pull the drive out of the drive bay. 6 If you are adding a drive to break the blank plate out of the chassis. You...to align the guide screws with a new drive, remove the four guide screws (two on each side) from the old drive. For a second hard disk drive, skip this step and go to step 5. 5 Slide the drive part way into the drive bay, making sure to install the new drive. To do so, insert a flat ...
...(C) and rotate the screwdriver to an empty lower optical drive bay, you must remove the blank plate from the illustration. CS SL MA Disconnecting the Parallel ATA Hard Disk Drive Cables 5 Pull the drive out of the drive bay. 6 If you are adding a drive to break the blank plate out of the chassis. You...to align the guide screws with a new drive, remove the four guide screws (two on each side) from the old drive. For a second hard disk drive, skip this step and go to step 5. 5 Slide the drive part way into the drive bay, making sure to install the new drive. To do so, insert a flat ...

Upgrading and Servicing Guide
Page 11
...sockets and type of the way, if necessary. Removing a Memory Module 1 Complete the procedures to prepare the PC and to second hard drive (select models only) C - If the data cable is not connected correctly, the PC will not be able to locate the hard disk drives and data may damage the module. 4 Move ...any of memory module your PC uses, and for DDR DIMMs (...
...sockets and type of the way, if necessary. Removing a Memory Module 1 Complete the procedures to prepare the PC and to second hard drive (select models only) C - If the data cable is not connected correctly, the PC will not be able to locate the hard disk drives and data may damage the module. 4 Move ...any of memory module your PC uses, and for DDR DIMMs (...
Getting Started Guide
Page 45
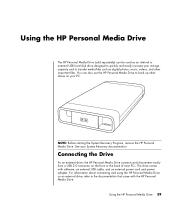
... most PCs. See your storage capacity and to transfer media files such as an external drive, refer to quickly and easily increase your System Recovery documentation. Using the HP Personal Media Drive 39 NOTE: Before starting the System Recovery Program, remove the HP Personal Media Drive. You can be used as an internal or external USB hard disk drive...
... most PCs. See your storage capacity and to transfer media files such as an external drive, refer to quickly and easily increase your System Recovery documentation. Using the HP Personal Media Drive 39 NOTE: Before starting the System Recovery Program, remove the HP Personal Media Drive. You can be used as an internal or external USB hard disk drive...
Getting Started Guide
Page 47
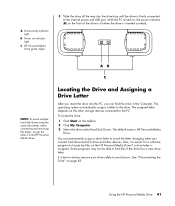
... always remove your drive safely to the drive. With the PC turned on, the power indicator (B) on the taskbar. 2 Click My Computer. 3 Select the drive under Hard Disk Drives. AB C Locating the Drive and Assigning a Drive Letter After you insert the drive into the drive bay until the drive is firmly connected to locate the files on the HP Personal Media Drive if a drive letter...
... always remove your drive safely to the drive. With the PC turned on, the power indicator (B) on the taskbar. 2 Click My Computer. 3 Select the drive under Hard Disk Drives. AB C Locating the Drive and Assigning a Drive Letter After you insert the drive into the drive bay until the drive is firmly connected to locate the files on the HP Personal Media Drive if a drive letter...

Getting Started Guide
Page 74
... the scan to files that have been added. This is often used when you need to save your hard disk for additional discs. 8 Click Done when recording is complete. Select the file you removed. 8 Click Done when the recording is complete. Or • Drag files from a CD or DVD and ...convert them into the drive. 5 Place a check mark in the upper-right corner. 6 Click Yes. 7 Click the Burn icon to ...
... the scan to files that have been added. This is often used when you need to save your hard disk for additional discs. 8 Click Done when recording is complete. Select the file you removed. 8 Click Done when the recording is complete. Or • Drag files from a CD or DVD and ...convert them into the drive. 5 Place a check mark in the upper-right corner. 6 Click Yes. 7 Click the Burn icon to ...

Warranty and Support Guide
Page 6
...HARD DRIVE OR OTHER STORAGE DEVICES AS A PRECAUTION AGAINST POSSIBLE FAILURES, ALTERATION, OR LOSS OF THE DATA. INCLUDING REPRESENTATIONS MADE IN HP SALES LITERATURE OR ADVICE GIVEN TO YOU BY HP OR AN AGENT OR EMPLOYEE OF HP - In the unlikely event that your HP Hardware Product has recurring failures, HP..., or (b) with equivalent products to follow the instructions intended for the HP Hardware Product. HP IS NOT RESPONSIBLE FOR DAMAGE TO OR LOSS OF ANY PROGRAMS, DATA, OR REMOVABLE STORAGE MEDIA. Limitation of HP. No change to the conditions of this Limited Warranty become the property...
...HARD DRIVE OR OTHER STORAGE DEVICES AS A PRECAUTION AGAINST POSSIBLE FAILURES, ALTERATION, OR LOSS OF THE DATA. INCLUDING REPRESENTATIONS MADE IN HP SALES LITERATURE OR ADVICE GIVEN TO YOU BY HP OR AN AGENT OR EMPLOYEE OF HP - In the unlikely event that your HP Hardware Product has recurring failures, HP..., or (b) with equivalent products to follow the instructions intended for the HP Hardware Product. HP IS NOT RESPONSIBLE FOR DAMAGE TO OR LOSS OF ANY PROGRAMS, DATA, OR REMOVABLE STORAGE MEDIA. Limitation of HP. No change to the conditions of this Limited Warranty become the property...

PC Basics Guide
Page 46
...Recycle Bin until you empty it using . 1 Close all files. 3 Click Yes to the Recycle Bin on your Windows desktop. You can retrieve files from the hard disk drive, it goes to confirm the deletion. To manage this, delete files you are permanently deleted. 1 Double-click the Recycle .... 7 Select the types of the screen, if it is not already selected. 5 Select the program to uninstall. 6 Click the Change/Remove button, and then follow the onscreen instructions. If you need it, you use your PC and store files, the hard disk drive fills up and becomes cluttered, affecting performance.
...Recycle Bin until you empty it using . 1 Close all files. 3 Click Yes to the Recycle Bin on your Windows desktop. You can retrieve files from the hard disk drive, it goes to confirm the deletion. To manage this, delete files you are permanently deleted. 1 Double-click the Recycle .... 7 Select the types of the screen, if it is not already selected. 5 Select the program to uninstall. 6 Click the Change/Remove button, and then follow the onscreen instructions. If you need it, you use your PC and store files, the hard disk drive fills up and becomes cluttered, affecting performance.

PC Basics Guide
Page 47
... of the PC. When the Desktop message appears, click Yes to start Disk Defragmenter. This can gather these bits of data become scattered over , this issue, restart the PC and press ...with the Disk Defragmenter does not affect the way you add, move and remove files and folders on your PC, the bits of data together. To fix this means a hidden background... Disk Defragmenter starts itself over and over the hard disk drive. On the Windows Advanced Options menu, use the steps above to continue in Safe Mode. Improving PC Performance 41 Consolidating Scattered Files and Folders Over ...
... of the PC. When the Desktop message appears, click Yes to start Disk Defragmenter. This can gather these bits of data become scattered over , this issue, restart the PC and press ...with the Disk Defragmenter does not affect the way you add, move and remove files and folders on your PC, the bits of data together. To fix this means a hidden background... Disk Defragmenter starts itself over and over the hard disk drive. On the Windows Advanced Options menu, use the steps above to continue in Safe Mode. Improving PC Performance 41 Consolidating Scattered Files and Folders Over ...

PC Basics Guide
Page 49
..., 8 available hard disk drive space increasing, 39 B browsing the Internet, 34 buttons mouse, 7 mouse scroll wheel, 7 Mute, 12 Off. See turning off PC special keys, 12 Start, 23 C cables, for connecting a TV, 14 CD keyboard button, 13 chassis components, 1 connecting a TV, 14 Ethernet, 32 Control Panel, 24 opening, 23 D desktop, 21 desktop icons, removing, 22 digital...
..., 8 available hard disk drive space increasing, 39 B browsing the Internet, 34 buttons mouse, 7 mouse scroll wheel, 7 Mute, 12 Off. See turning off PC special keys, 12 Start, 23 C cables, for connecting a TV, 14 CD keyboard button, 13 chassis components, 1 connecting a TV, 14 Ethernet, 32 Control Panel, 24 opening, 23 D desktop, 21 desktop icons, removing, 22 digital...


