
HP USB Digital Drive
Page 9
Gently unplug the Digital Drive from the USB port. ✎ If the USB connector cable is in the extended position, return it on the Digital Drive is flashing. 1. Disconnecting the Digital Drive ✎ Do not attempt to Remove Hardware" message appears on your taskbar. Select the "Safely Remove Hardware" icon on your screen. 3. Select the Digital Drive and wait until the "Safe to remove the Digital Drive when the status light on its track for safe storage. 8 User Guide A dialog box displays a list of connected devices. 2.
Gently unplug the Digital Drive from the USB port. ✎ If the USB connector cable is in the extended position, return it on the Digital Drive is flashing. 1. Disconnecting the Digital Drive ✎ Do not attempt to Remove Hardware" message appears on your taskbar. Select the "Safely Remove Hardware" icon on your screen. 3. Select the Digital Drive and wait until the "Safe to remove the Digital Drive when the status light on its track for safe storage. 8 User Guide A dialog box displays a list of connected devices. 2.
Backup and Recovery - Windows Vista
Page 8
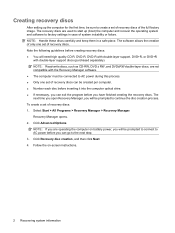
... to the next step. 3. Select Start > All Programs > Recovery Manager > Recovery Manager. The next time you open Recovery Manager, you are operating the computer on -screen instructions. 2 Recovering system information Recovery Manager opens. 2. Click Advanced Options. Follow the on battery power, you will be sure to continue the disc creation process...
... to the next step. 3. Select Start > All Programs > Recovery Manager > Recovery Manager. The next time you open Recovery Manager, you are operating the computer on -screen instructions. 2 Recovering system information Recovery Manager opens. 2. Click Advanced Options. Follow the on battery power, you will be sure to continue the disc creation process...
Backup and Recovery - Windows Vista
Page 9
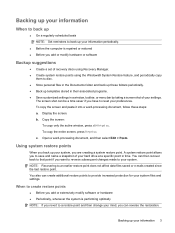
.... ● Create system restore points using the Windows® System Restore feature, and periodically copy them to reset your preferences. To copy the screen and paste it into a word-processing document, follow these folders periodically. ● Back up templates stored in their associated programs. ● Save...name a snapshot of your hard drive at a specific point in a window, toolbar, or menu bar by taking a screen shot of your settings. Display the screen. The screen shot can then recover back to that point if you have to disc. ● Store personal files in the Documents folder...
.... ● Create system restore points using the Windows® System Restore feature, and periodically copy them to reset your preferences. To copy the screen and paste it into a word-processing document, follow these folders periodically. ● Back up templates stored in their associated programs. ● Save...name a snapshot of your hard drive at a specific point in a window, toolbar, or menu bar by taking a screen shot of your settings. Display the screen. The screen shot can then recover back to that point if you have to disc. ● Store personal files in the Documents folder...
Backup and Recovery - Windows Vista
Page 10
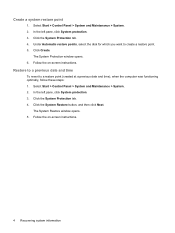
Select Start > Control Panel > System and Maintenance > System. 2. In the left pane, click System protection. 3. Follow the on -screen instructions. 4 Recovering system information Click the System Protection tab. 4. Select Start > Control Panel > System and Maintenance > System. 2....Create. Create a system restore point 1. In the left pane, click System protection. 3. The System Restore window opens. 5. Follow the on -screen instructions. Click the System Protection tab. 4. Under Automatic restore points, select the disk for which you want to a restore point (created at...
Select Start > Control Panel > System and Maintenance > System. 2. In the left pane, click System protection. 3. Follow the on -screen instructions. 4 Recovering system information Click the System Protection tab. 4. Select Start > Control Panel > System and Maintenance > System. 2....Create. Create a system restore point 1. In the left pane, click System protection. 3. The System Restore window opens. 5. Follow the on -screen instructions. Click the System Protection tab. 4. Under Automatic restore points, select the disk for which you want to a restore point (created at...
Backup and Recovery - Windows Vista
Page 11
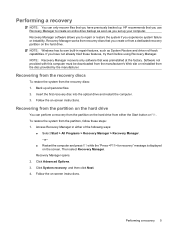
...a recovery from recovery discs that you use Recovery Manager to repair or restore the system if you have previously backed up. HP recommends that you have not already tried these steps: 1. Recovering from the recovery discs To restore the system from the disc ...Manager. Follow the on the hard drive. Recovery Manager works from the partition on -screen instructions. NOTE: Recovery Manager recovers only software that you create or from a dedicated recovery partition on -screen instructions. Back up your computer. Recovery Manager opens. 2. If you experience system failure...
...a recovery from recovery discs that you use Recovery Manager to repair or restore the system if you have previously backed up. HP recommends that you have not already tried these steps: 1. Recovering from the recovery discs To restore the system from the disc ...Manager. Follow the on the hard drive. Recovery Manager works from the partition on -screen instructions. NOTE: Recovery Manager recovers only software that you create or from a dedicated recovery partition on -screen instructions. Back up your computer. Recovery Manager opens. 2. If you experience system failure...
Security - Windows Vista
Page 8
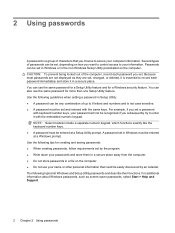
... in a file on how you set in Windows or in a secure place. For additional information about Windows passwords, such as they are not displayed as screen-saver passwords, select Start > Help and Support. 2 Chapter 2 Using passwords 2 Using passwords A password is a group of characters that could be set and entered with the...
... in a file on how you set in Windows or in a secure place. For additional information about Windows passwords, such as they are not displayed as screen-saver passwords, select Start > Help and Support. 2 Chapter 2 Using passwords 2 Using passwords A password is a group of characters that could be set and entered with the...
Security - Windows Vista
Page 10
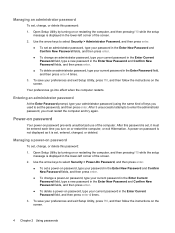
... is not displayed as it must restart the computer and try again. A power-on password prevents unauthorized use of the screen. 2. Managing a power-on the screen. To save your preferences and exit Setup Utility, press f10, and then follow the instructions on or restarting the computer,...message is displayed in the Enter Password field, and then press enter 4 times. 3. After this password: 1. Open Setup Utility by turning on the screen. 4 Chapter 2 Using passwords Managing an administrator password To set, change, or delete this password is set, it is set, entered, changed, or ...
... is not displayed as it must restart the computer and try again. A power-on password prevents unauthorized use of the screen. 2. Managing a power-on the screen. To save your preferences and exit Setup Utility, press f10, and then follow the instructions on or restarting the computer,...message is displayed in the Enter Password field, and then press enter 4 times. 3. After this password: 1. Open Setup Utility by turning on the screen. 4 Chapter 2 Using passwords Managing an administrator password To set, change, or delete this password is set, it is set, entered, changed, or ...

Security - Windows Vista
Page 18
... "Registration Complete" page opens. 9. When you are finished registering fingerprints, click Next. Type your computer. Registering fingerprints A fingerprint reader allows you to log on the screen that you register additional fingerprints.
... "Registration Complete" page opens. 9. When you are finished registering fingerprints, click Next. Type your computer. Registering fingerprints A fingerprint reader allows you to log on the screen that you register additional fingerprints.
Setup Utility - Windows Vista
Page 5
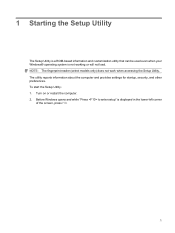
...-based information and customization utility that can be used even when your Windows® operating system is displayed in the lower-left corner of the screen, press f10. 1 The utility reports information about the computer and provides settings for startup, security, and other preferences.
...-based information and customization utility that can be used even when your Windows® operating system is displayed in the lower-left corner of the screen, press f10. 1 The utility reports information about the computer and provides settings for startup, security, and other preferences.
Setup Utility - Windows Vista
Page 6
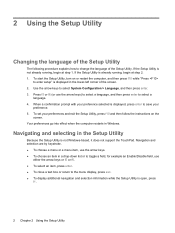
... with your preference selected is not Windows-based, it does not support the TouchPad. Navigating and selecting in the lower-left corner of the screen. 2. If the Setup Utility is displayed in the Setup Utility Because the Setup Utility is displayed, press enter to the menu display, press...restart the computer, and then press f10 while "Press to select a language. 4. To set your preference. 5. To start the Setup Utility, turn on the screen. Navigation and selection are by keystroke. ● To choose a menu or a menu item, use the arrow keys. ● To choose an item in ...
... with your preference selected is not Windows-based, it does not support the TouchPad. Navigating and selecting in the lower-left corner of the screen. 2. If the Setup Utility is displayed in the Setup Utility Because the Setup Utility is displayed, press enter to the menu display, press...restart the computer, and then press f10 while "Press to select a language. 4. To set your preference. 5. To start the Setup Utility, turn on the screen. Navigation and selection are by keystroke. ● To choose a menu or a menu item, use the arrow keys. ● To choose an item in ...
Setup Utility - Windows Vista
Page 7
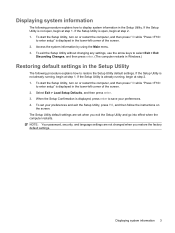
...Utility, turn on or restart the computer, and then press f10 while "Press to display system information in the lower-left corner of the screen. 2. If the Setup Utility is not already running , begin at step 2. 1. When the Setup Confirmation is displayed, press enter to... 1. Displaying system information 3 Displaying system information The following procedure explains how to enter setup" is displayed in the lower-left corner of the screen. 2. To exit the Setup Utility without changing any settings, use the arrow keys to select Exit > Exit Discarding Changes, and then press...
...Utility, turn on or restart the computer, and then press f10 while "Press to display system information in the lower-left corner of the screen. 2. If the Setup Utility is not already running , begin at step 2. 1. When the Setup Confirmation is displayed, press enter to... 1. Displaying system information 3 Displaying system information The following procedure explains how to enter setup" is displayed in the lower-left corner of the screen. 2. To exit the Setup Utility without changing any settings, use the arrow keys to select Exit > Exit Discarding Changes, and then press...
Setup Utility - Windows Vista
Page 8
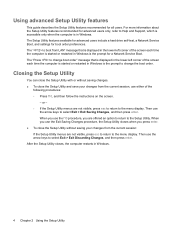
... saving your changes from LAN" message that is the prompt to the menu display. When you use the f10 procedure, you use either of the screen each time the computer is started or restarted in Windows is displayed in the lower-left corner of the following procedures: ◦ Press f10, and... then follow the instructions on the screen. - When you are not visible, press esc to return to change boot order" message that is displayed in the lower-left corner of the...
... saving your changes from LAN" message that is the prompt to the menu display. When you use the f10 procedure, you use either of the screen each time the computer is started or restarted in Windows is displayed in the lower-left corner of the following procedures: ◦ Press f10, and... then follow the instructions on the screen. - When you are not visible, press esc to return to change boot order" message that is displayed in the lower-left corner of the...

Software Updates - Windows Vista
Page 8
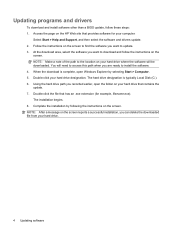
... on or restarting the computer, and then pressing f10 while the "Press to enter Setup" message is later than those currently installed on the screen to the computer or an unsuccessful installation, download and install a BIOS update only when the computer is displayed. 3. To download a BIOS update...: 1. Access the page on the HP Web site that is displayed in an optional docking device, or connected to the hard drive. 2 Updating software Follow the instructions on your selection...
... on or restarting the computer, and then pressing f10 while the "Press to enter Setup" message is later than those currently installed on the screen to the computer or an unsuccessful installation, download and install a BIOS update only when the computer is displayed. 3. To download a BIOS update...: 1. Access the page on the HP Web site that is displayed in an optional docking device, or connected to the hard drive. 2 Updating software Follow the instructions on your selection...

Software Updates - Windows Vista
Page 9
...the file that contains the update. 4. Updating the BIOS 3 BIOS installation procedures vary. Open Windows Explorer by following the instructions on the screen. Using the hard drive path you recorded earlier, open the folder on your hard drive that has an .exe extension (for example,... 2. The hard drive designation is complete. The BIOS installation begins. 5. You will be downloaded. NOTE: After a message on the screen reports a successful installation, you connect your computer to install the update. NOTE: If you can delete the downloaded file from your hard drive ...
...the file that contains the update. 4. Updating the BIOS 3 BIOS installation procedures vary. Open Windows Explorer by following the instructions on the screen. Using the hard drive path you recorded earlier, open the folder on your hard drive that has an .exe extension (for example,... 2. The hard drive designation is complete. The BIOS installation begins. 5. You will be downloaded. NOTE: After a message on the screen reports a successful installation, you connect your computer to install the update. NOTE: If you can delete the downloaded file from your hard drive ...
Software Updates - Windows Vista
Page 10
...selecting Start > Computer. 5. Double-click the file that contains the update. 7. The hard drive designation is complete, open the folder on the screen reports a successful installation, you can delete the downloaded file from your hard drive where the software will need to access this path when you ...install the software. 4. Updating programs and drivers To download and install software other than a BIOS update, follow the instructions on the HP Web site that provides software for your hard drive that has an .exe extension (for example, filename.exe). Follow the instructions on the...
...selecting Start > Computer. 5. Double-click the file that contains the update. 7. The hard drive designation is complete, open the folder on the screen reports a successful installation, you can delete the downloaded file from your hard drive where the software will need to access this path when you ...install the software. 4. Updating programs and drivers To download and install software other than a BIOS update, follow the instructions on the HP Web site that provides software for your hard drive that has an .exe extension (for example, filename.exe). Follow the instructions on the...

HP Mobile Remote Control (Select Models Only) - Windows Vista
Page 7
... scroll right. Press the button to the next track or chapter. QuickPlay or DVD Play launches after you may be asked to log on the screen. Fast forward Press the button to the previous track or chapter. Previous Up Press the button to go back to the previous track or Press... the button to go to scroll left . Navigation. Press the button to scroll right. screen. Press the button to scroll left . When in QuickPlay (select models only) NOTE: If the computer has been set up . Press the button to rewind...
... scroll right. Press the button to the next track or chapter. QuickPlay or DVD Play launches after you may be asked to log on the screen. Fast forward Press the button to the previous track or chapter. Previous Up Press the button to go back to the previous track or Press... the button to go to scroll left . Navigation. Press the button to scroll right. screen. Press the button to scroll left . When in QuickPlay (select models only) NOTE: If the computer has been set up . Press the button to rewind...
Notebook Tour - Windows Vista
Page 9
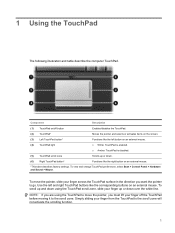
... models. Top components TouchPad Component Description (1) TouchPad on/off button Enables/disables the TouchPad. (2) TouchPad* Moves the pointer and selects or activates items on the screen. (3) Left TouchPad button* (4) TouchPad light Functions like the left button on an external mouse. ● White: TouchPad is enabled. ● Amber: TouchPad is disabled. (5) TouchPad...
... models. Top components TouchPad Component Description (1) TouchPad on/off button Enables/disables the TouchPad. (2) TouchPad* Moves the pointer and selects or activates items on the screen. (3) Left TouchPad button* (4) TouchPad light Functions like the left button on an external mouse. ● White: TouchPad is enabled. ● Amber: TouchPad is disabled. (5) TouchPad...
Pointing Devices and Keyboard - Windows Vista
Page 5
... Support (fn+f1 4 Opening the Print Options window (fn+f2 4 Opening a Web browser (fn+f3 5 Switching the screen image (fn+f4 5 Initiating Hibernation (fn+f5 6 Initiating QuickLock (fn+f6 6 Decreasing screen brightness (fn+f7 6 Increasing screen brightness (fn+f8 6 Playing, pausing or resuming an audio CD or a DVD (fn+f9 6 Stopping an audio...
... Support (fn+f1 4 Opening the Print Options window (fn+f2 4 Opening a Web browser (fn+f3 5 Switching the screen image (fn+f4 5 Initiating Hibernation (fn+f5 6 Initiating QuickLock (fn+f6 6 Decreasing screen brightness (fn+f7 6 Increasing screen brightness (fn+f8 6 Playing, pausing or resuming an audio CD or a DVD (fn+f9 6 Stopping an audio...
Pointing Devices and Keyboard - Windows Vista
Page 7
... pointer to move the pointer, slide your finger off button Enables/disables the TouchPad. (2) TouchPad* Moves the pointer and selects or activates items on the screen. (3) Left TouchPad button* (4) TouchPad light Functions like the left and right TouchPad buttons like the right button on an external mouse. ● White: TouchPad is...
... pointer to move the pointer, slide your finger off button Enables/disables the TouchPad. (2) TouchPad* Moves the pointer and selects or activates items on the screen. (3) Left TouchPad button* (4) TouchPad light Functions like the left and right TouchPad buttons like the right button on an external mouse. ● White: TouchPad is...
Pointing Devices and Keyboard - Windows Vista
Page 9
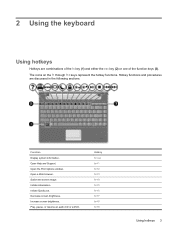
Open a Web browser. Open Help and Support. Increase screen brightness. Hotkey fn+esc fn+f1 fn+f2 fn+f3 fn+f4 fn+f5 fn+f6 fn+f7 fn+f8 fn+f9 Using hotkeys 3 The ... functions and procedures are combinations of the fn key (1) and either the esc key (2) or one of the function keys (3). Function Display system information. Decrease screen brightness. Open the Print Options window. Initiate QuickLock. Play, pause, or resume an audio CD or a DVD. Initiate Hibernation. 2 Using the keyboard Using hotkeys Hotkeys...
Open a Web browser. Open Help and Support. Increase screen brightness. Hotkey fn+esc fn+f1 fn+f2 fn+f3 fn+f4 fn+f5 fn+f6 fn+f7 fn+f8 fn+f9 Using hotkeys 3 The ... functions and procedures are combinations of the fn key (1) and either the esc key (2) or one of the function keys (3). Function Display system information. Decrease screen brightness. Open the Print Options window. Initiate QuickLock. Play, pause, or resume an audio CD or a DVD. Initiate Hibernation. 2 Using the keyboard Using hotkeys Hotkeys...


