
Backup and Recovery - Windows Vista
Page 6
...restore your system to its original factory state if you will be prompted to continue the disc creation process. NOTE: If your computer from the HP Web site. The next time you open Recovery Manager, you experience serious system failure or instability. Recovery Manager opens. 2. The software allows the... or CD-R discs. NOTE: If you have a much higher capacity than CDs. Click Recovery disc creation, and then click Next. 4. Follow the on battery power, you can go to 20 discs may be created per computer. ● Number each disc before inserting it into the optical drive. ● If...
...restore your system to its original factory state if you will be prompted to continue the disc creation process. NOTE: If your computer from the HP Web site. The next time you open Recovery Manager, you experience serious system failure or instability. Recovery Manager opens. 2. The software allows the... or CD-R discs. NOTE: If you have a much higher capacity than CDs. Click Recovery disc creation, and then click Next. 4. Follow the on battery power, you can go to 20 discs may be created per computer. ● Number each disc before inserting it into the optical drive. ● If...

Software Update, Backup and Recovery - Windows Vista
Page 6
Open the Setup Utility by turning on battery power, docked in an optional docking device, or connected to an optional power source. To use the Setup Utility for Startup Menu" message is selected, ... on the computer, you want to know the version of the date, name, or other system information is later than those currently installed on the HP Web site that provides software for your selection to reliable external power using the AC adapter. Identify the BIOS update that is displayed. 3. During the...
Open the Setup Utility by turning on battery power, docked in an optional docking device, or connected to an optional power source. To use the Setup Utility for Startup Menu" message is selected, ... on the computer, you want to know the version of the date, name, or other system information is later than those currently installed on the HP Web site that provides software for your selection to reliable external power using the AC adapter. Identify the BIOS update that is displayed. 3. During the...
Wireless (Select Models Only) - Windows Vista
Page 18
... the Global System for HP Mobile Broadband is preinstalled in the battery bay. For information on inserting and removing the SIM, refer to the "Inserting a SIM" and "Removing a SIM" sections in the HP Mobile Broadband information provided with mobile network operator service, HP Mobile Broadband gives you ... require the use of your computer, or the mobile network operator may provide it may need the HP Mobile Broadband Module serial number to networks based on a label inside the battery bay of a subscriber identity module (SIM). When used with your computer. If the SIM is ...
... the Global System for HP Mobile Broadband is preinstalled in the battery bay. For information on inserting and removing the SIM, refer to the "Inserting a SIM" and "Removing a SIM" sections in the HP Mobile Broadband information provided with mobile network operator service, HP Mobile Broadband gives you ... require the use of your computer, or the mobile network operator may provide it may need the HP Mobile Broadband Module serial number to networks based on a label inside the battery bay of a subscriber identity module (SIM). When used with your computer. If the SIM is ...
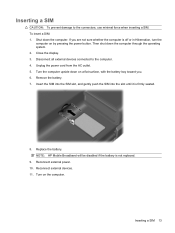
Wireless (Select Models Only) - Windows Vista
Page 19
Then shut down the computer. NOTE: HP Mobile Broadband will be disabled if the battery is firmly seated. 8. Reconnect external devices. 11. To insert a SIM: 1. Close the display. 3. Reconnect external power. 10. Turn on a flat surface, with the battery bay toward you are not sure whether the..., and gently push the SIM into the slot until it is not replaced. 9. Replace the battery. If you . 6. Inserting a SIM CAUTION: To prevent damage to the computer. 4. Remove the battery. 7. Unplug the power cord from the AC outlet. 5. Disconnect all external devices connected to ...
Then shut down the computer. NOTE: HP Mobile Broadband will be disabled if the battery is firmly seated. 8. Reconnect external devices. 11. To insert a SIM: 1. Close the display. 3. Reconnect external power. 10. Turn on a flat surface, with the battery bay toward you are not sure whether the..., and gently push the SIM into the slot until it is not replaced. 9. Replace the battery. If you . 6. Inserting a SIM CAUTION: To prevent damage to the computer. 4. Remove the battery. 7. Unplug the power cord from the AC outlet. 5. Disconnect all external devices connected to ...
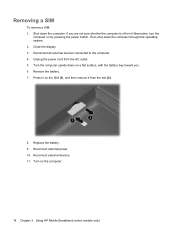
Wireless (Select Models Only) - Windows Vista
Page 20
...and then remove it from the AC outlet. 5. Disconnect all external devices connected to the computer. 4. Turn on a flat surface, with the battery bay toward you are not sure whether the computer is off or in on by pressing the power button. Close the display. 3. Reconnect external power.... 10. Reconnect external devices. 11. Replace the battery. 9. Remove the battery. 7. Shut down the computer through the operating system. 2. Turn the computer upside down on the computer. 14 Chapter 3 Using...
...and then remove it from the AC outlet. 5. Disconnect all external devices connected to the computer. 4. Turn on a flat surface, with the battery bay toward you are not sure whether the computer is off or in on by pressing the power button. Close the display. 3. Reconnect external power.... 10. Reconnect external devices. 11. Replace the battery. 9. Remove the battery. 7. Shut down the computer through the operating system. 2. Turn the computer upside down on the computer. 14 Chapter 3 Using...
Drives - Windows Vista
Page 5
...drive, discharge static electricity by touching the unpainted metal surface of information, observe these precautions: Before you are fragile computer components that the battery is sufficiently charged before handling drives. Do not type on it down the computer. Avoid exposing a drive to temperature or humidity extremes...FRAGILE." CAUTION: To reduce the risk of damage to the computer, damage to vibration. Avoid exposing a drive to media. When the battery is sensitive to a drive, or loss of the drive. Do not touch the connector pins on a removable drive or on the ...
...drive, discharge static electricity by touching the unpainted metal surface of information, observe these precautions: Before you are fragile computer components that the battery is sufficiently charged before handling drives. Do not type on it down the computer. Avoid exposing a drive to temperature or humidity extremes...FRAGILE." CAUTION: To reduce the risk of damage to the computer, damage to vibration. Avoid exposing a drive to media. When the battery is sensitive to a drive, or loss of the drive. Do not touch the connector pins on a removable drive or on the ...
Drives - Windows Vista
Page 14
... for such purposes. The write process is writing to the software manufacturer's instructions, which may be provided on disc, in the software Help, or on battery power. Do not use the computer keyboard or move the computer while the computer is sensitive to a destination disc. Do not copy directly from a source...
... for such purposes. The write process is writing to the software manufacturer's instructions, which may be provided on disc, in the software Help, or on battery power. Do not use the computer keyboard or move the computer while the computer is sensitive to a destination disc. Do not copy directly from a source...
Drives - Windows Vista
Page 19
...Hard Drive Protection protects a hard drive by parking the drive and halting I/O requests under either of these events, HP ProtectSmart Hard Drive Protection returns the hard drive to the HP ProtectSmart Hard Drive Protection software Help. 15 A short time after the end of one of the following conditions:...● You drop the computer. ● You move the computer with the display closed while the computer is protected by HP ProtectSmart Hard Drive Protection. NOTE: A hard drive in the hard drive bay is running on battery power. Hard drives connected to USB ports are not protected by...
...Hard Drive Protection protects a hard drive by parking the drive and halting I/O requests under either of these events, HP ProtectSmart Hard Drive Protection returns the hard drive to the HP ProtectSmart Hard Drive Protection software Help. 15 A short time after the end of one of the following conditions:...● You drop the computer. ● You move the computer with the display closed while the computer is protected by HP ProtectSmart Hard Drive Protection. NOTE: A hard drive in the hard drive bay is running on battery power. Hard drives connected to USB ports are not protected by...
Drives - Windows Vista
Page 21
... the following ways: ● The computer will not shut down or initiate Sleep or Hibernation. NOTE: If the computer is running on battery power and reaches a critical battery level, HP ProtectSmart Hard Drive Protection allows the computer to initiate Hibernation. ● The computer will behave in Power Options properties. Managing power with a parked...
... the following ways: ● The computer will not shut down or initiate Sleep or Hibernation. NOTE: If the computer is running on battery power and reaches a critical battery level, HP ProtectSmart Hard Drive Protection allows the computer to initiate Hibernation. ● The computer will behave in Power Options properties. Managing power with a parked...

Drives - Windows Vista
Page 24
Then shut down the computer and close the display. 3. Disconnect all external devices connected to the computer. 4. Remove the battery from the AC outlet. 5. If you , loosen the hard drive cover screws (1). 20 Chapter 6 Replacing the hard drive in the hard drive bay CAUTION: To ...
Then shut down the computer and close the display. 3. Disconnect all external devices connected to the computer. 4. Remove the battery from the AC outlet. 5. If you , loosen the hard drive cover screws (1). 20 Chapter 6 Replacing the hard drive in the hard drive bay CAUTION: To ...

Memory Modules - Windows Vista and Windows 7
Page 5
...ensure that you are discharged of the computer. Shut down on the bottom of static electricity by sliding the power switch. Remove the battery from the AC outlet. 5. Save your work. 2. To add or replace a memory module: 1. Unplug the power cord from the computer. 7. Disconnect... all batteries before installing a memory module. Then shut down the computer through the operating system. 3. The memory capacity of electric shock and damage to the ...
...ensure that you are discharged of the computer. Shut down on the bottom of static electricity by sliding the power switch. Remove the battery from the AC outlet. 5. Save your work. 2. To add or replace a memory module: 1. Unplug the power cord from the computer. 7. Disconnect... all batteries before installing a memory module. Then shut down the computer through the operating system. 3. The memory capacity of electric shock and damage to the ...

Memory Modules - Windows Vista and Windows 7
Page 7
... module with the notch on the computer. 3 b. Tighten the 2 memory module compartment screws (2). 13. Turn on the computer and close the cover (1). 12. Replace the battery. 14. a. CAUTION: To prevent damage to both the left and right edges of the memory module, until it is seated. Do not touch the components...
... module with the notch on the computer. 3 b. Tighten the 2 memory module compartment screws (2). 13. Turn on the computer and close the cover (1). 12. Replace the battery. 14. a. CAUTION: To prevent damage to both the left and right edges of the memory module, until it is seated. Do not touch the components...

Notebook Tour - Windows Vista
Page 9
...If the computer is plugged into an external power source, the light stays off until the battery reaches a low battery level. Lights Component (1) Caps lock light (2) Num lock light (3) Wireless light (4) Power light (5) Battery light (6) Drive light Description On: Caps lock is on . ● Blinking: The ...plugged into an external power source, the light is turned off when all batteries in Hibernation. ● On: A battery is charging. ● Blinking: A battery that is the only available power source has reached a low battery level. On: Num lock is on or the embedded numeric keypad is ...
...If the computer is plugged into an external power source, the light stays off until the battery reaches a low battery level. Lights Component (1) Caps lock light (2) Num lock light (3) Wireless light (4) Power light (5) Battery light (6) Drive light Description On: Caps lock is on . ● Blinking: The ...plugged into an external power source, the light is turned off when all batteries in Hibernation. ● On: A battery is charging. ● Blinking: A battery that is the only available power source has reached a low battery level. On: Num lock is on or the embedded numeric keypad is ...

Notebook Tour - Windows Vista
Page 11
...is in the Sleep state. ● Off: The computer is off when all batteries in Hibernation. ● On: A battery is charging. ● Blinking: A battery that is the only available power source has reached a low battery level. Blinking: The hard drive or optical drive is not plugged into an ...external power source, the light is turned off or in the computer are fully charged. When the battery reaches a critical battery level, the battery light begins blinking rapidly. ● Off: If the computer is plugged into an external power source, the light stays...
...is in the Sleep state. ● Off: The computer is off when all batteries in Hibernation. ● On: A battery is charging. ● Blinking: A battery that is the only available power source has reached a low battery level. Blinking: The hard drive or optical drive is not plugged into an ...external power source, the light is turned off or in the computer are fully charged. When the battery reaches a critical battery level, the battery light begins blinking rapidly. ● Off: If the computer is plugged into an external power source, the light stays...

Notebook Tour - Windows Vista
Page 15
... authorized for the internal fan to cool internal components and prevent overheating. Contains the memory module slots. Release the battery from the battery bay. Enable airflow to restore computer functionality, and then contact technical support through Help and Support. Contains a Bluetooth... or region. NOTE: The computer fan starts up automatically to cycle on and off during routine operation. Holds the battery. Located inside the battery bay. Bottom components 9 Bottom components Component (1) Hard drive bay (2) Vents (3) (3) Memory module compartment (4) Subscriber identity ...
... authorized for the internal fan to cool internal components and prevent overheating. Contains the memory module slots. Release the battery from the battery bay. Enable airflow to restore computer functionality, and then contact technical support through Help and Support. Contains a Bluetooth... or region. NOTE: The computer fan starts up automatically to cycle on and off during routine operation. Holds the battery. Located inside the battery bay. Bottom components 9 Bottom components Component (1) Hard drive bay (2) Vents (3) (3) Memory module compartment (4) Subscriber identity ...

Notebook Tour - Windows Vista
Page 18
Additional hardware components Component Description (1) Power cord* Connects an AC adapter to an AC outlet. (2) AC adapter Converts AC power to DC power. (3) Battery* Powers the computer when the computer is not plugged into external power. *Batteries and power cords vary in appearance by region and country. 12 Chapter 2 Components
Additional hardware components Component Description (1) Power cord* Connects an AC adapter to an AC outlet. (2) AC adapter Converts AC power to DC power. (3) Battery* Powers the computer when the computer is not plugged into external power. *Batteries and power cords vary in appearance by region and country. 12 Chapter 2 Components
Notebook Tour - Windows Vista
Page 19
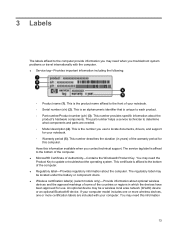
...important information including the following: ◦ Product name (1). You may need when you troubleshoot system problems or travel internationally with your notebook. ◦ Serial number (s/n) (2). If your computer model includes one or more wireless devices, one or more certification labels are ...contact technical support. This number provides specific information about the computer. The regulatory label may be located under the battery or component doors. ● Wireless certification label(s) (select models only)-Provide information about optional wireless devices and...
...important information including the following: ◦ Product name (1). You may need when you troubleshoot system problems or travel internationally with your notebook. ◦ Serial number (s/n) (2). If your computer model includes one or more wireless devices, one or more certification labels are ...contact technical support. This number provides specific information about the computer. The regulatory label may be located under the battery or component doors. ● Wireless certification label(s) (select models only)-Provide information about optional wireless devices and...

Notebook Tour - Windows Vista
Page 20
This label is located inside the Mini Card compartment. ● SIM (subscriber identity module) label (select models only)-Provides the ICCID (Integrated Circuit Card Identifier) of your SIM. Wireless certification labels are affixed inside the battery bay. 14 Chapter 3 Labels when traveling internationally.
This label is located inside the Mini Card compartment. ● SIM (subscriber identity module) label (select models only)-Provides the ICCID (Integrated Circuit Card Identifier) of your SIM. Wireless certification labels are affixed inside the battery bay. 14 Chapter 3 Labels when traveling internationally.

Notebook Tour - Windows Vista
Page 21
...4 audio-in (microphone) jack, identifying 7 audio-out (headphone) jack, identifying 7 B battery bay 13 battery bay, identifying 9 battery light, identifying 3, 5 battery release latches, identifying 9 battery, identifying 12 bays battery 9, 13 hard drive 9 Bluetooth label 14 buttons TouchPad 2 TouchPad on/off 2 wireless 6... logo 4 L labels Bluetooth 14 Microsoft Certificate of Authenticity 13 regulatory 13 service tag 13 SIM 14 wireless certification 14 WLAN 14 latches, battery release 9 lights battery 3, 5 caps lock 3 drive 3, 5 num lock 3 power 3, 5, 6, 7 TouchPad 2 webcam 10 wireless 3, 5, 6 ...
...4 audio-in (microphone) jack, identifying 7 audio-out (headphone) jack, identifying 7 B battery bay 13 battery bay, identifying 9 battery light, identifying 3, 5 battery release latches, identifying 9 battery, identifying 12 bays battery 9, 13 hard drive 9 Bluetooth label 14 buttons TouchPad 2 TouchPad on/off 2 wireless 6... logo 4 L labels Bluetooth 14 Microsoft Certificate of Authenticity 13 regulatory 13 service tag 13 SIM 14 wireless certification 14 WLAN 14 latches, battery release 9 lights battery 3, 5 caps lock 3 drive 3, 5 num lock 3 power 3, 5, 6, 7 TouchPad 2 webcam 10 wireless 3, 5, 6 ...

HP Pavilion dv2 Entertainment PC - Maintenance and Service Guide
Page 6
... module ...45 WLAN module ...47 Keyboard ...50 Top cover ...53 Fan ...55 Bluetooth module ...57 System board ...59 Speaker assembly ...63 LED board ...64 RTC battery ...66 Display assembly ...68 Webcam/microphone module 72 Power connector cable ...74 Heat sink ...76 5 Setup Utility Starting the Setup Utility ...80 Using the Setup...
... module ...45 WLAN module ...47 Keyboard ...50 Top cover ...53 Fan ...55 Bluetooth module ...57 System board ...59 Speaker assembly ...63 LED board ...64 RTC battery ...66 Display assembly ...68 Webcam/microphone module 72 Power connector cable ...74 Heat sink ...76 5 Setup Utility Starting the Setup Utility ...80 Using the Setup...


