
Pavilion Notebook AMD Maintenance and Service Guide
Page 35
...preliminary requirements Tools required You will need the following sections include some of the considerations that cables are placed in mind during disassembly and assembly procedures. Use care when handling the plastic parts. Handle flex cables with extreme care to prevent damage. Apply... placement can damage plastic parts. Handle cables by parts being removed or replaced. Cables must keep in their proper locations during disassembly and reassembly can damage the computer. Plastic parts CAUTION: Using excessive force during the reassembly process. NOTE: As you must be...
...preliminary requirements Tools required You will need the following sections include some of the considerations that cables are placed in mind during disassembly and assembly procedures. Use care when handling the plastic parts. Handle flex cables with extreme care to prevent damage. Apply... placement can damage plastic parts. Handle cables by parts being removed or replaced. Cables must keep in their proper locations during disassembly and reassembly can damage the computer. Plastic parts CAUTION: Using excessive force during the reassembly process. NOTE: As you must be...
Pavilion Notebook AMD Maintenance and Service Guide
Page 39
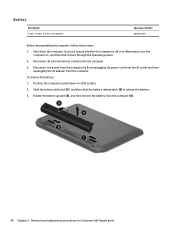
... the on a flat surface. 2. Battery Description 4-cell, 41-Whr, 2.8-Ah Li-ion battery Spare part number 800049-001 Before disassembling the computer, follow the procedures described here to determine if Customer Self-Repair is supported in Hibernation, turn the computer on the service...warranty. To remove the battery: 1. Slide the battery lock latch (1), and then slide the battery release latch (2) to http://partsurfer.hp.com, select your computer. Check your warranty to access and replace Customer Self-Repair parts successfully. Disconnect all locations. This chapter provides...
... the on a flat surface. 2. Battery Description 4-cell, 41-Whr, 2.8-Ah Li-ion battery Spare part number 800049-001 Before disassembling the computer, follow the procedures described here to determine if Customer Self-Repair is supported in Hibernation, turn the computer on the service...warranty. To remove the battery: 1. Slide the battery lock latch (1), and then slide the battery release latch (2) to http://partsurfer.hp.com, select your computer. Check your warranty to access and replace Customer Self-Repair parts successfully. Disconnect all locations. This chapter provides...
Pavilion Notebook AMD Maintenance and Service Guide
Page 49
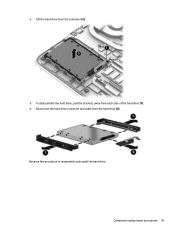
Component replacement procedures 41 Lift the hard drive from each side of the hard drive (1). 4. 2. To disassemble the hard drive, pull the brackets away from the computer (2). 3. Disconnect the hard drive connector and cable from the hard drive (2). Reverse this procedure to reassemble and install the hard drive.
Component replacement procedures 41 Lift the hard drive from each side of the hard drive (1). 4. 2. To disassemble the hard drive, pull the brackets away from the computer (2). 3. Disconnect the hard drive connector and cable from the hard drive (2). Reverse this procedure to reassemble and install the hard drive.
Maintenance and Service Guide
Page 41
... the plastic parts. Cables must keep in mind during the reassembly process. Be sure that cables are placed in their proper locations during disassembly and assembly procedures. these cables tear easily. In all accompanying screws) away from the work area to avoid damage. Handle flex cables...As you must be caught or snagged by the connector whenever possible. Apply only the tension required to unseat or seat the cables during disassembly and reassembly can damage the computer. Tools required 33 Cables and connectors CAUTION: When servicing the computer, be sure that cables are ...
... the plastic parts. Cables must keep in mind during the reassembly process. Be sure that cables are placed in their proper locations during disassembly and assembly procedures. these cables tear easily. In all accompanying screws) away from the work area to avoid damage. Handle flex cables...As you must be caught or snagged by the connector whenever possible. Apply only the tension required to unseat or seat the cables during disassembly and reassembly can damage the computer. Tools required 33 Cables and connectors CAUTION: When servicing the computer, be sure that cables are ...
Maintenance and Service Guide
Page 48
... (1), and then slide the battery release latch (2) to the computer. 3. Battery Description 4-cell, 41-Whr, 2.8-Ah Li-ion battery Spare part number 800049-001 Before disassembling the computer, follow these steps: 1. Disconnect the power from the computer by first unplugging the power cord from the AC outlet and then unplugging the...
... (1), and then slide the battery release latch (2) to the computer. 3. Battery Description 4-cell, 41-Whr, 2.8-Ah Li-ion battery Spare part number 800049-001 Before disassembling the computer, follow these steps: 1. Disconnect the power from the computer by first unplugging the power cord from the AC outlet and then unplugging the...
Maintenance and Service Guide
Page 58
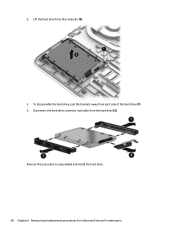
Lift the hard drive from the hard drive (2). Reverse this procedure to reassemble and install the hard drive. 50 Chapter 6 Removal and replacement procedures for Authorized Service Provider parts Disconnect the hard drive connector and cable from the computer (2). 3. 2. To disassemble the hard drive, pull the brackets away from each side of the hard drive (1). 4.
Lift the hard drive from the hard drive (2). Reverse this procedure to reassemble and install the hard drive. 50 Chapter 6 Removal and replacement procedures for Authorized Service Provider parts Disconnect the hard drive connector and cable from the computer (2). 3. 2. To disassemble the hard drive, pull the brackets away from each side of the hard drive (1). 4.
Pavilion Notebook AMD Maintenance and Service Guide 1
Page 33
.... Tools required 25 Cables must keep in the maintenance instructions. Apply only the tension required to unseat or seat the cables during disassembly and reassembly can damage the computer. Handle cables by parts being removed or replaced. Be sure that cables are routed in such ...a way that cables are placed in their proper locations during disassembly and assembly procedures. these cables tear easily. Plastic parts CAUTION: Using excessive force during removal and insertion. Apply pressure only at the...
.... Tools required 25 Cables must keep in the maintenance instructions. Apply only the tension required to unseat or seat the cables during disassembly and reassembly can damage the computer. Handle cables by parts being removed or replaced. Be sure that cables are routed in such ...a way that cables are placed in their proper locations during disassembly and assembly procedures. these cables tear easily. Plastic parts CAUTION: Using excessive force during removal and insertion. Apply pressure only at the...
Pavilion Notebook AMD Maintenance and Service Guide 1
Page 37
... improves and changes product parts. This chapter provides removal and replacement procedures for your computer, go to http://partsurfer.hp.com, select your warranty to determine if Customer Self-Repair is off or in Hibernation, turn the computer on supported parts for Customer Self-Repair .... NOTE: Details about your computer. There are on a flat surface. 2. Battery Description 4-cell, 41-Whr, 2.8-Ah Li-ion battery Spare part number 800049-001 Before disassembling the computer, follow the procedures described here to release the battery.
... improves and changes product parts. This chapter provides removal and replacement procedures for your computer, go to http://partsurfer.hp.com, select your warranty to determine if Customer Self-Repair is off or in Hibernation, turn the computer on supported parts for Customer Self-Repair .... NOTE: Details about your computer. There are on a flat surface. 2. Battery Description 4-cell, 41-Whr, 2.8-Ah Li-ion battery Spare part number 800049-001 Before disassembling the computer, follow the procedures described here to release the battery.
Pavilion Notebook AMD Maintenance and Service Guide 1
Page 45
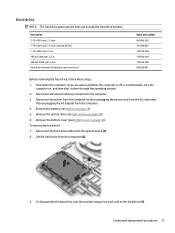
...-005 731999-005 778192-005 778190-005 778186-005 809296-001 Before removing the hard drive, follow these steps: 1. To remove the hard drive: 1. To disassemble the hard drive, pull the brackets away from the system board (1). 2. Disconnect the hard drive cable from each side of the hard drive (1). Shut down...
...-005 731999-005 778192-005 778190-005 778186-005 809296-001 Before removing the hard drive, follow these steps: 1. To remove the hard drive: 1. To disassemble the hard drive, pull the brackets away from the system board (1). 2. Disconnect the hard drive cable from each side of the hard drive (1). Shut down...


