User Guide
Page 6
...menus .......... 35 Load and print envelopes ...36 Introduction ...36 Print envelopes ...36 Envelope orientation ...36 Load and print labels ...38 Introduction ...38 Manually feed labels ...38 Label orientation ...39 3 Supplies, accessories, and parts ...41 Order supplies, accessories, and parts ...42 Ordering ...42 Supplies... 51 4 Print ...53 Print tasks (Windows) ...54 How to print (Windows) ...54 Automatically print on both sides (Windows 56 Manually print on both sides (Windows 56 Print multiple pages per sheet (Windows 57 Select the paper type (Windows) ...57 Additional print tasks...
...menus .......... 35 Load and print envelopes ...36 Introduction ...36 Print envelopes ...36 Envelope orientation ...36 Load and print labels ...38 Introduction ...38 Manually feed labels ...38 Label orientation ...39 3 Supplies, accessories, and parts ...41 Order supplies, accessories, and parts ...42 Ordering ...42 Supplies... 51 4 Print ...53 Print tasks (Windows) ...54 How to print (Windows) ...54 Automatically print on both sides (Windows 56 Manually print on both sides (Windows 56 Print multiple pages per sheet (Windows 57 Select the paper type (Windows) ...57 Additional print tasks...
User Guide
Page 7
...job ...65 Information sent to printer for Job Accounting purposes 65 Mobile printing ...66 Introduction ...66 Wireless Direct Print and NFC Printing 66 HP ePrint via email ...67 HP ePrint software ...68 AirPrint ...68 Google Cloud Print ...68 Android embedded printing ...69 Print from the USB port ...70 Introduction ...70 Enable...USB documents ...71 5 Copy ...73 Make a copy ...74 Copy on both sides (duplex) ...76 Copy on both sides automatically ...76 Copy on both sides manually ...76 Additional options when copying ...77 Additional copy tasks ...79 6 Scan ...81 Set up Scan to E-mail using the...
...job ...65 Information sent to printer for Job Accounting purposes 65 Mobile printing ...66 Introduction ...66 Wireless Direct Print and NFC Printing 66 HP ePrint via email ...67 HP ePrint software ...68 AirPrint ...68 Google Cloud Print ...68 Android embedded printing ...69 Print from the USB port ...70 Introduction ...70 Enable...USB documents ...71 5 Copy ...73 Make a copy ...74 Copy on both sides (duplex) ...76 Copy on both sides automatically ...76 Copy on both sides manually ...76 Additional options when copying ...77 Additional copy tasks ...79 6 Scan ...81 Set up Scan to E-mail using the...
User Guide
Page 9
... ...131 Send a fax ...133 Additional fax tasks ...134 8 Manage the printer ...135 Advanced configuration with HP Embedded Web Server (EWS 136 Introduction ...136 How to access the HP Embedded Web Server (EWS 136 HP Embedded Web Server features 137 Information tab ...137 General tab ...138...list ...144 Advanced configuration with HP Utility for OS X 145 Open HP Utility ...145 HP Utility features ...145 Configure IP network settings ...147 Printer sharing disclaimer ...147 View or change network settings 147 Rename the printer on a network 147 Manually configure IPv4 TCP/IP parameters ...
... ...131 Send a fax ...133 Additional fax tasks ...134 8 Manage the printer ...135 Advanced configuration with HP Embedded Web Server (EWS 136 Introduction ...136 How to access the HP Embedded Web Server (EWS 136 HP Embedded Web Server features 137 Information tab ...137 General tab ...138...list ...144 Advanced configuration with HP Utility for OS X 145 Open HP Utility ...145 HP Utility features ...145 Configure IP network settings ...147 Printer sharing disclaimer ...147 View or change network settings 147 Rename the printer on a network 147 Manually configure IPv4 TCP/IP parameters ...
User Guide
Page 50
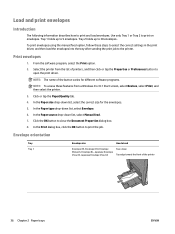
... to print on envelopes. Envelope orientation Tray Tray 1 Envelope size How to print the job. In the Paper size drop-down list, select Manual feed. 7. In the Paper type drop-down Top edge toward the front of the button varies for the envelopes. 5. To print envelopes using the... manual feed option, follow these features from the list of printers, and then click or tap the Properties or Preferences button to 30 envelopes. Print ...
... to print on envelopes. Envelope orientation Tray Tray 1 Envelope size How to print the job. In the Paper size drop-down list, select Manual feed. 7. In the Paper type drop-down Top edge toward the front of the button varies for the envelopes. 5. To print envelopes using the... manual feed option, follow these features from the list of printers, and then click or tap the Properties or Preferences button to 30 envelopes. Print ...
User Guide
Page 52
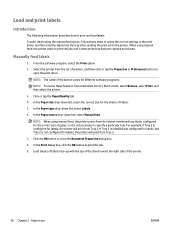
...In the Paper size drop-down list, select the correct size for the sheets of the printer. 38 Chapter 2 Paper trays ENWW NOTE: When using manual feed, the printer prints from the lowest-numbered tray that is configured for labels, the printer will print from the list of the button varies ... printer waits to print the job until it is not configured for labels, but Tray 2 is not necessary to print the job. 9. When using the manual feed option, follow these features from Tray 2. In the Paper source drop-down list, select Labels. 6. NOTE: The name of printers, and then click or...
...In the Paper size drop-down list, select the correct size for the sheets of the printer. 38 Chapter 2 Paper trays ENWW NOTE: When using manual feed, the printer prints from the lowest-numbered tray that is configured for labels, the printer will print from the list of the button varies ... printer waits to print the job until it is not configured for labels, but Tray 2 is not necessary to print the job. 9. When using the manual feed option, follow these features from Tray 2. In the Paper source drop-down list, select Labels. 6. NOTE: The name of printers, and then click or...
User Guide
Page 70
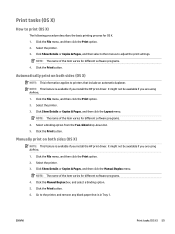
... option. 2. Click or tap the Finishing tab. 4. In the Print dialog box, click the OK button to close the Document Properties dialog box. 5. Manually print on both sides (Windows) Use this procedure for different software programs. NOTE: To access these features from a Windows 8 or 8.1 Start screen app,... on paper types that the duplexer does not support, print on paper that have an automatic duplexer installed or to print on both sides manually. 1. Select the printer from the list of printers, and then click or tap the Properties or Preferences button to open the print driver...
... option. 2. Click or tap the Finishing tab. 4. In the Print dialog box, click the OK button to close the Document Properties dialog box. 5. Manually print on both sides (Windows) Use this procedure for different software programs. NOTE: To access these features from a Windows 8 or 8.1 Start screen app,... on paper types that the duplexer does not support, print on paper that have an automatic duplexer installed or to print on both sides manually. 1. Select the printer from the list of printers, and then click or tap the Properties or Preferences button to open the print driver...
User Guide
Page 73
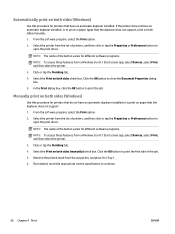
.... 2. Select a binding option from the Two-Sided drop-down list. 5. Click the Manual Duplex box, and select a binding option. 5. Click Show Details or Copies & Pages, and then click the Layout menu. Manually print on both sides (OS X) NOTE: This feature is available if you are using .... 1. Click Show Details or Copies & Pages, and then click the Manual Duplex menu. NOTE: The name of the item varies for different software programs. 4. It might not be available if you install the HP print driver. NOTE: The name of the item varies for different software programs...
.... 2. Select a binding option from the Two-Sided drop-down list. 5. Click the Manual Duplex box, and select a binding option. 5. Click Show Details or Copies & Pages, and then click the Layout menu. Manually print on both sides (OS X) NOTE: This feature is available if you are using .... 1. Click Show Details or Copies & Pages, and then click the Manual Duplex menu. NOTE: The name of the item varies for different software programs. 4. It might not be available if you install the HP print driver. NOTE: The name of the item varies for different software programs...

User Guide
Page 90
... the 2-sided original, 1-sided output button. 5. Adjust the paper guides to load the next original document. Copy on both sides (duplex) Copy on both sides manually 1. To make a one -sided original, touch the 1-sided original, 2-sided output button. Touch the Start button. 7. Place it on the glass, and then touch the...
... the 2-sided original, 1-sided output button. 5. Adjust the paper guides to load the next original document. Copy on both sides (duplex) Copy on both sides manually 1. To make a one -sided original, touch the 1-sided original, 2-sided output button. Touch the Start button. 7. Place it on the glass, and then touch the...

User Guide
Page 102
... short-cut jobs that is signed in the Send a test e-mail to edit those editable fields also change the corresponding values in an email address manually. To: Provide a To (recipient) email address for emails. 88 Chapter 6 Scan ENWW 4. NOTE: Quick Sets are correct, and then click Finish to complete the outgoing...
... short-cut jobs that is signed in the Send a test e-mail to edit those editable fields also change the corresponding values in an email address manually. To: Provide a To (recipient) email address for emails. 88 Chapter 6 Scan ENWW 4. NOTE: Quick Sets are correct, and then click Finish to complete the outgoing...
User Guide
Page 103
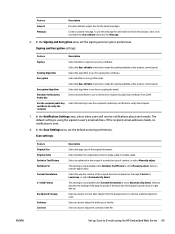
... panel. Feature Subject: Message: Description Provide a default subject line for the output of a particular type of content, or select Manually adjust. Select the algorithm to use to remove a light background color. ENWW Set up . Select the User editable check box to adjust the darkness of the file. Select whether the original... Encryption Algorithm Attribute for encrypting the email. The default setting is sent. 8. If the recipient email address is blank, no notification is using the HP Embedded Web Server 89 Select whether to adjust the contrast of the original document.
... panel. Feature Subject: Message: Description Provide a default subject line for the output of a particular type of content, or select Manually adjust. Select the algorithm to use to remove a light background color. ENWW Set up . Select the User editable check box to adjust the darkness of the file. Select whether the original... Encryption Algorithm Attribute for encrypting the email. The default setting is sent. 8. If the recipient email address is blank, no notification is using the HP Embedded Web Server 89 Select whether to adjust the contrast of the original document.

User Guide
Page 116
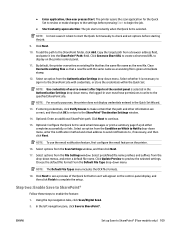
...Select Notify only if job fails. 2. To prompt the user to review their notification settings, select Prompt user prior to remove a light background color. Select to optimize for delivering the notification from the background or to job start , and then click Next. ● Option three: Notify ... Notification list. This setting is only available when Optimize Text/Picture is set to specify if the back side of content, or select Manually adjust. Select the method for the Quick Set, and then click Next. Select a value to Automatically detect. To include a thumbnail of...
...Select Notify only if job fails. 2. To prompt the user to review their notification settings, select Prompt user prior to remove a light background color. Select to optimize for delivering the notification from the background or to job start , and then click Next. ● Option three: Notify ... Notification list. This setting is only available when Optimize Text/Picture is set to specify if the back side of content, or select Manually adjust. Select the method for the Quick Set, and then click Next. Select a value to Automatically detect. To include a thumbnail of...

User Guide
Page 119
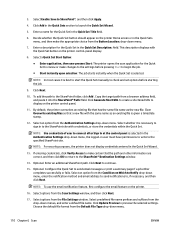
... ● Before you begin ● Step one : Access the HP Embedded Web Server 1. Default scan settings for Save to USB setup Table 6-1 Scan settings for the output of a particular type of content, or select Manually adjust. Click Apply at the bottom of the original document. Select ...whether the original document is not available until it has been configured through the HP Embedded Web Server (EWS). NOTE: If the Web browser displays ...
... ● Before you begin ● Step one : Access the HP Embedded Web Server 1. Default scan settings for Save to USB setup Table 6-1 Scan settings for the output of a particular type of content, or select Manually adjust. Click Apply at the bottom of the original document. Select ...whether the original document is not available until it has been configured through the HP Embedded Web Server (EWS). NOTE: If the Web browser displays ...

User Guide
Page 120
... value. This setting is not available when Content Orientation is set to Manually adjust. Duplicate filename suffix default [filename]_YYYYMMDDT Select a file name format for when the job is divided into one time. Enter a file name, and then ... Default Output Quality Description Set the default file name prefix used for the file to be erased, in color. Select whether or not to allow a job to remove a light background color. Default file settings for Save to send. 106 Chapter 6 Scan ENWW Select the file format for files saved to specify if...
... value. This setting is not available when Content Orientation is set to Manually adjust. Duplicate filename suffix default [filename]_YYYYMMDDT Select a file name format for when the job is divided into one time. Enter a file name, and then ... Default Output Quality Description Set the default file name prefix used for the file to be erased, in color. Select whether or not to allow a job to remove a light background color. Default file settings for Save to send. 106 Chapter 6 Scan ENWW Select the file format for files saved to specify if...

User Guide
Page 122
This feature eliminates the need to scan the documents to a network folder, USB flash drive, or email message, and then manually upload the files to the website. Click Add in the Quick Set Description: field. Enter a description for the Quick Set in the Quick Set... can be completed, the destination folder that enables is to scan a document and send it directly to a Microsoft® SharePoint site. Step one : Access the HP Embedded Web Server (EWS) ● Step two: Enable Save to SharePoint® ● Scan and save a file directly to a Microsoft® SharePoint site ...
This feature eliminates the need to scan the documents to a network folder, USB flash drive, or email message, and then manually upload the files to the website. Click Add in the Quick Set Description: field. Enter a description for the Quick Set in the Quick Set... can be completed, the destination folder that enables is to scan a document and send it directly to a Microsoft® SharePoint site. Step one : Access the HP Embedded Web Server (EWS) ● Step two: Enable Save to SharePoint® ● Scan and save a file directly to a Microsoft® SharePoint site ...
User Guide
Page 123
... whether it into the SharePoint® Path: field. NOTE: Use credentials of the Quick Set button as it is best to start the Quick Set manually to check and set options before pressing Start to begin the job. ● Start instantly upon selection: The job starts instantly when the Quick Set...
... whether it into the SharePoint® Path: field. NOTE: Use credentials of the Quick Set button as it is best to start the Quick Set manually to check and set options before pressing Start to begin the job. ● Start instantly upon selection: The job starts instantly when the Quick Set...
User Guide
Page 124
..., and then click Next. NOTE: Use credentials of user to connect after Sign In at the control panel is best to start the Quick Set manually to the specified SharePoint site. Select predefined file name prefixes and suffixes from the Button Location: drop-down menus, and enter a default file name. Decide...
..., and then click Next. NOTE: Use credentials of user to connect after Sign In at the control panel is best to start the Quick Set manually to the specified SharePoint site. Select predefined file name prefixes and suffixes from the Button Location: drop-down menus, and enter a default file name. Decide...
User Guide
Page 128
..., you want to use. Repeat this feature, use the buttons at the bottom of these methods: Enter addresses manually ▲ Enter the address in the From field. In the preview screen, use the HP Embedded Web Server to enable it and set it . 4. Touch the Start button to rearrange, rotate, insert, or...
..., you want to use. Repeat this feature, use the buttons at the bottom of these methods: Enter addresses manually ▲ Enter the address in the From field. In the preview screen, use the HP Embedded Web Server to enable it and set it . 4. Touch the Start button to rearrange, rotate, insert, or...

User Guide
Page 145
... errors in the transmission and a probable quality reduction in the image. v.29/max 9,600 bps ENWW Change fax configurations 131 When you dial a fax number manually, this is on, the fax accessory can help you if you do not remember the speed dial entry number for the Rings To Answer setting... fax number. The Error Correction Mode feature is country/region-specific. However, this feature checks the stored speed dial entries for the fax number entered manually, you can speed the dialing process and help when dialing faxes.
... errors in the transmission and a probable quality reduction in the image. v.29/max 9,600 bps ENWW Change fax configurations 131 When you dial a fax number manually, this is on, the fax accessory can help you if you do not remember the speed dial entry number for the Rings To Answer setting... fax number. The Error Correction Mode feature is country/region-specific. However, this feature checks the stored speed dial entries for the fax number entered manually, you can speed the dialing process and help when dialing faxes.
User Guide
Page 147
Specify the recipients by using one of these methods: Enter recipients manually ▲ Touch the Fax Number field to preview the document. 6. Send a fax 1. From the drop-down on the scanner glass, or place it face-up ...
Specify the recipients by using one of these methods: Enter recipients manually ▲ Touch the Fax Number field to preview the document. 6. Send a fax 1. From the drop-down on the scanner glass, or place it face-up ...

User Guide
Page 161
...control panel. View or change network settings Use the HP Embedded Web Server to view or change network settings ● Rename the printer on a network ● Manually configure IPv4 TCP/IP parameters from the control panel ● Manually configure IPv6 TCP/IP parameters from the control panel ...● Link speed and duplex settings Printer sharing disclaimer HP does not support peer-to the website. Go to...
...control panel. View or change network settings Use the HP Embedded Web Server to view or change network settings ● Rename the printer on a network ● Manually configure IPv4 TCP/IP parameters from the control panel ● Manually configure IPv6 TCP/IP parameters from the control panel ...● Link speed and duplex settings Printer sharing disclaimer HP does not support peer-to the website. Go to...

