User Guide
Page 7
... health ...58 Print the print quality diagnostic page 58 Align the printheads ...59 Calibrate the linefeed ...60 Clean the printheads ...60 Clean the printhead contacts manually 60 Replace the printheads ...63 Store printing supplies ...64 Store ink cartridges ...65 Store printheads ...65 Clean the device ...65 Clean the scanner glass 65...
... health ...58 Print the print quality diagnostic page 58 Align the printheads ...59 Calibrate the linefeed ...60 Clean the printheads ...60 Clean the printhead contacts manually 60 Replace the printheads ...63 Store printing supplies ...64 Store ink cartridges ...65 Store printheads ...65 Clean the device ...65 Clean the scanner glass 65...
User Guide
Page 33
.... If you want to 4800 x 1200 optimized dpi for color printing and 1200 input dpi. If you printed on thick or photo media, select the manual feed option. 10. Print borderless 29 Click File, and then click Page Setup. 4. For more slowly. 9. Open the Paper Type/Quality panel. 7. Change any other...
.... If you want to 4800 x 1200 optimized dpi for color printing and 1200 input dpi. If you printed on thick or photo media, select the manual feed option. 10. Print borderless 29 Click File, and then click Page Setup. 4. For more slowly. 9. Open the Paper Type/Quality panel. 7. Change any other...
User Guide
Page 35
... drop-down . • For auto-duplexing, when printing finishes on both sides of media either manually, or automatically using the optional duplexer. Print on both sides (duplexing) You can print on one side of a page • Always use media that you want (such as letterhead, preprinted paper... output tray. For more information, see Guidelines for supported media. When printing is complete, the media is selected. See the graphics in the printer driver. • Do not print on both sides (duplexing) 31 To automatically resize each page to open , click Print on both sides ...
... drop-down . • For auto-duplexing, when printing finishes on both sides of media either manually, or automatically using the optional duplexer. Print on both sides (duplexing) You can print on one side of a page • Always use media that you want (such as letterhead, preprinted paper... output tray. For more information, see Guidelines for supported media. When printing is complete, the media is selected. See the graphics in the printer driver. • Do not print on both sides (duplexing) 31 To automatically resize each page to open , click Print on both sides ...

User Guide
Page 36
... resize each page to print on both sides. 6. Print your document. Select the binding orientation by clicking the appropriate icon. 7. Print your document. To print manually on both sides of a page and Load media. 2. Select the Two-sided printing drop-down list, select Paper Handling, click Print: Odd numbered pages, and...
... resize each page to print on both sides. 6. Print your document. Select the binding orientation by clicking the appropriate icon. 7. Print your document. To print manually on both sides of a page and Load media. 2. Select the Two-sided printing drop-down list, select Paper Handling, click Print: Odd numbered pages, and...
User Guide
Page 62
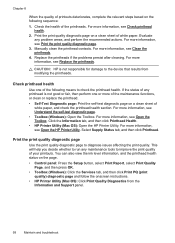
... Replace the printheads if the problems persist after cleaning. For more information, see Check printhead health. 2. Check printhead health Use one or more information, see Replace the printheads. This will help you decide whether to run any problem areas, and perform the ... health section. Select Supply Status tab, and then click Printhead. Manually clean the printhead contacts. Click the Information tab, and then click Printhead Health. • HP Printer Utility (Mac OS): Open the HP Printer Utility. If the status of any printhead is not responsible for damage...
... Replace the printheads if the problems persist after cleaning. For more information, see Check printhead health. 2. Check printhead health Use one or more information, see Replace the printheads. This will help you decide whether to run any problem areas, and perform the ... health section. Select Supply Status tab, and then click Printhead. Manually clean the printhead contacts. Click the Information tab, and then click Printhead Health. • HP Printer Utility (Mac OS): Open the HP Printer Utility. If the status of any printhead is not responsible for damage...
User Guide
Page 63
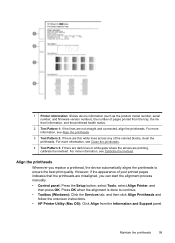
...done to ensure the best print quality. Align the printheads Whenever you can start the alignment process manually. • Control panel: Press the Setup button, select Tools, select Align Printer, and then press OK. However, if the appearance of your printed pages indicates that the ...the printheads to continue. • Toolbox (Windows): Click the Services tab, and then click Align Printheads and follow the onscreen instructions. • HP Printer Utility (Mac OS): Click Align from the tray, the ink level information, and the printhead health status. 2 Test Pattern 1: If the lines ...
...done to ensure the best print quality. Align the printheads Whenever you can start the alignment process manually. • Control panel: Press the Setup button, select Tools, select Align Printer, and then press OK. However, if the appearance of your printed pages indicates that the ...the printheads to continue. • Toolbox (Windows): Click the Services tab, and then click Align Printheads and follow the onscreen instructions. • HP Printer Utility (Mac OS): Click Align from the tray, the ink level information, and the printhead health status. 2 Test Pattern 1: If the lines ...
User Guide
Page 64
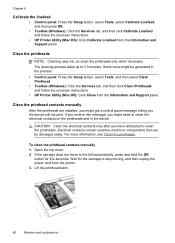
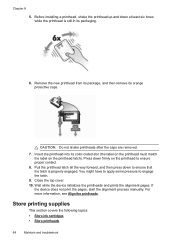
Clean the printhead contacts manually After the printheads are installed, you might need to stop moving, and then unplug the power cord from the printer. 3. For more information, see Clean the printheads. Lift the printhead latch. 60 Maintain and troubleshoot Some noise ...Clean Printhead. • Toolbox (Windows): Click the Services tab, and then click Clean Printheads and follow the onscreen instructions. • HP Printer Utility (Mac OS): Click Calibrate Linefeed from the Information and Support panel. The cleaning process takes up to clean the printheads. Open ...
Clean the printhead contacts manually After the printheads are installed, you might need to stop moving, and then unplug the power cord from the printer. 3. For more information, see Clean the printheads. Lift the printhead latch. 60 Maintain and troubleshoot Some noise ...Clean Printhead. • Toolbox (Windows): Click the Services tab, and then click Clean Printheads and follow the onscreen instructions. • HP Printer Utility (Mac OS): Click Calibrate Linefeed from the Information and Support panel. The cleaning process takes up to clean the printheads. Open ...
User Guide
Page 66
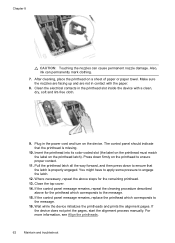
... to ensure that the printhead is properly engaged. Close the top cover. 14. If the device does not print the pages, start the alignment process manually. Chapter 8 CAUTION: Touching the nozzles can permanently mark clothing. 7. Press down to the message. 15. For more information, see Align the printheads. 62 Maintain and...
... to ensure that the printhead is properly engaged. Close the top cover. 14. If the device does not print the pages, start the alignment process manually. Chapter 8 CAUTION: Touching the nozzles can permanently mark clothing. 7. Press down to the message. 15. For more information, see Align the printheads. 62 Maintain and...
User Guide
Page 68
... installing a printhead, shake the printhead up and down firmly on the printhead latch). If the device does not print the pages, start the alignment process manually. CAUTION: Do not shake printheads after the caps are removed. 7. You might have to apply some pressure to ensure that the latch is still in...
... installing a printhead, shake the printhead up and down firmly on the printhead latch). If the device does not print the pages, start the alignment process manually. CAUTION: Do not shake printheads after the caps are removed. 7. You might have to apply some pressure to ensure that the latch is still in...
User Guide
Page 99
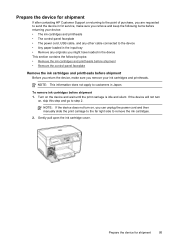
Turn on , you can unplug the power cord and then manually slide the print carriage to the far right side to remove the ink cartridges. 2. NOTE: If the device does not turn on, skip this step ... printheads before shipment • Remove the control-panel faceplate Remove the ink cartridges and printheads before shipment 1. Prepare the device for shipment If after contacting HP Customer Support or returning to the point of purchase, you are requested to send the device in for shipment 95 NOTE: This information does not...
Turn on , you can unplug the power cord and then manually slide the print carriage to the far right side to remove the ink cartridges. 2. NOTE: If the device does not turn on, skip this step ... printheads before shipment • Remove the control-panel faceplate Remove the ink cartridges and printheads before shipment 1. Prepare the device for shipment If after contacting HP Customer Support or returning to the point of purchase, you are requested to send the device in for shipment 95 NOTE: This information does not...
User Guide
Page 115
Index management tools 43 margins setting, specifications 23 media borderless printing 28 clear jams 83 duplexing 31 HP, order 87 load tray 23 load tray 2 25 locking trays 26 print on custom-sized 27 selecting 18 skewed pages 75 specifications 19 supported... page 58 troubleshoot 70 Print quality diagnostic page 58 print-carriage access door, locating 8 printer driver accessories settings 12 settings 30 version 90 warranty 89 printhead latch, locating 8 printheads aligning 59 clean 60 clean contacts manually 60 health, check 58 locating 8 maintaining 57 order online 86 part numbers 87 remove ...
Index management tools 43 margins setting, specifications 23 media borderless printing 28 clear jams 83 duplexing 31 HP, order 87 load tray 23 load tray 2 25 locking trays 26 print on custom-sized 27 selecting 18 skewed pages 75 specifications 19 supported... page 58 troubleshoot 70 Print quality diagnostic page 58 print-carriage access door, locating 8 printer driver accessories settings 12 settings 30 version 90 warranty 89 printhead latch, locating 8 printheads aligning 59 clean 60 clean contacts manually 60 health, check 58 locating 8 maintaining 57 order online 86 part numbers 87 remove ...

