
User Guide
Page 1
HP OfficeJet 7510 Wide Format All-in-One Printer series User Guide
HP OfficeJet 7510 Wide Format All-in-One Printer series User Guide

User Guide
Page 3
.... 7. There are wet. 5. Do not install or use this product from fire or electric shock. 1. Install the product in the documentation that comes with the printer. 2. Unplug this product near water, or when you are no one can step on the product. 3. If the product does not operate normally, see Solve...
.... 7. There are wet. 5. Do not install or use this product from fire or electric shock. 1. Install the product in the documentation that comes with the printer. 2. Unplug this product near water, or when you are no one can step on the product. 3. If the product does not operate normally, see Solve...

User Guide
Page 5
... Printing Supplies ...3 Understand the printer parts ...4 Front view ...4 Printing supplies area ...5 Back view ...5 Use the printer control panel ...6 Overview of buttons and lights ...6 Control panel display icons ...6 Change printer settings ...7 Paper basics ...8 Recommended papers for printing ...8 Order HP paper supplies ...10 Tips for......11 Load an original on the scanner glass ...17 Load an original in the document feeder ...18 Update the printer ...19 Open the HP printer software (Windows) ...20 3 Print ...21 Print documents ...21 Print brochures ...22 Print on envelopes ...23 Print...
... Printing Supplies ...3 Understand the printer parts ...4 Front view ...4 Printing supplies area ...5 Back view ...5 Use the printer control panel ...6 Overview of buttons and lights ...6 Control panel display icons ...6 Change printer settings ...7 Paper basics ...8 Recommended papers for printing ...8 Order HP paper supplies ...10 Tips for......11 Load an original on the scanner glass ...17 Load an original in the document feeder ...18 Update the printer ...19 Open the HP printer software (Windows) ...20 3 Print ...21 Print documents ...21 Print brochures ...22 Print on envelopes ...23 Print...

User Guide
Page 6
...standard fax ...41 Send a standard fax from the computer 42 Send a fax from a phone ...42 Send a fax using monitor dialing ...43 Send a fax using printer memory ...43 Send a fax to multiple recipients ...44 Send a fax in Error Correction Mode 44 Receive a fax ...45 Receive a fax manually ...45 Set up backup...faxes from memory 46 Forward faxes to another number ...47 Set automatic reduction for incoming faxes 47 Block unwanted fax numbers ...48 Receive faxes using HP Digital Fax ...49 Set up phone book contacts ...50 Create and edit a phone book contact 50 Create and edit a group phone book ...
...standard fax ...41 Send a standard fax from the computer 42 Send a fax from a phone ...42 Send a fax using monitor dialing ...43 Send a fax using printer memory ...43 Send a fax to multiple recipients ...44 Send a fax in Error Correction Mode 44 Receive a fax ...45 Receive a fax manually ...45 Set up backup...faxes from memory 46 Forward faxes to another number ...47 Set automatic reduction for incoming faxes 47 Block unwanted fax numbers ...48 Receive faxes using HP Digital Fax ...49 Set up phone book contacts ...50 Create and edit a phone book contact 50 Create and edit a group phone book ...

User Guide
Page 7
...the Call History ...59 6 Web Services ...60 What are Web Services? ...60 Set up Web Services ...60 Use Web Services ...62 HP ePrint ...62 HP Printables ...62 Remove Web Services ...63 7 Work with ink cartridges ...64 Information on ink cartridges and the printhead 64 Check the estimated ... ...67 Anonymous usage information storage ...68 Ink cartridge warranty information ...68 8 Network setup ...69 Set up the printer for wireless communication 69 Before you begin ...69 Set up the printer on your wireless network 70 Change the connection type ...70 Test the wireless connection ...71 ENWW vii
...the Call History ...59 6 Web Services ...60 What are Web Services? ...60 Set up Web Services ...60 Use Web Services ...62 HP ePrint ...62 HP Printables ...62 Remove Web Services ...63 7 Work with ink cartridges ...64 Information on ink cartridges and the printhead 64 Check the estimated ... ...67 Anonymous usage information storage ...68 Ink cartridge warranty information ...68 8 Network setup ...69 Set up the printer for wireless communication 69 Before you begin ...69 Set up the printer on your wireless network 70 Change the connection type ...70 Test the wireless connection ...71 ENWW vii

User Guide
Page 8
Turn on or off the wireless capability of the printer 71 Change network settings ...72 Use Wi-Fi Direct ...73 9 Printer management tools ...76 Toolbox (Windows) ...76 HP Utility (OS X) ...76 Embedded web server ...76 About cookies ...77 Open the embedded web server ...77 Embedded web server cannot be ... problems sending and receiving faxes 98 The printer cannot receive faxes, but can send faxes 100 The printer cannot send faxes, but can receive faxes 101 Fax tones are recorded on my answering machine 101 The computer cannot receive faxes (HP Digital Fax 102 Network and connection issues ...
Turn on or off the wireless capability of the printer 71 Change network settings ...72 Use Wi-Fi Direct ...73 9 Printer management tools ...76 Toolbox (Windows) ...76 HP Utility (OS X) ...76 Embedded web server ...76 About cookies ...77 Open the embedded web server ...77 Embedded web server cannot be ... problems sending and receiving faxes 98 The printer cannot receive faxes, but can send faxes 100 The printer cannot send faxes, but can receive faxes 101 Fax tones are recorded on my answering machine 101 The computer cannot receive faxes (HP Digital Fax 102 Network and connection issues ...

User Guide
Page 9
...105 Print quality report ...105 Wireless test report ...105 Web access report ...105 Solve problems using Web Services ...106 Maintain the printer ...106 Clean the scanner glass ...106 Clean the exterior ...108 Clean the document feeder ...108 Maintain the printhead and ink ...cartridges 109 Restore defaults and settings ...110 HP support ...111 Appendix A Technical information ...113 Specifications ...113 Regulatory information ...116 Regulatory Model Number ...117 FCC statement ...117 Notice ...
...105 Print quality report ...105 Wireless test report ...105 Web access report ...105 Solve problems using Web Services ...106 Maintain the printer ...106 Clean the scanner glass ...106 Clean the exterior ...108 Clean the document feeder ...108 Maintain the printhead and ink ...cartridges 109 Restore defaults and settings ...110 HP support ...111 Appendix A Technical information ...113 Specifications ...113 Regulatory information ...116 Regulatory Model Number ...117 FCC statement ...117 Notice ...

User Guide
Page 10
...125 European Union Commission Regulation 1275/2008 126 Paper use ...126 Plastics ...126 Material safety data sheets ...126 Recycling program ...126 HP inkjet supplies recycling program 126 Disposal of waste equipment by users 127 Power consumption ...127 Chemical substances ...127 Battery disposal in Taiwan... Battery Directive ...131 Restriction of hazardous substance (India 132 EPEAT ...132 China SEPA Eco Label User Information 132 China Energy Label for Printer, Fax and Copier 133 Appendix B Additional fax setup ...134 Set up faxing (parallel phone systems) ...134 Select the correct fax ...
...125 European Union Commission Regulation 1275/2008 126 Paper use ...126 Plastics ...126 Material safety data sheets ...126 Recycling program ...126 HP inkjet supplies recycling program 126 Disposal of waste equipment by users 127 Power consumption ...127 Chemical substances ...127 Battery disposal in Taiwan... Battery Directive ...131 Restriction of hazardous substance (India 132 EPEAT ...132 China SEPA Eco Label User Information 132 China Energy Label for Printer, Fax and Copier 133 Appendix B Additional fax setup ...134 Set up faxing (parallel phone systems) ...134 Select the correct fax ...

User Guide
Page 14
...screen readers, Braille readers, and voice-to resolve problems. ● Accessibility ● HP EcoSolutions (HP and the Environment) ● Understand the printer parts ● Use the printer control panel ● Paper basics ● Load paper ● Load an original on...the document feeder ● Update the printer ● Open the HP printer software (Windows) Accessibility The printer provides a number of this printer and HP's commitment to helping you optimize your operating system's accessibility options and features. HP EcoSolutions (HP and the Environment) Hewlett-Packard is...
...screen readers, Braille readers, and voice-to resolve problems. ● Accessibility ● HP EcoSolutions (HP and the Environment) ● Understand the printer parts ● Use the printer control panel ● Paper basics ● Load paper ● Load an original on...the document feeder ● Update the printer ● Open the HP printer software (Windows) Accessibility The printer provides a number of this printer and HP's commitment to helping you optimize your operating system's accessibility options and features. HP EcoSolutions (HP and the Environment) Hewlett-Packard is...

User Guide
Page 15
from the remaining ink cartridges, or damage to the ink system. Use the following instructions to change the period of the printer. For more information, visit www.hp.com/go/smartprint. Use the following instructions to schedule the day and time for On and Off. 1. For example, you ...improperly turn on at 8 p.m. ENWW HP EcoSolutions (HP and the Environment) 3 The printer goes into low-power mode after 5 minutes of the paper. ● Save ink and paper when printing web content with the...
from the remaining ink cartridges, or damage to the ink system. Use the following instructions to change the period of the printer. For more information, visit www.hp.com/go/smartprint. Use the following instructions to schedule the day and time for On and Off. 1. For example, you ...improperly turn on at 8 p.m. ENWW HP EcoSolutions (HP and the Environment) 3 The printer goes into low-power mode after 5 minutes of the paper. ● Save ink and paper when printing web content with the...

User Guide
Page 16
... to a draft setting. Doing so wastes ink and shortens the life of the cartridges. Understand the printer parts This section contains the following topics: ● Front view ● Printing supplies area ● Back view Front view 1 Document feeder 2 Control panel display 3 Control ...
... to a draft setting. Doing so wastes ink and shortens the life of the cartridges. Understand the printer parts This section contains the following topics: ● Front view ● Printing supplies area ● Back view Front view 1 Document feeder 2 Control panel display 3 Control ...
User Guide
Page 17
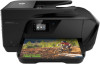
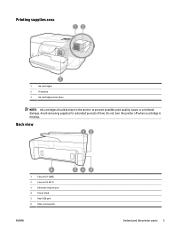
Back view 1 Fax port (1-LINE) 2 Fax port (2-EXT) 3 Ethernet network port 4 Power input 5 Rear USB port 6 Rear access panel ENWW Understand the printer parts 5 Do not turn the printer off when a cartridge is missing. Avoid removing supplies for extended periods of time. Printing supplies area 1 Ink cartridges 2 Printhead 3 Ink cartridges access door NOTE: Ink cartridges should be kept in the printer to prevent possible print quality issues or printhead damage.
Back view 1 Fax port (1-LINE) 2 Fax port (2-EXT) 3 Ethernet network port 4 Power input 5 Rear USB port 6 Rear access panel ENWW Understand the printer parts 5 Do not turn the printer off when a cartridge is missing. Avoid removing supplies for extended periods of time. Printing supplies area 1 Ink cartridges 2 Printhead 3 Ink cartridges access door NOTE: Ink cartridges should be kept in the printer to prevent possible print quality issues or printhead damage.

User Guide
Page 18
... the previous menu. Ethernet: Shows that appear on the display, see Set up the printer for wireless communication. 6 Chapter 2 Get started ENWW Control panel display: Touch the screen to the printer control panel features. Back button: Returns to the network status screen. Control panel display ...icons Icon Purpose Copy: Displays a screen where you can make copies or select other screen. Use the printer control panel This section contains the following topics: ● Overview of buttons and lights ● Control panel display icons ● Change...
... the previous menu. Ethernet: Shows that appear on the display, see Set up the printer for wireless communication. 6 Chapter 2 Get started ENWW Control panel display: Touch the screen to the printer control panel features. Back button: Returns to the network status screen. Control panel display ...icons Icon Purpose Copy: Displays a screen where you can make copies or select other screen. Use the printer control panel This section contains the following topics: ● Overview of buttons and lights ● Control panel display icons ● Change...

User Guide
Page 19
... settings, and then touch the setting you can use a number of the printer's environmental features. HP Printables: Displays a screen where you can send a fax, or change fax settings. Help: Shows How To Videos, printer feature information, and tips. You do not need to select the desired function...security). If the network connection of the control panel display shows the available functions for the printer. Wi-Fi Direct: From the HP Wi-Fi Direct menu you can see HP ePrint . HP ePrint: Displays the Web Services Settings menu, where you can also change ePrint settings, ...
... settings, and then touch the setting you can use a number of the printer's environmental features. HP Printables: Displays a screen where you can send a fax, or change fax settings. Help: Shows How To Videos, printer feature information, and tips. You do not need to select the desired function...security). If the network connection of the control panel display shows the available functions for the printer. Wi-Fi Direct: From the HP Wi-Fi Direct menu you can see HP ePrint . HP ePrint: Displays the Web Services Settings menu, where you can also change ePrint settings, ...

User Guide
Page 20
...: Touch (Home) to return to the Home screen. Look for selecting and using HP papers that dry faster than ordinary plain papers. NOTE: Touch (Home) to return to the Home screen. To change the printer settings To change the printer settings or print reports, use the options available on your country/region, some...
...: Touch (Home) to return to the Home screen. Look for selecting and using HP papers that dry faster than ordinary plain papers. NOTE: Touch (Home) to return to the Home screen. To change the printer settings To change the printer settings or print reports, use the options available on your country/region, some...

User Guide
Page 21
... prints have been designed to share. This affordable photo paper dries quickly for easy handling without smudging. ENWW Paper basics 9 HP Premium Plus Photo Paper delivers exceptional results with any inkjet printer. It is available in several sizes, including A4, 8.5 x 11 inches, 4 x 6 inches (10 x 15 cm), 5 x... Photo printing ● HP Premium Plus Photo Paper HP Premium Plus Photo Paper is HP's highest-quality photo paper for your photos are long lasting and vivid, print after print. With HP Premium Plus Photo Paper, you can share them right off the printer. It resists water, ...
... prints have been designed to share. This affordable photo paper dries quickly for easy handling without smudging. ENWW Paper basics 9 HP Premium Plus Photo Paper delivers exceptional results with any inkjet printer. It is available in several sizes, including A4, 8.5 x 11 inches, 4 x 6 inches (10 x 15 cm), 5 x... Photo printing ● HP Premium Plus Photo Paper HP Premium Plus Photo Paper is HP's highest-quality photo paper for your photos are long lasting and vivid, print after print. With HP Premium Plus Photo Paper, you can share them right off the printer. It resists water, ...

User Guide
Page 22
... enough for twosided color usage with no show-through, which makes it ideal for longer lasting documents. ● HP Office Paper HP Office Paper is too lightweight or stretches easily - Order HP paper supplies The printer is a high-quality multifunction paper. Media that look and feel more substantial than ordinary plain papers. Look for...
... enough for twosided color usage with no show-through, which makes it ideal for longer lasting documents. ● HP Office Paper HP Office Paper is too lightweight or stretches easily - Order HP paper supplies The printer is a high-quality multifunction paper. Media that look and feel more substantial than ordinary plain papers. Look for...

User Guide
Page 24
Ensure that the stack of paper is printing. 4. Slide the paper-width guides in portrait orientation and with the appropriate paper size lines on the bottom of the input tray, and does not exceed the stack height marking on the side of paper, and then close the input tray if required. 5. NOTE: Do not load paper while the printer is aligned with the side to be printed facing down. 3. Insert the paper in the tray until they touch the edge of the stack of the tray. Lower the output tray. 12 Chapter 2 Get started ENWW
Ensure that the stack of paper is printing. 4. Slide the paper-width guides in portrait orientation and with the appropriate paper size lines on the bottom of the input tray, and does not exceed the stack height marking on the side of paper, and then close the input tray if required. 5. NOTE: Do not load paper while the printer is aligned with the side to be printed facing down. 3. Insert the paper in the tray until they touch the edge of the stack of the tray. Lower the output tray. 12 Chapter 2 Get started ENWW

User Guide
Page 26
Lower the output tray. 14 Chapter 2 Get started ENWW 2. Ensure that the stack of paper is printing. 3. Remove all the paper from the input tray, insert the envelopes with the appropriate paper size lines on the bottom of the input tray, and does not exceed the stack height marking on the side of envelopes. 4. Slide the paper-width guides in the tray until they touch the edge of the stack of the tray. NOTE: Do not load envelopes while the printer is aligned with the print side down, and load according to the graphic.
Lower the output tray. 14 Chapter 2 Get started ENWW 2. Ensure that the stack of paper is printing. 3. Remove all the paper from the input tray, insert the envelopes with the appropriate paper size lines on the bottom of the input tray, and does not exceed the stack height marking on the side of envelopes. 4. Slide the paper-width guides in the tray until they touch the edge of the stack of the tray. NOTE: Do not load envelopes while the printer is aligned with the print side down, and load according to the graphic.

User Guide
Page 28
2. Ensure that the stack of paper is printing. 3. Slide the paper-width guides in the center of the tray. Lower the output tray. 16 Chapter 2 Get started ENWW Insert the paper print-side down in the tray until they touch the edge of the stack of the tray. NOTE: Do not load paper while the printer is aligned with the appropriate paper size lines on the bottom of the input tray, and does not exceed the stack height marking on the side of paper. 4.
2. Ensure that the stack of paper is printing. 3. Slide the paper-width guides in the center of the tray. Lower the output tray. 16 Chapter 2 Get started ENWW Insert the paper print-side down in the tray until they touch the edge of the stack of the tray. NOTE: Do not load paper while the printer is aligned with the appropriate paper size lines on the bottom of the input tray, and does not exceed the stack height marking on the side of paper. 4.


