
Quick Setup Guide
Page 1
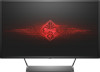
HP shall not be liable for technical or editorial edits or omissions contained herein. 866207-B21 1 3 USB 2 HDMI OR HDMI HDMI DisplayPort 4 www.hp.com/support 5 Cable not included. 3 2 1 Copyright © 2016 HP Development Company, L.P. First Edition: March 2016 The information contained herein is subject to change without notice.
HP shall not be liable for technical or editorial edits or omissions contained herein. 866207-B21 1 3 USB 2 HDMI OR HDMI HDMI DisplayPort 4 www.hp.com/support 5 Cable not included. 3 2 1 Copyright © 2016 HP Development Company, L.P. First Edition: March 2016 The information contained herein is subject to change without notice.

User Guide
Page 2
... To access the latest user guide, go to most models. © Copyright 2016 HP Development Company, L.P. Product Notice This guide describes features that are common to http://www.hp.com/support. HDMI, the HDMI Logo and High-Definition Multimedia Interface are set forth ...: 866208-001 The only warranties for technical or editorial errors or omissions contained herein. Nothing herein should be liable for HP products and services are trademarks or registered trademarks of Microsoft Corporation in the express warranty statements accompanying such products and services....
... To access the latest user guide, go to most models. © Copyright 2016 HP Development Company, L.P. Product Notice This guide describes features that are common to http://www.hp.com/support. HDMI, the HDMI Logo and High-Definition Multimedia Interface are set forth ...: 866208-001 The only warranties for technical or editorial errors or omissions contained herein. Nothing herein should be liable for HP products and services are trademarks or registered trademarks of Microsoft Corporation in the express warranty statements accompanying such products and services....

User Guide
Page 3
NOTE: Text set off in this manner provides important supplemental information. WARNING! iii TIP: Text set off in this manner provides helpful hints. Text set off in this manner indicates that failure to equipment or loss of life. CAUTION: Text set off in this manner indicates that failure to follow directions could result in damage to follow directions could result in bodily harm or loss of information. About This Guide This guide provides information on monitor features, setting up the monitor, using the software and technical specifications. This product ...
NOTE: Text set off in this manner provides important supplemental information. WARNING! iii TIP: Text set off in this manner provides helpful hints. Text set off in this manner indicates that failure to equipment or loss of life. CAUTION: Text set off in this manner indicates that failure to follow directions could result in damage to follow directions could result in bodily harm or loss of information. About This Guide This guide provides information on monitor features, setting up the monitor, using the software and technical specifications. This product ...

User Guide
Page 4
iv About This Guide
iv About This Guide
User Guide
Page 5
Table of contents 1 Getting Started ...1 Important safety information ...1 Product features and components ...2 Features ...2 Side and Bottom Components on the Rear Panel 3 Setting up the monitor ...4 Use caution when setting up the monitor 4 Attaching the monitor stand ...5 Connecting the cables ...6 Connecting USB devices ...8 Adjusting the monitor ...8 Turning on the monitor ...9 Mounting the display head ...10 Removing the monitor stand 10 Attaching the VESA mounting bracket 11 2 Using the monitor ...12 Software and utilities ...12 The Information file ...12 The Image Color Matching ...
Table of contents 1 Getting Started ...1 Important safety information ...1 Product features and components ...2 Features ...2 Side and Bottom Components on the Rear Panel 3 Setting up the monitor ...4 Use caution when setting up the monitor 4 Attaching the monitor stand ...5 Connecting the cables ...6 Connecting USB devices ...8 Adjusting the monitor ...8 Turning on the monitor ...9 Mounting the display head ...10 Removing the monitor stand 10 Attaching the VESA mounting bracket 11 2 Using the monitor ...12 Software and utilities ...12 The Information file ...12 The Image Color Matching ...

User Guide
Page 6
4 Maintaining the monitor ...19 Maintenance guidelines ...19 Cleaning the monitor ...19 Shipping the monitor ...19 Appendix A Technical specifications ...20 Preset display resolutions ...21 Entering user modes ...22 Power adapter ...22 Energy saver feature ...22 Appendix B Accessibility ...23 Supported assistive technologies ...23 Contacting support ...23 vi
4 Maintaining the monitor ...19 Maintenance guidelines ...19 Cleaning the monitor ...19 Shipping the monitor ...19 Appendix A Technical specifications ...20 Preset display resolutions ...21 Entering user modes ...22 Power adapter ...22 Energy saver feature ...22 Appendix B Accessibility ...23 Supported assistive technologies ...23 Contacting support ...23 vi
User Guide
Page 7
...and bright surfaces that is used, use with the monitor, refer to the Product Notices provided in a controlled luminous environment to properly support your HP LCD monitor. CAUTION: For the protection of the monitor, as well as a power strip or Uninterruptible Power Supply (UPS). Care should be ...Consider placing the display in your safety, do not place anything on a cord or cable. If another cord is easily accessible at http://www.hp.com/ergo. For your documentation kit. It describes proper workstation, setup, posture, and health and work habits for example, by the plug. ...
...and bright surfaces that is used, use with the monitor, refer to the Product Notices provided in a controlled luminous environment to properly support your HP LCD monitor. CAUTION: For the protection of the monitor, as well as a power strip or Uninterruptible Power Supply (UPS). Care should be ...Consider placing the display in your safety, do not place anything on a cord or cable. If another cord is easily accessible at http://www.hp.com/ergo. For your documentation kit. It describes proper workstation, setup, posture, and health and work habits for example, by the plug. ...
User Guide
Page 8
... HDMI. The light-emitting diode (LED) backlit display has an active matrix, AMVA+ panel. The display features include the following: ● 81.3 cm (32-inch) diagonal viewable area with 2560 × 1440 QHD resolution, plus full-screen support for lower resolutions ● Tilt capability and easy viewing from sitting...OSD) adjustments in games and videos by display. The external source connected to your component or system for your product, go to http://www.hp.com/support to download the latest versions of the monitor to a wall mount device or swing arm ● USB 2.0 hub with one side ...
... HDMI. The light-emitting diode (LED) backlit display has an active matrix, AMVA+ panel. The display features include the following: ● 81.3 cm (32-inch) diagonal viewable area with 2560 × 1440 QHD resolution, plus full-screen support for lower resolutions ● Tilt capability and easy viewing from sitting...OSD) adjustments in games and videos by display. The external source connected to your component or system for your product, go to http://www.hp.com/support to download the latest versions of the monitor to a wall mount device or swing arm ● USB 2.0 hub with one side ...

User Guide
Page 9
NOTE: The USB 2.0 downstream with charging port also provides current to charge a device such as a smartphone or tablet. Product features and components 3 If the OSD menu is inactive, press to open the OSD menu, select a menu item from the source device to the monitor. Open the OSD and select Power Control > USB Power > Enable. You can make the charging current available even when the monitor power button is on. 7 USB 2.0 (upstream) Connects the USB hub cable from the source device to the monitor. 8 USB 2.0 (downstream) Connects optional USB devices to the monitor. 9 ...
NOTE: The USB 2.0 downstream with charging port also provides current to charge a device such as a smartphone or tablet. Product features and components 3 If the OSD menu is inactive, press to open the OSD menu, select a menu item from the source device to the monitor. Open the OSD and select Power Control > USB Power > Enable. You can make the charging current available even when the monitor power button is on. 7 USB 2.0 (upstream) Connects the USB hub cable from the source device to the monitor. 8 USB 2.0 (downstream) Connects optional USB devices to the monitor. 9 ...

User Guide
Page 10
NOTE: Your monitor may cause non-uniformity of color or disorientation of the LCD panel. If installing a stand, lay the monitor face down on the panel may look different from getting scratched, defaced or broken as well as damage to its normal condition. This prevents the screen from the monitor in this occurs the screen will not recover to the front panel. If this illustration. 4 Chapter 1 Getting Started Setting up the monitor Use caution when setting up the monitor To prevent damage to the monitor, do not touch the surface of the liquid crystals. Pressure on a flat ...
NOTE: Your monitor may cause non-uniformity of color or disorientation of the LCD panel. If installing a stand, lay the monitor face down on the panel may look different from getting scratched, defaced or broken as well as damage to its normal condition. This prevents the screen from the monitor in this occurs the screen will not recover to the front panel. If this illustration. 4 Chapter 1 Getting Started Setting up the monitor Use caution when setting up the monitor To prevent damage to the monitor, do not touch the surface of the liquid crystals. Pressure on a flat ...

User Guide
Page 11
Attaching the monitor stand CAUTION: The screen is fragile. TIP: Consider the placement of the display head until the bracket clicks securely in place. Lift the monitor from its box and place it face down on a flat surface covered by inserting the bracket at the top of the stand into the slot on the back of the display, because the bezel might cause interfering reflections from surrounding light and bright surfaces. 1. Attach the stand to the screen; doing so can cause damage. Avoid touching or applying pressure to the monitor by a clean, dry cloth. 2. Setting up the monitor ...
Attaching the monitor stand CAUTION: The screen is fragile. TIP: Consider the placement of the display head until the bracket clicks securely in place. Lift the monitor from its box and place it face down on a flat surface covered by inserting the bracket at the top of the stand into the slot on the back of the display, because the bezel might cause interfering reflections from surrounding light and bright surfaces. 1. Attach the stand to the screen; doing so can cause damage. Avoid touching or applying pressure to the monitor by a clean, dry cloth. 2. Setting up the monitor ...

User Guide
Page 12
Place the monitor in this section are included with select cables. Connect a video cable. Not all cables shown in a convenient, well-ventilated location near the computer. 2. The inputs can be selected by pressing the Minus button on the rear panel or through the on-screen display by pressing the Menu button and selecting Input Control. ● Connect an HDMI cable to the HDMI connector on the back of the monitor and the other end to the source device. ● Connect a DisplayPort cable to the DisplayPort connector on the rear of the monitor and the other end to the DisplayPort ...
Place the monitor in this section are included with select cables. Connect a video cable. Not all cables shown in a convenient, well-ventilated location near the computer. 2. The inputs can be selected by pressing the Minus button on the rear panel or through the on-screen display by pressing the Menu button and selecting Input Control. ● Connect an HDMI cable to the HDMI connector on the back of the monitor and the other end to the source device. ● Connect a DisplayPort cable to the DisplayPort connector on the rear of the monitor and the other end to the DisplayPort ...

User Guide
Page 13
WARNING! Disconnect power from the electrical outlet. Plug the power cord into a grounded (earthed) electrical outlet that no one end of the power cord to the power supply (1) and the other end to a USB downstream connector on or trip over them so that is an important safety feature. Connect one may accidentally step on the source device. 4. To reduce the risk of the power supply cord to the equipment: Do not disable the power cord grounding plug. For your safety, do not place anything on a cord or cable. Do not pull on power cords or cables. When unplugging from ...
WARNING! Disconnect power from the electrical outlet. Plug the power cord into a grounded (earthed) electrical outlet that no one end of the power cord to the power supply (1) and the other end to a USB downstream connector on or trip over them so that is an important safety feature. Connect one may accidentally step on the source device. 4. To reduce the risk of the power supply cord to the equipment: Do not disable the power cord grounding plug. For your safety, do not place anything on a cord or cable. Do not pull on power cords or cables. When unplugging from ...

User Guide
Page 14
Refer to Step 3 in Connecting the cables on the rear of the monitor. Adjusting the monitor Tilt the monitor panel forward or backward to set it to enable the USB ports on the monitor. Connecting USB devices There is one USB upstream port and two USB downstream ports on page 6. NOTE: You must connect the USB upstream cable from the source computer to the monitor to a comfortable eye level. 8 Chapter 1 Getting Started
Refer to Step 3 in Connecting the cables on the rear of the monitor. Adjusting the monitor Tilt the monitor panel forward or backward to set it to enable the USB ports on the monitor. Connecting USB devices There is one USB upstream port and two USB downstream ports on page 6. NOTE: You must connect the USB upstream cable from the source computer to the monitor to a comfortable eye level. 8 Chapter 1 Getting Started

User Guide
Page 15
... button for the display. Monitors with a "burned-in the OSD menu. NOTE: You can disable the power LED in image" are not covered under the HP warranty. * A prolonged period of time is On), the current preset display resolution, and the recommended preset display resolution. Image retention is a condition that display the...
... button for the display. Monitors with a "burned-in the OSD menu. NOTE: You can disable the power LED in image" are not covered under the HP warranty. * A prolonged period of time is On), the current preset display resolution, and the recommended preset display resolution. Image retention is a condition that display the...

User Guide
Page 16
To attach a thirdparty mounting solution to install the display head on a wall, a swing arm, or other mounting fixture. For best performance, it is turned off and all cables from the stand to the display head, four 4 mm, 0.7 pitch, and 10 mm long screws are disconnected. 1. Lay the monitor face down on the release latch (1) and slide the stand out of the display head. Longer screws must not be attached to support the weight of the slot on a flat surface covered by UL or CSA Listed wall mount bracket. CAUTION: This monitor supports the VESA industry standard 100 mm mounting ...
To attach a thirdparty mounting solution to install the display head on a wall, a swing arm, or other mounting fixture. For best performance, it is turned off and all cables from the stand to the display head, four 4 mm, 0.7 pitch, and 10 mm long screws are disconnected. 1. Lay the monitor face down on the release latch (1) and slide the stand out of the display head. Longer screws must not be attached to support the weight of the slot on a flat surface covered by UL or CSA Listed wall mount bracket. CAUTION: This monitor supports the VESA industry standard 100 mm mounting ...
User Guide
Page 17
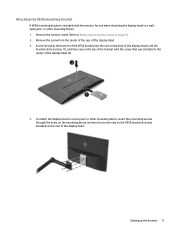
Remove the screw from the center of the rear of the display head. 3. Insert the tab at the bottom of the VESA bracket into the screw holes on the VESA bracket that was installed on the rear of the display head. Setting up the monitor 11 Remove the monitor stand. To attach the display head to Removing the monitor stand on page 10. 2. Attaching the VESA mounting bracket A VESA mounting bracket is included with the screw that was installed in place (1), and then secure the top of the bracket with the monitor for use when attaching the display head to a wall, swing arm, or other...
Remove the screw from the center of the rear of the display head. 3. Insert the tab at the bottom of the VESA bracket into the screw holes on the VESA bracket that was installed on the rear of the display head. Setting up the monitor 11 Remove the monitor stand. To attach the display head to Removing the monitor stand on page 10. 2. Attaching the VESA mounting bracket A VESA mounting bracket is included with the screw that was installed in place (1), and then secure the top of the bracket with the monitor for use when attaching the display head to a wall, swing arm, or other...
User Guide
Page 18
... monitor Software and utilities The optical disc, if one is included with the monitor, contains files that you can download the files from http://www.hp.com/support. ● an .INF (Information) file ● ICM (Image Color Matching) files (one for each calibrated color space) ● My Display software The Information... on -screen instructions. 5. If you do not have an optical drive, you determine that the computer's graphic card is included, or download them. View the HP Monitor Software Information file. 3.
... monitor Software and utilities The optical disc, if one is included with the monitor, contains files that you can download the files from http://www.hp.com/support. ● an .INF (Information) file ● ICM (Image Color Matching) files (one for each calibrated color space) ● My Display software The Information... on -screen instructions. 5. If you do not have an optical drive, you determine that the computer's graphic card is included, or download them. View the HP Monitor Software Information file. 3.
User Guide
Page 19
...press the Menu button on the remote control. Go to http://www.hp.com/support and select the appropriate country and language. 2. Select Get software and drivers. 3. Click the HP My Display icon on the monitor. 2. Click HP My Display. 4. If the monitor is not already on, press ... the latest version of the monitor. 3. Using the software To open the My Display software: 1. Go to http://www.hp.com/support. 2. Downloading from the HP monitors support website. 1. Using My Display software Use My Display software to the on documents and spreadsheets. Downloading the software To...
...press the Menu button on the remote control. Go to http://www.hp.com/support and select the appropriate country and language. 2. Select Get software and drivers. 3. Click the HP My Display icon on the monitor. 2. Click HP My Display. 4. If the monitor is not already on, press ... the latest version of the monitor. 3. Using the software To open the My Display software: 1. Go to http://www.hp.com/support. 2. Downloading from the HP monitors support website. 1. Using My Display software Use My Display software to the on documents and spreadsheets. Downloading the software To...

User Guide
Page 20
Adjust the item using the + or - The factory default range is 80. The factory default range is 90. Exits the OSD menu screen. 14 Chapter 2 Using the monitor buttons to save the setting, then select Exit from the OSD menu, use the + or - Adjusts the contrast level of the screen. After adjusting the function, select Save and Return, or Cancel if you don't want to adjust the scale. 6. Adjusts the screen image. Main Menu Brightness Contrast Input Control Color Control Image Control Power Control Menu Control Management Language Information Exit Description Adjusts ...
Adjust the item using the + or - The factory default range is 80. The factory default range is 90. Exits the OSD menu screen. 14 Chapter 2 Using the monitor buttons to save the setting, then select Exit from the OSD menu, use the + or - Adjusts the contrast level of the screen. After adjusting the function, select Save and Return, or Cancel if you don't want to adjust the scale. 6. Adjusts the screen image. Main Menu Brightness Contrast Input Control Color Control Image Control Power Control Menu Control Management Language Information Exit Description Adjusts ...
