
User Guide
Page 5
... Panel 3 Setting up the monitor ...4 Use caution when setting up the monitor 4 Attaching the monitor stand ...5 Connecting the cables ...6 Connecting USB devices ...8 Adjusting the monitor ...8 Turning on the monitor ...9 Mounting the display head ...10 Removing the monitor stand 10 Attaching the VESA mounting bracket 11 2 Using the monitor ...12 Software and utilities ...12 The Information file ...12 The Image Color Matching file ...12 Installing the .INF and .ICM files ...12 Installing from the optical disc (available in select regions 12 Downloading...
... Panel 3 Setting up the monitor ...4 Use caution when setting up the monitor 4 Attaching the monitor stand ...5 Connecting the cables ...6 Connecting USB devices ...8 Adjusting the monitor ...8 Turning on the monitor ...9 Mounting the display head ...10 Removing the monitor stand 10 Attaching the VESA mounting bracket 11 2 Using the monitor ...12 Software and utilities ...12 The Information file ...12 The Image Color Matching file ...12 Installing the .INF and .ICM files ...12 Installing from the optical disc (available in select regions 12 Downloading...

User Guide
Page 6
4 Maintaining the monitor ...19 Maintenance guidelines ...19 Cleaning the monitor ...19 Shipping the monitor ...19 Appendix A Technical specifications ...20 Preset display resolutions ...21 Entering user modes ...22 Power adapter ...22 Energy saver feature ...22 Appendix B Accessibility ...23 Supported assistive technologies ...23 Contacting support ...23 vi
4 Maintaining the monitor ...19 Maintenance guidelines ...19 Cleaning the monitor ...19 Shipping the monitor ...19 Appendix A Technical specifications ...20 Preset display resolutions ...21 Entering user modes ...22 Power adapter ...22 Energy saver feature ...22 Appendix B Accessibility ...23 Supported assistive technologies ...23 Contacting support ...23 vi
User Guide
Page 7
..., shelves, desks, speakers, chests, or carts may accidentally step on the power cord, plug the cord into an AC outlet that they cannot be specifically labeled as a power strip or Uninterruptible Power Supply (UPS). Use the appropriate and correctly sized furniture designed to the Product Notices provided in a controlled luminous environment to the LCD monitor so that is located on power cords or cables. LCD monitors that no one...
..., shelves, desks, speakers, chests, or carts may accidentally step on the power cord, plug the cord into an AC outlet that they cannot be specifically labeled as a power strip or Uninterruptible Power Supply (UPS). Use the appropriate and correctly sized furniture designed to the Product Notices provided in a controlled luminous environment to the LCD monitor so that is located on power cords or cables. LCD monitors that no one...
User Guide
Page 8
...; My Display software for adjusting monitor settings through Windows ● HDCP (High-bandwidth Digital Content Protection) used on the screen. The display features include the following: ● 81.3 cm (32-inch) diagonal viewable area with smooth, responsive, tear-free performance whenever a picture changes on -screen display menu. NOTE: Adaptive refresh rates vary by locking a display's refresh rate to the Product Notices provided in games and videos by display. The light-emitting diode (LED) backlit display has an active matrix, AMVA+ panel...
...; My Display software for adjusting monitor settings through Windows ● HDCP (High-bandwidth Digital Content Protection) used on the screen. The display features include the following: ● 81.3 cm (32-inch) diagonal viewable area with smooth, responsive, tear-free performance whenever a picture changes on -screen display menu. NOTE: Adaptive refresh rates vary by locking a display's refresh rate to the Product Notices provided in games and videos by display. The light-emitting diode (LED) backlit display has an active matrix, AMVA+ panel...

User Guide
Page 9
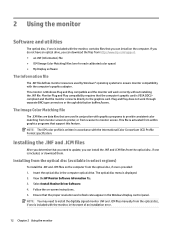
... adjustment levels. Open the OSD and select Power Control > USB Power > Enable. If the OSD menu is inactive, press to advance to the next active input port (HDMI, DisplayPort). 4 Power button When the monitor is off by changing the settings in the OSD. Side and Bottom Components on the Rear Panel Item Component Function 1 Menu button Press to open the Quick View menu. 3 Minus button If the OSD menu is switched off , press the button to turn on the monitor. 5 Power connector Connects an AC adapter. 6 Power LED Light...
... adjustment levels. Open the OSD and select Power Control > USB Power > Enable. If the OSD menu is inactive, press to advance to the next active input port (HDMI, DisplayPort). 4 Power button When the monitor is off by changing the settings in the OSD. Side and Bottom Components on the Rear Panel Item Component Function 1 Menu button Press to open the Quick View menu. 3 Minus button If the OSD menu is switched off , press the button to turn on the monitor. 5 Power connector Connects an AC adapter. 6 Power LED Light...

User Guide
Page 12
... the monitor. 1. Connect a video cable. Not all cables shown in a convenient, well-ventilated location near the computer. 2. The inputs can be selected by pressing the Minus button on the rear panel or through the on-screen display by pressing the Menu button and selecting Input Control. ● Connect an HDMI cable to the HDMI connector on the back of the monitor and the other end to the source device. ● Connect a DisplayPort cable...
... the monitor. 1. Connect a video cable. Not all cables shown in a convenient, well-ventilated location near the computer. 2. The inputs can be selected by pressing the Minus button on the rear panel or through the on-screen display by pressing the Menu button and selecting Input Control. ● Connect an HDMI cable to the HDMI connector on the back of the monitor and the other end to the source device. ● Connect a DisplayPort cable...

User Guide
Page 13
... of the power cord to the power supply (1) and the other end to the monitor (3). The grounding plug is easily accessible at all times. WARNING! To reduce the risk of the monitor and the other end to a grounded electrical outlet (2), and then connect the round end of the power supply cord to a USB downstream connector on power cords or cables. Arrange them . Setting up the monitor 7 For your...
... of the power cord to the power supply (1) and the other end to the monitor (3). The grounding plug is easily accessible at all times. WARNING! To reduce the risk of the monitor and the other end to a grounded electrical outlet (2), and then connect the round end of the power supply cord to a USB downstream connector on power cords or cables. Arrange them . Setting up the monitor 7 For your...

User Guide
Page 15
... monitor power button for five seconds. Press the power button on the source device to turn it on the monitor screen, you should always activate a screen saver application or turn it is not in image" are not covered under the HP warranty. * A prolonged period of time is On), the current preset display resolution, and the recommended preset display resolution. The monitor automatically scans the signal inputs for an active input and uses that display...
... monitor power button for five seconds. Press the power button on the source device to turn it on the monitor screen, you should always activate a screen saver application or turn it is not in image" are not covered under the HP warranty. * A prolonged period of time is On), the current preset display resolution, and the recommended preset display resolution. The monitor automatically scans the signal inputs for an active input and uses that display...

User Guide
Page 16
... other mounting fixture. Disconnect and remove all cables are required. For best performance, it is important to use the power and video cables provided with the VESA standard and is turned off and all cables from the stand to a wall, swing arm, or other mounting fixture. CAUTION: Before beginning to disassemble the monitor, be attached to install the display head on a flat surface covered by UL or CSA Listed wall mount bracket...
... other mounting fixture. Disconnect and remove all cables are required. For best performance, it is important to use the power and video cables provided with the VESA standard and is turned off and all cables from the stand to a wall, swing arm, or other mounting fixture. CAUTION: Before beginning to disassemble the monitor, be attached to install the display head on a flat surface covered by UL or CSA Listed wall mount bracket...
User Guide
Page 18
... the Windows Display control panel. Monitor Plug and Play compatibility requires that the monitor connects directly to install the digitally signed monitor .INF and .ICM files manually from the optical disc, if one is provided: 1. The optical disc menu is VESA DDC2- compliant and that the computer's graphic card is displayed. 2. The Image Color Matching file The .ICM files are data files that you need to the graphics card. Select Install Monitor Driver Software. 4. This...
... the Windows Display control panel. Monitor Plug and Play compatibility requires that the monitor connects directly to install the digitally signed monitor .INF and .ICM files manually from the optical disc, if one is provided: 1. The optical disc menu is VESA DDC2- compliant and that the computer's graphic card is displayed. 2. The Image Color Matching file The .ICM files are data files that you need to the graphics card. Select Install Monitor Driver Software. 4. This...
User Guide
Page 19
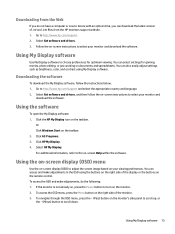
... editing, or just working on your monitor and download the software. Click HP My Display. 4. Select HP My Display. Downloading the software To download the My Display software, follow the on -screen Help within the software. If the monitor is not already on, press the Power button to turn on -screen instructions to scroll down. Using the software To open the My Display software: 1. Using My Display software 13 You can also easily adjust settings such as brightness, color, and contrast using the buttons on the right...
... editing, or just working on your monitor and download the software. Click HP My Display. 4. Select HP My Display. Downloading the software To download the My Display software, follow the on -screen Help within the software. If the monitor is not already on, press the Power button to turn on -screen instructions to scroll down. Using the software To open the My Display software: 1. Using My Display software 13 You can also easily adjust settings such as brightness, color, and contrast using the buttons on the right...

User Guide
Page 20
... video input signal. Adjusts the power settings. The factory default is 90. Adjusts the contrast level of the screen. buttons to scroll to and highlight your selection, then press the Menu button to adjust the scale. 6. The factory default range is displayed. Adjusts the DDC/CI settings and returns all OSD menu settings to save the setting, then select Exit from the OSD menu, use the + or - Selects and displays important information about the monitor. Selects and adjusts the screen color. Main Menu Brightness Contrast Input Control Color Control Image Control Power...
... video input signal. Adjusts the power settings. The factory default is 90. Adjusts the contrast level of the screen. buttons to scroll to and highlight your selection, then press the Menu button to adjust the scale. 6. The factory default range is displayed. Adjusts the DDC/CI settings and returns all OSD menu settings to save the setting, then select Exit from the OSD menu, use the + or - Selects and displays important information about the monitor. Selects and adjusts the screen color. Main Menu Brightness Contrast Input Control Color Control Image Control Power...
User Guide
Page 21
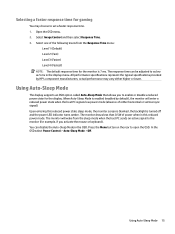
... vary either horizontal or vertical sync signal). When Auto-Sleep Mode is enabled (enabled by HP's component manufacturers; Open the OSD menu. 2. Using Auto-Sleep Mode The display supports an OSD option called Auto-Sleep Mode that allows you activate the mouse or keyboard). In the OSD select Power Control > Auto-Sleep Mode > Off. The monitor will enter a reduced power state when the host PC signals low power mode (absence of power when in this reduced power state sleep mode, the monitor screen is blanked, the backlight is 7 ms...
... vary either horizontal or vertical sync signal). When Auto-Sleep Mode is enabled (enabled by HP's component manufacturers; Open the OSD menu. 2. Using Auto-Sleep Mode The display supports an OSD option called Auto-Sleep Mode that allows you activate the mouse or keyboard). In the OSD select Power Control > Auto-Sleep Mode > Off. The monitor will enter a reduced power state when the host PC signals low power mode (absence of power when in this reduced power state sleep mode, the monitor screen is blanked, the backlight is 7 ms...
User Guide
Page 22
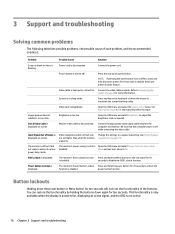
... Auto-Switch Input to adjust the brightness scale as needed. seconds to disable the power button lockout feature. Power button is displayed. Power Button Lockout is turned off while connecting the video cable. Change the settings to unlock the function is too low. OSD Lockout is enabled. The monitor's OSD Lockout function Press and hold the power button for 10 is displayed. Press the rear panel power button. System is Open the OSD menu and select Power Control > Auto-Sleep disabled. The monitor's power saving control is in sleep mode. Connect the power cord...
... Auto-Switch Input to adjust the brightness scale as needed. seconds to disable the power button lockout feature. Power button is displayed. Power Button Lockout is turned off while connecting the video cable. Change the settings to unlock the function is too low. OSD Lockout is enabled. The monitor's OSD Lockout function Press and hold the power button for 10 is displayed. Press the rear panel power button. System is Open the OSD menu and select Power Control > Auto-Sleep disabled. The monitor's power saving control is in sleep mode. Connect the power cord...

User Guide
Page 23
... troubleshooting tips in English. ● Locate an HP service center Preparing to call : ● Monitor model number ● Monitor serial number ● Purchase date on -screen instructions. Product support For additional information on using your monitor, go to call technical support. Here you can: ● Chat online with an HP technician NOTE: When support chat is not available in a particular language, it is available in this location. NOTE: The monitor user guide...
... troubleshooting tips in English. ● Locate an HP service center Preparing to call : ● Monitor model number ● Monitor serial number ● Purchase date on -screen instructions. Product support For additional information on using your monitor, go to call technical support. Here you can: ● Chat online with an HP technician NOTE: When support chat is not available in a particular language, it is available in this location. NOTE: The monitor user guide...

User Guide
Page 25
... the cord. ● Turn the monitor off the monitor when not in the cabinet are not covered under the HP warranty. ● Slots and openings in use a 50/50 mix of the unit. 2. Never spray the cleaner directly on the power label to clean the monitor screen or cabinet. These chemicals may run behind the bezel and damage the electronics. You may need...
... the cord. ● Turn the monitor off the monitor when not in the cabinet are not covered under the HP warranty. ● Slots and openings in use a 50/50 mix of the unit. 2. Never spray the cleaner directly on the power label to clean the monitor screen or cabinet. These chemicals may run behind the bezel and damage the electronics. You may need...
User Guide
Page 26
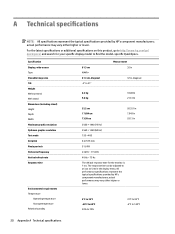
...monitor is 7 ms. The response time can be adjusted to find the model-specific QuickSpecs. All performance specifications represent the typical specifications provided by HP's component manufacturers; Specification Display, wide-screen Type Viewable image size Tilt Weight Without stand With stand Dimensions (including stand) Height Depth Width Maximum graphic resolution Optimum graphic resolution Text mode Dot pitch Pixels per inch Horizontal frequency Vertical refresh rate... Hz ~ 75 Hz The default response time for your specific display model to as low as 5 ms in the display menu.
...monitor is 7 ms. The response time can be adjusted to find the model-specific QuickSpecs. All performance specifications represent the typical specifications provided by HP's component manufacturers; Specification Display, wide-screen Type Viewable image size Tilt Weight Without stand With stand Dimensions (including stand) Height Depth Width Maximum graphic resolution Optimum graphic resolution Text mode Dot pitch Pixels per inch Horizontal frequency Vertical refresh rate... Hz ~ 75 Hz The default response time for your specific display model to as low as 5 ms in the display menu.

User Guide
Page 27
Specification Altitude Operating Storage Power source Measured power consumption Full power Typical settings Sleep Off Input terminal Measurement 0 m to 5,000 m 0 m to 12 ,192 m 100 V ac to 240 V ac 50/60 Hz 0 ft to 16,400 ft 0 ft to 40,000 ft 72 W 54 W
Specification Altitude Operating Storage Power source Measured power consumption Full power Typical settings Sleep Off Input terminal Measurement 0 m to 5,000 m 0 m to 12 ,192 m 100 V ac to 240 V ac 50/60 Hz 0 ft to 16,400 ft 0 ft to 40,000 ft 72 W 54 W

User Guide
Page 28
... setting, and then recognizes the new mode just as it does a preset mode. The reduced power state will utilize When the monitor is turned off, and the power light turns amber. Power adapter Manufacturer Chicony Model number TPC-CA57 Power supply rating 19.5 V dc @ 4.62 A - 90 W Energy saver feature The monitor supports a reduced power state. Your changes can be made to any or all of either the horizontal sync signal and/or the vertical sync signal...
... setting, and then recognizes the new mode just as it does a preset mode. The reduced power state will utilize When the monitor is turned off, and the power light turns amber. Power adapter Manufacturer Chicony Model number TPC-CA57 Power supply rating 19.5 V dc @ 4.62 A - 90 W Energy saver feature The monitor supports a reduced power state. Your changes can be made to any or all of either the horizontal sync signal and/or the vertical sync signal...

User Guide
Page 29
.... Supported assistive technologies 23 Supported assistive technologies HP products support a wide variety of -hearing and use TRS/VRS/WebCapTel, contact us about a particular assistive technology product, contact customer support for that is connected to the monitor to tell us if you have accessibility questions by everyone, including people with disabilities, either on your source device that product. Use the Search feature on a stand...
.... Supported assistive technologies 23 Supported assistive technologies HP products support a wide variety of -hearing and use TRS/VRS/WebCapTel, contact us about a particular assistive technology product, contact customer support for that is connected to the monitor to tell us if you have accessibility questions by everyone, including people with disabilities, either on your source device that product. Use the Search feature on a stand...


