User Guide
Page 5
...5 Setting up the monitor ...5 Attaching the monitor stand ...6 Mounting the monitor head ...7 Removing the monitor stand 7 Attaching the monitor head to a mounting device 7 Connecting the cables ...9 Connecting USB devices ...12 Adjusting the monitor ...12 Installing a security cable ...13 Turning on the monitor ...13 HP watermark and image retention policy 14 2 Using the monitor ...15 Downloading software and utilities ...15 The Information file ...15 The Image Color Matching file ...15 Using the OSD menu ...15 Selecting color presets ...16 Using RGB Gain Adjust ...17 Using Auto-Sleep Mode...
...5 Setting up the monitor ...5 Attaching the monitor stand ...6 Mounting the monitor head ...7 Removing the monitor stand 7 Attaching the monitor head to a mounting device 7 Connecting the cables ...9 Connecting USB devices ...12 Adjusting the monitor ...12 Installing a security cable ...13 Turning on the monitor ...13 HP watermark and image retention policy 14 2 Using the monitor ...15 Downloading software and utilities ...15 The Information file ...15 The Image Color Matching file ...15 Using the OSD menu ...15 Selecting color presets ...16 Using RGB Gain Adjust ...17 Using Auto-Sleep Mode...

User Guide
Page 6
... the monitor ...22 Appendix A Technical specifications ...23 62.22 cm (24.5 in) model specifications ...23 Preset display resolutions ...23 62.22 cm (24.5 in) model ...24 Enhanced-definition and high-definition video formats 24 Appendix B Accessibility ...25 HP and accessibility ...25 Finding the technology tools you need 25 The HP commitment ...25 International Association of Accessibility Professionals (IAAP 26 Finding the best...
... the monitor ...22 Appendix A Technical specifications ...23 62.22 cm (24.5 in) model specifications ...23 Preset display resolutions ...23 62.22 cm (24.5 in) model ...24 Enhanced-definition and high-definition video formats 24 Appendix B Accessibility ...25 HP and accessibility ...25 Finding the technology tools you need 25 The HP commitment ...25 International Association of Accessibility Professionals (IAAP 26 Finding the best...
User Guide
Page 7
... & Comfort Guide also provides important electrical and mechanical safety information. Use a power strip whose manufacturer offers a damage replacement policy so that is not suitable for use with the installation instructions. It describes proper workstation setup and proper posture, health, and work habits for entertainment purposes. Not all cords and cables connected to the monitor so that provide product details, how-to properly support your...
... & Comfort Guide also provides important electrical and mechanical safety information. Use a power strip whose manufacturer offers a damage replacement policy so that is not suitable for use with the installation instructions. It describes proper workstation setup and proper posture, health, and work habits for entertainment purposes. Not all cords and cables connected to the monitor so that provide product details, how-to properly support your...
User Guide
Page 8
or - NOTE: Contact customer support to replace the power cord, the AC adapter (select products only), or any other cables that you are located, and how they are using Support and troubleshooting on page 19, a call to technical support can provide additional help. Preparing to call . ● Monitor model number ● Monitor serial number ● Purchase date on the model, your monitor might include the following information available when you...
or - NOTE: Contact customer support to replace the power cord, the AC adapter (select products only), or any other cables that you are located, and how they are using Support and troubleshooting on page 19, a call to technical support can provide additional help. Preparing to call . ● Monitor model number ● Monitor serial number ● Purchase date on the model, your monitor might include the following information available when you...
User Guide
Page 9
... supported by your operating system Monitor stand ● Removable stand for flexible monitor head mounting solutions ● HP Quick Release 2 device to quickly attach the monitor head to the stand with a simple click, and then remove it with an LED backlight ● Wide viewing angle to allow viewing from a sitting or standing position, or moving from side to side ● Tilt adjustment capability ● On-screen display (OSD) adjustments in several languages for easy setup and screen optimization ● Color space...
... supported by your operating system Monitor stand ● Removable stand for flexible monitor head mounting solutions ● HP Quick Release 2 device to quickly attach the monitor head to the stand with a simple click, and then remove it with an LED backlight ● Wide viewing angle to allow viewing from a sitting or standing position, or moving from side to side ● Tilt adjustment capability ● On-screen display (OSD) adjustments in several languages for easy setup and screen optimization ● Color space...

User Guide
Page 10
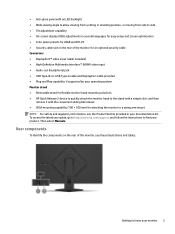
... Component Description (1) OSD controller Opens the OSD menu and makes adjustments to a source device such as a computer or game console. (3) DisplayPort connector Connects the DisplayPort cable to monitor settings. (2) Power button Turns the monitor on or off. CAUTION: To reduce the risk of personal injury, adjust the volume before using headphones or earbuds. Table 1-2 Rear components and their descriptions Component Description (1) Audio-out (headphone) jack Connects headphones, earbuds, or an audio cable. For additional...
... Component Description (1) OSD controller Opens the OSD menu and makes adjustments to a source device such as a computer or game console. (3) DisplayPort connector Connects the DisplayPort cable to monitor settings. (2) Power button Turns the monitor on or off. CAUTION: To reduce the risk of personal injury, adjust the volume before using headphones or earbuds. Table 1-2 Rear components and their descriptions Component Description (1) Audio-out (headphone) jack Connects headphones, earbuds, or an audio cable. For additional...
User Guide
Page 11
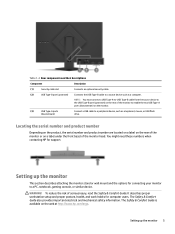
... and their descriptions Component Description (1) Security cable slot Connects an optional security cable. (2) USB Type-B port (upstream) Connects the USB Type-B cable to a source device such as a keyboard, mouse, or USB flash drive. To reduce the risk of the monitor head. Setting up the monitor 5 It describes proper workstation setup and proper posture, health, and work habits for support. The Safety & Comfort Guide is available on a label under...
... and their descriptions Component Description (1) Security cable slot Connects an optional security cable. (2) USB Type-B port (upstream) Connects the USB Type-B cable to a source device such as a keyboard, mouse, or USB flash drive. To reduce the risk of the monitor head. Setting up the monitor 5 It describes proper workstation setup and proper posture, health, and work habits for support. The Safety & Comfort Guide is available on a label under...

User Guide
Page 13
... with the monitor. Use a flathead screwdriver to pry open the VESA cover on the back of foam or a clean, dry cloth. 3. Be sure that you decide to use four 4 mm, 0.7 pitch, and 10 mm long screws. Disconnect and remove all cables are disconnected. See Removing the monitor stand on a flat surface covered by a UL-listed or CSA-listed wall-mount bracket. NOTE: This apparatus is rated to support the...
... with the monitor. Use a flathead screwdriver to pry open the VESA cover on the back of foam or a clean, dry cloth. 3. Be sure that you decide to use four 4 mm, 0.7 pitch, and 10 mm long screws. Disconnect and remove all cables are disconnected. See Removing the monitor stand on a flat surface covered by a UL-listed or CSA-listed wall-mount bracket. NOTE: This apparatus is rated to support the...

User Guide
Page 19
...-in use for 2 or more hours. Press the center of the OSD controller to open the OSD, select Power, select Power LED, and then select Off. ▲ Press the power button on the rear of time. Image retention is not covered under the HP warranty. Use the key that came with an optional security cable available from HP. Installing a security cable As a security measure, you can disable the power light in...
...-in use for 2 or more hours. Press the center of the OSD controller to open the OSD, select Power, select Power LED, and then select Off. ▲ Press the power button on the rear of time. Image retention is not covered under the HP warranty. Use the key that came with an optional security cable available from HP. Installing a security cable As a security measure, you can disable the power light in...
User Guide
Page 20
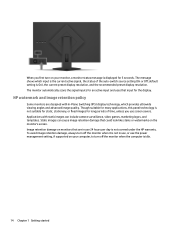
... provides ultrawide viewing angles and advanced image quality. The monitor automatically scans the signal inputs for long periods of the auto-switch source setting (On or Off; Image retention damage on your computer, to turn off the monitor when the computer is not covered under the HP warranty. HP watermark and image retention policy Some monitors are in use, or use the power management setting, if supported on the monitor's screen. Static images can include...
... provides ultrawide viewing angles and advanced image quality. The monitor automatically scans the signal inputs for long periods of the auto-switch source setting (On or Off; Image retention damage on your computer, to turn off the monitor when the computer is not covered under the HP warranty. HP watermark and image retention policy Some monitors are in use, or use the power management setting, if supported on the monitor's screen. Static images can include...

User Guide
Page 21
... used by Windows® operating systems to ensure monitor compatibility with the International Color Consortium (ICC) Profile Format specification. 2 Using the monitor This chapter describes how to use the OSD controller on -screen instructions. Monitor Plug and Play compatibility requires that the computer's graphics card is VESA DDC2 compliant and that support this feature. Enter your HP monitor model in accordance with the computer's graphics adapter. Using the OSD menu You can download and install these files from HP Support...
... used by Windows® operating systems to ensure monitor compatibility with the International Color Consortium (ICC) Profile Format specification. 2 Using the monitor This chapter describes how to use the OSD controller on -screen instructions. Monitor Plug and Play compatibility requires that the computer's graphics card is VESA DDC2 compliant and that support this feature. Enter your HP monitor model in accordance with the computer's graphics adapter. Using the OSD menu You can download and install these files from HP Support...

User Guide
Page 22
... the monitor. Selecting color presets Use the OSD menu to select from a variety of color presets that configure the monitor for non-native ( The following table lists possible menu selections in the OSD main menu. Exit Exits the OSD menu screen. In the OSD menu, select the Color menu. 2. Move the controller up, down, left, or right to the factory default settings. Image Adjusts the screen image, including brightness, contrast, dynamic contrast, black stretch, sharpness, and image scaling. Power Adjusts the power settings. Table 2-2 Color presets...
... the monitor. Selecting color presets Use the OSD menu to select from a variety of color presets that configure the monitor for non-native ( The following table lists possible menu selections in the OSD main menu. Exit Exits the OSD menu screen. In the OSD menu, select the Color menu. 2. Move the controller up, down, left, or right to the factory default settings. Image Adjusts the screen image, including brightness, contrast, dynamic contrast, black stretch, sharpness, and image scaling. Power Adjusts the power settings. Table 2-2 Color presets...

User Guide
Page 23
... blue light preset that used to enhance their original appearance. Select Auto-Sleep Mode, and then select Off. The default is close to open the OSD. Connect a secondary input source to the monitor (for watching black-and-white films because it more blue look than 0.5 W of any color preset. Using RGB Gain Adjust 17 Press the center of detail (sharpness and contrast) to static images and motion video to adjust the color temperature of power when...
... blue light preset that used to enhance their original appearance. Select Auto-Sleep Mode, and then select Off. The default is close to open the OSD. Connect a secondary input source to the monitor (for watching black-and-white films because it more blue look than 0.5 W of any color preset. Using RGB Gain Adjust 17 Press the center of detail (sharpness and contrast) to static images and motion video to adjust the color temperature of power when...
User Guide
Page 25
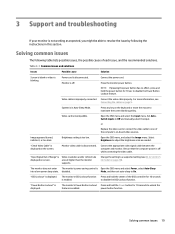
... information, see 62.22 cm (24.5 in) model on page 9. Connect the power cord. 3 Support and troubleshooting If your monitor is not working as needed. System is displayed on screen. Set AutoSwitch Inputs to resolve the issue by following table lists possible issues, the possible cause of Range" is Video resolution and/or refresh rate displayed on the screen. "Check Video Cable" is in this section. "Input Signal Out of each issue, and the recommended...
... information, see 62.22 cm (24.5 in) model on page 9. Connect the power cord. 3 Support and troubleshooting If your monitor is not working as needed. System is displayed on screen. Set AutoSwitch Inputs to resolve the issue by following table lists possible issues, the possible cause of Range" is Video resolution and/or refresh rate displayed on the screen. "Check Video Cable" is in this section. "Input Signal Out of each issue, and the recommended...

User Guide
Page 27
... life of the monitor. ● Do not open the monitor cabinet or attempt to the cord does not exceed the rating of the AC outlet and that are covered in image on the power cord. IMPORTANT: Do not use a screen saver program. If the monitor is not covered under the HP warranty. ● Never block the slots and openings of the products connected to service this can...
... life of the monitor. ● Do not open the monitor cabinet or attempt to the cord does not exceed the rating of the AC outlet and that are covered in image on the power cord. IMPORTANT: Do not use a screen saver program. If the monitor is not covered under the HP warranty. ● Never block the slots and openings of the products connected to service this can...

User Guide
Page 29
... DisplayPort connector Preset display resolutions The following display resolutions are the most commonly used modes and are set as required environmental operating conditions and power source ranges. NOTE: For the latest specifications or additional specifications for this product, go to http://www.hp.com/ go/quickspecs/ and search for the physical aspects of your monitor, such as the weight and viewing dimensions, as well as factory defaults. actual...
... DisplayPort connector Preset display resolutions The following display resolutions are the most commonly used modes and are set as required environmental operating conditions and power source ranges. NOTE: For the latest specifications or additional specifications for this product, go to http://www.hp.com/ go/quickspecs/ and search for the physical aspects of your monitor, such as the weight and viewing dimensions, as well as factory defaults. actual...

Maintenance and Service Guide
Page 1
Maintenance and Service Guide OMEN 25i model M25866 SUMMARY This guide provides information about spare parts, removal and replacement of parts, diagnostic tests, problem troubleshooting, and more.
Maintenance and Service Guide OMEN 25i model M25866 SUMMARY This guide provides information about spare parts, removal and replacement of parts, diagnostic tests, problem troubleshooting, and more.
Maintenance and Service Guide
Page 5
... product service or maintenance requires replacing parts, confirm the RoHS requirement before returning it is a legal requirement by the EU (European Union) for the global electronics industry sold in the EU and other countries. If no firmware is working properly. Do not use lead-free solder. ● When soldering, work quickly to confirm the power supply is posted, the monitor does not need a firmware update...
... product service or maintenance requires replacing parts, confirm the RoHS requirement before returning it is a legal requirement by the EU (European Union) for the global electronics industry sold in the EU and other countries. If no firmware is working properly. Do not use lead-free solder. ● When soldering, work quickly to confirm the power supply is posted, the monitor does not need a firmware update...

Maintenance and Service Guide
Page 6
... panel with an LED backlight ● Wide viewing angle to allow viewing from a sitting or standing position, or moving from side to side ● Tilt capability ● On-screen display (OSD) adjustments in your product. Features Depending on rear of monitor for optional cable lock ● Energy saver feature to meet requirements for reduced power consumption ● DisplayPort™ video input (cable included) ● High-Definition Multimedia Interface™ (HDMI) video input ● Audio...
... panel with an LED backlight ● Wide viewing angle to allow viewing from a sitting or standing position, or moving from side to side ● Tilt capability ● On-screen display (OSD) adjustments in your product. Features Depending on rear of monitor for optional cable lock ● Energy saver feature to meet requirements for reduced power consumption ● DisplayPort™ video input (cable included) ● High-Definition Multimedia Interface™ (HDMI) video input ● Audio...
Maintenance and Service Guide
Page 22
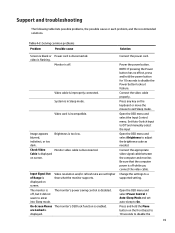
.... Input Signal Out of Range is disconnected. On-Screen Menus The monitor's OSD lock function is off . Connect the power cord. Set Auto-Switch Input to Off and manually select the input Open the OSD menu and select Brightness to a supported setting. Press and hold the power button for 10 seconds to exit Sleep mode. Change the settings to adjust the brightness scale as needed. are set auto-sleep to disable the 19 Monitor is displayed. Check Video Monitor video cable is displayed on the front bezel to 10 seconds to On. Open the OSD menu...
.... Input Signal Out of Range is disconnected. On-Screen Menus The monitor's OSD lock function is off . Connect the power cord. Set Auto-Switch Input to Off and manually select the input Open the OSD menu and select Brightness to a supported setting. Press and hold the power button for 10 seconds to exit Sleep mode. Change the settings to adjust the brightness scale as needed. are set auto-sleep to disable the 19 Monitor is displayed. Check Video Monitor video cable is displayed on the front bezel to 10 seconds to On. Open the OSD menu...


