HP Pavilion zd8000 Notebook PC - Maintenance and Service Guide
Page 7
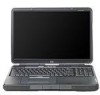
... for both 32-bit (CardBus) and 16-bit PC Cards ■ External 180- and 135-watt AC adapter with 3-wire power cord, varying by notebook model ■ 12-cell Li-Ion battery pack ■ Stereo speakers with support for the following optical drives: ❏ 8X Max DVD±RW.../R and CD-RW Combo Drive ❏ 24X Max DVD/CD-RW Combo Drive ■ Connectors: ❏ External monitor ❏ Universal Serial Bus (USB) v. 2.0 (four ports) ❏ RJ-11 (modem) ❏ RJ-45 (network) ❏ Audio-out (headphone) ❏ Audio-in (microphone)...
... for both 32-bit (CardBus) and 16-bit PC Cards ■ External 180- and 135-watt AC adapter with 3-wire power cord, varying by notebook model ■ 12-cell Li-Ion battery pack ■ Stereo speakers with support for the following optical drives: ❏ 8X Max DVD±RW.../R and CD-RW Combo Drive ❏ 24X Max DVD/CD-RW Combo Drive ■ Connectors: ❏ External monitor ❏ Universal Serial Bus (USB) v. 2.0 (four ports) ❏ RJ-11 (modem) ❏ RJ-45 (network) ❏ Audio-out (headphone) ❏ Audio-in (microphone)...
HP Pavilion zd8000 Notebook PC - Maintenance and Service Guide
Page 13
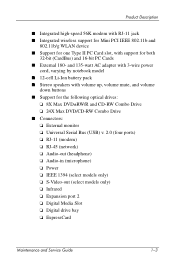
... such as a television, VCR, camcorder, projector, or video capture card. External monitor port Connects an optional VGA external monitor or projector. Maintenance and Service Guide 1-9 Exhaust vent Provides airflow to cool internal components.... Ä To prevent overheating, do not obstruct vents. Power connector Connects an AC adapter. S-Video-out jack Connects an optional S-Video device, such as pillows, thick rugs or clothing, to the notebook...
... such as a television, VCR, camcorder, projector, or video capture card. External monitor port Connects an optional VGA external monitor or projector. Maintenance and Service Guide 1-9 Exhaust vent Provides airflow to cool internal components.... Ä To prevent overheating, do not obstruct vents. Power connector Connects an AC adapter. S-Video-out jack Connects an optional S-Video device, such as pillows, thick rugs or clothing, to the notebook...
HP Pavilion zd8000 Notebook PC - Maintenance and Service Guide
Page 35
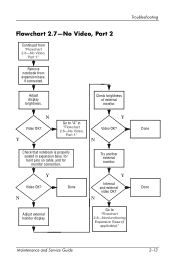
... applicable)." Done Done Maintenance and Service Guide 2-13 Remove notebook from "Flowchart 2.6-No Video, Part 1." N Check that notebook is properly seated in "Flowchart 2.6-No Video, Part 1." Y Internal and external video OK? N Go to "A" in expansion base, for bent pins on cable, and for monitor connection. Y Video OK? Adjust display brightness. Check brightness of...
... applicable)." Done Done Maintenance and Service Guide 2-13 Remove notebook from "Flowchart 2.6-No Video, Part 1." N Check that notebook is properly seated in "Flowchart 2.6-No Video, Part 1." Y Internal and external video OK? N Go to "A" in expansion base, for bent pins on cable, and for monitor connection. Y Video OK? Adjust display brightness. Check brightness of...
HP Pavilion zd8000 Notebook PC - Maintenance and Service Guide
Page 36
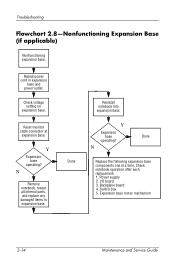
Y Expansion base operating? Check notebook operation after each replacement. 1. I/O board 3. Expansion base motor mechanism 2-14 Maintenance and Service Guide Check voltage setting on expansion base. Backplane ... box 5. Troubleshooting Flowchart 2.8-Nonfunctioning Expansion Base (if applicable) Nonfunctioning expansion base. Reseat power cord in expansion base. N Remove notebook, reseat all internal parts, and replace any damaged items in expansion base and power outlet. Reset monitor cable connector at a time. Y Expansion base operating? Power supply 2. Done Reinstall...
Y Expansion base operating? Check notebook operation after each replacement. 1. I/O board 3. Expansion base motor mechanism 2-14 Maintenance and Service Guide Check voltage setting on expansion base. Backplane ... box 5. Troubleshooting Flowchart 2.8-Nonfunctioning Expansion Base (if applicable) Nonfunctioning expansion base. Reseat power cord in expansion base. N Remove notebook, reseat all internal parts, and replace any damaged items in expansion base and power outlet. Reset monitor cable connector at a time. Y Expansion base operating? Power supply 2. Done Reinstall...
HP Pavilion zd8000 Notebook PC - Maintenance and Service Guide
Page 71
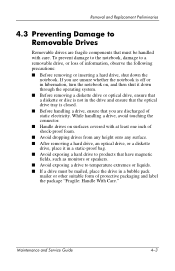
... Avoid dropping drives from any height onto any surface. ■ After removing a hard drive, an optical drive, or a diskette drive, place it down the notebook. While handling a drive, avoid touching the connector. ■ Handle drives on , and then shut it in a static-proof bag. ■ Avoid exposing a... hard drive to products that have magnetic fields, such as monitors or speakers. ■ Avoid exposing a drive to temperature extremes or liquids. ■ If a drive must be mailed, place the drive in hibernation, ...
... Avoid dropping drives from any height onto any surface. ■ After removing a hard drive, an optical drive, or a diskette drive, place it down the notebook. While handling a drive, avoid touching the connector. ■ Handle drives on , and then shut it in a static-proof bag. ■ Avoid exposing a... hard drive to products that have magnetic fields, such as monitors or speakers. ■ Avoid exposing a drive to temperature extremes or liquids. ■ If a drive must be mailed, place the drive in hibernation, ...

HP Pavilion zd8000 Notebook PC - Maintenance and Service Guide
Page 119
Remove the following: 1 Two HM5.0×9.0 screw locks on each side of the external monitor connector 2 Five PM2.0×4.0 screws that secure the system board to the base enclosure 3 Two PM2.0×8.0 screws that secure the heat sink module to the base enclosure Removing the System Board Screws and Screw Locks Maintenance and Service Guide 5-43 Position the notebook with the rear panel toward you. 8. Removal and Replacement Procedures 7.
Remove the following: 1 Two HM5.0×9.0 screw locks on each side of the external monitor connector 2 Five PM2.0×4.0 screws that secure the system board to the base enclosure 3 Two PM2.0×8.0 screws that secure the heat sink module to the base enclosure Removing the System Board Screws and Screw Locks Maintenance and Service Guide 5-43 Position the notebook with the rear panel toward you. 8. Removal and Replacement Procedures 7.

HP Pavilion zd8000 Notebook PC - Maintenance and Service Guide
Page 128
... 374758-001 1. Switch cover (refer to Section 5.12) h. Top cover (refer to Section 5.8) e. Turn the system board upside down with the external monitor connector toward you. 5-52 Maintenance and Service Guide Mini PCI compartment cover (refer to Section 5.11) g. Display assembly (refer to Section 5.7) d. Optical ...to Section 5.10) f. Keyboard (refer to Section 5.5) b. Memory module compartment cover (refer to Section 5.16) 2. System board (refer to Section 5.6) c. Prepare the notebook for disassembly (refer to Section 5.3) and remove the following components: a.
... 374758-001 1. Switch cover (refer to Section 5.12) h. Top cover (refer to Section 5.8) e. Turn the system board upside down with the external monitor connector toward you. 5-52 Maintenance and Service Guide Mini PCI compartment cover (refer to Section 5.11) g. Display assembly (refer to Section 5.7) d. Optical ...to Section 5.10) f. Keyboard (refer to Section 5.5) b. Memory module compartment cover (refer to Section 5.16) 2. System board (refer to Section 5.6) c. Prepare the notebook for disassembly (refer to Section 5.3) and remove the following components: a.

HP Pavilion zd8000 Notebook PC - Maintenance and Service Guide
Page 155
Connector Pin Assignments Table A-4 External Monitor Pin Signal 1 Red analog 2 Green analog 3 Blue analog 4 Not connected 5 Ground 6 Ground analog 7 Ground analog 8 Ground analog Pin Signal 9 +5 VDC 10 Ground 11 Monitor detect 12 DDC 2B data 13 Horizontal sync 14 Vertical sync 15 DDC 2B clock Maintenance and Service Guide A-3
Connector Pin Assignments Table A-4 External Monitor Pin Signal 1 Red analog 2 Green analog 3 Blue analog 4 Not connected 5 Ground 6 Ground analog 7 Ground analog 8 Ground analog Pin Signal 9 +5 VDC 10 Ground 11 Monitor detect 12 DDC 2B data 13 Horizontal sync 14 Vertical sync 15 DDC 2B clock Maintenance and Service Guide A-3
HP Pavilion zd8000 Notebook PC - Maintenance and Service Guide
Page 184
Index right-side 1-6 upper keyboard 1-12 Computer Setup Advanced Menu 2-4 Main Menu 2-2 overview 2-1 Security Menu 2-3 Tools Menu 2-4 connector pin assignments external monitor A-3 headphone A-6 microphone A-5 monitor A-3 RJ-11 (modem) A-4 RJ-45 (network) A-2 S-Video-out A-2 Universal Serial Bus (USB) A-1 connectors, service considerations 4-2 D design overview 1-18 digital drive bay 1-7 digital drive board spare ...
Index right-side 1-6 upper keyboard 1-12 Computer Setup Advanced Menu 2-4 Main Menu 2-2 overview 2-1 Security Menu 2-3 Tools Menu 2-4 connector pin assignments external monitor A-3 headphone A-6 microphone A-5 monitor A-3 RJ-11 (modem) A-4 RJ-45 (network) A-2 S-Video-out A-2 Universal Serial Bus (USB) A-1 connectors, service considerations 4-2 D design overview 1-18 digital drive bay 1-7 digital drive board spare ...

HP Pavilion zd8000 Notebook PC - Maintenance and Service Guide
Page 185
... not loading 2-20 precautions 4-3 E electrostatic discharge 4-4, 4-8 Entertainment Y-cable, spare part number 3-10 exhaust vents 1-7, 1-8, 1-9, 1-13, 1-16 expansion base, troubleshooting 2-14 expansion port 2 1-7 ExpressCard slot 1-6 external monitor port location 1-9 pin assignments A-3 F f1 to f12 keys 1-11 fan locations 1-17 removal 5-50 spare part numbers 3-5, 3-20, 5-50 features 1-2 flowcharts, troubleshooting no audio 2-21...
... not loading 2-20 precautions 4-3 E electrostatic discharge 4-4, 4-8 Entertainment Y-cable, spare part number 3-10 exhaust vents 1-7, 1-8, 1-9, 1-13, 1-16 expansion base, troubleshooting 2-14 expansion port 2 1-7 ExpressCard slot 1-6 external monitor port location 1-9 pin assignments A-3 F f1 to f12 keys 1-11 fan locations 1-17 removal 5-50 spare part numbers 3-5, 3-20, 5-50 features 1-2 flowcharts, troubleshooting no audio 2-21...
HP Pavilion zd8000 Notebook PC - Maintenance and Service Guide
Page 187
... number 3-5, 3-19, 5-52 modem jack location 1-7 pin assignments A-4 modem, troubleshooting 2-26 monitor port location 1-9 pin assignments A-3 mouse, spare part number 3-11, 3-14 N network jack location 1-7 pin assignments A-2 network, troubleshooting 2-26 nonfunctioning device, troubleshooting 2-14, 2-23 notebook feet locations 5-11 notebook specifications 6-1 notebook top components 1-14 num lock key 1-11 num lock light 1-15 O operating...
... number 3-5, 3-19, 5-52 modem jack location 1-7 pin assignments A-4 modem, troubleshooting 2-26 monitor port location 1-9 pin assignments A-3 mouse, spare part number 3-11, 3-14 N network jack location 1-7 pin assignments A-2 network, troubleshooting 2-26 nonfunctioning device, troubleshooting 2-14, 2-23 notebook feet locations 5-11 notebook specifications 6-1 notebook top components 1-14 num lock key 1-11 num lock light 1-15 O operating...
Hardware and Software Guide
Page 4
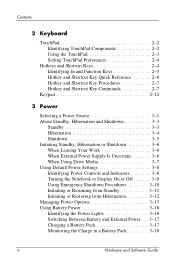
... Work 3-6 When External Power Supply Is Uncertain 3-6 When Using Drive Media 3-7 Using Default Power Settings 3-8 Identifying Power Controls and Indicators 3-8 Turning the Notebook or Display On or Off 3-9 Using Emergency Shutdown Procedures 3-10 Initiating or Resuming from Standby 3-11 Initiating or Restoring from Hibernation 3-12 Managing Power Options... 3-13 Using Battery Power 3-16 Identifying the Power Lights 3-16 Switching Between Battery and External Power. . . 3-17 Charging a Battery Pack 3-17 Monitoring the Charge in a Battery Pack 3-18 iv Hardware and Software Guide
... Work 3-6 When External Power Supply Is Uncertain 3-6 When Using Drive Media 3-7 Using Default Power Settings 3-8 Identifying Power Controls and Indicators 3-8 Turning the Notebook or Display On or Off 3-9 Using Emergency Shutdown Procedures 3-10 Initiating or Resuming from Standby 3-11 Initiating or Restoring from Hibernation 3-12 Managing Power Options... 3-13 Using Battery Power 3-16 Identifying the Power Lights 3-16 Switching Between Battery and External Power. . . 3-17 Charging a Battery Pack 3-17 Monitoring the Charge in a Battery Pack 3-18 iv Hardware and Software Guide

Hardware and Software Guide
Page 6
Contents HP Administrator Password 5-8 Setting HP Administrator Passwords 5-9 Entering HP Administrator Passwords 5-10 Power-On Passwords 5-10 Setting Power-On Passwords 5-10 Entering Power-On Passwords 5-11 DriveLock... 5-16 Antivirus Software 5-17 Critical Security Updates for Windows XP 5-18 Firewall Software 5-19 Optional Security Cable 5-20 6 Hardware Options and Upgrades External Devices 6-1 Connecting a Monitor or Projector 6-2 Connecting a USB Device 6-2 Using a USB Device 6-3 Connecting a 1394 Device 6-4 Using a PC Card 6-5 Selecting a PC Card 6-5 Configuring a PC Card...
Contents HP Administrator Password 5-8 Setting HP Administrator Passwords 5-9 Entering HP Administrator Passwords 5-10 Power-On Passwords 5-10 Setting Power-On Passwords 5-10 Entering Power-On Passwords 5-11 DriveLock... 5-16 Antivirus Software 5-17 Critical Security Updates for Windows XP 5-18 Firewall Software 5-19 Optional Security Cable 5-20 6 Hardware Options and Upgrades External Devices 6-1 Connecting a Monitor or Projector 6-2 Connecting a USB Device 6-2 Using a USB Device 6-3 Connecting a 1394 Device 6-4 Using a PC Card 6-5 Selecting a PC Card 6-5 Configuring a PC Card...

Hardware and Software Guide
Page 16
Connects an optional VGA external monitor or projector. Connects an optional S-Video device, such as a television, VCR, camcorder, projector, or video capture card. Hardware Rear Components Connectors, Jacks and Ports Component 1 Power connector 2 USB port 3 S-Video-out jack 4 External monitor port 5 Security cable slot Description Connects an AC adapter. or 2.0-compliant USB device. Attaches an optional security cable to the notebook. 1-8 Hardware and Software Guide Connects an optional 1.1-
Connects an optional VGA external monitor or projector. Connects an optional S-Video device, such as a television, VCR, camcorder, projector, or video capture card. Hardware Rear Components Connectors, Jacks and Ports Component 1 Power connector 2 USB port 3 S-Video-out jack 4 External monitor port 5 Security cable slot Description Connects an AC adapter. or 2.0-compliant USB device. Attaches an optional security cable to the notebook. 1-8 Hardware and Software Guide Connects an optional 1.1-

Hardware and Software Guide
Page 36
... for quick access to software updates and online technical support specialists, and other devices receiving video information from the notebook using the external VGA video standard. Most external monitors receive video information from the notebook. 2-8 Hardware and Software Guide Switch Display (fn+f4) The fn+f4 hotkey switches the screen image between display...
... for quick access to software updates and online technical support specialists, and other devices receiving video information from the notebook using the external VGA video standard. Most external monitors receive video information from the notebook. 2-8 Hardware and Software Guide Switch Display (fn+f4) The fn+f4 hotkey switches the screen image between display...
Hardware and Software Guide
Page 37
...3 For information about changing the function of devices that use them, are supported by default to the notebook only through an optional HP notebook expansion product. If the notebook is in Hibernation, you must restore from Hibernation before you can initiate Standby. ■ To restore...; Component video ✎ Composite video and component video devices can be initiated only while the notebook is set by the fn+f4 hotkey: ■ LCD (notebook display) ■ External VGA (most external monitors) ■ S-Video (televisions, camcorders, VCRs, and video capture boards with S-Video-in ...
...3 For information about changing the function of devices that use them, are supported by default to the notebook only through an optional HP notebook expansion product. If the notebook is in Hibernation, you must restore from Hibernation before you can initiate Standby. ■ To restore...; Component video ✎ Composite video and component video devices can be initiated only while the notebook is set by the fn+f4 hotkey: ■ LCD (notebook display) ■ External VGA (most external monitors) ■ S-Video (televisions, camcorders, VCRs, and video capture boards with S-Video-in ...

Hardware and Software Guide
Page 58
... playing a DVD. 3-18 Hardware and Software Guide Even a new battery pack can display charge information inaccurately if it . ■ Charge the battery pack fully. Power Monitoring the Charge in the battery pack. ■ The time indicates the approximate running time remaining on the screen: » Select Start > Control Panel > Performance and...
... playing a DVD. 3-18 Hardware and Software Guide Even a new battery pack can display charge information inaccurately if it . ■ Charge the battery pack fully. Power Monitoring the Charge in the battery pack. ■ The time indicates the approximate running time remaining on the screen: » Select Start > Control Panel > Performance and...

Hardware and Software Guide
Page 63
... or select Start > Control Panel > Performance and Maintenance > Power Options > Power Schemes tab. 3. You can use the notebook occasionally during the discharge procedure and have set energy-saving timeouts, expect the following performance from your system during the discharge process: &#...9632; The monitor will not turn off automatically. ■ Hard drive speed will not occur. Recharging the Battery Pack 1. To reenable Hibernation: 1....
... or select Start > Control Panel > Performance and Maintenance > Power Options > Power Schemes tab. 3. You can use the notebook occasionally during the discharge procedure and have set energy-saving timeouts, expect the following performance from your system during the discharge process: &#...9632; The monitor will not turn off automatically. ■ Hard drive speed will not occur. Recharging the Battery Pack 1. To reenable Hibernation: 1....
Hardware and Software Guide
Page 65
...; Do not leave your work, initiate Standby or Hibernation or shut down the notebook. ■ Select a short wait time, 5 minutes or less, for extended periods of time. ■ Disconnect from the Turn Off Monitor list, and then select OK. Hardware and Software Guide 3-25 To change...I/O Card, MultiMediaCard, Memory Stick, Memory Stick Pro, xD-Picture Card, or SmartMedia) you leave your notebook connected to AC power for the monitor timeout. Select a short wait time from the notebook any external devices that are plugged into an external power source. ■ Stop or remove a PC ...
...; Do not leave your work, initiate Standby or Hibernation or shut down the notebook. ■ Select a short wait time, 5 minutes or less, for extended periods of time. ■ Disconnect from the Turn Off Monitor list, and then select OK. Hardware and Software Guide 3-25 To change...I/O Card, MultiMediaCard, Memory Stick, Memory Stick Pro, xD-Picture Card, or SmartMedia) you leave your notebook connected to AC power for the monitor timeout. Select a short wait time from the notebook any external devices that are plugged into an external power source. ■ Stop or remove a PC ...

Hardware and Software Guide
Page 103
... software application for additional information. ✎ Under some circumstances a firewall can block access to obtain information about you use the notebook for e-mail, network, or Internet access, it is recommended that is possible for unauthorized persons to Internet games, interfere with preinstalled... resolve the problem, reconfigure the firewall. To temporarily solve the problem, disable the firewall, perform the task that you , your notebook, and your data. To protect your computer by including features such as logging and reporting, automatic alarms, and user interfaces for...
... software application for additional information. ✎ Under some circumstances a firewall can block access to obtain information about you use the notebook for e-mail, network, or Internet access, it is recommended that is possible for unauthorized persons to Internet games, interfere with preinstalled... resolve the problem, reconfigure the firewall. To temporarily solve the problem, disable the firewall, perform the task that you , your notebook, and your data. To protect your computer by including features such as logging and reporting, automatic alarms, and user interfaces for...

