
Bluetooth Wireless Technology Basics
Page 1
Bluetooth wireless technology basics Abstract...2 Introduction...2 How Bluetooth wireless technology works 3 BWT network topologies ...4 BWT security ...5 Establishing BWT connections ...6 Activating BWT devices ...6 Notebook PCs...6 iPAQ Pocket PCs ...8 Printers...8 Cellular phones ...8 Selecting BWT device profiles ...8 Pairing...10 Summary ...10 For more information...11
Bluetooth wireless technology basics Abstract...2 Introduction...2 How Bluetooth wireless technology works 3 BWT network topologies ...4 BWT security ...5 Establishing BWT connections ...6 Activating BWT devices ...6 Notebook PCs...6 iPAQ Pocket PCs ...8 Printers...8 Cellular phones ...8 Selecting BWT device profiles ...8 Pairing...10 Summary ...10 For more information...11
Bluetooth Wireless Technology Basics
Page 2
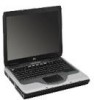
... Ericsson, Intel, IBM, Nokia, and Toshiba. More than 2000 adopter companies have joined the SIG, including HP, Lucent, Motorola, and 3Com. 2 Therefore, Ericsson chose to use an inexpensive, low-power radio built ...into a radio technology that eliminates the need for proprietary cabling between devices such as notebook PCs, handheld PCs, personal digital assistants (PDAs), cameras, and printers. Because of the unlimited potential of... on your office, don't fret. Exchange electronic business cards with everyone in a wireless personal area network (WPAN).
... Ericsson, Intel, IBM, Nokia, and Toshiba. More than 2000 adopter companies have joined the SIG, including HP, Lucent, Motorola, and 3Com. 2 Therefore, Ericsson chose to use an inexpensive, low-power radio built ...into a radio technology that eliminates the need for proprietary cabling between devices such as notebook PCs, handheld PCs, personal digital assistants (PDAs), cameras, and printers. Because of the unlimited potential of... on your office, don't fret. Exchange electronic business cards with everyone in a wireless personal area network (WPAN).
Bluetooth Wireless Technology Basics
Page 3
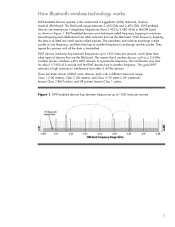
... a high immunity to interference from other types of devices that use seventy-nine 1-megahertz frequencies (from other networks that use the ISM band. HP notebooks feature Class 3 BWT radios, and HP printers feature Class 1 radios. With frequency hopping, the data is transmitted. and Class 3 (10 meters). They repeat this process until the BWT...
... a high immunity to interference from other types of devices that use seventy-nine 1-megahertz frequencies (from other networks that use the ISM band. HP notebooks feature Class 3 BWT radios, and HP printers feature Class 1 radios. With frequency hopping, the data is transmitted. and Class 3 (10 meters). They repeat this process until the BWT...
Bluetooth Wireless Technology Basics
Page 6
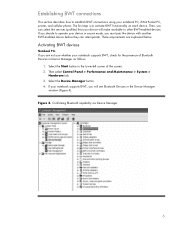
... This section describes how to activate BWT functionality on each device. Select the Start button in the Device Manager window (Figure 4). If your notebook supports BWT, check for the presence of the screen. 2. If you must pair the device with another BWT-enabled device before they can ...select the services (profiles) that your notebook PC, iPAQ Pocket PC, printer, and cellular phone. The first step is to establish BWT connections using your device will see Bluetooth Devices in...
... This section describes how to activate BWT functionality on each device. Select the Start button in the Device Manager window (Figure 4). If your notebook supports BWT, check for the presence of the screen. 2. If you must pair the device with another BWT-enabled device before they can ...select the services (profiles) that your notebook PC, iPAQ Pocket PC, printer, and cellular phone. The first step is to establish BWT connections using your device will see Bluetooth Devices in...

Bluetooth Wireless Technology Basics
Page 7
...the Software Setup Welcome window is disabled (red logo), enable it on by pressing the wireless button on your notebook user documentation if you turn it by hp to Bluetooth operations. Select the check box next to Bluetooth by right-clicking the Bluetooth icon and selecting Start the... then select Explore My Bluetooth Places. 2. Set up the BWT software After the software is installed and BWT functionality is off, turn on HP notebook PCs; Enable BWT functionality If the wireless light (ICON) is enabled, a Bluetooth icon will change from red to begin the configuration process...
...the Software Setup Welcome window is disabled (red logo), enable it on by pressing the wireless button on your notebook user documentation if you turn it by hp to Bluetooth operations. Select the check box next to Bluetooth by right-clicking the Bluetooth icon and selecting Start the... then select Explore My Bluetooth Places. 2. Set up the BWT software After the software is installed and BWT functionality is off, turn on HP notebook PCs; Enable BWT functionality If the wireless light (ICON) is enabled, a Bluetooth icon will change from red to begin the configuration process...

Bluetooth Wireless Technology Basics
Page 8
... two devices match, they report a list of your notebook, select Start > My Programs > My Bluetooth Places to manage the BWT printer connection. If any of the HP 450 Deskjet printer feature integrated BWT capability. Table 2. HP products D = supported by HP BWT-enabled products. Allows a device to another BWT-...lower right corner of the BWT profiles built into HP notebook PCs, iPAQ Pocket PCs, and printers. To see the full line of HP BWT offerings and to send images, text, business cards, and calendar notes. Also, visit http://www.hp.com/products/wireless/ for a summary of these ...
... two devices match, they report a list of your notebook, select Start > My Programs > My Bluetooth Places to manage the BWT printer connection. If any of the HP 450 Deskjet printer feature integrated BWT capability. Table 2. HP products D = supported by HP BWT-enabled products. Allows a device to another BWT-...lower right corner of the BWT profiles built into HP notebook PCs, iPAQ Pocket PCs, and printers. To see the full line of HP BWT offerings and to send images, text, business cards, and calendar notes. Also, visit http://www.hp.com/products/wireless/ for a summary of these ...
Bluetooth Wireless Technology Basics
Page 9
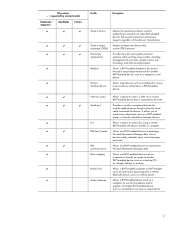
Provides the same print quality and print speed as a desktop PC) for another BWT-enabled device, such as business cards, calendar items, email messages, and notes. Allows a device to send a fax using a cable, ... for a remote Bluetooth device, such as an input or output device. 9 Allows input devices such as though a physical serial cable connected the devices. HP products D = supported by selected models Notebooks/ Tablet PCs Handhelds Printers D D D D D D D D D D D D D D D D D D D D D D D D Profile Description Generic access Generic object exchange ...
Provides the same print quality and print speed as a desktop PC) for another BWT-enabled device, such as business cards, calendar items, email messages, and notes. Allows a device to send a fax using a cable, ... for a remote Bluetooth device, such as an input or output device. 9 Allows input devices such as though a physical serial cable connected the devices. HP products D = supported by selected models Notebooks/ Tablet PCs Handhelds Printers D D D D D D D D D D D D D D D D D D D D D D D D Profile Description Generic access Generic object exchange ...
Reference Guide
Page 3
... report a gas leak in the vicinity of the leak. • Use only the power cord and batteries indicated in a wet basement). • Avoid using your notebook computer with a telephone connection near water (for possible special disposal instructions. • Disconnect the modem cable before opening the computer case or touching an uninsulated...
... report a gas leak in the vicinity of the leak. • Use only the power cord and batteries indicated in a wet basement). • Avoid using your notebook computer with a telephone connection near water (for possible special disposal instructions. • Disconnect the modem cable before opening the computer case or touching an uninsulated...

Reference Guide
Page 7
... 10 Step 2: Connect AC power 11 Step 3: Connect a phone line 12 Step 4: Turn on the notebook 13 Step 5: Set up Windows 13 Basic Operation ...15 Operating Your Notebook 16 Default power settings 16 To reset the notebook 17 To change the boot device 17 To use the TouchPad 18 To use the function... insert or remove a CD or DVD 22 To play DVD movies 23 To create or copy CDs 23 Securing Your Notebook 24 To set up password protection 24 To lock your notebook 24 To attach a security cable 25 To protect against viruses 25 To lock the hard drive 26 Reference Guide vii
... 10 Step 2: Connect AC power 11 Step 3: Connect a phone line 12 Step 4: Turn on the notebook 13 Step 5: Set up Windows 13 Basic Operation ...15 Operating Your Notebook 16 Default power settings 16 To reset the notebook 17 To change the boot device 17 To use the TouchPad 18 To use the function... insert or remove a CD or DVD 22 To play DVD movies 23 To create or copy CDs 23 Securing Your Notebook 24 To set up password protection 24 To lock your notebook 24 To attach a security cable 25 To protect against viruses 25 To lock the hard drive 26 Reference Guide vii

Reference Guide
Page 8
... To safeguard your data 28 To extend the life of the display 28 To clean your notebook 28 Batteries and Power Management 29 Managing Power Consumption 30 How the notebook manages power automatically 30 Using Battery Power 32 To check battery status 32 To respond to a low-battery warning 33 To recharge...
... To safeguard your data 28 To extend the life of the display 28 To clean your notebook 28 Batteries and Power Management 29 Managing Power Consumption 30 How the notebook manages power automatically 30 Using Battery Power 32 To check battery status 32 To respond to a low-battery warning 33 To recharge...
Reference Guide
Page 9
...the hard drive 62 To replace the hard drive holder 63 To prepare a new hard drive 64 Troubleshooting and Maintenance 65 Troubleshooting Your Notebook 66 Audio problems 66 CD-ROM and DVD problems 67 Display problems 68 Hard drive problems 69 Heat problems 70 Infrared problems 70 ...76 Power and battery problems 77 Printing problems 79 Serial, parallel, and USB problems 80 Startup problems 81 Wireless problems 82 Configuring Your Notebook 84 To run the BIOS Setup utility 84 To change video memory settings using BIOS Setup utility 87 Reinstalling and Updating Software 88 To...
...the hard drive 62 To replace the hard drive holder 63 To prepare a new hard drive 64 Troubleshooting and Maintenance 65 Troubleshooting Your Notebook 66 Audio problems 66 CD-ROM and DVD problems 67 Display problems 68 Hard drive problems 69 Heat problems 70 Infrared problems 70 ...76 Power and battery problems 77 Printing problems 79 Serial, parallel, and USB problems 80 Startup problems 81 Wireless problems 82 Configuring Your Notebook 84 To run the BIOS Setup utility 84 To change video memory settings using BIOS Setup utility 87 Reinstalling and Updating Software 88 To...

Reference Guide
Page 11
Getting Started with Your Notebook Reference Guide 1
Getting Started with Your Notebook Reference Guide 1
Reference Guide
Page 12
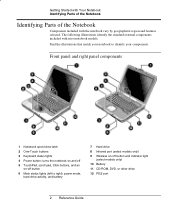
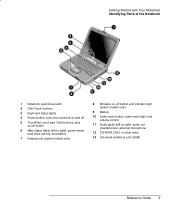
...illustrations identify the standard external components included with the notebook vary by geographical region and features selected. Front panel and right panel components 1 Notebook open/close latch 2 One-Touch buttons 3 Keyboard status lights 4 Power button: turns the notebook on and off 5 TouchPad, scroll pad, Click... buttons, and an on -off button 6 Main status lights (left to identify your components. Find the illustrations that match your notebook to right): power mode, hard drive activity, and battery 7 Hard drive 8 Infrared port (select models only) 9 Wireless on -off...
...illustrations identify the standard external components included with the notebook vary by geographical region and features selected. Front panel and right panel components 1 Notebook open/close latch 2 One-Touch buttons 3 Keyboard status lights 4 Power button: turns the notebook on and off 5 TouchPad, scroll pad, Click... buttons, and an on -off button 6 Main status lights (left to identify your components. Find the illustrations that match your notebook to right): power mode, hard drive activity, and battery 7 Hard drive 8 Infrared port (select models only) 9 Wireless on -off...
Reference Guide
Page 13
.../close latch 2 One-Touch buttons 3 Keyboard status lights 4 Power button: turns the notebook on and off 5 TouchPad, scroll pad, Click buttons, plus on-off button 6 Main status lights (left to right): power mode, hard drive activity, and battery 7 ...
.../close latch 2 One-Touch buttons 3 Keyboard status lights 4 Power button: turns the notebook on and off 5 TouchPad, scroll pad, Click buttons, plus on-off button 6 Main status lights (left to right): power mode, hard drive activity, and battery 7 ...
Reference Guide
Page 14
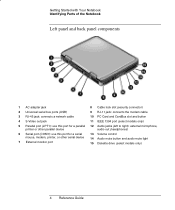
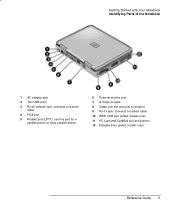
Getting Started with Your Notebook Identifying Parts of the Notebook Left panel and back panel components 1 AC adapter jack 8 Cable lock slot (security connector) 2 Universal serial bus ports (USB) 9 RJ-11 jack: connects the modem ...
Getting Started with Your Notebook Identifying Parts of the Notebook Left panel and back panel components 1 AC adapter jack 8 Cable lock slot (security connector) 2 Universal serial bus ports (USB) 9 RJ-11 jack: connects the modem ...
Reference Guide
Page 15
Getting Started with Your Notebook Identifying Parts of the Notebook 1 AC adapter jack 2 Two USB ports 3 RJ-45 network jack: connects a network cable 4 PS/2 port 5 Parallel port (LPT1): use this port for a parallel printer or other parallel device 6 External monitor port 7 S-Video out jack 8 Cable lock slot (security connector) 9 RJ-11 jack: connects a modem cable 10 IEEE 1394 port (select models only) 11 PC Card and CardBus slot and buttons 12 Diskette drive (select models only) Reference Guide 5
Getting Started with Your Notebook Identifying Parts of the Notebook 1 AC adapter jack 2 Two USB ports 3 RJ-45 network jack: connects a network cable 4 PS/2 port 5 Parallel port (LPT1): use this port for a parallel printer or other parallel device 6 External monitor port 7 S-Video out jack 8 Cable lock slot (security connector) 9 RJ-11 jack: connects a modem cable 10 IEEE 1394 port (select models only) 11 PC Card and CardBus slot and buttons 12 Diskette drive (select models only) Reference Guide 5
Reference Guide
Page 16
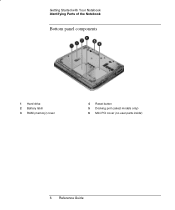
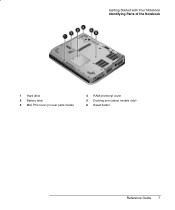
Getting Started with Your Notebook Identifying Parts of the Notebook Bottom panel components 1 Hard drive 2 Battery latch 3 RAM (memory) cover 4 Reset button 5 Docking port (select models only) 6 Mini PCI cover (no user parts inside) 6 Reference Guide
Getting Started with Your Notebook Identifying Parts of the Notebook Bottom panel components 1 Hard drive 2 Battery latch 3 RAM (memory) cover 4 Reset button 5 Docking port (select models only) 6 Mini PCI cover (no user parts inside) 6 Reference Guide
Reference Guide
Page 17
Getting Started with Your Notebook Identifying Parts of the Notebook 1 Hard drive 2 Battery latch 3 Mini PCI cover (no user parts inside) 4 RAM (memory) cover 5 Docking port (select models only) 6 Reset button Reference Guide 7
Getting Started with Your Notebook Identifying Parts of the Notebook 1 Hard drive 2 Battery latch 3 Mini PCI cover (no user parts inside) 4 RAM (memory) cover 5 Docking port (select models only) 6 Reset button Reference Guide 7
Reference Guide
Page 18
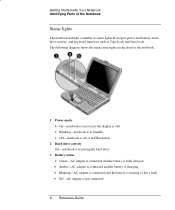
... such as Caps Lock and Num Lock. Getting Started with Your Notebook Identifying Parts of the Notebook Status lights The notebook includes a number of the notebook. 1 Power mode • On-notebook is on (even if the display is off) • Blinking-notebook is in Standby • Off-notebook is off or in Hibernation 2 Hard drive activity On...
... such as Caps Lock and Num Lock. Getting Started with Your Notebook Identifying Parts of the Notebook Status lights The notebook includes a number of the notebook. 1 Power mode • On-notebook is on (even if the display is off) • Blinking-notebook is in Standby • Off-notebook is off or in Hibernation 2 Hard drive activity On...
Reference Guide
Page 19
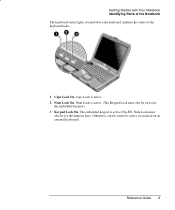
Otherwise, cursor control is active (Fn+F8). The embedded keypad is active (as marked on to use the embedded keypad.) 3 Keypad Lock On. Reference Guide 9 Getting Started with Your Notebook Identifying Parts of the Notebook The keyboard status lights, located above the keyboard, indicate the states of the keyboard locks. 1 Caps Lock On. Caps Lock is active. (The Keypad Lock must also be on an external keyboard). Num Lock is active. 2 Num Lock On. Num Lock must also be for the numeric keys.
Otherwise, cursor control is active (Fn+F8). The embedded keypad is active (as marked on to use the embedded keypad.) 3 Keypad Lock On. Reference Guide 9 Getting Started with Your Notebook Identifying Parts of the Notebook The keyboard status lights, located above the keyboard, indicate the states of the keyboard locks. 1 Caps Lock On. Caps Lock is active. (The Keypad Lock must also be on an external keyboard). Num Lock is active. 2 Num Lock On. Num Lock must also be for the numeric keys.


