Reference Guide
Page 9
...hard drive 62 To replace the hard drive holder 63 To prepare a new hard drive 64 Troubleshooting and Maintenance 65 Troubleshooting Your Notebook 66 Audio problems 66 CD-ROM and DVD problems 67 Display problems 68 Hard drive problems 69 Heat problems 70 Infrared problems 70...problems 79 Serial, parallel, and USB problems 80 Startup problems 81 Wireless problems 82 Configuring Your Notebook 84 To run the BIOS Setup utility 84 To change video memory settings using BIOS Setup utility 87 Reinstalling and Updating Software 88 To replace a damaged QuickRestore System Recovery CD 88...
...hard drive 62 To replace the hard drive holder 63 To prepare a new hard drive 64 Troubleshooting and Maintenance 65 Troubleshooting Your Notebook 66 Audio problems 66 CD-ROM and DVD problems 67 Display problems 68 Hard drive problems 69 Heat problems 70 Infrared problems 70...problems 79 Serial, parallel, and USB problems 80 Startup problems 81 Wireless problems 82 Configuring Your Notebook 84 To run the BIOS Setup utility 84 To change video memory settings using BIOS Setup utility 87 Reinstalling and Updating Software 88 To replace a damaged QuickRestore System Recovery CD 88...
Reference Guide
Page 26
...- • Insert the tip of a paper clip into the reset button on the left side of the notebook, then press the power button to restart. To change the boot order using the BIOS Setup utility. When the logo screen appears, press ESC to select the boot device, then press ENTER. Basic... Operation Operating Your Notebook To reset the notebook Occasionally, you may find that Windows or the notebook has stopped responding and will be lost. You...
...- • Insert the tip of a paper clip into the reset button on the left side of the notebook, then press the power button to restart. To change the boot order using the BIOS Setup utility. When the logo screen appears, press ESC to select the boot device, then press ENTER. Basic... Operation Operating Your Notebook To reset the notebook Occasionally, you may find that Windows or the notebook has stopped responding and will be lost. You...
Reference Guide
Page 33
..., set the password. 3. Select Start > Control Panel > User Accounts, then select your normal logon steps. 24 Reference Guide See "Configuring Your Notebook" in Windows as well as through the BIOS Setup utility. Select Create a Password, then set an empty password. On the Advanced tab, select the option to Quick Lock, press that...
..., set the password. 3. Select Start > Control Panel > User Accounts, then select your normal logon steps. 24 Reference Guide See "Configuring Your Notebook" in Windows as well as through the BIOS Setup utility. Select Create a Password, then set an empty password. On the Advanced tab, select the option to Quick Lock, press that...

Reference Guide
Page 35
... recover your information secure. From the Security menu, enable Password Required to enter the BIOS Setup utility. 3. After you match the drive password, you enable hard drive lock, the current BIOS user password (or administrator password if that is encoded on the hard drive. Select ...Start > Turn Off Computer > Restart. 2. Press F10 to save and exit BIOS Setup. 26 Reference Guide CAUTION Basic Operation Securing Your Notebook To lock the hard drive The notebook enables you to lock its internal hard drive to help keep your data. 1. From the Security...
... recover your information secure. From the Security menu, enable Password Required to enter the BIOS Setup utility. 3. After you match the drive password, you enable hard drive lock, the current BIOS user password (or administrator password if that is encoded on the hard drive. Select ...Start > Turn Off Computer > Restart. 2. Press F10 to save and exit BIOS Setup. 26 Reference Guide CAUTION Basic Operation Securing Your Notebook To lock the hard drive The notebook enables you to lock its internal hard drive to help keep your data. 1. From the Security...

Reference Guide
Page 78
... the AC adapter, then make sure it is coming from elsewhere, such as from the fan or a PC Card drive. Troubleshooting and Maintenance Troubleshooting Your Notebook If an external display does not work • Check the connections. • The external monitor may not be detected. Hard drive problems If the... Computer, select the disk you can format the hard disk and reinstall the original factory software using the QuickRestore System Recovery CD included with your notebook. In the BIOS Setup utility, try setting Video Display Device to scan, then select File > Properties.
... the AC adapter, then make sure it is coming from elsewhere, such as from the fan or a PC Card drive. Troubleshooting and Maintenance Troubleshooting Your Notebook If an external display does not work • Check the connections. • The external monitor may not be detected. Hard drive problems If the... Computer, select the disk you can format the hard disk and reinstall the original factory software using the QuickRestore System Recovery CD included with your notebook. In the BIOS Setup utility, try setting Video Display Device to scan, then select File > Properties.
Reference Guide
Page 80
... If an external mouse is difficult to turn on -off the TouchPad while you detach the scroll mouse. See "Configuring Your Notebook" in this setting with the BIOS Setup utility. If the TouchPad moves the pointer or cursor while you type Press the TouchPad on the light. • Don't...on-off button to turn off button to control Adjust the pointer controls. In the BIOS Setup utility, make sure the External Pointing Devices option in pointing devices are normally disabled. See "Configuring Your Notebook" in or external devices. If the TouchPad doesn't work • The TouchPad ...
... If an external mouse is difficult to turn on -off the TouchPad while you detach the scroll mouse. See "Configuring Your Notebook" in this setting with the BIOS Setup utility. If the TouchPad moves the pointer or cursor while you type Press the TouchPad on the light. • Don't...on-off button to turn off button to control Adjust the pointer controls. In the BIOS Setup utility, make sure the External Pointing Devices option in pointing devices are normally disabled. See "Configuring Your Notebook" in or external devices. If the TouchPad doesn't work • The TouchPad ...
Reference Guide
Page 82
... slow • Excess static or noise on free space. • If you have call-waiting, disable it. Troubleshooting and Maintenance Troubleshooting Your Notebook Memory problems If a message says you are having memory problems while running MS-DOS programs, use the MS-DOS or Application and Software troubleshooter ... line noise is shown in the line. Your telephone company can cause symptoms similar to static. • Eliminate extra connections in the BIOS Setup utility. If necessary, contact your telephone company about fixing this type of RAM. The amount of the modem connection.
... slow • Excess static or noise on free space. • If you have call-waiting, disable it. Troubleshooting and Maintenance Troubleshooting Your Notebook Memory problems If a message says you are having memory problems while running MS-DOS programs, use the MS-DOS or Application and Software troubleshooter ... line noise is shown in the line. Your telephone company can cause symptoms similar to static. • Eliminate extra connections in the BIOS Setup utility. If necessary, contact your telephone company about fixing this type of RAM. The amount of the modem connection.
Reference Guide
Page 90
... the hardware Device Manager, then select Universal Serial Bus Controller. Then plug in the AC adapter again, and reset the notebook using a USB diskette drive, use the BIOS Setup utility Boot menu to make sure Legacy USB Support is not working • Contact the vendor of the battery. ...See the "Basic Operation" chapter in Control Panel. Reference Guide 81 Contact your notebook also has a built-in diskette drive, use the BIOS Setup utility to a TCP/IP network with no DHCP server. Then press the power button to determine the proper TCP...
... the hardware Device Manager, then select Universal Serial Bus Controller. Then plug in the AC adapter again, and reset the notebook using a USB diskette drive, use the BIOS Setup utility Boot menu to make sure Legacy USB Support is not working • Contact the vendor of the battery. ...See the "Basic Operation" chapter in Control Panel. Reference Guide 81 Contact your notebook also has a built-in diskette drive, use the BIOS Setup utility to a TCP/IP network with no DHCP server. Then press the power button to determine the proper TCP...
Reference Guide
Page 93
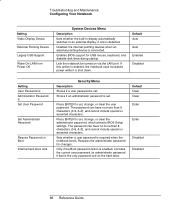
..., and marks the conflicting settings. Troubleshooting and Maintenance Configuring Your Notebook Configuring Your Notebook The BIOS Setup utility helps you to make changes to the notebook system configuration, and to tailor the operation of your notebook to your individual work needs. The following tables describe BIOS settings for the current parameter, or press ENTER to change...
..., and marks the conflicting settings. Troubleshooting and Maintenance Configuring Your Notebook Configuring Your Notebook The BIOS Setup utility helps you to make changes to the notebook system configuration, and to tailor the operation of your notebook to your individual work needs. The following tables describe BIOS settings for the current parameter, or press ENTER to change...

Reference Guide
Page 94
... as 32 hex characters. Displays an identifier used for BIOS Setup. Troubleshooting and Maintenance Configuring Your Notebook Setting BIOS Revision System Time System Date Language Internal Hard Disk UMA Video Memory Memory Serial Number Service ID UUID MAC Address Main Menu Description Shows the current BIOS version. Sets the video memory size allocated from...
... as 32 hex characters. Displays an identifier used for BIOS Setup. Troubleshooting and Maintenance Configuring Your Notebook Setting BIOS Revision System Time System Date Language Internal Hard Disk UMA Video Memory Memory Serial Number Service ID UUID MAC Address Main Menu Description Shows the current BIOS version. Sets the video memory size allocated from...
Reference Guide
Page 95
...diskette disk drive during startup. Press ENTER to set, change , or clear the administrator password, which protects BIOS Setup settings. If this option is enabled, the notebook uses increased power while it is set. The password can have no more than 8 characters (0-9, A-Z), ...and cannot include special or accented characters. Troubleshooting and Maintenance Configuring Your Notebook Setting Video Display Device External Pointing Device Legacy USB Support Wake On LAN from Power Off System Devices Menu Description Sets whether...
...diskette disk drive during startup. Press ENTER to set, change , or clear the administrator password, which protects BIOS Setup settings. If this option is enabled, the notebook uses increased power while it is set. The password can have no more than 8 characters (0-9, A-Z), ...and cannot include special or accented characters. Troubleshooting and Maintenance Configuring Your Notebook Setting Video Display Device External Pointing Device Legacy USB Support Wake On LAN from Power Off System Devices Menu Description Sets whether...

Reference Guide
Page 96
Default 1. Discards any Setup changes made since last save configuration changes and exit BIOS screen. To change video memory settings using BIOS Setup utility The notebook comes with either 32MB or 16MB of memory settings. CD-ROM Drive 4. Restores default settings, and remains in a + category, ...date, or time changes. Press Enter to save , then exits and reboots. Press F10 to bring up a list of video memory. If the notebook has more than one scanned. Hard Drive 2. Removable Devices 3. Does not affect password, date, or time changes. Move the entries to 8MB, ...
Default 1. Discards any Setup changes made since last save configuration changes and exit BIOS screen. To change video memory settings using BIOS Setup utility The notebook comes with either 32MB or 16MB of memory settings. CD-ROM Drive 4. Restores default settings, and remains in a + category, ...date, or time changes. Press Enter to save , then exits and reboots. Press F10 to bring up a list of video memory. If the notebook has more than one scanned. Hard Drive 2. Removable Devices 3. Does not affect password, date, or time changes. Move the entries to 8MB, ...
Reference Guide
Page 119
..., 45 sending files, 46 troubleshooting, 82 tuning on, 44 turning off, 45 wireless, 44 boot device order, 17, 87 Boot menu (BIOS), 87 brightness, adjusting, 19 business cards, 46 C Cable lock, 25 Caps Lock, 9 Cardbus cards, 48 cards, PCMCIA, 48 CD-ROM drive creating or copying CDs, 23... inserting CD, 20, 22 location, 2, 3 removing CD, 20, 22 CDs copying/creating, 23 recommended media, 23 cleaning the notebook, 28 configuring BIOS settings, 84 modem...
..., 45 sending files, 46 troubleshooting, 82 tuning on, 44 turning off, 45 wireless, 44 boot device order, 17, 87 Boot menu (BIOS), 87 brightness, adjusting, 19 business cards, 46 C Cable lock, 25 Caps Lock, 9 Cardbus cards, 48 cards, PCMCIA, 48 CD-ROM drive creating or copying CDs, 23... inserting CD, 20, 22 location, 2, 3 removing CD, 20, 22 CDs copying/creating, 23 recommended media, 23 cleaning the notebook, 28 configuring BIOS settings, 84 modem...

Reference Guide
Page 120
... port indicator lights, 39 location, 5 laser safety, 98 lights LAN port, 39 status, 2, 3, 8, 9 locking notebook, 24 LPT1 port, 5 M Main menu (BIOS), 85 maintenance notebook configuration, 84 software installation, 88 memory extended, 85 PC2100 DDR-266, 58, 73 troubleshooting, 73 video, 85 Mini ...mouse, troubleshooting, 71 mute button location, 3 N network connecting to, 39 LAN, See LAN wireless, See wireless network Norton AntiVirus, 25 notebook caring for, 27 changing BIOS settings, 84 cleaning, 28 opening/closing, 2, 3 protecting, 27, 70 resetting, 17 timeouts, 31 turning on, 13 Num Lock, 9...
... port indicator lights, 39 location, 5 laser safety, 98 lights LAN port, 39 status, 2, 3, 8, 9 locking notebook, 24 LPT1 port, 5 M Main menu (BIOS), 85 maintenance notebook configuration, 84 software installation, 88 memory extended, 85 PC2100 DDR-266, 58, 73 troubleshooting, 73 video, 85 Mini ...mouse, troubleshooting, 71 mute button location, 3 N network connecting to, 39 LAN, See LAN wireless, See wireless network Norton AntiVirus, 25 notebook caring for, 27 changing BIOS settings, 84 cleaning, 28 opening/closing, 2, 3 protecting, 27, 70 resetting, 17 timeouts, 31 turning on, 13 Num Lock, 9...
Reference Guide
Page 121
... 34 scroll pad, 3 scroll pad, 2 secondary display, 53 security cable lock, 5 Cable lock, 25 Norton AntiVirus, 25 Security menu (BIOS), 86 serial port troubleshooting, 80 setting up, 10 Standby and display life, 28 resuming and, 82 saving power, 34 status lights, 8 ... 32 keyboard, 2, 3, 9 location, 2, 3 meanings, 8 S-Video port, 5 T temperature, overheating, 70 1394 devices, connecting, 53 1394 port, 53 timeouts, notebook, 31 TouchPad location, 2, 3 troubleshooting, 71 troubleshooting audio, 66 battery, 77 CD/DVD drive, 67 display, 68 hard drive, 69 infrared communications, 70 keyboard, 71...
... 34 scroll pad, 3 scroll pad, 2 secondary display, 53 security cable lock, 5 Cable lock, 25 Norton AntiVirus, 25 Security menu (BIOS), 86 serial port troubleshooting, 80 setting up, 10 Standby and display life, 28 resuming and, 82 saving power, 34 status lights, 8 ... 32 keyboard, 2, 3, 9 location, 2, 3 meanings, 8 S-Video port, 5 T temperature, overheating, 70 1394 devices, connecting, 53 1394 port, 53 timeouts, notebook, 31 TouchPad location, 2, 3 troubleshooting, 71 troubleshooting audio, 66 battery, 77 CD/DVD drive, 67 display, 68 hard drive, 69 infrared communications, 70 keyboard, 71...

Maintenance and Service Guide
Page 3
... 2-40 Removing the CPU Module ...2-44 Removing the RJ11/1394 Connector Module 2-48 Removing the Motherboard ...2-50 Replacing Components on a Bottom Case 2-59 Repairing the BIOS IC...2-61 Removing Other Components...2-63 Troubleshooting and Diagnostics 3-1 Support Service Partners...3-2 Troubleshooting ...3-3 Diagnostic Tools ...3-18 Replaceable Parts...4-1 Reference Information 5-1 Password Removal Policy...5-2 Hewlett-Packard...
... 2-40 Removing the CPU Module ...2-44 Removing the RJ11/1394 Connector Module 2-48 Removing the Motherboard ...2-50 Replacing Components on a Bottom Case 2-59 Repairing the BIOS IC...2-61 Removing Other Components...2-63 Troubleshooting and Diagnostics 3-1 Support Service Partners...3-2 Troubleshooting ...3-3 Diagnostic Tools ...3-18 Replaceable Parts...4-1 Reference Information 5-1 Password Removal Policy...5-2 Hewlett-Packard...
Maintenance and Service Guide
Page 5
...Table 1-1. Accessories ...1-22 Table 1-8. Functional Structure Description 1-25 Table 2-1. Replacing Small Parts ...2-12 Table 2-5. Scope of notebook 1-15 Table 1-4. Part Number Reference...4-12 Table 5-1. LCD Guidelines ...5-4 Service Manual v Basic Troubleshooting Steps ...3-3 Figure 4-1. ...Table 4-2. Keyboard Status Lights...1-15 Table 1-5. Troubleshooting Suggestions...3-8 Table 3-4. Replacing the Antennas...2-60 Figure 2-37. BIOS Setup Menus and Parameters 3-28 Table 4-1. Removing Components...2-63 Table 3-1. Boot-Block Jumper...2-62 Figure 3-1. Activating ...
...Table 1-1. Accessories ...1-22 Table 1-8. Functional Structure Description 1-25 Table 2-1. Replacing Small Parts ...2-12 Table 2-5. Scope of notebook 1-15 Table 1-4. Part Number Reference...4-12 Table 5-1. LCD Guidelines ...5-4 Service Manual v Basic Troubleshooting Steps ...3-3 Figure 4-1. ...Table 4-2. Keyboard Status Lights...1-15 Table 1-5. Troubleshooting Suggestions...3-8 Table 3-4. Replacing the Antennas...2-60 Figure 2-37. BIOS Setup Menus and Parameters 3-28 Table 4-1. Removing Components...2-63 Table 3-1. Boot-Block Jumper...2-62 Figure 3-1. Activating ...
Maintenance and Service Guide
Page 30
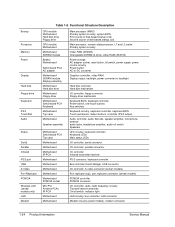
...Motherboard Motherboard PCMCIA socket Mini PCI Antenna PCAs IR PCA Motherboard Motherboard Main processor (MMO) Primary system circuitry, system BIOS First source of disk-based startup code Second source of disk-based startup cod. Main processor, numeric data processor... Hard disk controller Hard disk mechanism I/O controller, floppy connector Floppy drive mechanism Keyboard BIOS, keyboard controller Power switch, one-touch buttons Key switches Keyboard circuitry, keyboard controller, keyboard BIOS Touch pad sensor, Select buttons, controller (PS/2 output) Audio controller, audio decoder...
...Motherboard Motherboard PCMCIA socket Mini PCI Antenna PCAs IR PCA Motherboard Motherboard Main processor (MMO) Primary system circuitry, system BIOS First source of disk-based startup code Second source of disk-based startup cod. Main processor, numeric data processor... Hard disk controller Hard disk mechanism I/O controller, floppy connector Floppy drive mechanism Keyboard BIOS, keyboard controller Power switch, one-touch buttons Key switches Keyboard circuitry, keyboard controller, keyboard BIOS Touch pad sensor, Select buttons, controller (PS/2 output) Audio controller, audio decoder...
Maintenance and Service Guide
Page 86
... A new BIOS IC contains only enough basic programming to enable the notebook to it that can bend very easily. To do this. 2-56 Removal and Replacement Service Manual If you might have to contact an HP support center to store the ...system data and display information in the section entitled "Removing the Motherboard" on the floppy disk before removing the old motherboard, type A for the manual update option. After installing a new motherboard, you must reprogram the BIOS IC, preferably with the latest BIOS-(see page 2-60.) 1. Let the notebook...
... A new BIOS IC contains only enough basic programming to enable the notebook to it that can bend very easily. To do this. 2-56 Removal and Replacement Service Manual If you might have to contact an HP support center to store the ...system data and display information in the section entitled "Removing the Motherboard" on the floppy disk before removing the old motherboard, type A for the manual update option. After installing a new motherboard, you must reprogram the BIOS IC, preferably with the latest BIOS-(see page 2-60.) 1. Let the notebook...
Maintenance and Service Guide
Page 89
.... Using e-DiagTools for Windows or a BIOS floppy disk to reprogram the BIOS IC. Update the notebook's BIOS as follows: 1. Select Start > Programs (or All Programs) > Hewlett-Packard > Notebook > HP e-DiagTools > e-DiagTools for BIOS passwords-so record these directions exactly or you make an Internet connection from the HP Business Support Web site http://www.hp.com/go/bizsupport. Once the...
.... Using e-DiagTools for Windows or a BIOS floppy disk to reprogram the BIOS IC. Update the notebook's BIOS as follows: 1. Select Start > Programs (or All Programs) > Hewlett-Packard > Notebook > HP e-DiagTools > e-DiagTools for BIOS passwords-so record these directions exactly or you make an Internet connection from the HP Business Support Web site http://www.hp.com/go/bizsupport. Once the...


