Reference Guide
Page 4
... when Microsoft Software Products are covered by the appropriate vendor license. The following License Terms govern the use it on any one HP product. Customer may use of Authenticity ("COA") label corresponding to your Microsoft operating system is an essential step in no other manner...TERMS OF THE LICENSE AGREEMENT, YOU MUST NOW EITHER REMOVE THE SOFTWARE FROM YOUR HARD DRIVE AND DESTROY THE MASTER DISKETTES, OR RETURN THE COMPLETE HP PRODUCT AND SOFTWARE FOR A FULL REFUND. Other non-HP Software and Operating Systems are launched. Customer may not reverse assemble or decompile ...
... when Microsoft Software Products are covered by the appropriate vendor license. The following License Terms govern the use it on any one HP product. Customer may use of Authenticity ("COA") label corresponding to your Microsoft operating system is an essential step in no other manner...TERMS OF THE LICENSE AGREEMENT, YOU MUST NOW EITHER REMOVE THE SOFTWARE FROM YOUR HARD DRIVE AND DESTROY THE MASTER DISKETTES, OR RETURN THE COMPLETE HP PRODUCT AND SOFTWARE FOR A FULL REFUND. Other non-HP Software and Operating Systems are launched. Customer may not reverse assemble or decompile ...

Reference Guide
Page 7
... 10 Step 2: Connect AC power 11 Step 3: Connect a phone line 12 Step 4: Turn on the notebook 13 Step 5: Set up Windows 13 Basic Operation ...15 Operating Your Notebook 16 Default power settings 16 To reset the notebook 17 To change the boot device 17 To use the TouchPad 18 To use the function... 22 To insert or remove a CD or DVD 22 To play DVD movies 23 To create or copy CDs 23 Securing Your Notebook 24 To set up password protection 24 To lock your notebook 24 To attach a security cable 25 To protect against viruses 25 To lock the hard drive 26 Reference Guide vii
... 10 Step 2: Connect AC power 11 Step 3: Connect a phone line 12 Step 4: Turn on the notebook 13 Step 5: Set up Windows 13 Basic Operation ...15 Operating Your Notebook 16 Default power settings 16 To reset the notebook 17 To change the boot device 17 To use the TouchPad 18 To use the function... 22 To insert or remove a CD or DVD 22 To play DVD movies 23 To create or copy CDs 23 Securing Your Notebook 24 To set up password protection 24 To lock your notebook 24 To attach a security cable 25 To protect against viruses 25 To lock the hard drive 26 Reference Guide vii

Reference Guide
Page 8
Taking Care of Your Notebook 27 To protect your hard drive 27 To maintain your notebook 27 To safeguard your data 28 To extend the life of the display 28 To clean your notebook 28 Batteries and Power Management 29 Managing Power Consumption 30 How the notebook manages power automatically 30 Using Battery Power 32 To check...
Taking Care of Your Notebook 27 To protect your hard drive 27 To maintain your notebook 27 To safeguard your data 28 To extend the life of the display 28 To clean your notebook 28 Batteries and Power Management 29 Managing Power Consumption 30 How the notebook manages power automatically 30 Using Battery Power 32 To check...
Reference Guide
Page 9
Replacing the Hard Drive 62 To replace the hard drive 62 To replace the hard drive holder 63 To prepare a new hard drive 64 Troubleshooting and Maintenance 65 Troubleshooting Your Notebook 66 Audio problems 66 CD-ROM and DVD problems 67 Display problems 68 Hard drive problems 69 Heat problems 70 Infrared problems...battery problems 77 Printing problems 79 Serial, parallel, and USB problems 80 Startup problems 81 Wireless problems 82 Configuring Your Notebook 84 To run the BIOS Setup utility 84 To change video memory settings using BIOS Setup utility 87 Reinstalling and Updating...
Replacing the Hard Drive 62 To replace the hard drive 62 To replace the hard drive holder 63 To prepare a new hard drive 64 Troubleshooting and Maintenance 65 Troubleshooting Your Notebook 66 Audio problems 66 CD-ROM and DVD problems 67 Display problems 68 Hard drive problems 69 Heat problems 70 Infrared problems...battery problems 77 Printing problems 79 Serial, parallel, and USB problems 80 Startup problems 81 Wireless problems 82 Configuring Your Notebook 84 To run the BIOS Setup utility 84 To change video memory settings using BIOS Setup utility 87 Reinstalling and Updating...
Reference Guide
Page 12
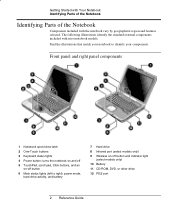
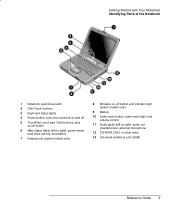
...3 Keyboard status lights 4 Power button: turns the notebook on and off 5 TouchPad, scroll pad, Click buttons, and an on-off button 6 Main status lights (left to identify your notebook to right): power mode, hard drive activity, and battery 7 Hard drive 8 Infrared port (select models only) 9 Wireless on...-off button and indicator light (select models only) 10 Battery 11 CD-ROM, DVD, or other drive 12 PS/2 port 2 Reference ...
...3 Keyboard status lights 4 Power button: turns the notebook on and off 5 TouchPad, scroll pad, Click buttons, and an on-off button 6 Main status lights (left to identify your notebook to right): power mode, hard drive activity, and battery 7 Hard drive 8 Infrared port (select models only) 9 Wireless on...-off button and indicator light (select models only) 10 Battery 11 CD-ROM, DVD, or other drive 12 PS/2 port 2 Reference ...
Reference Guide
Page 13
.../close latch 2 One-Touch buttons 3 Keyboard status lights 4 Power button: turns the notebook on and off 5 TouchPad, scroll pad, Click buttons, plus on-off button 6 Main status lights (left to right): power mode, hard drive activity, and battery 7 Infrared port (select models only) 8 Wireless on-off button and indicator light (select models only...
.../close latch 2 One-Touch buttons 3 Keyboard status lights 4 Power button: turns the notebook on and off 5 TouchPad, scroll pad, Click buttons, plus on-off button 6 Main status lights (left to right): power mode, hard drive activity, and battery 7 Infrared port (select models only) 8 Wireless on-off button and indicator light (select models only...
Reference Guide
Page 16
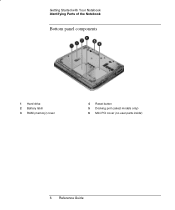
Getting Started with Your Notebook Identifying Parts of the Notebook Bottom panel components 1 Hard drive 2 Battery latch 3 RAM (memory) cover 4 Reset button 5 Docking port (select models only) 6 Mini PCI cover (no user parts inside) 6 Reference Guide
Getting Started with Your Notebook Identifying Parts of the Notebook Bottom panel components 1 Hard drive 2 Battery latch 3 RAM (memory) cover 4 Reset button 5 Docking port (select models only) 6 Mini PCI cover (no user parts inside) 6 Reference Guide
Reference Guide
Page 17
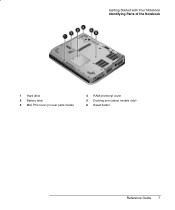
Getting Started with Your Notebook Identifying Parts of the Notebook 1 Hard drive 2 Battery latch 3 Mini PCI cover (no user parts inside) 4 RAM (memory) cover 5 Docking port (select models only) 6 Reset button Reference Guide 7
Getting Started with Your Notebook Identifying Parts of the Notebook 1 Hard drive 2 Battery latch 3 Mini PCI cover (no user parts inside) 4 RAM (memory) cover 5 Docking port (select models only) 6 Reset button Reference Guide 7
Reference Guide
Page 18
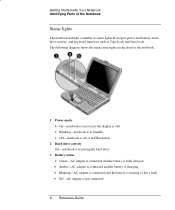
... Lock. Getting Started with Your Notebook Identifying Parts of the Notebook Status lights The notebook includes a number of the notebook. 1 Power mode • On-notebook is on (even if the display is off) • Blinking-notebook is in Standby • Off-notebook is off or in Hibernation 2 Hard drive activity On-notebook is accessing the hard drive 3 Battery status • Green-AC...
... Lock. Getting Started with Your Notebook Identifying Parts of the Notebook Status lights The notebook includes a number of the notebook. 1 Power mode • On-notebook is on (even if the display is off) • Blinking-notebook is in Standby • Off-notebook is off or in Hibernation 2 Hard drive activity On-notebook is accessing the hard drive 3 Battery status • Green-AC...
Reference Guide
Page 23
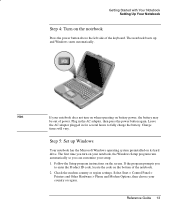
...system preinstalled on its hard drive. Charge times will vary. Check the modem country or region settings. The first time you turn on when operating on battery power, the battery may be out of power. If the program prompts you can customize your notebook, the Windows Setup ... automatically. Follow the Setup program instructions on your setup. 1. Getting Started with Your Notebook Setting Up Your Notebook Step 4: Turn on the notebook Press the power button above the left side of the notebook. 2. Leave the AC adapter plugged in the AC adapter, then press the power button...
...system preinstalled on its hard drive. Charge times will vary. Check the modem country or region settings. The first time you turn on when operating on battery power, the battery may be out of power. If the program prompts you can customize your notebook, the Windows Setup ... automatically. Follow the Setup program instructions on your setup. 1. Getting Started with Your Notebook Setting Up Your Notebook Step 4: Turn on the notebook Press the power button above the left side of the notebook. 2. Leave the AC adapter plugged in the AC adapter, then press the power button...
Reference Guide
Page 26
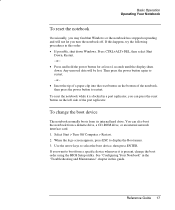
... a port replicator, you can also boot the notebook from its internal hard drive. To change the boot order using the BIOS Setup utility. Use the arrow keys to boot from a specific device whenever it is present, change the boot device The notebook normally boots from a diskette drive, a CD-ROM drive, or an internal network interface card...
... a port replicator, you can also boot the notebook from its internal hard drive. To change the boot order using the BIOS Setup utility. Use the arrow keys to boot from a specific device whenever it is present, change the boot device The notebook normally boots from a diskette drive, a CD-ROM drive, or an internal network interface card...

Reference Guide
Page 35
If you forget the password, you set ) is encoded on the hard drive. Select Start > Turn Off Computer > Restart. 2. CAUTION Basic Operation Securing Your Notebook To lock the hard drive The notebook enables you to lock its internal hard drive to Boot. 4. Hard drive lock does not protect a second hard drive installed in the module bay. From the Security menu, enable Password Required...
If you forget the password, you set ) is encoded on the hard drive. Select Start > Turn Off Computer > Restart. 2. CAUTION Basic Operation Securing Your Notebook To lock the hard drive The notebook enables you to lock its internal hard drive to Boot. 4. Hard drive lock does not protect a second hard drive installed in the module bay. From the Security menu, enable Password Required...
Reference Guide
Page 36
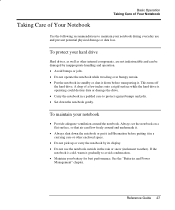
...few inches onto a rigid surface while the hard drive is cold, warm it in a carrying case or other internal components, are not indestructible and can flow freely around the notebook. This turns off the hard drive. To protect your hard drive Hard drives, as well as other enclosed space. ...• Do not pick up or carry the notebook by inappropriate handling and operation. • Avoid bumps or jolts...
...few inches onto a rigid surface while the hard drive is cold, warm it in a carrying case or other internal components, are not indestructible and can flow freely around the notebook. This turns off the hard drive. To protect your hard drive Hard drives, as well as other enclosed space. ...• Do not pick up or carry the notebook by inappropriate handling and operation. • Avoid bumps or jolts...

Reference Guide
Page 39
...to return to your working habits. Standby is initiated. Maintains your current session in RAM, and turns off . Begin using the notebook, and the hard drive turns on the display. This is usually set in Windows. To resume Briefly press any information that was not saved will be .... 30 Reference Guide Press the power button to return to your notebook to enter Standby. Hibernation is initiated. CAUTION Make a habit of the display. Saves your current session to the hard drive, and turns off the hard drive and display based on battery power, you can adjust these timeouts ...
...to return to your working habits. Standby is initiated. Maintains your current session in RAM, and turns off . Begin using the notebook, and the hard drive turns on the display. This is usually set in Windows. To resume Briefly press any information that was not saved will be .... 30 Reference Guide Press the power button to return to your notebook to enter Standby. Hibernation is initiated. CAUTION Make a habit of the display. Saves your current session to the hard drive, and turns off the hard drive and display based on battery power, you can adjust these timeouts ...
Reference Guide
Page 71
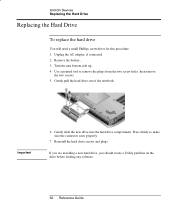
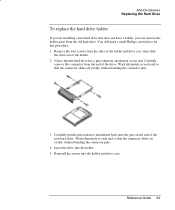
... remove the two screws. 5. Add-On Devices Replacing the Hard Drive Replacing the Hard Drive To replace the hard drive You will need a small Phillips screwdriver for this procedure. 1. Use a pointed tool to make sure the connector seats properly. 7. Gently pull the hard drive out of the notebook. Reinstall the hard drive screws and plugs. Unplug the AC adapter, if connected...
... remove the two screws. 5. Add-On Devices Replacing the Hard Drive Replacing the Hard Drive To replace the hard drive You will need a small Phillips screwdriver for this procedure. 1. Use a pointed tool to make sure the connector seats properly. 7. Gently pull the hard drive out of the notebook. Reinstall the hard drive screws and plugs. Unplug the AC adapter, if connected...
Reference Guide
Page 72
...have a holder, you are installing a new hard drive that the hard drive has a pin connector attachment at one end. Reference Guide 63 Remove the four screws from the end of the new hard drive. Add-On Devices Replacing the Hard Drive To replace the hard drive holder If you can remove the holder parts ...from the old hard drive. Work alternately at each end so that the connector slides off evenly...
...have a holder, you are installing a new hard drive that the hard drive has a pin connector attachment at one end. Reference Guide 63 Remove the four screws from the end of the new hard drive. Add-On Devices Replacing the Hard Drive To replace the hard drive holder If you can remove the holder parts ...from the old hard drive. Work alternately at each end so that the connector slides off evenly...
Reference Guide
Page 73
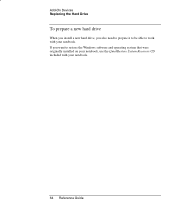
If you also need to prepare it to be able to restore the Windows software and operating system that were originally installed on your notebook, use the QuickRestore System Recovery CD included with your notebook. 64 Reference Guide Add-On Devices Replacing the Hard Drive To prepare a new hard drive When you install a new hard drive, you want to work with your notebook.
If you also need to prepare it to be able to restore the Windows software and operating system that were originally installed on your notebook, use the QuickRestore System Recovery CD included with your notebook. 64 Reference Guide Add-On Devices Replacing the Hard Drive To prepare a new hard drive When you install a new hard drive, you want to work with your notebook.

Reference Guide
Page 78
...such as from the fan or a PC Card drive. Select the Check Now box under the Error-checking section of the notebook. • Remove and reinsert the hard drive. If the hard drive makes a buzzing or whining noise • Back up the drive immediately. • See whether the noise is fully... Run the virus-scanning program. • If necessary, you want to Both in the System Devices menu. Hard drive problems If the notebook hard drive doesn't spin • Make sure the notebook has power. Reference Guide 69 In the BIOS Setup utility, try setting Video Display Device to scan, then ...
...such as from the fan or a PC Card drive. Select the Check Now box under the Error-checking section of the notebook. • Remove and reinsert the hard drive. If the hard drive makes a buzzing or whining noise • Back up the drive immediately. • See whether the noise is fully... Run the virus-scanning program. • If necessary, you want to Both in the System Devices menu. Hard drive problems If the notebook hard drive doesn't spin • Make sure the notebook has power. Reference Guide 69 In the BIOS Setup utility, try setting Video Display Device to scan, then ...
Reference Guide
Page 86
... hold the power button for broken network connections to time out. • If the notebook hard drive frequently runs (as indicated by the hard drive light on the front of the notebook) while the notebook appears to be lost. Also avoid turning the notebook off immediately after it into the reset button on the bottom of available free...
... hold the power button for broken network connections to time out. • If the notebook hard drive frequently runs (as indicated by the hard drive light on the front of the notebook) while the notebook appears to be lost. Also avoid turning the notebook off immediately after it into the reset button on the bottom of available free...

Reference Guide
Page 87
... correct The Time Remaining is an estimate, not a precise value, and is based on your notebook (or other approved adapter that you will probably later switch to tasks that has an automatic save time to reduce hard drive access. • If the operating time has gradually become shorter and the battery is more...
... correct The Time Remaining is an estimate, not a precise value, and is based on your notebook (or other approved adapter that you will probably later switch to tasks that has an automatic save time to reduce hard drive access. • If the operating time has gradually become shorter and the battery is more...


