
HP USB Digital Drive
Page 2
The HP USB Digital Drive 1 is running Microsoft Windows XP Home, Windows XP Pro, or Windows 2000. The Digital Drive can purchase one (in various storage capacities) from any computer that is a pocket-sized SD (Secure Digital) memory drive for storing and transferring files such as digital pictures, music, video, and data. User Guide 1 An SD memory card 2 may not be used with any HP authorized reseller. However, you will need an SD memory card to operate the Digital Drive. You can be included.
The HP USB Digital Drive 1 is running Microsoft Windows XP Home, Windows XP Pro, or Windows 2000. The Digital Drive can purchase one (in various storage capacities) from any computer that is a pocket-sized SD (Secure Digital) memory drive for storing and transferring files such as digital pictures, music, video, and data. User Guide 1 An SD memory card 2 may not be used with any HP authorized reseller. However, you will need an SD memory card to operate the Digital Drive. You can be included.

HP USB Digital Drive
Page 3
Insert the SD memory card into the SD slot 2 with the notched corner positioned on the lower left as shown. If the SD memory card does not slide in properly, gently pull it out and reinsert it. 2 User Guide Remove the cap 1 of the Digital Drive. 2. Installing the SD Memory Card 1.
Insert the SD memory card into the SD slot 2 with the notched corner positioned on the lower left as shown. If the SD memory card does not slide in properly, gently pull it out and reinsert it. 2 User Guide Remove the cap 1 of the Digital Drive. 2. Installing the SD Memory Card 1.
HP USB Digital Drive
Page 4
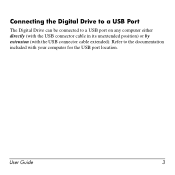
Refer to a USB port on any computer either directly (with the USB connector cable in its unextended position) or by extension (with your computer for the USB port location. Connecting the Digital Drive to a USB Port The Digital Drive can be connected to the documentation included with the USB connector cable extended). User Guide 3
Refer to a USB port on any computer either directly (with the USB connector cable in its unextended position) or by extension (with your computer for the USB port location. Connecting the Digital Drive to a USB Port The Digital Drive can be connected to the documentation included with the USB connector cable extended). User Guide 3
HP USB Digital Drive
Page 5
If the status light does not turn on your computer. To connect the Digital Drive to a USB port directly (with the connector cable in the unextended position): » Insert the USB connector on the Digital Drive into a USB port on , remove the Digital Drive from the USB port, then reinsert the USB connector. 4 User Guide The status light on the Digital Drive turns on when the connection is successful.
If the status light does not turn on your computer. To connect the Digital Drive to a USB port directly (with the connector cable in the unextended position): » Insert the USB connector on the Digital Drive into a USB port on , remove the Digital Drive from the USB port, then reinsert the USB connector. 4 User Guide The status light on the Digital Drive turns on when the connection is successful.

HP USB Digital Drive
Page 6
User Guide 5 Rotate the USB connector cable out of its extended position): 1. To connect the Digital Drive to a USB port by extension (with the USB cable in its track gently until it is fully extended.
User Guide 5 Rotate the USB connector cable out of its extended position): 1. To connect the Digital Drive to a USB port by extension (with the USB cable in its track gently until it is fully extended.
HP USB Digital Drive
Page 7
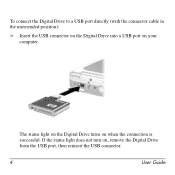
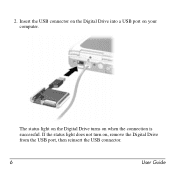
2. The status light on the Digital Drive turns on , remove the Digital Drive from the USB port, then reinsert the USB connector. 6 User Guide If the status light does not turn on when the connection is successful. Insert the USB connector on the Digital Drive into a USB port on your computer.
2. The status light on the Digital Drive turns on , remove the Digital Drive from the USB port, then reinsert the USB connector. 6 User Guide If the status light does not turn on when the connection is successful. Insert the USB connector on the Digital Drive into a USB port on your computer.
HP USB Digital Drive
Page 8
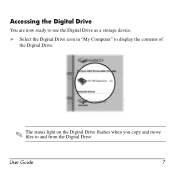
User Guide 7 Accessing the Digital Drive You are now ready to use the Digital Drive as a storage device. » Select the Digital Drive icon in "My Computer" to display the contents of the Digital Drive. ✎ The status light on the Digital Drive flashes when you copy and move files to and from the Digital Drive.
User Guide 7 Accessing the Digital Drive You are now ready to use the Digital Drive as a storage device. » Select the Digital Drive icon in "My Computer" to display the contents of the Digital Drive. ✎ The status light on the Digital Drive flashes when you copy and move files to and from the Digital Drive.

HP USB Digital Drive
Page 9
Disconnecting the Digital Drive ✎ Do not attempt to Remove Hardware" message appears on your taskbar. Gently unplug the Digital Drive from the USB port. ✎ If the USB connector cable is flashing. 1. Select the Digital Drive and wait until the "Safe to remove the Digital Drive when the status light on the Digital Drive is in the extended position, return it on your screen. 3. Select the "Safely Remove Hardware" icon on its track for safe storage. 8 User Guide A dialog box displays a list of connected devices. 2.
Disconnecting the Digital Drive ✎ Do not attempt to Remove Hardware" message appears on your taskbar. Gently unplug the Digital Drive from the USB port. ✎ If the USB connector cable is flashing. 1. Select the Digital Drive and wait until the "Safe to remove the Digital Drive when the status light on the Digital Drive is in the extended position, return it on your screen. 3. Select the "Safely Remove Hardware" icon on its track for safe storage. 8 User Guide A dialog box displays a list of connected devices. 2.
HP USB Digital Drive
Page 10
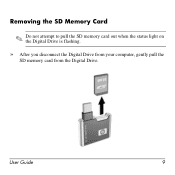
User Guide 9 Removing the SD Memory Card ✎ Do not attempt to pull the SD memory card out when the status light on the Digital Drive is flashing. » After you disconnect the Digital Drive from your computer, gently pull the SD memory card from the Digital Drive.
User Guide 9 Removing the SD Memory Card ✎ Do not attempt to pull the SD memory card out when the status light on the Digital Drive is flashing. » After you disconnect the Digital Drive from your computer, gently pull the SD memory card from the Digital Drive.
HP USB Digital Drive
Page 11
... Technical Support Support services are using 10 User Guide To access HP technical support, visit the HP Web site at http://www.hp.com, and select your own questions. When you call technical support, have the following items available: ■ The HP USB Digital Drive ■ Conditions under which... ■ Error messages that have occurred ■ Hardware and software you are available on the Internet through HP technical support. HP responds to questions in a timely manner. You can either browse the postings as a guest, or register as a user and submit your country or region.
... Technical Support Support services are using 10 User Guide To access HP technical support, visit the HP Web site at http://www.hp.com, and select your own questions. When you call technical support, have the following items available: ■ The HP USB Digital Drive ■ Conditions under which... ■ Error messages that have occurred ■ Hardware and software you are available on the Internet through HP technical support. HP responds to questions in a timely manner. You can either browse the postings as a guest, or register as a user and submit your country or region.

HP USB Digital Drive
Page 112
User Guide HP USB Digital Drive First Edition July 2003 Microsoft and Windows are set forth in the U.S. SD Logo is subject to change without notice. The information contained herein is a trademark. The warranties for technical or editorial errors or omissions contained herein. and/or other countries. © 2003 Hewlett-Packard Development Company, L.P. HP shall not be liable for HP products and services are trademarks of Microsoft Corporation in the express warranty statements accompanying such products and services.
User Guide HP USB Digital Drive First Edition July 2003 Microsoft and Windows are set forth in the U.S. SD Logo is subject to change without notice. The information contained herein is a trademark. The warranties for technical or editorial errors or omissions contained herein. and/or other countries. © 2003 Hewlett-Packard Development Company, L.P. HP shall not be liable for HP products and services are trademarks of Microsoft Corporation in the express warranty statements accompanying such products and services.

Lithium-ion battery technology: Getting the most from Smart Batteries
Page 6
...capacity. • Running high-end applications using word processing applications. Battery care practices After reading the information presented in this paper, users should be aware of conditions that is left in an unpowered notebook. • During prolonged storage or non-use and storage are... applications on battery power. • Periodically calibrate the battery based on the usage model. Additional battery care practices are covered in the HP User Guides for extended periods. Such aging occurs more than 2 weeks. • Use the type of battery with the highest capacity (Ah) ...
...capacity. • Running high-end applications using word processing applications. Battery care practices After reading the information presented in this paper, users should be aware of conditions that is left in an unpowered notebook. • During prolonged storage or non-use and storage are... applications on battery power. • Periodically calibrate the battery based on the usage model. Additional battery care practices are covered in the HP User Guides for extended periods. Such aging occurs more than 2 weeks. • Use the type of battery with the highest capacity (Ah) ...

Hardware Guide
Page 34
Sets the notebook to connectors on an optional Port Replicator. The image simultaneously displays on the notebook screen and an external device connected to the external monitor connector or S-Video out jack on and off when these devices are enabled in the software utilities. Hardware Guide 2-11 Pointing Devices and Keyboard Component 2 Wireless On/Off button 3 Presentation Mode button Description Turns the wireless LAN and optional Bluetooth device on the rear panel or to presentation mode, which opens a user-defined application, folder, file, or Web site.
Sets the notebook to connectors on an optional Port Replicator. The image simultaneously displays on the notebook screen and an external device connected to the external monitor connector or S-Video out jack on and off when these devices are enabled in the software utilities. Hardware Guide 2-11 Pointing Devices and Keyboard Component 2 Wireless On/Off button 3 Presentation Mode button Description Turns the wireless LAN and optional Bluetooth device on the rear panel or to presentation mode, which opens a user-defined application, folder, file, or Web site.
Hardware Guide
Page 85
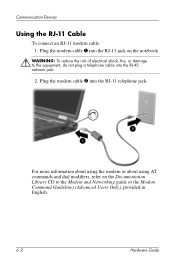
... on the notebook. Å WARNING: To reduce the risk of electrical shock, fire, or damage to the Modem and Networking guide or the Modem Command Guidelines (Advanced Users Only), provided in English. 6-2 Hardware Guide Plug the modem cable 2 into the RJ-45 network jack. 2. Plug the modem cable 1 into the RJ-11 jack...
... on the notebook. Å WARNING: To reduce the risk of electrical shock, fire, or damage to the Modem and Networking guide or the Modem Command Guidelines (Advanced Users Only), provided in English. 6-2 Hardware Guide Plug the modem cable 2 into the RJ-45 network jack. 2. Plug the modem cable 1 into the RJ-11 jack...
Hardware Guide
Page 100
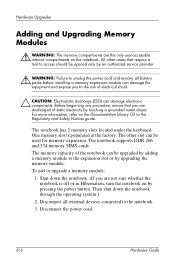
... the keyboard. To add or upgrade a memory module: 1. Disconnect the power cord. 8-6 Hardware Guide The other areas that you are not sure whether the notebook is populated at the factory. Shut down... WARNING: Failure to unplug the power cord and remove all external devices connected to the Regulatory and Safety Notices guide. For more information, refer on the Documentation Library CD to the notebook. 3. One memory slot is off... Memory Modules Å WARNING: The memory compartments are the only user-accessible internal compartments on by touching a grounded metal object.
... the keyboard. To add or upgrade a memory module: 1. Disconnect the power cord. 8-6 Hardware Guide The other areas that you are not sure whether the notebook is populated at the factory. Shut down... WARNING: Failure to unplug the power cord and remove all external devices connected to the Regulatory and Safety Notices guide. For more information, refer on the Documentation Library CD to the notebook. 3. One memory slot is off... Memory Modules Å WARNING: The memory compartments are the only user-accessible internal compartments on by touching a grounded metal object.
Software Guide
Page 93
...information 9-2 Advanced Port Replicator docking or undocking before starting DVD 4-4 antivirus software 1-5 B battery pack, causing CD or DVD write corruption 4-8, 4-13 Bluetooth installing software 1-2 Bluetooth user guides 1-4 boot sequence default 6-2 setting new 6-5 C CD(s) accessing Windows Media Player help files 4-3 avoiding Standby and Hibernation 4-1 CD-R vs. CD-RW 4-8, 4-13 copying ... with 3-14, 6-3 File menu 8-3 including devices in MultiBoot 6-3 notebook information 9-2 procedures 8-1 protecting with password 3-15 restoring defaults 8-2 Security menu 8-4 Software Guide Index-1
...information 9-2 Advanced Port Replicator docking or undocking before starting DVD 4-4 antivirus software 1-5 B battery pack, causing CD or DVD write corruption 4-8, 4-13 Bluetooth installing software 1-2 Bluetooth user guides 1-4 boot sequence default 6-2 setting new 6-5 C CD(s) accessing Windows Media Player help files 4-3 avoiding Standby and Hibernation 4-1 CD-R vs. CD-RW 4-8, 4-13 copying ... with 3-14, 6-3 File menu 8-3 including devices in MultiBoot 6-3 notebook information 9-2 procedures 8-1 protecting with password 3-15 restoring defaults 8-2 Security menu 8-4 Software Guide Index-1
Software Guide
Page 96
Index security features device disabling 3-14 HP Administrator password 3-15 shutting down the notebook 2-6 SoftPaq 9-3 software antivirus 1-5 installing 1-2 license 1-1 setup 1-1 Software Setup utility 1-3 space requirements 1-3 UDF Reader 4-8 Software Setup utility 1-2 software updates 9-1 ... support 8-1 W Windows Media Player accessing Help file 4-3 playing CDs 4-2 WinDVD Creating DVDs 4-12 error message 4-4 installing 4-3 playing DVDs 4-3 region settings 4-5 wireless (802.11 and Bluetooth) user guides 1-4 Index-4 Software...
Index security features device disabling 3-14 HP Administrator password 3-15 shutting down the notebook 2-6 SoftPaq 9-3 software antivirus 1-5 installing 1-2 license 1-1 setup 1-1 Software Setup utility 1-3 space requirements 1-3 UDF Reader 4-8 Software Setup utility 1-2 software updates 9-1 ... support 8-1 W Windows Media Player accessing Help file 4-3 playing CDs 4-2 WinDVD Creating DVDs 4-12 error message 4-4 installing 4-3 playing DVDs 4-3 region settings 4-5 wireless (802.11 and Bluetooth) user guides 1-4 Index-4 Software...
Startup Guide
Page 18
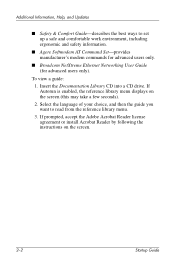
... comfortable work environment, including ergonomic and safety information. ■ Agere Softmodem AT Command Set-provides manufacturer's modem commands for advanced users only. ■ Broadcom NetXtreme Ethernet Networking User Guide (for advanced users only). Additional Information, Help, and Updates ■ Safety & Comfort Guide-describes the best ways to read from the reference library menu. 3. To view...
... comfortable work environment, including ergonomic and safety information. ■ Agere Softmodem AT Command Set-provides manufacturer's modem commands for advanced users only. ■ Broadcom NetXtreme Ethernet Networking User Guide (for advanced users only). Additional Information, Help, and Updates ■ Safety & Comfort Guide-describes the best ways to read from the reference library menu. 3. To view...
Startup Guide
Page 40
... Power Adapter/Charger 3-12 Autorun 2-2 B battery pack battery light 1-5, 3-6 inserting 1-2 primary bay 3-8 bay(s) hard drive 3-15 primary battery 3-8 Bluetooth 1-10, 3-10 Broadcom NetXtreme Ethernet Networking User Guide 2-2 button(s) power 1-4, 3-3 Quick Launch 3-2, 3-3 release latch 1-4 TouchPad 3-1 volume 3-11 C caps lock light 3-5 CD, Documentation Library 2-1 commands, modem 2-1 compartments, primary memory 3-4 connector(s) 1394 3-12 DC power...
... Power Adapter/Charger 3-12 Autorun 2-2 B battery pack battery light 1-5, 3-6 inserting 1-2 primary bay 3-8 bay(s) hard drive 3-15 primary battery 3-8 Bluetooth 1-10, 3-10 Broadcom NetXtreme Ethernet Networking User Guide 2-2 button(s) power 1-4, 3-3 Quick Launch 3-2, 3-3 release latch 1-4 TouchPad 3-1 volume 3-11 C caps lock light 3-5 CD, Documentation Library 2-1 commands, modem 2-1 compartments, primary memory 3-4 connector(s) 1394 3-12 DC power...
Startup Guide
Page 43
... configuration, disabling 1-9 wireless 802.11 wireless LAN 1-8 Bluetooth 1-10 locating device information 1-10 On/Off light 3-2, 3-3 reference guides 1-10 worldwide telephone numbers 2-4 Index-4 Startup Guide Index Software Guide 2-1 Software Setup utility 1-6 speakers 3-11 Standby, exiting 3-3 S-Video out jack 3-13 system drivers 1-1 T technical support 2-3,...2-4 TouchPad 3-1 traveling with the notebook Aircraft Power Adapter 3-12 Automobile Power Adapter/Charger 3-12 Troubleshooting guide 2-1 turning the notebook on/off 1-4 U USB connectors 3-12 with power connector 3-12 user guides.
... configuration, disabling 1-9 wireless 802.11 wireless LAN 1-8 Bluetooth 1-10 locating device information 1-10 On/Off light 3-2, 3-3 reference guides 1-10 worldwide telephone numbers 2-4 Index-4 Startup Guide Index Software Guide 2-1 Software Setup utility 1-6 speakers 3-11 Standby, exiting 3-3 S-Video out jack 3-13 system drivers 1-1 T technical support 2-3,...2-4 TouchPad 3-1 traveling with the notebook Aircraft Power Adapter 3-12 Automobile Power Adapter/Charger 3-12 Troubleshooting guide 2-1 turning the notebook on/off 1-4 U USB connectors 3-12 with power connector 3-12 user guides.


