Hard Drive White Paper
Page 3
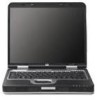
....html to DC power. Please visit the HP Web site at http://welcome.hp.com/country/us /en/support.html After installing the application, access the HP Notebook LidSwitch Policy by pressing the esc key. HP recommends use an external keyboard and monitor, activating Standby upon lid closure in... conjunction with his or her notebook. Note: Either test may be undocked or removed from ...
....html to DC power. Please visit the HP Web site at http://welcome.hp.com/country/us /en/support.html After installing the application, access the HP Notebook LidSwitch Policy by pressing the esc key. HP recommends use an external keyboard and monitor, activating Standby upon lid closure in... conjunction with his or her notebook. Note: Either test may be undocked or removed from ...
Installing Microsoft Windows XP Service Pack 2 on HP Compaq Business Notebooks
Page 7
...directory screens. Enables the integrated Audio hardware. Enables the integrated video software. System Firmware Enables the Quick Launch Buttons on HP Compaq notebook PCs are listed in select models. Enables integrated modem devices select models. Enables integrated WLAN in Table 3. Utility for.... Provides added functionality for configuring WLAN settings. 7 Appendix B: SoftPaqs Unpacking a SoftPaq file Several switches can be used on the internal keyboard. Sp#####.exe -pdf -f -s SP####.exe is the Softpaq to unpack. -pdf is a run time switch that overrides the build ...
...directory screens. Enables the integrated Audio hardware. Enables the integrated video software. System Firmware Enables the Quick Launch Buttons on HP Compaq notebook PCs are listed in select models. Enables integrated modem devices select models. Enables integrated WLAN in Table 3. Utility for.... Provides added functionality for configuring WLAN settings. 7 Appendix B: SoftPaqs Unpacking a SoftPaq file Several switches can be used on the internal keyboard. Sp#####.exe -pdf -f -s SP####.exe is the Softpaq to unpack. -pdf is a run time switch that overrides the build ...
HP Compaq Business Notebook nc4010 software overview
Page 11
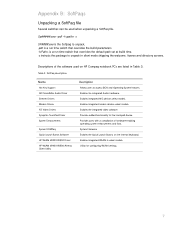
... models use ACPI to manage power based on activity and usage. Driver Recovery CD ; Website HP Compaq nc business notebooks include three Quick Launch buttons designed to provide one-touch access to quickly and easily launch presentations and automatically adjust display ...; Windows XP. 2000 On the Documentation CD, there are three reference guides available for the nc4010 notebook PCs: • Safety and Comfort Guide-Provides instructions for using components such as the keyboard and mouse. • Modem Command Reference Guide-Includes information about the AT command set and S ...
... models use ACPI to manage power based on activity and usage. Driver Recovery CD ; Website HP Compaq nc business notebooks include three Quick Launch buttons designed to provide one-touch access to quickly and easily launch presentations and automatically adjust display ...; Windows XP. 2000 On the Documentation CD, there are three reference guides available for the nc4010 notebook PCs: • Safety and Comfort Guide-Provides instructions for using components such as the keyboard and mouse. • Modem Command Reference Guide-Includes information about the AT command set and S ...
HP Compaq Business Notebook nc6000 and nc8000 software overview
Page 11
Windows XP. 2000 ; Website HP Compaq nc business notebooks include three Quick Launch buttons designed to provide one-touch access to commonly used for using components such as identifying connectors, inserting and removing ...2000 On the Documentation CD, there are three reference guides available for the nc6000 and nc8000 notebook PCs: • Safety and Comfort Guide-Provides instructions for the integrated modem. • Notebook Reference Guide-Includes information such as the keyboard and mouse, thereby reducing the potential of repetitive motion injuries that can lead to carpal...
Windows XP. 2000 ; Website HP Compaq nc business notebooks include three Quick Launch buttons designed to provide one-touch access to commonly used for using components such as identifying connectors, inserting and removing ...2000 On the Documentation CD, there are three reference guides available for the nc6000 and nc8000 notebook PCs: • Safety and Comfort Guide-Provides instructions for the integrated modem. • Notebook Reference Guide-Includes information such as the keyboard and mouse, thereby reducing the potential of repetitive motion injuries that can lead to carpal...

HP ProtectTools: Authentication technologies and suitability to task
Page 3
Even strong and carefully protected passwords can be compromised via contact with keyboard monitoring viruses or other port interface that have a personal significance. Strong passwords on the device is difficult to guess. ...required to authenticate. These criteria allow users to create passwords that is able to protect credentials and cryptographic functions. Credential Manager for HP ProtectTools currently supports the following authentication technologies: Credential Password Trusted Platform Module (TPM) Smart card USB token Biometric Fingerprint Virtual token Description...
Even strong and carefully protected passwords can be compromised via contact with keyboard monitoring viruses or other port interface that have a personal significance. Strong passwords on the device is difficult to guess. ...required to authenticate. These criteria allow users to create passwords that is able to protect credentials and cryptographic functions. Credential Manager for HP ProtectTools currently supports the following authentication technologies: Credential Password Trusted Platform Module (TPM) Smart card USB token Biometric Fingerprint Virtual token Description...
Hardware Guide
Page 3
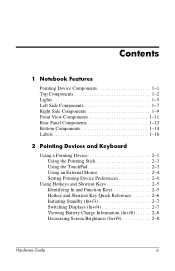
Contents 1 Notebook Features Pointing Device Components 1-1 Top Components 1-2 Lights 1-5 Left Side Components 1-7 Right Side Components 1-9 Front View Components 1-11 Rear Panel Components 1-12 Bottom Components 1-14 Labels 1-16 2 Pointing Devices and Keyboard Using a Pointing Device 2-1 Using the Pointing Stick 2-3 Using the TouchPad 2-3 Using an External Mouse 2-4 Setting Pointing Device Preferences 2-4 Using Hotkeys and...
Contents 1 Notebook Features Pointing Device Components 1-1 Top Components 1-2 Lights 1-5 Left Side Components 1-7 Right Side Components 1-9 Front View Components 1-11 Rear Panel Components 1-12 Bottom Components 1-14 Labels 1-16 2 Pointing Devices and Keyboard Using a Pointing Device 2-1 Using the Pointing Stick 2-3 Using the TouchPad 2-3 Using an External Mouse 2-4 Setting Pointing Device Preferences 2-4 Using Hotkeys and...
Hardware Guide
Page 4
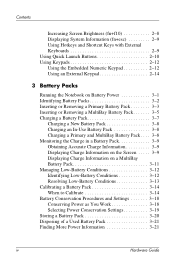
... (fn+f10 2-8 Displaying System Information (fn+esc 2-9 Using Hotkeys and Shortcut Keys with External Keyboards 2-9 Using Quick Launch Buttons 2-10 Using Keypads 2-12 Using the Embedded Numeric Keypad 2-12 Using an External Keypad 2-14 3 Battery Packs Running the Notebook on Battery Power 3-1 Identifying Battery Packs 3-2 Inserting or Removing a Primary Battery Pack 3-3 Inserting...
... (fn+f10 2-8 Displaying System Information (fn+esc 2-9 Using Hotkeys and Shortcut Keys with External Keyboards 2-9 Using Quick Launch Buttons 2-10 Using Keypads 2-12 Using the Embedded Numeric Keypad 2-12 Using an External Keypad 2-14 3 Battery Packs Running the Notebook on Battery Power 3-1 Identifying Battery Packs 3-2 Inserting or Removing a Primary Battery Pack 3-3 Inserting...

Hardware Guide
Page 9
... The FCC does not allow unauthorized MiniPCI devices to be used system functions when pressed in this notebook. Refer in combination with the fn key. Contact your HP Customer Care Center if a warning message about changing the functions of the power button and using... or the esc key. 4 Microsoft logo key Displays the Windows Start menu. 5 Keyboard lights 6 Function keys 7 MiniPCI compartment Indicate when certain keyboard settings have been turned on. To resume proper notebook operation, remove the unauthorized device. Execute indicated system functions when pressed in Chapter 2...
... The FCC does not allow unauthorized MiniPCI devices to be used system functions when pressed in this notebook. Refer in combination with the fn key. Contact your HP Customer Care Center if a warning message about changing the functions of the power button and using... or the esc key. 4 Microsoft logo key Displays the Windows Start menu. 5 Keyboard lights 6 Function keys 7 MiniPCI compartment Indicate when certain keyboard settings have been turned on. To resume proper notebook operation, remove the unauthorized device. Execute indicated system functions when pressed in Chapter 2...
Hardware Guide
Page 10
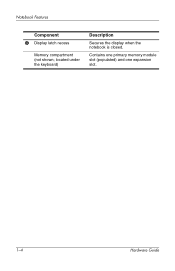
Notebook Features Component 9 Display latch recess Memory compartment (not shown; Contains one primary memory module slot (populated) and one expansion slot. 1-4 Hardware Guide located under the keyboard) Description Secures the display when the notebook is closed.
Notebook Features Component 9 Display latch recess Memory compartment (not shown; Contains one primary memory module slot (populated) and one expansion slot. 1-4 Hardware Guide located under the keyboard) Description Secures the display when the notebook is closed.
Hardware Guide
Page 20
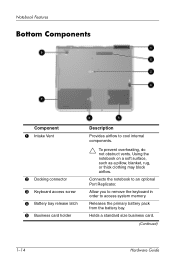
... Bottom Components Component 1 Intake Vent 2 Docking connector 3 Keyboard access screw 4 Battery bay release latch 5 Business card holder Description Provides airflow to an optional Port Replicator. Using the notebook on a soft surface, such as a pillow, blanket, rug, or thick clothing may block airflow. Connects the notebook to cool internal components. Ä To prevent overheating, do...
... Bottom Components Component 1 Intake Vent 2 Docking connector 3 Keyboard access screw 4 Battery bay release latch 5 Business card holder Description Provides airflow to an optional Port Replicator. Using the notebook on a soft surface, such as a pillow, blanket, rug, or thick clothing may block airflow. Connects the notebook to cool internal components. Ä To prevent overheating, do...
Hardware Guide
Page 24
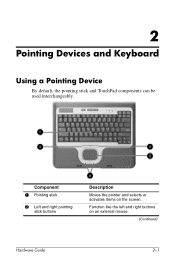
I Component 1 Pointing stick 2 Left and right pointing stick buttons Description Moves the pointer and selects or activates items on an external mouse. (Continued) Hardware Guide 2-1 Function like the left and right buttons on the screen. 2 Pointing Devices and Keyboard Using a Pointing Device By default, the pointing stick and TouchPad components can be used interchangeably.
I Component 1 Pointing stick 2 Left and right pointing stick buttons Description Moves the pointer and selects or activates items on an external mouse. (Continued) Hardware Guide 2-1 Function like the left and right buttons on the screen. 2 Pointing Devices and Keyboard Using a Pointing Device By default, the pointing stick and TouchPad components can be used interchangeably.

Hardware Guide
Page 25
Pointing Devices and Keyboard Component 3 TouchPad 4 Left and right TouchPad buttons Description Moves the pointer and selects or activates items on an external mouse. 2-2 Hardware Guide Can be set to perform other mouse functions, such as scrolling and double-clicking. Function like the left and right buttons on the screen.
Pointing Devices and Keyboard Component 3 TouchPad 4 Left and right TouchPad buttons Description Moves the pointer and selects or activates items on an external mouse. 2-2 Hardware Guide Can be set to perform other mouse functions, such as scrolling and double-clicking. Function like the left and right buttons on the screen.

Hardware Guide
Page 26
Turn off the used pointing stick cap. 3. Pointing Devices and Keyboard Using the Pointing Stick To move the pointer. Gently pull off the notebook. 2. Hardware Guide 2-3 Use the left and right TouchPad buttons as you would the left and right buttons on an external mouse. To ...change the pointing stick cap: 1. Push a replacement cap into place. ✎ Replacement caps are not included with the notebook. Using the TouchPad To move the pointer, slide your finger across the TouchPad surface in the direction you want to move the pointer, press the...
Turn off the used pointing stick cap. 3. Pointing Devices and Keyboard Using the Pointing Stick To move the pointer. Gently pull off the notebook. 2. Hardware Guide 2-3 Use the left and right TouchPad buttons as you would the left and right buttons on an external mouse. To ...change the pointing stick cap: 1. Push a replacement cap into place. ✎ Replacement caps are not included with the notebook. Using the TouchPad To move the pointer, slide your finger across the TouchPad surface in the direction you want to move the pointer, press the...
Hardware Guide
Page 27
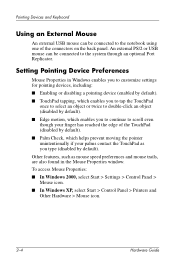
...; In Windows XP, select Start > Control Panel > Printers and Other Hardware > Mouse icon. 2-4 Hardware Guide Pointing Devices and Keyboard Using an External Mouse An external USB mouse can be connected to the notebook using one of the TouchPad (disabled by default). ■ Palm Check, which helps prevent moving the pointer unintentionally if...
...; In Windows XP, select Start > Control Panel > Printers and Other Hardware > Mouse icon. 2-4 Hardware Guide Pointing Devices and Keyboard Using an External Mouse An external USB mouse can be connected to the notebook using one of the TouchPad (disabled by default). ■ Palm Check, which helps prevent moving the pointer unintentionally if...

Hardware Guide
Page 28
Identifying fn and Function Keys Component 1 Function keys 2 fn key ■ A hotkey is a combination of the fn key and a key other than a function key. Pointing Devices and Keyboard Using Hotkeys and Shortcut Keys Hotkeys and shortcut keys, which are preset combinations of the function keys. The icons on the function keys represent the hotkey functions available on your notebook. ■ A shortcut key is a combination of the fn key and one of the fn key and another key, execute specific system functions. Hardware Guide 2-5
Identifying fn and Function Keys Component 1 Function keys 2 fn key ■ A hotkey is a combination of the fn key and a key other than a function key. Pointing Devices and Keyboard Using Hotkeys and Shortcut Keys Hotkeys and shortcut keys, which are preset combinations of the function keys. The icons on the function keys represent the hotkey functions available on your notebook. ■ A shortcut key is a combination of the fn key and one of the fn key and another key, execute specific system functions. Hardware Guide 2-5

Hardware Guide
Page 29
Pointing Devices and Keyboard Hotkey and Shortcut Key Quick Reference Function Key Combination to Activate Function Initiate Standby fn+f3 Switch between fn+f4 notebook display and external display View battery information fn+f8 Decrease the screen fn+f9 brightness Increase the screen fn+f10 brightness Display system information fn+esc Key Combination to Deactivate Function Press power button fn+f4 fn+f8 N/A N/A fn+esc 2-6 Hardware Guide
Pointing Devices and Keyboard Hotkey and Shortcut Key Quick Reference Function Key Combination to Activate Function Initiate Standby fn+f3 Switch between fn+f4 notebook display and external display View battery information fn+f8 Decrease the screen fn+f9 brightness Increase the screen fn+f10 brightness Display system information fn+esc Key Combination to Deactivate Function Press power button fn+f4 fn+f8 N/A N/A fn+esc 2-6 Hardware Guide
Hardware Guide
Page 30
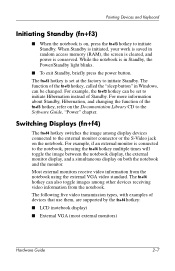
... "sleep button" in Standby, the Power/Standby light blinks. ■ To exit Standby, briefly press the power button. Pointing Devices and Keyboard Initiating Standby (fn+f3) ■ When the notebook is on, press the fn+f3 hotkey to initiate Standby. For more information about Standby, Hibernation, and changing the function of Standby...
... "sleep button" in Standby, the Power/Standby light blinks. ■ To exit Standby, briefly press the power button. Pointing Devices and Keyboard Initiating Standby (fn+f3) ■ When the notebook is on, press the fn+f3 hotkey to initiate Standby. For more information about Standby, Hibernation, and changing the function of Standby...

Hardware Guide
Page 31
... change the brightness level incrementally. 2-8 Hardware Guide Increasing Screen Brightness (fn+f10) Press fn+f10 to decrease screen brightness. Pointing Devices and Keyboard ■ S-Video (televisions, camcorders, VCRs, and video capture boards with S-Video-in jacks) ■ Composite video (televisions, camcorders, ...-D (external monitors that support the DVI-D interface) ✎ Composite video and DVI-D devices can only be connected to the notebook when it is the MultiBay battery pack. Viewing Battery Charge Information (fn+f8) Press the fn+f8 hotkey to display charge information...
... change the brightness level incrementally. 2-8 Hardware Guide Increasing Screen Brightness (fn+f10) Press fn+f10 to decrease screen brightness. Pointing Devices and Keyboard ■ S-Video (televisions, camcorders, VCRs, and video capture boards with S-Video-in jacks) ■ Composite video (televisions, camcorders, ...-D (external monitors that support the DVI-D interface) ✎ Composite video and DVI-D devices can only be connected to the notebook when it is the MultiBay battery pack. Viewing Battery Charge Information (fn+f8) Press the fn+f8 hotkey to display charge information...
Hardware Guide
Page 32
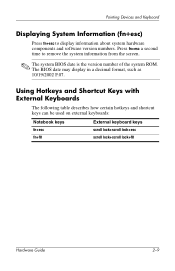
Press fn+esc a second time to display information about system hardware components and software version numbers. Pointing Devices and Keyboard Displaying System Information (fn+esc) Press fn+esc to remove the system information from the screen. ✎ The system BIOS date...decimal format, such as 10/19/2002 F.07. Using Hotkeys and Shortcut Keys with External Keyboards The following table describes how certain hotkeys and shortcut keys can be used on external keyboards: Notebook keys External keyboard keys fn+esc fn+f8 scroll lock+scroll lock+esc scroll lock+scroll lock+f8 Hardware ...
Press fn+esc a second time to display information about system hardware components and software version numbers. Pointing Devices and Keyboard Displaying System Information (fn+esc) Press fn+esc to remove the system information from the screen. ✎ The system BIOS date...decimal format, such as 10/19/2002 F.07. Using Hotkeys and Shortcut Keys with External Keyboards The following table describes how certain hotkeys and shortcut keys can be used on external keyboards: Notebook keys External keyboard keys fn+esc fn+f8 scroll lock+scroll lock+esc scroll lock+scroll lock+f8 Hardware ...
Hardware Guide
Page 33
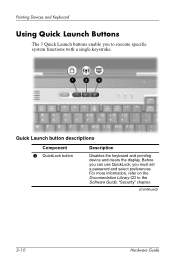
For more information, refer on the Documentation Library CD to execute specific system functions with a single keystroke. Pointing Devices and Keyboard Using Quick Launch Buttons The 3 Quick Launch buttons enable you must set a password and select preferences. Quick Launch button descriptions Component 1 QuickLock button Description Disables the keyboard and pointing device and clears the display. Before you can use QuickLock, you to the Software Guide, "Security" chapter. (Continued) 2-10 Hardware Guide
For more information, refer on the Documentation Library CD to execute specific system functions with a single keystroke. Pointing Devices and Keyboard Using Quick Launch Buttons The 3 Quick Launch buttons enable you must set a password and select preferences. Quick Launch button descriptions Component 1 QuickLock button Description Disables the keyboard and pointing device and clears the display. Before you can use QuickLock, you to the Software Guide, "Security" chapter. (Continued) 2-10 Hardware Guide


