Bluetooth Wireless Technology Basics
Page 9
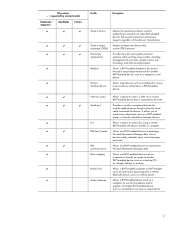
HP products...) to use the OBEX protocol. Allows a BWT-enabled device (such as a keyboard or mouse to be wirelessly connected to send a fax using a cable, including management... as an input or output device. 9 Allows one BWT-enabled device (such as business cards, calendar items, email messages, and notes. Allows two BWT-enabled devices to ...such as a camera) to transfer an image to a BWT-enabled printer; Enables printing from devices that can be used by selected models Notebooks/ Tablet PCs Handhelds Printers D D D D D D D D D D D D D D D D D D D D D...
HP products...) to use the OBEX protocol. Allows a BWT-enabled device (such as a keyboard or mouse to be wirelessly connected to send a fax using a cable, including management... as an input or output device. 9 Allows one BWT-enabled device (such as business cards, calendar items, email messages, and notes. Allows two BWT-enabled devices to ...such as a camera) to transfer an image to a BWT-enabled printer; Enables printing from devices that can be used by selected models Notebooks/ Tablet PCs Handhelds Printers D D D D D D D D D D D D D D D D D D D D D...
Using LightScribe (Select Models Only)
Page 10
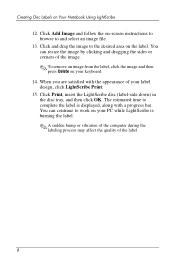
... displayed, along with the appearance of the image. ✎ To remove an image from the label, click the image and then press Delete on Your Notebook Using LightScribe 12. Click Add Image and follow the on the label. Click Print, insert the LightScribe disc (label-side down) in the disc tray... then click OK. When you are satisfied with a progress bar. You can resize the image by clicking and dragging the sides or corners of your keyboard. 14. You can continue to and select an image file. 13. Creating Disc Labels on your label design, click LightScribe Print. 15.
... displayed, along with the appearance of the image. ✎ To remove an image from the label, click the image and then press Delete on Your Notebook Using LightScribe 12. Click Add Image and follow the on the label. Click Print, insert the LightScribe disc (label-side down) in the disc tray... then click OK. When you are satisfied with a progress bar. You can resize the image by clicking and dragging the sides or corners of your keyboard. 14. You can continue to and select an image file. 13. Creating Disc Labels on your label design, click LightScribe Print. 15.
HP Compaq notebook single image white paper
Page 9
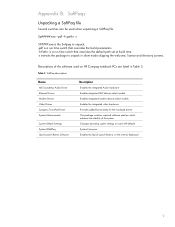
Appendix B: SoftPaqs Unpacking a SoftPaq file Several switches can be used on the internal keyboard 9 Table 3 SoftPaq descriptions Name ADI SoundMax Audio Driver Ethernet Drivers Modem Drivers Video Drivers Synaptics TouchPad Driver System Enhancements System Default Settings ...that overrides the build parameters. -f is a run time switch that overrides the default path set at build time. -s instructs the package to match HP defaults System Firmware Enables the Quick Launch Buttons on HP Compaq notebook PCs are listed in silent mode skipping the welcome, license and directory screens.
Appendix B: SoftPaqs Unpacking a SoftPaq file Several switches can be used on the internal keyboard 9 Table 3 SoftPaq descriptions Name ADI SoundMax Audio Driver Ethernet Drivers Modem Drivers Video Drivers Synaptics TouchPad Driver System Enhancements System Default Settings ...that overrides the build parameters. -f is a run time switch that overrides the default path set at build time. -s instructs the package to match HP defaults System Firmware Enables the Quick Launch Buttons on HP Compaq notebook PCs are listed in silent mode skipping the welcome, license and directory screens.

HP ProtectTools: Authentication technologies and suitability to task
Page 3
... passwords that are not derived from a user's personal information such as such because they can be compromised via contact with keyboard monitoring viruses or other computing device that , used network attacks. A type of criteria designed to ensure that have a ...carefully protected passwords can go undetected, which means timely steps cannot be enforced by an IT administrator. Credential Manager for HP ProtectTools currently supports the following authentication technologies: Credential Password Trusted Platform Module (TPM) Smart card USB token Biometric Fingerprint Virtual...
... passwords that are not derived from a user's personal information such as such because they can be compromised via contact with keyboard monitoring viruses or other computing device that , used network attacks. A type of criteria designed to ensure that have a ...carefully protected passwords can go undetected, which means timely steps cannot be enforced by an IT administrator. Credential Manager for HP ProtectTools currently supports the following authentication technologies: Credential Password Trusted Platform Module (TPM) Smart card USB token Biometric Fingerprint Virtual...

Hardware-Software Guide
Page 4
Contents Default Power Settings 2-9 Turning the Notebook or Display On or Off 2-9 Initiating or Restoring from Hibernation 2-10 Initiating or Resuming from Standby 2-11 Using Emergency Shutdown Procedures 2-12 Power... 2-25 Calibrating a Battery Pack 2-27 Conserving Battery Power 2-31 Storing a Battery Pack 2-33 Disposing of a Used Battery Pack 2-34 3 Pointing Devices and Keyboard Pointing Devices 3-1 Using the TouchPad 3-3 Using the Pointing Stick 3-3 Setting Mouse Preferences 3-4 Hotkeys 3-5 Hotkey Quick Reference 3-6 Using Hotkey Commands 3-7 Using Hotkeys with External...
Contents Default Power Settings 2-9 Turning the Notebook or Display On or Off 2-9 Initiating or Restoring from Hibernation 2-10 Initiating or Resuming from Standby 2-11 Using Emergency Shutdown Procedures 2-12 Power... 2-25 Calibrating a Battery Pack 2-27 Conserving Battery Power 2-31 Storing a Battery Pack 2-33 Disposing of a Used Battery Pack 2-34 3 Pointing Devices and Keyboard Pointing Devices 3-1 Using the TouchPad 3-3 Using the Pointing Stick 3-3 Setting Mouse Preferences 3-4 Hotkeys 3-5 Hotkey Quick Reference 3-6 Using Hotkey Commands 3-7 Using Hotkeys with External...
Hardware-Software Guide
Page 9
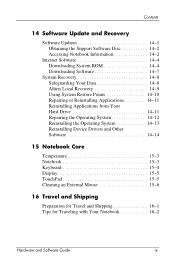
Contents 14 Software Update and Recovery Software Updates 14-1 Obtaining the Support Software Disc 14-2 Accessing Notebook Information 14-2 Internet Software 14-4 Downloading System ROM 14-4 Downloading Software 14-7 System Recovery 14-8 Safeguarding Your Data 14-8 ... Repairing the Operating System 14-12 Reinstalling the Operating System 14-13 Reinstalling Device Drivers and Other Software 14-14 15 Notebook Care Temperature 15-3 Notebook 15-3 Keyboard 15-4 Display 15-5 TouchPad 15-5 Cleaning an External Mouse 15-6 16 Travel and Shipping Preparation for Travel and Shipping ...
Contents 14 Software Update and Recovery Software Updates 14-1 Obtaining the Support Software Disc 14-2 Accessing Notebook Information 14-2 Internet Software 14-4 Downloading System ROM 14-4 Downloading Software 14-7 System Recovery 14-8 Safeguarding Your Data 14-8 ... Repairing the Operating System 14-12 Reinstalling the Operating System 14-13 Reinstalling Device Drivers and Other Software 14-14 15 Notebook Care Temperature 15-3 Notebook 15-3 Keyboard 15-4 Display 15-5 TouchPad 15-5 Cleaning an External Mouse 15-6 16 Travel and Shipping Preparation for Travel and Shipping ...

Hardware-Software Guide
Page 13
... on an external mouse. *This table describes default settings. Hardware and Software Guide 1-3 Can be set to "Using the TouchPad" in Chapter 3, "Pointing Devices and Keyboard." For information about changing the functions of TouchPad features, refer to perform other mouse functions, such as scrolling, selecting, and double-clicking. 3 Left TouchPad button...
... on an external mouse. *This table describes default settings. Hardware and Software Guide 1-3 Can be set to "Using the TouchPad" in Chapter 3, "Pointing Devices and Keyboard." For information about changing the functions of TouchPad features, refer to perform other mouse functions, such as scrolling, selecting, and double-clicking. 3 Left TouchPad button...

Hardware-Software Guide
Page 62
Moves the pointer and selects or activates items on the screen. Can be used interchangeably. Component 1 Pointing stick 2 TouchPad* Hardware and Software Guide Description Moves the pointer and selects or activates items on the screen. 3 Pointing Devices and Keyboard Pointing Devices The pointing stick and TouchPad controls can be set to perform other mouse functions, such as scrolling, selecting, and double-clicking. (Continued) 3-1
Moves the pointer and selects or activates items on the screen. Can be used interchangeably. Component 1 Pointing stick 2 TouchPad* Hardware and Software Guide Description Moves the pointer and selects or activates items on the screen. 3 Pointing Devices and Keyboard Pointing Devices The pointing stick and TouchPad controls can be set to perform other mouse functions, such as scrolling, selecting, and double-clicking. (Continued) 3-1

Hardware-Software Guide
Page 63
... Functions like the right button on an external mouse. 7 Left pointing stick button Functions like the left button on an external mouse. Pointing Devices and Keyboard Component Description 3 Left TouchPad button* 4 Right TouchPad button* Functions like the left button on an external mouse. *This table describes default settings. Hardware and Software...
... Functions like the right button on an external mouse. 7 Left pointing stick button Functions like the left button on an external mouse. Pointing Devices and Keyboard Component Description 3 Left TouchPad button* 4 Right TouchPad button* Functions like the left button on an external mouse. *This table describes default settings. Hardware and Software...

Hardware-Software Guide
Page 64
... right buttons on an external mouse. To change the pointing stick cap: 1. Press a replacement cap into place. ✎ Replacement caps are not included with the notebook. Use the left and right pointing stick buttons as you want to move the pointer, slide your finger up or down over the raised area...you would the left and right buttons on an external mouse. Hardware and Software Guide 3-3 Turn off the used pointing stick cap. 3. Pointing Devices and Keyboard Using the TouchPad To move the pointer. Use the left and right TouchPad buttons as you want the pointer to go.
... right buttons on an external mouse. To change the pointing stick cap: 1. Press a replacement cap into place. ✎ Replacement caps are not included with the notebook. Use the left and right pointing stick buttons as you want to move the pointer, slide your finger up or down over the raised area...you would the left and right buttons on an external mouse. Hardware and Software Guide 3-3 Turn off the used pointing stick cap. 3. Pointing Devices and Keyboard Using the TouchPad To move the pointer. Use the left and right TouchPad buttons as you want the pointer to go.

Hardware-Software Guide
Page 65
... type (disabled by default). To access Mouse Properties: » Select Start > Control Panel > Printers and Other Hardware > Mouse. Hardware and Software Guide 3-4 Pointing Devices and Keyboard Setting Mouse Preferences Mouse Properties in Mouse Properties.
... type (disabled by default). To access Mouse Properties: » Select Start > Control Panel > Printers and Other Hardware > Mouse. Hardware and Software Guide 3-4 Pointing Devices and Keyboard Setting Mouse Preferences Mouse Properties in Mouse Properties.

Hardware-Software Guide
Page 66
Hardware and Software Guide 3-5 Hotkey functions and procedures are discussed in the following sections. The icons on the f3, f4, and f8 through f10 keys represent the hotkey functions. Pointing Devices and Keyboard Hotkeys A hotkey is a preset combination of the fn key 1 and either the esc key 2 or one of the function keys 3.
Hardware and Software Guide 3-5 Hotkey functions and procedures are discussed in the following sections. The icons on the f3, f4, and f8 through f10 keys represent the hotkey functions. Pointing Devices and Keyboard Hotkeys A hotkey is a preset combination of the fn key 1 and either the esc key 2 or one of the function keys 3.

Hardware-Software Guide
Page 67
Pointing Devices and Keyboard Hotkey Quick Reference Function Key Combination to Activate Function Initiate standby fn+f3 Switch between notebook display and external display fn+f4 View battery information fn+f8 Decrease screen brightness fn+f9 Increase screen brightness fn+f10 Turn on and off the ambient light sensor fn+f11 Display system information fn+esc Key Combination to Deactivate Function Power button fn+f4 fn+f8 N/A N/A fn+f11 fn+esc Hardware and Software Guide 3-6
Pointing Devices and Keyboard Hotkey Quick Reference Function Key Combination to Activate Function Initiate standby fn+f3 Switch between notebook display and external display fn+f4 View battery information fn+f8 Decrease screen brightness fn+f9 Increase screen brightness fn+f10 Turn on and off the ambient light sensor fn+f11 Display system information fn+esc Key Combination to Deactivate Function Power button fn+f4 fn+f8 N/A N/A fn+f11 fn+esc Hardware and Software Guide 3-6
Hardware-Software Guide
Page 68
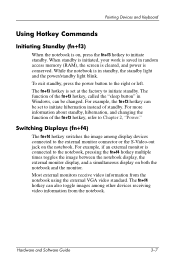
... toggles the image between the notebook display, the external monitor display, and a simultaneous display on , press the fn+f3 hotkey to initiate hibernation instead of standby. While the notebook is set to initiate standby. Pointing Devices and Keyboard Using Hotkey Commands Initiating Standby ...(fn+f3) When the notebook is on both the notebook and the monitor. Most external monitors receive video information from the notebook. The fn+f3 hotkey ...
... toggles the image between the notebook display, the external monitor display, and a simultaneous display on , press the fn+f3 hotkey to initiate hibernation instead of standby. While the notebook is set to initiate standby. Pointing Devices and Keyboard Using Hotkey Commands Initiating Standby ...(fn+f3) When the notebook is on both the notebook and the monitor. Most external monitors receive video information from the notebook. The fn+f3 hotkey ...
Hardware-Software Guide
Page 69
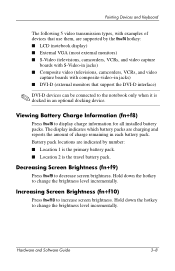
...down the hotkey to change the brightness level incrementally. Hold down the hotkey to change the brightness level incrementally. Pointing Devices and Keyboard The following 5 video transmission types, with composite-video-in jacks) ■ DVI-D (external monitors that use them, are ... fn+f10 to display charge information for all installed battery packs. Battery pack locations are indicated by the fn+f4 hotkey: ■ LCD (notebook display) ■ External VGA (most external monitors) ■ S-Video (televisions, camcorders, VCRs, and video capture boards with S-Video-in ...
...down the hotkey to change the brightness level incrementally. Hold down the hotkey to change the brightness level incrementally. Pointing Devices and Keyboard The following 5 video transmission types, with composite-video-in jacks) ■ DVI-D (external monitors that use them, are ... fn+f10 to display charge information for all installed battery packs. Battery pack locations are indicated by the fn+f4 hotkey: ■ LCD (notebook display) ■ External VGA (most external monitors) ■ S-Video (televisions, camcorders, VCRs, and video capture boards with S-Video-in ...
Hardware-Software Guide
Page 70
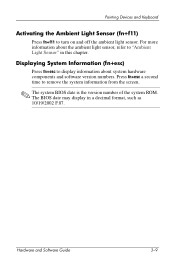
.... The BIOS date may display in this chapter. Press fn+esc a second time to turn on and off the ambient light sensor. Pointing Devices and Keyboard Activating the Ambient Light Sensor (fn+f11) Press fn+f11 to remove the system information from the screen. ✎ The system BIOS date is the...
.... The BIOS date may display in this chapter. Press fn+esc a second time to turn on and off the ambient light sensor. Pointing Devices and Keyboard Activating the Ambient Light Sensor (fn+f11) Press fn+f11 to remove the system information from the screen. ✎ The system BIOS date is the...

Hardware-Software Guide
Page 71
...software, refer to duplicate certain hotkeys on the type of external keyboard you use with optional external keyboards differ depending on external keyboards. The following table describes how to the "Quick Launch Buttons" section later in this chapter. Notebook Keys fn+f3 fn+f4 fn+f8 fn+f9 fn+f10 ...fn+f11 fn+esc External Keyboard Keys scroll lock+scroll lock+f3 (PS/2 keyboards only) scroll lock+scroll lock+f4 (PS/2 keyboards only) scroll lock+scroll lock+f8 scroll lock+...
...software, refer to duplicate certain hotkeys on the type of external keyboard you use with optional external keyboards differ depending on external keyboards. The following table describes how to the "Quick Launch Buttons" section later in this chapter. Notebook Keys fn+f3 fn+f4 fn+f8 fn+f9 fn+f10 ...fn+f11 fn+esc External Keyboard Keys scroll lock+scroll lock+f3 (PS/2 keyboards only) scroll lock+scroll lock+f4 (PS/2 keyboards only) scroll lock+scroll lock+f8 scroll lock+...

Hardware-Software Guide
Page 72
Starts Presentation mode, which optimizes the display for an external monitor or projectors and opens a user-defined program such as Microsoft PowerPoint. Item Component 1 Info Center 2 Presentation mode button Description Enables you to "Presentation Mode" in this chapter. For more information about Presentation mode, refer to view a list of commonly used applications. Hardware and Software Guide 3-11 Pointing Devices and Keyboard Quick Launch Buttons Identifying Quick Launch Buttons The notebook has 2 Quick Launch buttons that open frequently used software solutions.
Starts Presentation mode, which optimizes the display for an external monitor or projectors and opens a user-defined program such as Microsoft PowerPoint. Item Component 1 Info Center 2 Presentation mode button Description Enables you to "Presentation Mode" in this chapter. For more information about Presentation mode, refer to view a list of commonly used applications. Hardware and Software Guide 3-11 Pointing Devices and Keyboard Quick Launch Buttons Identifying Quick Launch Buttons The notebook has 2 Quick Launch buttons that open frequently used software solutions.
Hardware-Software Guide
Page 73
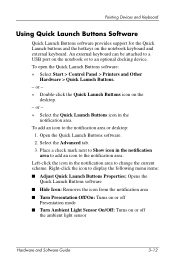
... for the Quick Launch buttons and the hotkeys on the desktop. - or - » Double-click the Quick Launch Buttons icon on the notebook keyboard and external keyboard. To add an icon to the notification area. To open the Quick Launch Buttons software: » Select Start > Control Panel > Printers... Presentation Off/On: Turns on or off Presentation mode ■ Turn Ambient Light Sensor On/Off: Turns on the notebook or to an optional docking device. An external keyboard can be attached to change the current scheme. Left-click the icon in the notification area. or - » ...
... for the Quick Launch buttons and the hotkeys on the desktop. - or - » Double-click the Quick Launch Buttons icon on the notebook keyboard and external keyboard. To add an icon to the notification area. To open the Quick Launch Buttons software: » Select Start > Control Panel > Printers... Presentation Off/On: Turns on or off Presentation mode ■ Turn Ambient Light Sensor On/Off: Turns on the notebook or to an optional docking device. An external keyboard can be attached to change the current scheme. Left-click the icon in the notification area. or - » ...

Hardware-Software Guide
Page 74
... displays on the notebook screen and an external device connected to the external monitor port or S-Video-out jack on the rear panel, or to ports and jacks on and off. Presentation Mode Button The Presentation mode button toggles Presentation mode on an optional docking device. Pointing Devices and Keyboard Presentation Mode...
... displays on the notebook screen and an external device connected to the external monitor port or S-Video-out jack on the rear panel, or to ports and jacks on and off. Presentation Mode Button The Presentation mode button toggles Presentation mode on an optional docking device. Pointing Devices and Keyboard Presentation Mode...


