
End User License Agreement
Page 1
... PURCHASE. 1. You do not have Software Product into Your Computer's AGREE TO ALL TERMS AND temporary memory (RAM) for use on more than one computer. Reservation of the HP Product. Notwithstanding the terms and conditions of this EULA, all of the original Software Product's proprietary notices...in its suppliers reserve all rights not expressly granted to you may load the Software ON THE CONDITION THAT YOU Product into the local memory or storage device of Rights. The term "Software Product" means computer software and may copy the OTHERWISE USING THE SOFTWARE PRODUCT, ...
... PURCHASE. 1. You do not have Software Product into Your Computer's AGREE TO ALL TERMS AND temporary memory (RAM) for use on more than one computer. Reservation of the HP Product. Notwithstanding the terms and conditions of this EULA, all of the original Software Product's proprietary notices...in its suppliers reserve all rights not expressly granted to you may load the Software ON THE CONDITION THAT YOU Product into the local memory or storage device of Rights. The term "Software Product" means computer software and may copy the OTHERWISE USING THE SOFTWARE PRODUCT, ...

HP USB Digital Drive
Page 2
You can be included. However, you will need an SD memory card to operate the Digital Drive. The Digital Drive can purchase one (in various storage capacities) from any computer that is a pocket-sized SD (Secure Digital) memory drive for storing and transferring files such as digital pictures, music, video, and data. The HP USB Digital Drive 1 is running Microsoft Windows XP Home, Windows XP Pro, or Windows 2000. An SD memory card 2 may not be used with any HP authorized reseller. User Guide 1
You can be included. However, you will need an SD memory card to operate the Digital Drive. The Digital Drive can purchase one (in various storage capacities) from any computer that is a pocket-sized SD (Secure Digital) memory drive for storing and transferring files such as digital pictures, music, video, and data. The HP USB Digital Drive 1 is running Microsoft Windows XP Home, Windows XP Pro, or Windows 2000. An SD memory card 2 may not be used with any HP authorized reseller. User Guide 1

HP USB Digital Drive
Page 3
Insert the SD memory card into the SD slot 2 with the notched corner positioned on the lower left as shown. Remove the cap 1 of the Digital Drive. 2. If the SD memory card does not slide in properly, gently pull it out and reinsert it. 2 User Guide Installing the SD Memory Card 1.
Insert the SD memory card into the SD slot 2 with the notched corner positioned on the lower left as shown. Remove the cap 1 of the Digital Drive. 2. If the SD memory card does not slide in properly, gently pull it out and reinsert it. 2 User Guide Installing the SD Memory Card 1.
HP USB Digital Drive
Page 10
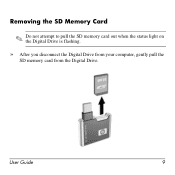
User Guide 9 Removing the SD Memory Card ✎ Do not attempt to pull the SD memory card out when the status light on the Digital Drive is flashing. » After you disconnect the Digital Drive from your computer, gently pull the SD memory card from the Digital Drive.
User Guide 9 Removing the SD Memory Card ✎ Do not attempt to pull the SD memory card out when the status light on the Digital Drive is flashing. » After you disconnect the Digital Drive from your computer, gently pull the SD memory card from the Digital Drive.

Hardware and Software Guide
Page 6
... Disc Contents (Select Models Only 5-13 Avoiding Standby or Hibernation 5-13 Using PC Cards 5-14 Inserting a PC Card 5-15 Removing a PC Card 5-16 Using Digital Memory Cards (Select Models Only) . . . 5-17 Inserting an Optional Digital Memory Card 5-18 Removing an Optional Digital Memory Card . . . . . 5-19 viii Hardware and Software Guide
... Disc Contents (Select Models Only 5-13 Avoiding Standby or Hibernation 5-13 Using PC Cards 5-14 Inserting a PC Card 5-15 Removing a PC Card 5-16 Using Digital Memory Cards (Select Models Only) . . . 5-17 Inserting an Optional Digital Memory Card 5-18 Removing an Optional Digital Memory Card . . . . . 5-19 viii Hardware and Software Guide

Hardware and Software Guide
Page 7
Contents Adding and Upgrading Memory Modules 5-20 Adding a Memory Module to the Expansion Memory Module Slot 5-21 Upgrading the Memory Module in the Primary Memory Module Slot 5-26 Effects of Increasing Memory 5-34 Connecting a Modem Cable 5-35 Using a Modem Cable 5-36 Using a Country...Optional External MultiBay and External MultiBay II 5-45 Mobile Printing for Notebooks 5-45 6 Wireless Wireless Local Area Network (Select Models Only) . . . 6-4 Connecting Your Wireless Notebook to a Corporate WLAN 6-5 Connecting Your Wireless Notebook to a Public WLAN 6-5 Setting Up a WLAN in Your Home...
Contents Adding and Upgrading Memory Modules 5-20 Adding a Memory Module to the Expansion Memory Module Slot 5-21 Upgrading the Memory Module in the Primary Memory Module Slot 5-26 Effects of Increasing Memory 5-34 Connecting a Modem Cable 5-35 Using a Modem Cable 5-36 Using a Country...Optional External MultiBay and External MultiBay II 5-45 Mobile Printing for Notebooks 5-45 6 Wireless Wireless Local Area Network (Select Models Only) . . . 6-4 Connecting Your Wireless Notebook to a Corporate WLAN 6-5 Connecting Your Wireless Notebook to a Public WLAN 6-5 Setting Up a WLAN in Your Home...
Hardware and Software Guide
Page 23
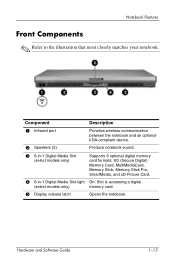
... Front Components ✎ Refer to the illustration that most closely matches your notebook. Hardware and Software Guide 1-13 Produce notebook sound. 3 6-in-1 Digital Media Slot (select models only) Supports 6 optional digital memory card formats: SD (Secure Digital) Memory Card, MultiMediaCard, Memory Stick, Memory Stick Pro, SmartMedia, and xD-Picture Card. 4 6-in-1 Digital Media Slot light On...
... Front Components ✎ Refer to the illustration that most closely matches your notebook. Hardware and Software Guide 1-13 Produce notebook sound. 3 6-in-1 Digital Media Slot (select models only) Supports 6 optional digital memory card formats: SD (Secure Digital) Memory Card, MultiMediaCard, Memory Stick, Memory Stick Pro, SmartMedia, and xD-Picture Card. 4 6-in-1 Digital Media Slot light On...
Hardware and Software Guide
Page 33
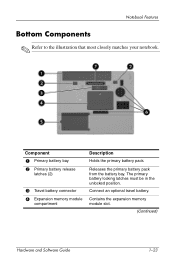
Notebook Features Bottom Components ✎ Refer to the illustration that most closely matches your notebook. Releases the primary battery pack from the battery bay. The primary battery locking latches must be in the unlocked position. Contains the expansion memory module slot. (Continued) Hardware and Software Guide 1-23 Connect an optional travel battery. Component 1 Primary battery bay 2 Primary battery release latches (2) 3 Travel battery connector 4 Expansion memory module compartment Description Holds the primary battery pack.
Notebook Features Bottom Components ✎ Refer to the illustration that most closely matches your notebook. Releases the primary battery pack from the battery bay. The primary battery locking latches must be in the unlocked position. Contains the expansion memory module slot. (Continued) Hardware and Software Guide 1-23 Connect an optional travel battery. Component 1 Primary battery bay 2 Primary battery release latches (2) 3 Travel battery connector 4 Expansion memory module compartment Description Holds the primary battery pack.

Hardware and Software Guide
Page 35
.... Ä To prevent overheating, do not obstruct vents. The primary battery locking latches must be in the unlocked position. Notebook Features Component 1 Primary battery bay 2 Primary battery release latches (2) 3 Travel battery connector 4 Expansion memory module compartment 5 Hard drive bay 6 Vents (4) Description Holds the primary battery pack. Release the primary battery pack from...
.... Ä To prevent overheating, do not obstruct vents. The primary battery locking latches must be in the unlocked position. Notebook Features Component 1 Primary battery bay 2 Primary battery release latches (2) 3 Travel battery connector 4 Expansion memory module compartment 5 Hard drive bay 6 Vents (4) Description Holds the primary battery pack. Release the primary battery pack from...

Hardware and Software Guide
Page 42
When standby is initiated, your notebook in random access memory (RAM) and the screen is in standby, the power/standby lights blink... when to the "Initiating Standby, Hibernation or Shutdown" section in use each setting. Connect the notebook to the screen where you or by the system. Standby reduces power to system components that conserve...work before initiating standby is not usually necessary, but it is a recommended precaution. ■ When the notebook is cleared. Refer to use . Power Standby and Hibernation Standby and hibernation are energy-saving features that ...
When standby is initiated, your notebook in random access memory (RAM) and the screen is in standby, the power/standby lights blink... when to the "Initiating Standby, Hibernation or Shutdown" section in use each setting. Connect the notebook to the screen where you or by the system. Standby reduces power to system components that conserve...work before initiating standby is not usually necessary, but it is a recommended precaution. ■ When the notebook is cleared. Refer to use . Power Standby and Hibernation Standby and hibernation are energy-saving features that ...

Hardware and Software Guide
Page 43
...order to select it has been disabled. Hibernation saves your work returns to restore from hibernation. When you left off. Click one of the notebook is changed during hibernation, resuming from hibernation may not be entered to the screen where you restore from a docking device. ■ Do... not add or remove memory modules. ■ Do not insert or remove any hard drives or optical drives. ■ Do not connect or disconnect external devices. ■...
...order to select it has been disabled. Hibernation saves your work returns to restore from hibernation. When you left off. Click one of the notebook is changed during hibernation, resuming from hibernation may not be entered to the screen where you restore from a docking device. ■ Do... not add or remove memory modules. ■ Do not insert or remove any hard drives or optical drives. ■ Do not connect or disconnect external devices. ■...

Hardware and Software Guide
Page 81
The fn+f3 hotkey is set to Chapter 2, "Power." 3-8 Hardware and Software Guide Pointing Devices and Keyboard Initiating Standby (fn+f3) When the notebook is on, press the fn+f3 hotkey to initiate standby. The function of standby. For example, the fn+f3 hotkey can be set at the ... button" in Windows, can be changed. To exit standby: » Press the power/standby button. When standby is initiated, your work is conserved. While the notebook is in random access memory (RAM), the screen is cleared, and power is saved in standby, the power/standby lights blink.
The fn+f3 hotkey is set to Chapter 2, "Power." 3-8 Hardware and Software Guide Pointing Devices and Keyboard Initiating Standby (fn+f3) When the notebook is on, press the fn+f3 hotkey to initiate standby. The function of standby. For example, the fn+f3 hotkey can be set at the ... button" in Windows, can be changed. To exit standby: » Press the power/standby button. When standby is initiated, your work is conserved. While the notebook is in random access memory (RAM), the screen is cleared, and power is saved in standby, the power/standby lights blink.
Hardware and Software Guide
Page 125
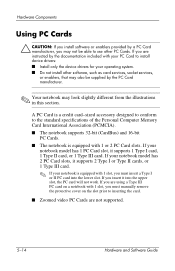
... has 2 PC Card slots, it supports 1 Type I card, 1 Type II card, or 1 Type III card. If your notebook model has 1 PC Card slot, it supports 2 Type I or II PC card into the upper slot, the PC card will not work. If you are ... designed to conform to the standard specifications of the Personal Computer Memory Card International Association (PCMCIA). ■ The notebook supports 32-bit (CardBus) and 16-bit PC Cards. ■ The notebook is equipped with 1 slot, you must manually remove the protective cover on a notebook with 1 slot, you must insert a Type I or Type II cards...
... has 2 PC Card slots, it supports 1 Type I card, 1 Type II card, or 1 Type III card. If your notebook model has 1 PC Card slot, it supports 2 Type I or II PC card into the upper slot, the PC card will not work. If you are ... designed to conform to the standard specifications of the Personal Computer Memory Card International Association (PCMCIA). ■ The notebook supports 32-bit (CardBus) and 16-bit PC Cards. ■ The notebook is equipped with 1 slot, you must manually remove the protective cover on a notebook with 1 slot, you must insert a Type I or Type II cards...
Hardware and Software Guide
Page 128
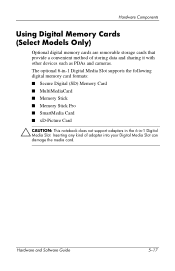
... Software Guide 5-17 The optional 6-in-1 Digital Media Slot supports the following digital memory card formats: ■ Secure Digital (SD) Memory Card ■ MultiMediaCard ■ Memory Stick ■ Memory Stick Pro ■ SmartMedia Card ■ xD-Picture Card Ä CAUTION: This notebook does not support adapters in the 6-in-1 Digital Media Slot. Hardware Components Using...
... Software Guide 5-17 The optional 6-in-1 Digital Media Slot supports the following digital memory card formats: ■ Secure Digital (SD) Memory Card ■ MultiMediaCard ■ Memory Stick ■ Memory Stick Pro ■ SmartMedia Card ■ xD-Picture Card Ä CAUTION: This notebook does not support adapters in the 6-in-1 Digital Media Slot. Hardware Components Using...

Hardware and Software Guide
Page 129
Hold the digital memory card label-side up with the connectors facing the notebook. 2. To insert a digital memory card: 1. Slide the memory card into a Digital Media Slot. Hardware Components Inserting an Optional Digital Memory Card Ä CAUTION: To prevent damage to the connectors to the digital memory card connectors, use minimal pressure when inserting a digital memory card into the Digital Media Slot until the card is seated. 5-18 Hardware and Software Guide
Hold the digital memory card label-side up with the connectors facing the notebook. 2. To insert a digital memory card: 1. Slide the memory card into a Digital Media Slot. Hardware Components Inserting an Optional Digital Memory Card Ä CAUTION: To prevent damage to the connectors to the digital memory card connectors, use minimal pressure when inserting a digital memory card into the Digital Media Slot until the card is seated. 5-18 Hardware and Software Guide
Hardware and Software Guide
Page 130
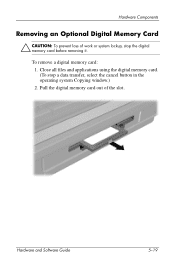
Close all files and applications using the digital memory card. (To stop the digital memory card before removing it. Hardware and Software Guide 5-19 Pull the digital memory card out of work or system lockup, stop a data transfer, select the cancel button in the operating system Copying window.) 2. Hardware Components Removing an Optional Digital Memory Card Ä CAUTION: To prevent loss of the slot. To remove a digital memory card: 1.
Close all files and applications using the digital memory card. (To stop the digital memory card before removing it. Hardware and Software Guide 5-19 Pull the digital memory card out of work or system lockup, stop a data transfer, select the cancel button in the operating system Copying window.) 2. Hardware Components Removing an Optional Digital Memory Card Ä CAUTION: To prevent loss of the slot. To remove a digital memory card: 1.

Hardware and Software Guide
Page 131
...the only user-accessible internal compartments on the bottom of the notebook can be opened only by a service partner. Å WARNING: To reduce the risk of static electricity by adding a memory module to the equipment, unplug the power cord and remove...can damage electronic components. Hardware Components Adding and Upgrading Memory Modules The notebook has 2 memory module compartments. All other areas that includes safety and regulatory information. 5-20 Hardware and Software Guide The memory capacity of the notebook. Some notebook models may be shipped with a User Guides disc ...
...the only user-accessible internal compartments on the bottom of the notebook can be opened only by a service partner. Å WARNING: To reduce the risk of static electricity by adding a memory module to the equipment, unplug the power cord and remove...can damage electronic components. Hardware Components Adding and Upgrading Memory Modules The notebook has 2 memory module compartments. All other areas that includes safety and regulatory information. 5-20 Hardware and Software Guide The memory capacity of the notebook. Some notebook models may be shipped with a User Guides disc ...
Hardware and Software Guide
Page 132
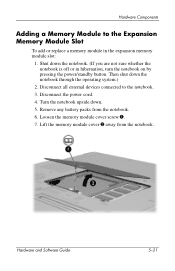
... slot: 1. Disconnect all external devices connected to the Expansion Memory Module Slot To add or replace a memory module in hibernation, turn the notebook on by pressing the power/standby button. Turn the notebook upside down the notebook through the operating system.) 2. Hardware Components Adding a Memory Module to the notebook. 3. Then shut down . 5. Remove any battery packs from...
... slot: 1. Disconnect all external devices connected to the Expansion Memory Module Slot To add or replace a memory module in hibernation, turn the notebook on by pressing the power/standby button. Turn the notebook upside down the notebook through the operating system.) 2. Hardware Components Adding a Memory Module to the notebook. 3. Then shut down . 5. Remove any battery packs from...
Hardware and Software Guide
Page 133
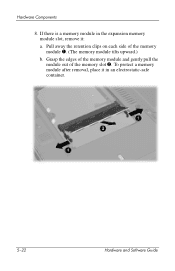
Hardware Components 8. Pull away the retention clips on each side of the memory slot 2. If there is a memory module in the expansion memory module slot, remove it in an electrostatic-safe container. 5-22 Hardware and Software Guide Grasp the edges of the memory module and gently pull the module out of the memory module 1. (The memory module tilts upward.) b. To protect a memory module after removal, place it : a.
Hardware Components 8. Pull away the retention clips on each side of the memory slot 2. If there is a memory module in the expansion memory module slot, remove it in an electrostatic-safe container. 5-22 Hardware and Software Guide Grasp the edges of the memory module and gently pull the module out of the memory module 1. (The memory module tilts upward.) b. To protect a memory module after removal, place it : a.

Hardware and Software Guide
Page 134
b. With the memory module at a 45-degree angle from the surface of the memory module with the tabbed area in the memory slot. Hardware Components 9. Align the keyed (notched) edge 1 of the memory module compartment, press the module into the memory slot until it is seated 2. Hardware and Software Guide 5-23 Insert the new memory module: a.
b. With the memory module at a 45-degree angle from the surface of the memory module with the tabbed area in the memory slot. Hardware Components 9. Align the keyed (notched) edge 1 of the memory module compartment, press the module into the memory slot until it is seated 2. Hardware and Software Guide 5-23 Insert the new memory module: a.


