HP Client Manager 6.1
Page 4
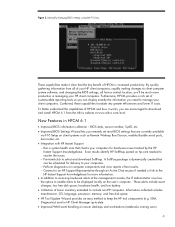
...HP client computers. New Features in HP...hp.com needed or link to the HP Instant Support knowledgebase for delivery to your HP... with HP Instant Support...HP Instant Support knowledgebase. Information collected includes manufacturer, OS, language, processor, memory, and free disk space. • HP... Tool Update Wizard provides an easy method to select and download SoftPaqs. Scan results identify HP...notebooks coming soon) 4 Point-and-click to keep the HP tool components (e.g. These capabilities make it works, you need to include non-HP... an HP Support...
...HP client computers. New Features in HP...hp.com needed or link to the HP Instant Support knowledgebase for delivery to your HP... with HP Instant Support...HP Instant Support knowledgebase. Information collected includes manufacturer, OS, language, processor, memory, and free disk space. • HP... Tool Update Wizard provides an easy method to select and download SoftPaqs. Scan results identify HP...notebooks coming soon) 4 Point-and-click to keep the HP tool components (e.g. These capabilities make it works, you need to include non-HP... an HP Support...
Hard Drive White Paper
Page 5
...run, at a minimum, the chkdsk /p /r commands to the hard drive. HP Recommendations for Notebook Users • Install HP Notebook LidSwitch Policy, or as an alternative, place the notebook into Standby mode before transporting it from one location to another. • Upgrade to the latest system BIOS, as given in...for an extended period of time, e.g., when you are working in applications such as a word processor that executes primarily from electronic memory without having to access the hard drive very often. • Perform the Defrag operation periodically to optimize the reading and writing ...
...run, at a minimum, the chkdsk /p /r commands to the hard drive. HP Recommendations for Notebook Users • Install HP Notebook LidSwitch Policy, or as an alternative, place the notebook into Standby mode before transporting it from one location to another. • Upgrade to the latest system BIOS, as given in...for an extended period of time, e.g., when you are working in applications such as a word processor that executes primarily from electronic memory without having to access the hard drive very often. • Perform the Defrag operation periodically to optimize the reading and writing ...
HP Compaq nc6000 Notebook PC - Maintenance and Service Guide
Page 32
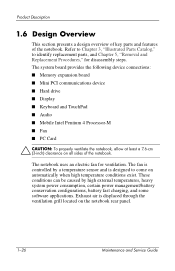
... by a temperature sensor and is displaced through the ventilation grill located on all sides of the notebook. Product Description 1.6 Design Overview This section presents a design overview of key parts and features of the notebook. The system board provides the following device connections: ■ Memory expansion board ■ Mini PCI communications device ■ Hard drive...
... by a temperature sensor and is displaced through the ventilation grill located on all sides of the notebook. Product Description 1.6 Design Overview This section presents a design overview of key parts and features of the notebook. The system board provides the following device connections: ■ Memory expansion board ■ Mini PCI communications device ■ Hard drive...
HP Compaq nc6000 Notebook PC - Maintenance and Service Guide
Page 193
... 5-49 spare part number 3-7, 3-15, 5-49 left-side components 1-14 M mass storage devices, spare part numbers 3-10 memory expansion board illustrated 3-4 removal 5-26 spare part numbers 3-5, 5-26 memory shield illustrated 3-2, 3-8 removal 5-26 microphone jack location 1-15 pin assignments A-4 Mini PCI communications board illustrated 3-6 removal 5-12 spare part numbers 3-7, 5-12 Mini PCI compartment cover...
... 5-49 spare part number 3-7, 3-15, 5-49 left-side components 1-14 M mass storage devices, spare part numbers 3-10 memory expansion board illustrated 3-4 removal 5-26 spare part numbers 3-5, 5-26 memory shield illustrated 3-2, 3-8 removal 5-26 microphone jack location 1-15 pin assignments A-4 Mini PCI communications board illustrated 3-6 removal 5-12 spare part numbers 3-7, 5-12 Mini PCI compartment cover...

Hardware Guide
Page 11
located under (populated) and one primary memory slot (not shown; the keyboard) Hardware Guide 1-5 Not shown Memory compartment Contains one expansion slot. Notebook Features Top component descriptions (Continued) Item Component Description 7 fn key Executes frequently used system functions when pressed in combination with a function key or the esc key.
located under (populated) and one primary memory slot (not shown; the keyboard) Hardware Guide 1-5 Not shown Memory compartment Contains one expansion slot. Notebook Features Top component descriptions (Continued) Item Component Description 7 fn key Executes frequently used system functions when pressed in combination with a function key or the esc key.
Hardware Guide
Page 97
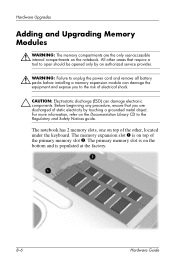
All other , located under the keyboard. The notebook has 2 memory slots, one on the Documentation Library CD to the risk of the primary memory slot 2. Before beginning any procedure, ensure that you are the only user-accessible internal compartments on top of electrical ... and remove all battery packs before installing a memory expansion module can damage electronic components. The primary memory slot is on the bottom and is on the notebook. Hardware Upgrades Adding and Upgrading Memory Modules Å WARNING: The memory compartments are discharged of the other areas that ...
All other , located under the keyboard. The notebook has 2 memory slots, one on the Documentation Library CD to the risk of the primary memory slot 2. Before beginning any procedure, ensure that you are the only user-accessible internal compartments on top of electrical ... and remove all battery packs before installing a memory expansion module can damage electronic components. The primary memory slot is on the bottom and is on the notebook. Hardware Upgrades Adding and Upgrading Memory Modules Å WARNING: The memory compartments are discharged of the other areas that ...
Hardware Guide
Page 98
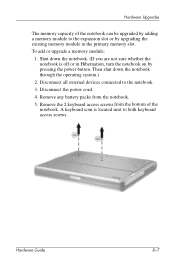
... you are not sure whether the notebook is located next to the notebook. 3. Disconnect the power cord. 4. Remove any battery packs from the bottom of the notebook can be upgraded by adding a memory module to the expansion slot or by upgrading the existing memory module in Hibernation, turn the notebook on by pressing the power button. Hardware...
... you are not sure whether the notebook is located next to the notebook. 3. Disconnect the power cord. 4. Remove any battery packs from the bottom of the notebook can be upgraded by adding a memory module to the expansion slot or by upgrading the existing memory module in Hibernation, turn the notebook on by pressing the power button. Hardware...
Hardware Guide
Page 101
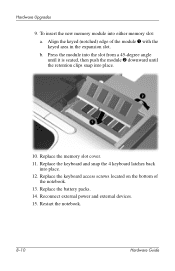
Replace the keyboard and snap the 4 keyboard latches back into place. 10. Restart the notebook. 8-10 Hardware Guide Replace the battery packs. 14. Press the module into the slot from a 45-degree angle until it is seated, then push the ... into place. 12. Hardware Upgrades 9. Align the keyed (notched) edge of the notebook. 13. Reconnect external power and external devices. 15. b. To insert the new memory module into either memory slot: a. Replace the memory slot cover. 11. Replace the keyboard access screws located on the bottom of the module 1 with the keyed area in the...
Replace the keyboard and snap the 4 keyboard latches back into place. 10. Restart the notebook. 8-10 Hardware Guide Replace the battery packs. 14. Press the module into the slot from a 45-degree angle until it is seated, then push the ... into place. 12. Hardware Upgrades 9. Align the keyed (notched) edge of the notebook. 13. Reconnect external power and external devices. 15. b. To insert the new memory module into either memory slot: a. Replace the memory slot cover. 11. Replace the keyboard access screws located on the bottom of the module 1 with the keyed area in the...
Hardware Guide
Page 107
hard drive, bay; analog line 6-1 dimensions, notebook 9-2 discharge sequence, battery 3-7 Index-2 Hardware Guide MultiBay Bluetooth 2-9 buttons mute 2-9, 5-1 PC Card 8-3 pointing stick 2-1 power 1-3 Presentation Mode 2-9 Quick Launch 1-4, 2-9 Quick Lock 2-9...CD displaying contents 4-16 inserting 4-13 removing 4-15 CD drive inserting CD 4-13 inserting into MultiBay 4-11 locations supported 4-3 removing CD 4-15 See also drives CD-RW. See CD charge sequence 3-7 compartments primary memory 1-5 Computer Setup navigating 2-12, 7-4 num lock mode at startup 2-12 USB legacy support 7-4 connecting ...
hard drive, bay; analog line 6-1 dimensions, notebook 9-2 discharge sequence, battery 3-7 Index-2 Hardware Guide MultiBay Bluetooth 2-9 buttons mute 2-9, 5-1 PC Card 8-3 pointing stick 2-1 power 1-3 Presentation Mode 2-9 Quick Launch 1-4, 2-9 Quick Lock 2-9...CD displaying contents 4-16 inserting 4-13 removing 4-15 CD drive inserting CD 4-13 inserting into MultiBay 4-11 locations supported 4-3 removing CD 4-15 See also drives CD-RW. See CD charge sequence 3-7 compartments primary memory 1-5 Computer Setup navigating 2-12, 7-4 num lock mode at startup 2-12 USB legacy support 7-4 connecting ...

Hardware Guide
Page 109
...-battery condition 3-11 initiating 2-6 hotkeys defined 2-5 shortcut reference to commands 2-6 switch image 2-7 with external keyboards 2-8 hub, USB 7-3 humidity specifications 9-2 I IDE (Integrated Drive Electronics) light 4-5 increasing memory 8-11 infrared 6-5, 6-6 intake vent 1-15 J jack(s) audio line-out 5-1, 5-2 microphone input 1-8, 5-1, 5-2 RJ-11 1-9, 6-1 RJ-45 1-13 S-Video out 5-4 K key(s) application 1-4 Fn 2-5,... release 1-11 Index-4 Hardware Guide Index H hard drive bay 1-8 inserting into hard drive bay 4-5 inserting into MultiBay 4-11 locations supported 4-3 MultiBay vs.
...-battery condition 3-11 initiating 2-6 hotkeys defined 2-5 shortcut reference to commands 2-6 switch image 2-7 with external keyboards 2-8 hub, USB 7-3 humidity specifications 9-2 I IDE (Integrated Drive Electronics) light 4-5 increasing memory 8-11 infrared 6-5, 6-6 intake vent 1-15 J jack(s) audio line-out 5-1, 5-2 microphone input 1-8, 5-1, 5-2 RJ-11 1-9, 6-1 RJ-45 1-13 S-Video out 5-4 K key(s) application 1-4 Fn 2-5,... release 1-11 Index-4 Hardware Guide Index H hard drive bay 1-8 inserting into hard drive bay 4-5 inserting into MultiBay 4-11 locations supported 4-3 MultiBay vs.
Hardware Guide
Page 111
...(dual pointing stick/TouchPad models) 1-2 pointing device (TouchPad models) 1-1 pointing device preferences 2-4 pointing stick buttons 2-1 cap, replacing 2-3 location 2-1 using 2-3 Port Replicator docking connecter 1-15 external device connections 2-4 port, infrared 6-5 power rated input 9-3 switching between AC and ... See also battery packs; hard drive projector connecting 7-1 switching display 2-7 Q Quick Launch buttons 1-4, 2-9 R RAM (random access memory) 8-11 regulatory information 9-3 release latch battery 1-15 display 1-11 RJ-11 telephone jack 1-9 RJ-45 network jack 1-13 Index...
...(dual pointing stick/TouchPad models) 1-2 pointing device (TouchPad models) 1-1 pointing device preferences 2-4 pointing stick buttons 2-1 cap, replacing 2-3 location 2-1 using 2-3 Port Replicator docking connecter 1-15 external device connections 2-4 port, infrared 6-5 power rated input 9-3 switching between AC and ... See also battery packs; hard drive projector connecting 7-1 switching display 2-7 Q Quick Launch buttons 1-4, 2-9 R RAM (random access memory) 8-11 regulatory information 9-3 release latch battery 1-15 display 1-11 RJ-11 telephone jack 1-9 RJ-45 network jack 1-13 Index...

Hardware Guide
Page 112
... (SD) slot 1-9 security cable slot 1-10 security features 7-6 shortcut keys defined 2-5 with the notebook Aircraft Power Adapter 1-13, 3-12 Automobile Power Adapter/Charger 3-12 battery pack temperature considerations 3-19 Hardware Guide Index-7 See Standby slots memory 1-5, 8-9 SD Card 8-4 socket services, PC Card 8-2 software modem 3-17 Power Meter (Windows)...connecting video 5-5 S-Video jack 1-14, 5-5 switching image to or from 2-6 temperature operating 9-2 storage, for battery packs 3-19 To 4-16 TouchPad buttons 2-1 location 2-1 using 2-3 traveling with external keyboards 2-8 Sleep.
... (SD) slot 1-9 security cable slot 1-10 security features 7-6 shortcut keys defined 2-5 with the notebook Aircraft Power Adapter 1-13, 3-12 Automobile Power Adapter/Charger 3-12 battery pack temperature considerations 3-19 Hardware Guide Index-7 See Standby slots memory 1-5, 8-9 SD Card 8-4 socket services, PC Card 8-2 software modem 3-17 Power Meter (Windows)...connecting video 5-5 S-Video jack 1-14, 5-5 switching image to or from 2-6 temperature operating 9-2 storage, for battery packs 3-19 To 4-16 TouchPad buttons 2-1 location 2-1 using 2-3 traveling with external keyboards 2-8 Sleep.

Getting Started
Page 27
334088-001.book Page 5 Friday, July 11, 2003 3:39 PM Notebook Features Top component descriptions (Continued) Item Component Description 5 Display release latch Secure the display when it is closed. located under (populated) and one primary memory slot (not shown; recesses (2) 6 Microsoft logo key Displays the Windows Start menu. 7 fn key Executes frequently used system functions when pressed in combination with a function key or the esc key. Not shown Memory compartment Contains one expansion slot. the keyboard) Startup Guide 3-5
334088-001.book Page 5 Friday, July 11, 2003 3:39 PM Notebook Features Top component descriptions (Continued) Item Component Description 5 Display release latch Secure the display when it is closed. located under (populated) and one primary memory slot (not shown; recesses (2) 6 Microsoft logo key Displays the Windows Start menu. 7 fn key Executes frequently used system functions when pressed in combination with a function key or the esc key. Not shown Memory compartment Contains one expansion slot. the keyboard) Startup Guide 3-5

Getting Started - Enhanced for Accessibility
Page 27
located under (populated) and one primary memory slot (not shown; the keyboard) Startup Guide 3-5 Notebook Features Top component descriptions (Continued) Item Component Description 5 Display release latch Secure the display when it is closed. Not shown Memory compartment Contains one expansion slot. recesses (2) 6 Microsoft logo key Displays the Windows Start menu. 7 fn key Executes frequently used system functions when pressed in combination with a function key or the esc key.
located under (populated) and one primary memory slot (not shown; the keyboard) Startup Guide 3-5 Notebook Features Top component descriptions (Continued) Item Component Description 5 Display release latch Secure the display when it is closed. Not shown Memory compartment Contains one expansion slot. recesses (2) 6 Microsoft logo key Displays the Windows Start menu. 7 fn key Executes frequently used system functions when pressed in combination with a function key or the esc key.

