HP Mini 2102, HP Mini 210, and Compaq Mini 210 - Maintenance and Service Guide
Page 12
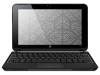
...-user replaceable parts: AC adapter √ √ Battery (system) √ √ Hard drive √ √ Memory module √ √ WLAN module √ √ WWAN module √ √ 4 Chapter 1 Product description Category Power requirements Security Operating system Serviceability Description HP Mini 2102 and HP Mini 210 HP Clikpad TouchPad with localized cable √ plug support and stepped plug AC adapter connector on /off button with LED indicator 40-W UMA AC adapter (non-Smart) with multi-touch/gesture support √ No numeric pad...
...-user replaceable parts: AC adapter √ √ Battery (system) √ √ Hard drive √ √ Memory module √ √ WLAN module √ √ WWAN module √ √ 4 Chapter 1 Product description Category Power requirements Security Operating system Serviceability Description HP Mini 2102 and HP Mini 210 HP Clikpad TouchPad with localized cable √ plug support and stepped plug AC adapter connector on /off button with LED indicator 40-W UMA AC adapter (non-Smart) with multi-touch/gesture support √ No numeric pad...
HP Mini 2102, HP Mini 210, and Compaq Mini 210 - Maintenance and Service Guide
Page 18
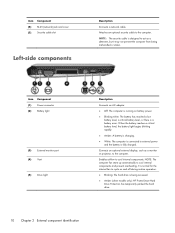
... cool internal components. Attaches an optional security cable to the computer. Connects an optional external display, such as a deterrent, but it may not prevent the computer from being accessed. ● Amber (select models only): HP ProtectSmart Hard Drive Protection has temporarily parked the hard drive. 10 Chapter 2 External component identification Enables airflow to act as a monitor or projector, to the computer. item Component (6) RJ-45 (network) jack and cover (7) Security cable slot...
... cool internal components. Attaches an optional security cable to the computer. Connects an optional external display, such as a deterrent, but it may not prevent the computer from being accessed. ● Amber (select models only): HP ProtectSmart Hard Drive Protection has temporarily parked the hard drive. 10 Chapter 2 External component identification Enables airflow to act as a monitor or projector, to the computer. item Component (6) RJ-45 (network) jack and cover (7) Security cable slot...
HP Mini 2102, HP Mini 210, and Compaq Mini 210 - Maintenance and Service Guide
Page 80
... the "F10 = BIOS Setup Options" message is not already running , begin at step 2. 1. Select the Main menu. Restoring default settings in the lower-left corner of the screen. 2. If Setup Utility is displayed in a list or to toggle a field, for example an Enable/Disable field, use the arrow keys to the menu display, press esc. ● To display additional navigation and selection information while Setup Utility is open , press f1. Open Setup Utility by keystroke...
... the "F10 = BIOS Setup Options" message is not already running , begin at step 2. 1. Select the Main menu. Restoring default settings in the lower-left corner of the screen. 2. If Setup Utility is displayed in a list or to toggle a field, for example an Enable/Disable field, use the arrow keys to the menu display, press esc. ● To display additional navigation and selection information while Setup Utility is open , press f1. Open Setup Utility by keystroke...
HP Mini 2102, HP Mini 210, and Compaq Mini 210 - Maintenance and Service Guide
Page 86
... installing software, running utilities, or changing Windows settings. Follow the on file size and the speed of the computer screen. 6. Using the Instant Restore utility when the operating system is functioning To recover information when the operating system is functioning properly, follow these steps: NOTE: Be sure that the computer is displayed on -screen instructions. Click Yes to set up and create a backup. Using the Instant Restore utility You can also access the utility by turning the power switch...
... installing software, running utilities, or changing Windows settings. Follow the on file size and the speed of the computer screen. 6. Using the Instant Restore utility when the operating system is functioning To recover information when the operating system is functioning properly, follow these steps: NOTE: Be sure that the computer is displayed on -screen instructions. Click Yes to set up and create a backup. Using the Instant Restore utility You can also access the utility by turning the power switch...

HP Mini 2102, HP Mini 210, and Compaq Mini 210 - Maintenance and Service Guide
Page 108
... 2 internal media cards 3 keyboard 3 memory module 1 modem 2 operating system 4 optical drive 2 panels 1 pointing device 3 ports 3 power requirements 4 processors 1 product name 1 security 4 serviceability 4 video 2 wireless 3 product name 1 R recycling battery 92 display 92 removal/replacement preliminaries 32 procedures 37 restoring default settings in Setup Utility 72 RJ-45 jack connector pinout 89 location 10 RTC battery removal 51 spare part numbers 19, 27, 51 Rubber Kit, spare part numbers 19, 26 S Screw Kit, spare part numbers 24, 28 security cable slot 10 Security Menu, Setup Utility...
... 2 internal media cards 3 keyboard 3 memory module 1 modem 2 operating system 4 optical drive 2 panels 1 pointing device 3 ports 3 power requirements 4 processors 1 product name 1 security 4 serviceability 4 video 2 wireless 3 product name 1 R recycling battery 92 display 92 removal/replacement preliminaries 32 procedures 37 restoring default settings in Setup Utility 72 RJ-45 jack connector pinout 89 location 10 RTC battery removal 51 spare part numbers 19, 27, 51 Rubber Kit, spare part numbers 19, 26 S Screw Kit, spare part numbers 24, 28 security cable slot 10 Security Menu, Setup Utility...
HP Mini 2102, HP Mini 210, and Compaq Mini 210 - Maintenance and Service Guide
Page 11
... 3 TouchPad with 2 TouchPad buttons and 2-way scrolling (taps enabled and some gestures enabled by default) TouchPad on/off button with LED indicator Power 40-W UMA AC adapter (non-Smart) with push-push technology supporting: ● Memory Stick (MS) ● MS/Pro ● MultiMediaCard (MMC) ● Secure Digital High Capacity (SDHC) Memory Card (standard and large size) ● xD-Picture Internal media cards Two Mini Card slots: ● Full-size Mini Card slot ● Half-size Mini Card slot √ √ Ports Audio...
... 3 TouchPad with 2 TouchPad buttons and 2-way scrolling (taps enabled and some gestures enabled by default) TouchPad on/off button with LED indicator Power 40-W UMA AC adapter (non-Smart) with push-push technology supporting: ● Memory Stick (MS) ● MS/Pro ● MultiMediaCard (MMC) ● Secure Digital High Capacity (SDHC) Memory Card (standard and large size) ● xD-Picture Internal media cards Two Mini Card slots: ● Full-size Mini Card slot ● Half-size Mini Card slot √ √ Ports Audio...

HP Mini 2102, HP Mini 210, and Compaq Mini 210 - Maintenance and Service Guide
Page 18
... (6) RJ-45 (network) jack and cover (7) Security cable slot Left-side components Description Connects a network cable. item Component (1) Power connector (2) Battery light (3) External monitor port (4) Vent (5) Drive light Description Connects an AC adapter. ● Off: The computer is running on and off during routine operation. ● Blinking: The hard drive is fully charged. Enables airflow to the computer. NOTE: The security cable is a battery error. When the battery reaches a critical battery level, the battery light begins blinking rapidly. ●...
... (6) RJ-45 (network) jack and cover (7) Security cable slot Left-side components Description Connects a network cable. item Component (1) Power connector (2) Battery light (3) External monitor port (4) Vent (5) Drive light Description Connects an AC adapter. ● Off: The computer is running on and off during routine operation. ● Blinking: The hard drive is fully charged. Enables airflow to the computer. NOTE: The security cable is a battery error. When the battery reaches a critical battery level, the battery light begins blinking rapidly. ●...
HP Mini 2102, HP Mini 210, and Compaq Mini 210 - Maintenance and Service Guide
Page 82
... utility by turning the power switch off and then on -screen instructions. If the operating system is connected to improve the security of the computer screen. 6. Save and close all open documents and close any open programs. 2. When the computer logo is displayed on the screen, press f6 repeatedly until the Windows status bar is functioning. Using Windows Backup and Restore To create a backup using Windows Backup and Restore, follow the on . 2. NOTE: Windows includes the User...
... utility by turning the power switch off and then on -screen instructions. If the operating system is connected to improve the security of the computer screen. 6. Save and close all open documents and close any open programs. 2. When the computer logo is displayed on the screen, press f6 repeatedly until the Windows status bar is functioning. Using Windows Backup and Restore To create a backup using Windows Backup and Restore, follow the on . 2. NOTE: Windows includes the User...
HP Mini 2102, HP Mini 210, and Compaq Mini 210 - Maintenance and Service Guide
Page 103
..., removal 42 Hard Drive Hardware Kit, spare part number 20, 23, 28, 41 headphone jack connector pinout 83 location 11 hinge, spare part number 21, 27 I internal media cards, product description 3 J jacks audio-in 11 audio-out 11 headphone 11 microphone 11 network 10 RJ-45 10 K keyboard product description 3 removal 49 spare part numbers 16, 28, 29, 49 keys action 8 fn 8 Windows applications 8 Windows logo 8 L language support 70 lights battery 10 caps lock 7 drive 10 mute 7 power 9 TouchPad 7 webcam 11 wireless 7 M Main Menu, Setup Utility 69 memory module...
..., removal 42 Hard Drive Hardware Kit, spare part number 20, 23, 28, 41 headphone jack connector pinout 83 location 11 hinge, spare part number 21, 27 I internal media cards, product description 3 J jacks audio-in 11 audio-out 11 headphone 11 microphone 11 network 10 RJ-45 10 K keyboard product description 3 removal 49 spare part numbers 16, 28, 29, 49 keys action 8 fn 8 Windows applications 8 Windows logo 8 L language support 70 lights battery 10 caps lock 7 drive 10 mute 7 power 9 TouchPad 7 webcam 11 wireless 7 M Main Menu, Setup Utility 69 memory module...
Mini User Guide - Windows XP
Page 7
Video ...47 Connecting an external monitor or projector 47 Webcam ...48 6 Security Protecting the computer ...49 Using passwords ...49 Passwords set in Windows 50 Passwords set in Setup Utility 50 Administrator password 51 Managing an administrator password 51 Entering an administrator password 51 Power-on password 51 Managing a power-on password 52 Entering a power-on password 52 Using antivirus software ...53 Using firewall software ...54 Installing critical updates ...55 7 Digital cards Inserting a digital card ...56 Stopping and removing a digital card 57 8 USB devices Using a ...
Video ...47 Connecting an external monitor or projector 47 Webcam ...48 6 Security Protecting the computer ...49 Using passwords ...49 Passwords set in Windows 50 Passwords set in Setup Utility 50 Administrator password 51 Managing an administrator password 51 Entering an administrator password 51 Power-on password 51 Managing a power-on password 52 Entering a power-on password 52 Using antivirus software ...53 Using firewall software ...54 Installing critical updates ...55 7 Digital cards Inserting a digital card ...56 Stopping and removing a digital card 57 8 USB devices Using a ...

Mini User Guide - Windows XP
Page 32
Select Start > Control Panel > Performance and Maintenance > Power Options. 2. If the capacity is fully charged and the battery light has turned white. Plug the computer into an external power source, when you are not using them. ● Stop, disable, or remove any external media cards that you recorded for one month or more than 50 percent, recharge the battery before using . ● Use the f2 and f3 action keys to high temperatures for...
Select Start > Control Panel > Performance and Maintenance > Power Options. 2. If the capacity is fully charged and the battery light has turned white. Plug the computer into an external power source, when you are not using them. ● Stop, disable, or remove any external media cards that you recorded for one month or more than 50 percent, recharge the battery before using . ● Use the f2 and f3 action keys to high temperatures for...
Mini User Guide - Windows XP
Page 57
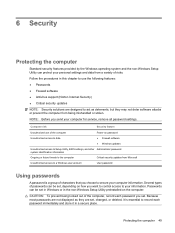
...: ● Passwords ● Firewall software ● Antivirus support (Norton Internet Security) ● Critical security updates NOTE: Security solutions are set , depending on how you want to control access to secure your information. Passwords can be set , changed, or deleted, it in a secure place. Follow the procedures in the non-Windows Setup Utility preinstalled on password ● Firewall software ● Windows updates Unauthorized access to Setup Utility, BIOS settings, and other Administrator password system identification...
...: ● Passwords ● Firewall software ● Antivirus support (Norton Internet Security) ● Critical security updates NOTE: Security solutions are set , depending on how you want to control access to secure your information. Passwords can be set , changed, or deleted, it in a secure place. Follow the procedures in the non-Windows Setup Utility preinstalled on password ● Firewall software ● Windows updates Unauthorized access to Setup Utility, BIOS settings, and other Administrator password system identification...

Mini User Guide - Windows XP
Page 83
... = BIOS Setup Options" message is displayed. 3. When the Main menu is selected, BIOS and other identifier. You may need this path when you want to download. 3. b. Follow the instructions on your hard drive where the BIOS update is connected to reliable external power using the AC adapter. You will need to access this information to locate the update later, after it has been downloaded to your selection to the hard drive. To exit Setup Utility, use the arrow keys...
... = BIOS Setup Options" message is displayed. 3. When the Main menu is selected, BIOS and other identifier. You may need this path when you want to download. 3. b. Follow the instructions on your hard drive where the BIOS update is connected to reliable external power using the AC adapter. You will need to access this information to locate the update later, after it has been downloaded to your selection to the hard drive. To exit Setup Utility, use the arrow keys...

Mini User Guide - Windows XP
Page 91
...menu 82 digital card inserting 56 removing 57 stopping 57 Digital Media Slot, identifying 6 diskette drive 69 display switch, identifying 8 displaying system information 80 drive media 15 drives diskette 69 external 69 hard 69 optical 69 drives, boot order 81 DVD drive 69 E earbuds 8, 40 encryption 32 entering a power-on password 52 entering an administrator password 51 exiting Setup Utility 80 external audio devices, connecting 45 external drive 69 external monitor port 47 F firewall 32 fn key 5, 63 function keys 63 H hard drive self test 82 hardware, identifying 3 headphone (audio-out) jack...
...menu 82 digital card inserting 56 removing 57 stopping 57 Digital Media Slot, identifying 6 diskette drive 69 display switch, identifying 8 displaying system information 80 drive media 15 drives diskette 69 external 69 hard 69 optical 69 drives, boot order 81 DVD drive 69 E earbuds 8, 40 encryption 32 entering a power-on password 52 entering an administrator password 51 exiting Setup Utility 80 external audio devices, connecting 45 external drive 69 external monitor port 47 F firewall 32 fn key 5, 63 function keys 63 H hard drive self test 82 hardware, identifying 3 headphone (audio-out) jack...

Mini User Guide - Windows XP
Page 92
... 14 serial number 13 language support 81 latches, battery release 9 left TouchPad button, identifying 4 lights caps lock 4 webcam 8 local area network (LAN) cable required 27 connecting cable 27 low battery level 21 M Main menu 81 managing a power-on password 52 managing an administrator password 51 memory module removing 71 memory test 82 microphone (audio-in) jack 8, 40 monitor, connecting 47 mouse, external connecting 62 setting preferences 60 multimedia components, identifying 39 multimedia software installing 44 using 44 mute, identifying 40 N navigating in Setup Utility 79 network cable...
... 14 serial number 13 language support 81 latches, battery release 9 left TouchPad button, identifying 4 lights caps lock 4 webcam 8 local area network (LAN) cable required 27 connecting cable 27 low battery level 21 M Main menu 81 managing a power-on password 52 managing an administrator password 51 memory module removing 71 memory test 82 microphone (audio-in) jack 8, 40 monitor, connecting 47 mouse, external connecting 62 setting preferences 60 multimedia components, identifying 39 multimedia software installing 44 using 44 mute, identifying 40 N navigating in Setup Utility 79 network cable...

Mini User Guide - Windows 7
Page 32
... battery level. 1. To discharge a battery: 1. When the battery is fully charged and the battery light has turned white. or - Click Change advanced power settings. 5. Select Start > Control Panel > System and Security > Power Options. 2. Under the current power plan, click Change plan settings. 3. Click OK. 8. Click Save changes. Step 4: Fully recharge the battery To recharge the battery: 1. Plug the computer into an external power source, when you are not using them. ● Stop, disable, or remove any external media cards...
... battery level. 1. To discharge a battery: 1. When the battery is fully charged and the battery light has turned white. or - Click Change advanced power settings. 5. Select Start > Control Panel > System and Security > Power Options. 2. Under the current power plan, click Change plan settings. 3. Click OK. 8. Click Save changes. Step 4: Fully recharge the battery To recharge the battery: 1. Plug the computer into an external power source, when you are not using them. ● Stop, disable, or remove any external media cards...
Mini User Guide - Windows 7
Page 56
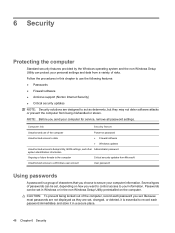
... security features provided by the Windows operating system and the non-Windows Setup Utility can protect your computer for service, remove all password settings. NOTE: Before you set , depending on password ● Firewall software ● Windows updates Unauthorized access to Setup Utility, BIOS settings, and other Administrator password system identification information Ongoing or future threats to the computer Critical security updates from Microsoft Unauthorized access to a Windows user account User password Using passwords A password is essential to your computer...
... security features provided by the Windows operating system and the non-Windows Setup Utility can protect your computer for service, remove all password settings. NOTE: Before you set , depending on password ● Firewall software ● Windows updates Unauthorized access to Setup Utility, BIOS settings, and other Administrator password system identification information Ongoing or future threats to the computer Critical security updates from Microsoft Unauthorized access to a Windows user account User password Using passwords A password is essential to your computer...
Mini User Guide - Windows 7
Page 82
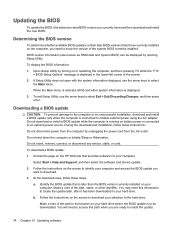
... locate the update later, after it has been downloaded to reliable external power using the AC adapter. During the download and installation, follow these instructions: Do not disconnect power from the AC outlet. To exit Setup Utility, use the arrow keys to install the update. 74 Chapter 12 Updating software Make a note of the system BIOS currently installed. Follow the instructions on battery power or connected to select Exit > Exit Discarding Changes, and then press enter. To display the BIOS...
... locate the update later, after it has been downloaded to reliable external power using the AC adapter. During the download and installation, follow these instructions: Do not disconnect power from the AC outlet. To exit Setup Utility, use the arrow keys to install the update. 74 Chapter 12 Updating software Make a note of the system BIOS currently installed. Follow the instructions on battery power or connected to select Exit > Exit Discarding Changes, and then press enter. To display the BIOS...

Mini User Guide - Windows 7
Page 90
..., updating 74 Bluetooth device 29 boot options 80 boot order 80 buttons left TouchPad 4 right TouchPad 4 TouchPad, on/off button 3 C cables LAN 28 USB 57 VGA 46 calibrating battery 22 caps lock light, identifying 4 CD drive 68 changing Setup Utility language 78 charging batteries 20, 22 checking audio functions 45 components additional hardware 13 bottom 9 display 8 front 5 left-side 7 right-side 6 TouchPad 3 connecting to a WLAN 33 Connection Manager icon 29 connection, external power 18 cord, power 13 corporate WLAN connection 33 critical battery level 22 D Diagnostics menu 81 digital card...
..., updating 74 Bluetooth device 29 boot options 80 boot order 80 buttons left TouchPad 4 right TouchPad 4 TouchPad, on/off button 3 C cables LAN 28 USB 57 VGA 46 calibrating battery 22 caps lock light, identifying 4 CD drive 68 changing Setup Utility language 78 charging batteries 20, 22 checking audio functions 45 components additional hardware 13 bottom 9 display 8 front 5 left-side 7 right-side 6 TouchPad 3 connecting to a WLAN 33 Connection Manager icon 29 connection, external power 18 cord, power 13 corporate WLAN connection 33 critical battery level 22 D Diagnostics menu 81 digital card...

Mini User Guide - Windows 7
Page 91
..., network cable 28 ports external monitor 46 USB 6, 8, 57 power connecting 18 power connector, identifying 7 power cord, identifying 13 power-on password creating 51 entering 51 managing 51 Processor C4 State 80 product name and number, computer 13 programs, updating 76 projector, connecting 46 public WLAN connection 33 Q QuickWeb disabling 77 enabling 77 Setup Utility 80 R readable media 15 regulatory information HP Mobile Broadband Module serial number 14 regulatory label 14 wireless 14 release latches battery 9, 20 restoring default settings 79 right TouchPad button, identifying...
..., network cable 28 ports external monitor 46 USB 6, 8, 57 power connecting 18 power connector, identifying 7 power cord, identifying 13 power-on password creating 51 entering 51 managing 51 Processor C4 State 80 product name and number, computer 13 programs, updating 76 projector, connecting 46 public WLAN connection 33 Q QuickWeb disabling 77 enabling 77 Setup Utility 80 R readable media 15 regulatory information HP Mobile Broadband Module serial number 14 regulatory label 14 wireless 14 release latches battery 9, 20 restoring default settings 79 right TouchPad button, identifying...


