Getting Started - Windows 7
Page 8
... to update the software Help and Support ● Operating system information To access Help and Support, select Start > Help and ● Software, driver, and BIOS updates Support. ● Troubleshooting tools NOTE: For country- Finding information The computer comes with your country or ● How to access technical support region, and follow the on-screen instructions. or region-specific support, go to http://www.hp.com/ support. ● Support information ● Ordering parts and finding...
... to update the software Help and Support ● Operating system information To access Help and Support, select Start > Help and ● Software, driver, and BIOS updates Support. ● Troubleshooting tools NOTE: For country- Finding information The computer comes with your country or ● How to access technical support region, and follow the on-screen instructions. or region-specific support, go to http://www.hp.com/ support. ● Support information ● Ordering parts and finding...
Getting Started - Windows 7
Page 15
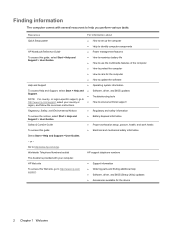
...) jack/Audioin (microphone) jack Connects optional powered stereo speakers, headphones, earbuds, a headset, or television audio. WARNING! To reduce the risk of personal injury, adjust the volume before putting on and off during routine operation. NOTE: When a device is not connected to external power. Left side 9 Left side Component (1) (2) (3) (4) (5) (6) (7) Power connector AC adapter light External monitor port Description Connects an AC adapter. ● White: The computer is connected to external power and the battery is fully charged. ●...
...) jack/Audioin (microphone) jack Connects optional powered stereo speakers, headphones, earbuds, a headset, or television audio. WARNING! To reduce the risk of personal injury, adjust the volume before putting on and off during routine operation. NOTE: When a device is not connected to external power. Left side 9 Left side Component (1) (2) (3) (4) (5) (6) (7) Power connector AC adapter light External monitor port Description Connects an AC adapter. ● White: The computer is connected to external power and the battery is fully charged. ●...
Getting Started - Windows 7
Page 25
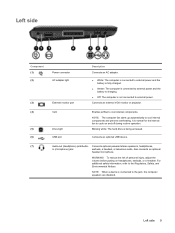
.... NOTE: Your ISP will help set up for using it in some locations)-These icons may be displayed either individually on wireless technology and connecting to a wireless network, refer to use an existing account: ● Internet Services & Offers (available in a safe place. To access the Windows Connect to the Internet Wizard and instructions for a new Internet account and configuring the computer to the HP Notebook Reference Guide and information and Web site links...
.... NOTE: Your ISP will help set up for using it in some locations)-These icons may be displayed either individually on wireless technology and connecting to a wireless network, refer to use an existing account: ● Internet Services & Offers (available in a safe place. To access the Windows Connect to the Internet Wizard and instructions for a new Internet account and configuring the computer to the HP Notebook Reference Guide and information and Web site links...
Getting Started - Windows 7
Page 29
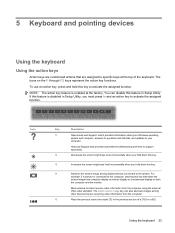
... alternate images among display devices connected to the system. The switch screen image key can disable this feature in Setup Utility, you hold down this key. 5 Keyboard and pointing devices Using the keyboard Using the action keys Action keys are customized actions that are assigned to specific keys at the factory. To use an action key, press and hold down this key to activate the assigned function. Help and Support also provides automated troubleshooting and links to...
... alternate images among display devices connected to the system. The switch screen image key can disable this feature in Setup Utility, you hold down this key. 5 Keyboard and pointing devices Using the keyboard Using the action keys Action keys are customized actions that are assigned to specific keys at the factory. To use an action key, press and hold down this key to activate the assigned function. Help and Support also provides automated troubleshooting and links to...
Getting Started - Windows 7
Page 31
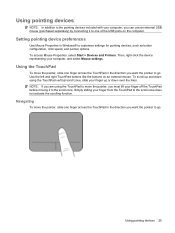
... USB ports on an external mouse. Then, right-click the device representing your finger from the TouchPad to the scroll zone does not activate the scrolling function. NOTE: If you are using the TouchPad vertical scroll zone, slide your finger off the TouchPad before moving it to one finger across the TouchPad in Windows® to customize settings for pointing devices, such as button configuration, click speed, and pointer options. Using pointing devices...
... USB ports on an external mouse. Then, right-click the device representing your finger from the TouchPad to the scroll zone does not activate the scrolling function. NOTE: If you are using the TouchPad vertical scroll zone, slide your finger off the TouchPad before moving it to one finger across the TouchPad in Windows® to customize settings for pointing devices, such as button configuration, click speed, and pointer options. Using pointing devices...
Getting Started - Windows 7
Page 37
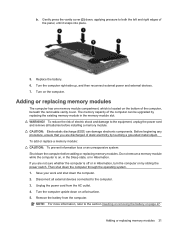
... the computer. Adding or replacing memory modules 31 Turn the computer right-side up, and then reconnect external power and external devices. 7. CAUTION: Electrostatic discharge (ESD) can be upgraded by replacing the existing memory module in Hibernation, turn the computer on the bottom of static electricity by sliding the power switch. NOTE: For more information, refer to the section Inserting or removing the battery on a flat surface...
... the computer. Adding or replacing memory modules 31 Turn the computer right-side up, and then reconnect external power and external devices. 7. CAUTION: Electrostatic discharge (ESD) can be upgraded by replacing the existing memory module in Hibernation, turn the computer on the bottom of static electricity by sliding the power switch. NOTE: For more information, refer to the section Inserting or removing the battery on a flat surface...

Getting Started - Windows 7
Page 45
... them to complete the backup process. The screen shot can back up all personal files. 2. Backing up your information You should back up the entire computer image. NOTE: Windows® includes the User Account Control feature to maintain a current backup. Depending on -screen instructions. Refer to an optional external hard drive, a network drive, or discs. You can be prompted for tasks such as installing software, running utilities, or changing Windows settings.
... them to complete the backup process. The screen shot can back up all personal files. 2. Backing up your information You should back up the entire computer image. NOTE: Windows® includes the User Account Control feature to maintain a current backup. Depending on -screen instructions. Refer to an optional external hard drive, a network drive, or discs. You can be prompted for tasks such as installing software, running utilities, or changing Windows settings.
Getting Started - Windows 7
Page 50
... latches 11 battery, replacing 27 buttons left TouchPad 4 right TouchPad 4 C caps lock light, identifying 5 components bottom 11 display 10 front 7 left-side 9 right-side 8 top 4 connector, power 9 D Digital Media Slot, identifying 8 drive light 9 E esc key, identifying 6 external monitor port 9 F f11 38 fn key, identifying 6 full system recovery 37 H hard drive installing 30 removing 29 headphone (audio-out) jack 9 I input power 43 integrated webcam light, identifying 10 internal microphones, identifying 10 Internet connection setup 21 ISP, using 19 J jacks audio-in (microphone) 9 audio-out...
... latches 11 battery, replacing 27 buttons left TouchPad 4 right TouchPad 4 C caps lock light, identifying 5 components bottom 11 display 10 front 7 left-side 9 right-side 8 top 4 connector, power 9 D Digital Media Slot, identifying 8 drive light 9 E esc key, identifying 6 external monitor port 9 F f11 38 fn key, identifying 6 full system recovery 37 H hard drive installing 30 removing 29 headphone (audio-out) jack 9 I input power 43 integrated webcam light, identifying 10 internal microphones, identifying 10 Internet connection setup 21 ISP, using 19 J jacks audio-in (microphone) 9 audio-out...
HP Mini 110 and Compaq Mini CQ10 - Maintenance and Service Guide
Page 13
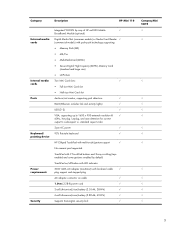
... HP Mini 110 External media cards Internal media cards Ports Keyboard/ pointing device Power requirements Security Integrated WWAN by default) TouchPad on/off button with LED indicator 30-W UMA AC adapter (non-Smart) with push-push technology supporting: ● Memory Stick (MS) ● MS/Pro ● MultiMediaCard (MMC) ● Secure Digital High Capacity (SDHC) Memory Card (standard and large size) ● xD-Picture Two Mini Card slots: √ ● Full-size Mini Card slot ● Half-size Mini Card slot Audio-in/out combo, supporting jack...
... HP Mini 110 External media cards Internal media cards Ports Keyboard/ pointing device Power requirements Security Integrated WWAN by default) TouchPad on/off button with LED indicator 30-W UMA AC adapter (non-Smart) with push-push technology supporting: ● Memory Stick (MS) ● MS/Pro ● MultiMediaCard (MMC) ● Secure Digital High Capacity (SDHC) Memory Card (standard and large size) ● xD-Picture Two Mini Card slots: √ ● Full-size Mini Card slot ● Half-size Mini Card slot Audio-in/out combo, supporting jack...
HP Mini 110 and Compaq Mini CQ10 - Maintenance and Service Guide
Page 21
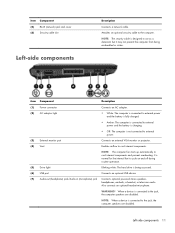
... cover (6) Security cable slot Left-side components Description Connects a network cable. When a device is designed to the jack, the computer speakers are disabled. Connects an external VGA monitor or projector. Also connects an optional headset microphone. Attaches an optional security cable to cool internal components and prevent overheating. NOTE: The security cable is connected to act as a deterrent, but it may not prevent the computer from being accessed. (6) USB port Connects an optional USB device. (7) Audio-out (headphone) jack/Audio...
... cover (6) Security cable slot Left-side components Description Connects a network cable. When a device is designed to the jack, the computer speakers are disabled. Connects an external VGA monitor or projector. Also connects an optional headset microphone. Attaches an optional security cable to cool internal components and prevent overheating. NOTE: The security cable is connected to act as a deterrent, but it may not prevent the computer from being accessed. (6) USB port Connects an optional USB device. (7) Audio-out (headphone) jack/Audio...
HP Mini 110 and Compaq Mini CQ10 - Maintenance and Service Guide
Page 24
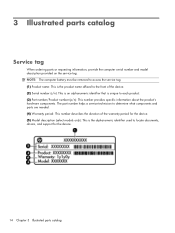
... unique to locate documents, drivers, and support for the device. (5) Model description (select models only): This is the alphanumeric identifier used to each product. (3) Part number/Product number (p/n): This number provides specific information about the product's hardware components. 3 Illustrated parts catalog Service tag When ordering parts or requesting information, provide the computer serial number and model description provided on the service tag: NOTE: The computer battery must be removed to access the service tag. (1) Product...
... unique to locate documents, drivers, and support for the device. (5) Model description (select models only): This is the alphanumeric identifier used to each product. (3) Part number/Product number (p/n): This number provides specific information about the product's hardware components. 3 Illustrated parts catalog Service tag When ordering parts or requesting information, provide the computer serial number and model description provided on the service tag: NOTE: The computer battery must be removed to access the service tag. (1) Product...
HP Mini 110 and Compaq Mini CQ10 - Maintenance and Service Guide
Page 46
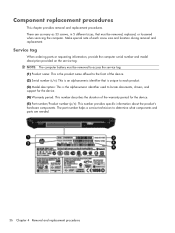
... device. (5) Part number/Product number (p/n): This number provides specific information about the product's hardware components. The part number helps a service technician to locate documents, drivers, and support for the device. (4) Warranty period: This number describes the duration of each screw size and location during removal and replacement. Service tag When ordering parts or requesting information, provide the computer serial number and model description provided on the service tag: NOTE: The computer battery must be removed to access the service...
... device. (5) Part number/Product number (p/n): This number provides specific information about the product's hardware components. The part number helps a service technician to locate documents, drivers, and support for the device. (4) Warranty period: This number describes the duration of each screw size and location during removal and replacement. Service tag When ordering parts or requesting information, provide the computer serial number and model description provided on the service tag: NOTE: The computer battery must be removed to access the service...
HP Mini 110 and Compaq Mini CQ10 - Maintenance and Service Guide
Page 86
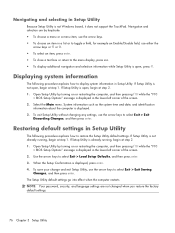
... while the "F10 = BIOS Setup Options" message is displayed in the lower-left corner of the screen. 2. Restoring default settings in Setup Utility The following procedure explains how to restore the Setup Utility default settings. Open Setup Utility by keystroke. ● To choose a menu or a menu item, use the arrow keys. ● To choose an item in a list or to toggle a field, for example an Enable/Disable field, use either the arrow keys or f5 or f6...
... while the "F10 = BIOS Setup Options" message is displayed in the lower-left corner of the screen. 2. Restoring default settings in Setup Utility The following procedure explains how to restore the Setup Utility default settings. Open Setup Utility by keystroke. ● To choose a menu or a menu item, use the arrow keys. ● To choose an item in a list or to toggle a field, for example an Enable/Disable field, use either the arrow keys or f5 or f6...

HP Mini 110 and Compaq Mini CQ10 - Maintenance and Service Guide
Page 88
...―Enable/disable boot from Internal Network Adapter. ● Boot Device Priority―Set the boot device priority for: ◦ Internal hard drive (select models only) ◦ USB Floppy ◦ USB CD/DVD ROM Drive ◦ USB flash drive ◦ USB Hard drive ◦ USB Card Reader ◦ Network adapter NOTE: Only the devices attached to the system will appear in the boot order menu. System Configuration Menu Select Language Support Processor C4 State Boot Options Diagnostics Menu Select Hard Disk Self Test (select models only) Memory Test To do this Change the Setup Utility...
...―Enable/disable boot from Internal Network Adapter. ● Boot Device Priority―Set the boot device priority for: ◦ Internal hard drive (select models only) ◦ USB Floppy ◦ USB CD/DVD ROM Drive ◦ USB flash drive ◦ USB Hard drive ◦ USB Card Reader ◦ Network adapter NOTE: Only the devices attached to the system will appear in the boot order menu. System Configuration Menu Select Language Support Processor C4 State Boot Options Diagnostics Menu Select Hard Disk Self Test (select models only) Memory Test To do this Change the Setup Utility...
HP Mini 110 and Compaq Mini CQ10 - Maintenance and Service Guide
Page 91
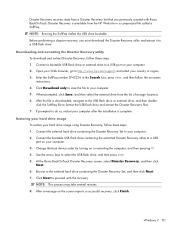
... computer after the installation is complete. Change the boot device order by turning on -screen instructions. 4. Disaster Recovery recovers data from the list of storage locations. 6. Downloading and extracting the Disaster Recovery utility To download and extract Disaster Recovery, follow the on or restarting the computer, and then pressing f9. 4. Before performing a disaster recovery, you previously created with the recovery. Windows 7 81 Disaster Recovery is downloaded, navigate to the USB flash drive or external drive, and then doubleclick...
... computer after the installation is complete. Change the boot device order by turning on -screen instructions. 4. Disaster Recovery recovers data from the list of storage locations. 6. Downloading and extracting the Disaster Recovery utility To download and extract Disaster Recovery, follow the on or restarting the computer, and then pressing f9. 4. Before performing a disaster recovery, you previously created with the recovery. Windows 7 81 Disaster Recovery is downloaded, navigate to the USB flash drive or external drive, and then doubleclick...
HP Mini 110 and Compaq Mini CQ10 - Maintenance and Service Guide
Page 92
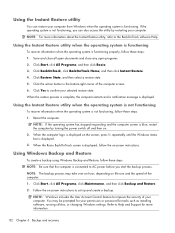
... is displayed. Click Start, click All Programs, click Maintenance, and then click Backup and Restore. 2. NOTE: Windows includes the User Account Control feature to Help and Support for tasks such as installing software, running utilities, or changing Windows settings. Using the Instant Restore utility You can also access the utility by turning the power switch off and then on. 2. Using the Instant Restore utility when the operating system is functioning To recover information when the operating system is functioning. Click Restore State...
... is displayed. Click Start, click All Programs, click Maintenance, and then click Backup and Restore. 2. NOTE: Windows includes the User Account Control feature to Help and Support for tasks such as installing software, running utilities, or changing Windows settings. Using the Instant Restore utility You can also access the utility by turning the power switch off and then on. 2. Using the Instant Restore utility when the operating system is functioning To recover information when the operating system is functioning. Click Restore State...
HP Mini 110 and Compaq Mini CQ10 - Maintenance and Service Guide
Page 99
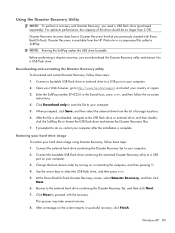
... the external drive from a Disaster Recovery Set that you previously created with the recovery. Change the boot device order by turning on the screen reports a successful recovery, click Finish. Disaster Recovery recovers data from the list of the drive should be no larger than 2 GB. Disaster Recovery is downloaded, navigate to the USB flash drive or external drive, and then doubleclick the SoftPaq file to select the USB flash drive, and then press enter. 5. Use the arrow keys to format the USB flash drive...
... the external drive from a Disaster Recovery Set that you previously created with the recovery. Change the boot device order by turning on the screen reports a successful recovery, click Finish. Disaster Recovery recovers data from the list of the drive should be no larger than 2 GB. Disaster Recovery is downloaded, navigate to the USB flash drive or external drive, and then doubleclick the SoftPaq file to select the USB flash drive, and then press enter. 5. Use the arrow keys to format the USB flash drive...

HP Mini 110 and Compaq Mini CQ10 - Maintenance and Service Guide
Page 113
... drive 2 Ethernet 2 external media cards 3 graphics 1 hard drive 2 internal media cards 3 keyboard 3 memory module 2 modem 2 operating system 4 optical drive 2 panels 1 pointing device 3 ports 3 power requirements 3 processors 1 product name 1 security 3 serviceability 4 video 2 wireless 2 product name 1 R removal/replacement preliminaries 31 procedures 36 restoring default settings in Setup Utility 76 RJ-45 jack connector pinout 93 location 11 RTC battery removal 53 spare part number 17, 28, 53 Rubber Kit, spare part number 17, 25, 27 S security cable slot 11 Security Menu, Setup Utility...
... drive 2 Ethernet 2 external media cards 3 graphics 1 hard drive 2 internal media cards 3 keyboard 3 memory module 2 modem 2 operating system 4 optical drive 2 panels 1 pointing device 3 ports 3 power requirements 3 processors 1 product name 1 security 3 serviceability 4 video 2 wireless 2 product name 1 R removal/replacement preliminaries 31 procedures 36 restoring default settings in Setup Utility 76 RJ-45 jack connector pinout 93 location 11 RTC battery removal 53 spare part number 17, 28, 53 Rubber Kit, spare part number 17, 25, 27 S security cable slot 11 Security Menu, Setup Utility...

HP Mini 110 and Compaq Mini CQ10 - Maintenance and Service Guide
Page 114
... Configuration Menu 78 using 75 Setup Utility menus 77 SIM, removal 39 speakers location 9 removal 60 spare part number 17, 28, 60 starting Setup Utility 75 static-shielding materials 35 system board removal 68 spare part numbers 17, 26, 68 System Configuration Menu, Setup Utility 78 system information 76, 77 U Universal Serial Bus (USB) port connector pinout 93 location 10, 11 using Setup Utility 75 V vent 11 vents location 9 video, product description 2 W webcam 12 webcam light 12 webcam/microphone module, spare part number 22, 27 Windows applications key 8 Windows logo key 8 wireless light...
... Configuration Menu 78 using 75 Setup Utility menus 77 SIM, removal 39 speakers location 9 removal 60 spare part number 17, 28, 60 starting Setup Utility 75 static-shielding materials 35 system board removal 68 spare part numbers 17, 26, 68 System Configuration Menu, Setup Utility 78 system information 76, 77 U Universal Serial Bus (USB) port connector pinout 93 location 10, 11 using Setup Utility 75 V vent 11 vents location 9 video, product description 2 W webcam 12 webcam light 12 webcam/microphone module, spare part number 22, 27 Windows applications key 8 Windows logo key 8 wireless light...

HP Notebook Hard Drives & Solid State Drives Identifying, Preventing, Diagnosing and Recovering from Drive Failures Care and Mai
Page 6
... (Remote Installation Service) installation points include: Adding SATA drivers to installation CDs, building an image, and switching to SATA AHCI mode Using Sysprep with Serial ATA hard disk drives. Updates to the Intel Matrix Storage Manager driver are configured with Intel® Application Accelerator drivers. To download the latest version of the Intel Matrix Storage Technology driver: http://www8.hp.com/us/en/support-drivers.html Installing SATA drivers SATA Native Mode is...
... (Remote Installation Service) installation points include: Adding SATA drivers to installation CDs, building an image, and switching to SATA AHCI mode Using Sysprep with Serial ATA hard disk drives. Updates to the Intel Matrix Storage Manager driver are configured with Intel® Application Accelerator drivers. To download the latest version of the Intel Matrix Storage Technology driver: http://www8.hp.com/us/en/support-drivers.html Installing SATA drivers SATA Native Mode is...


