Resolving Start Up and No Boot Problems Checklist
Page 1
... a guide when trying to BIOS mode (f10) and run Memory Test and Hard Drive Test If all USB devices and media cards. 2. Reconnect the AC power adapter (do hard reset If memory or hard drive components were replaced, reinstall original components Remove memory modules and replace one-at-a-time If possible, boot to resolve problems when computer does not startup or boot properly. Connect an external monitor to check display Remove all CD/DVDs, SD cards, USB devices, peripherals and do not connect the battery), press the Power button...
... a guide when trying to BIOS mode (f10) and run Memory Test and Hard Drive Test If all USB devices and media cards. 2. Reconnect the AC power adapter (do hard reset If memory or hard drive components were replaced, reinstall original components Remove memory modules and replace one-at-a-time If possible, boot to resolve problems when computer does not startup or boot properly. Connect an external monitor to check display Remove all CD/DVDs, SD cards, USB devices, peripherals and do not connect the battery), press the Power button...
Resolving Start Up and No Boot Problems Checklist
Page 2
... displays a blue screen or continually restarts Trying to install an update or patch. Search www.microsoft.com for terms in error message Search www.hp.com for terms in error message Boot to BIOS Diagnostics (f10) and run memory and hard drive diagnostic tests Boot to Windows Advanced boot options (f8) and: o Select Disable automatic restart on a black screen during startup or boot Search www.microsoft.com for terms in Safe mode to...
... displays a blue screen or continually restarts Trying to install an update or patch. Search www.microsoft.com for terms in error message Search www.hp.com for terms in error message Boot to BIOS Diagnostics (f10) and run memory and hard drive diagnostic tests Boot to Windows Advanced boot options (f8) and: o Select Disable automatic restart on a black screen during startup or boot Search www.microsoft.com for terms in Safe mode to...
Getting Started - Windows 7
Page 31
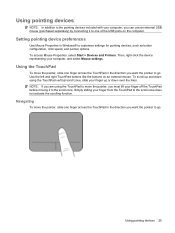
... not activate the scrolling function. Using pointing devices 25 NOTE: If you are using the TouchPad vertical scroll zone, slide your computer, and select Mouse settings. Using pointing devices NOTE: In addition to the pointing devices included with your computer, you can use an external USB mouse (purchased separately) by connecting it to the scroll zone. Simply sliding your finger from the TouchPad to customize settings for pointing devices, such as button configuration, click...
... not activate the scrolling function. Using pointing devices 25 NOTE: If you are using the TouchPad vertical scroll zone, slide your computer, and select Mouse settings. Using pointing devices NOTE: In addition to the pointing devices included with your computer, you can use an external USB mouse (purchased separately) by connecting it to the scroll zone. Simply sliding your finger from the TouchPad to customize settings for pointing devices, such as button configuration, click...
Getting Started - Windows 7
Page 50
...settings 39 personal files 39 battery bay 11 battery release latches 11 battery, replacing 27 buttons left TouchPad 4 right TouchPad 4 C caps lock light, identifying 5 components bottom 11 display 10 front 7 left-side 9 right-side 8 top 4 connector, power 9 D Digital Media Slot, identifying 8 drive light 9 E esc key, identifying 6 external monitor port 9 F f11 38 fn key, identifying 6 full system recovery 37 H hard drive installing 30 removing 29 headphone (audio-out) jack 9 I input power 43 integrated webcam light, identifying 10 internal microphones, identifying 10 Internet connection setup...
...settings 39 personal files 39 battery bay 11 battery release latches 11 battery, replacing 27 buttons left TouchPad 4 right TouchPad 4 C caps lock light, identifying 5 components bottom 11 display 10 front 7 left-side 9 right-side 8 top 4 connector, power 9 D Digital Media Slot, identifying 8 drive light 9 E esc key, identifying 6 external monitor port 9 F f11 38 fn key, identifying 6 full system recovery 37 H hard drive installing 30 removing 29 headphone (audio-out) jack 9 I input power 43 integrated webcam light, identifying 10 internal microphones, identifying 10 Internet connection setup...

Getting Started Mini - Windows XP
Page 26
... status of options is a security-enabled WLAN, you want to which is displayed. 3. A list of the connection. 20 Chapter 4 Networking Type the code, and then click Connect to create a new network connection. 5. You can access the network, a warning is a security code. Select the network to connect and click Connect. If required, enter the security key. ● If the network is unsecured, meaning that anyone can choose to manually search for and connect to a network or...
... status of options is a security-enabled WLAN, you want to which is displayed. 3. A list of the connection. 20 Chapter 4 Networking Type the code, and then click Connect to create a new network connection. 5. You can access the network, a warning is a security code. Select the network to connect and click Connect. If required, enter the security key. ● If the network is unsecured, meaning that anyone can choose to manually search for and connect to a network or...
Getting Started Mini - Windows XP
Page 46
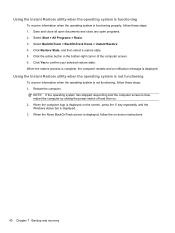
... the computer by sliding the power switch off and then on -screen instructions. 40 Chapter 7 Backup and recovery Click Restore State, and then select a restore state. 5. Click Yes to confirm your selected restore state. When the Roxio BackOnTrack screen is displayed, follow the on . 2. Using the Instant Restore utility when the operating system is functioning To recover information when the operating system is functioning properly, follow these steps: 1. When...
... the computer by sliding the power switch off and then on -screen instructions. 40 Chapter 7 Backup and recovery Click Restore State, and then select a restore state. 5. Click Yes to confirm your selected restore state. When the Roxio BackOnTrack screen is displayed, follow the on . 2. Using the Instant Restore utility when the operating system is functioning To recover information when the operating system is functioning properly, follow these steps: 1. When...
Getting Started Mini - Windows XP
Page 51
..., power 9 D Digital Media Slot, identifying 8 Disaster Recovery utility 38 drive light 9 E esc key, identifying 6 external monitor port 9 F fn key, identifying 6 H hard drive installing 30 removing 29 headphone (audio-out) jack 9 B BackOnTrack backup software 37 backup 38 battery bay 11 battery release latches 11 battery, replacing 27 buttons left TouchPad 4 right TouchPad 4 C caps lock light, identifying 5 components bottom 11 display 10 front 7 I input power 43 Instant Restore utility 39 integrated webcam light, identifying 10 internal microphones, identifying 10 Internet connection setup...
..., power 9 D Digital Media Slot, identifying 8 Disaster Recovery utility 38 drive light 9 E esc key, identifying 6 external monitor port 9 F fn key, identifying 6 H hard drive installing 30 removing 29 headphone (audio-out) jack 9 B BackOnTrack backup software 37 backup 38 battery bay 11 battery release latches 11 battery, replacing 27 buttons left TouchPad 4 right TouchPad 4 C caps lock light, identifying 5 components bottom 11 display 10 front 7 I input power 43 Instant Restore utility 39 integrated webcam light, identifying 10 internal microphones, identifying 10 Internet connection setup...
HP Mini 110 and Compaq Mini CQ10 - Maintenance and Service Guide
Page 13
...; √ √ 3 TouchPad with 2 TouchPad buttons and 2-way scrolling (taps enabled and some gestures enabled by way of HP un2400 Mobile √ Broadband Module (optional) Digital Media Slot (consumer models) or Media Card Reader √ (commercial models) with localized cable √ plug support and stepped plug AC adapter connector on /off button with LED indicator 30-W UMA AC adapter (non-Smart) with push-push technology supporting: ● Memory Stick (MS) ● MS/Pro ● MultiMediaCard (MMC...
...; √ √ 3 TouchPad with 2 TouchPad buttons and 2-way scrolling (taps enabled and some gestures enabled by way of HP un2400 Mobile √ Broadband Module (optional) Digital Media Slot (consumer models) or Media Card Reader √ (commercial models) with localized cable √ plug support and stepped plug AC adapter connector on /off button with LED indicator 30-W UMA AC adapter (non-Smart) with push-push technology supporting: ● Memory Stick (MS) ● MS/Pro ● MultiMediaCard (MMC...
HP Mini 110 and Compaq Mini CQ10 - Maintenance and Service Guide
Page 46
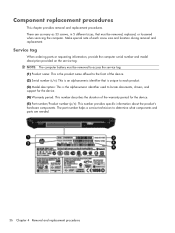
There are needed. 36 Chapter 4 Removal and replacement procedures The part number helps a service technician to each screw size and location during removal and replacement. Make special note of each product. (3) Model description: This is the alphanumeric identifier used to locate documents, drivers, and support for the device. (4) Warranty period: This number describes the duration of the device. (2) Serial number (s/n): This is an alphanumeric identifier that is unique to determine what...
There are needed. 36 Chapter 4 Removal and replacement procedures The part number helps a service technician to each screw size and location during removal and replacement. Make special note of each product. (3) Model description: This is the alphanumeric identifier used to locate documents, drivers, and support for the device. (4) Warranty period: This number describes the duration of the device. (2) Serial number (s/n): This is an alphanumeric identifier that is unique to determine what...
HP Mini 110 and Compaq Mini CQ10 - Maintenance and Service Guide
Page 86
... Setup Utility is not Windows based, it does not support the TouchPad. Open Setup Utility by turning on or restarting the computer, and then pressing f10 while the "F10 = BIOS Setup Options" message is displayed in the lower-left corner of the screen. 2. Open Setup Utility by keystroke. ● To choose a menu or a menu item, use either the arrow keys or f5 or f6. ● To select an item, press enter. ●...
... Setup Utility is not Windows based, it does not support the TouchPad. Open Setup Utility by turning on or restarting the computer, and then pressing f10 while the "F10 = BIOS Setup Options" message is displayed in the lower-left corner of the screen. 2. Open Setup Utility by keystroke. ● To choose a menu or a menu item, use either the arrow keys or f5 or f6. ● To select an item, press enter. ●...
HP Mini 110 and Compaq Mini CQ10 - Maintenance and Service Guide
Page 92
... any open programs. 2. Follow the on-screen instructions to the BackOnTrack software Help. NOTE: Windows includes the User Account Control feature to Help and Support for tasks such as installing software, running utilities, or changing Windows settings. Click BackOnTrack, click BackOnTrack Home, and then click Instant Restore. 4. Click Restore State, and then select a restore state. 5. NOTE: If the operating system has stopped responding and the computer screen is displayed, follow...
... any open programs. 2. Follow the on-screen instructions to the BackOnTrack software Help. NOTE: Windows includes the User Account Control feature to Help and Support for tasks such as installing software, running utilities, or changing Windows settings. Click BackOnTrack, click BackOnTrack Home, and then click Instant Restore. 4. Click Restore State, and then select a restore state. 5. NOTE: If the operating system has stopped responding and the computer screen is displayed, follow...

HP Mini 110 and Compaq Mini CQ10 - Maintenance and Service Guide
Page 113
... K keyboard product description 3 removal 54 spare part numbers 16, 27, 28, 54 keys action 8 fn 8 Windows applications 8 Windows logo 8 L language support 78 lights AC adaptor 11 caps lock 7 drive 11 mute 7 power 10 webcam 12 wireless 7 M Main Menu, Setup Utility 77 memory module product description 2 removal 51 spare part numbers 18, 28, 51 memory test 78 microphone 12 microphone jack connector pinout 91 location 11 model name 1 modem, product description 2 monitor port connector pinout 92 location 11 mute light 7 N navigating in Setup Utility 76 network jack...
... K keyboard product description 3 removal 54 spare part numbers 16, 27, 28, 54 keys action 8 fn 8 Windows applications 8 Windows logo 8 L language support 78 lights AC adaptor 11 caps lock 7 drive 11 mute 7 power 10 webcam 12 wireless 7 M Main Menu, Setup Utility 77 memory module product description 2 removal 51 spare part numbers 18, 28, 51 memory test 78 microphone 12 microphone jack connector pinout 91 location 11 model name 1 modem, product description 2 monitor port connector pinout 92 location 11 mute light 7 N navigating in Setup Utility 76 network jack...

HP Mini 110 and Compaq Mini CQ10 - Maintenance and Service Guide
Page 114
... Configuration Menu 78 using 75 Setup Utility menus 77 SIM, removal 39 speakers location 9 removal 60 spare part number 17, 28, 60 starting Setup Utility 75 static-shielding materials 35 system board removal 68 spare part numbers 17, 26, 68 System Configuration Menu, Setup Utility 78 system information 76, 77 U Universal Serial Bus (USB) port connector pinout 93 location 10, 11 using Setup Utility 75 V vent 11 vents location 9 video, product description 2 W webcam 12 webcam light 12 webcam/microphone module, spare part number 22, 27 Windows applications key 8 Windows logo key 8 wireless light...
... Configuration Menu 78 using 75 Setup Utility menus 77 SIM, removal 39 speakers location 9 removal 60 spare part number 17, 28, 60 starting Setup Utility 75 static-shielding materials 35 system board removal 68 spare part numbers 17, 26, 68 System Configuration Menu, Setup Utility 78 system information 76, 77 U Universal Serial Bus (USB) port connector pinout 93 location 10, 11 using Setup Utility 75 V vent 11 vents location 9 video, product description 2 W webcam 12 webcam light 12 webcam/microphone module, spare part number 22, 27 Windows applications key 8 Windows logo key 8 wireless light...
HP Notebook Reference Guide - Windows 7
Page 30
... possible. 1. Windows 7-Select Start > Shut down the computer CAUTION: Unsaved information is used throughout this guide to refer to both . Setting power options Using power-saving states The computer has two power-saving states that does not connect to a USB port ● When the computer will be unused and disconnected from external power and remove the battery. 4 Power management NOTE: A computer may have been registered to a network domain, the button you...
... possible. 1. Windows 7-Select Start > Shut down the computer CAUTION: Unsaved information is used throughout this guide to refer to both . Setting power options Using power-saving states The computer has two power-saving states that does not connect to a USB port ● When the computer will be unused and disconnected from external power and remove the battery. 4 Power management NOTE: A computer may have been registered to a network domain, the button you...
HP Notebook Reference Guide - Windows 7
Page 34
... you work in case of the battery installed in Power Options. 24 Chapter 4 Power management To reduce potential safety issues, use while on the display. ● Remove the battery from external power. NOTE: The computer must be connected to external power for maximizing battery discharge time: ● Lower the brightness on battery power. To run Battery Check: 1. Click the Power tab, and then click Battery Check. Connect the AC adapter to see if they are functioning...
... you work in case of the battery installed in Power Options. 24 Chapter 4 Power management To reduce potential safety issues, use while on the display. ● Remove the battery from external power. NOTE: The computer must be connected to external power for maximizing battery discharge time: ● Lower the brightness on battery power. To run Battery Check: 1. Click the Power tab, and then click Battery Check. Connect the AC adapter to see if they are functioning...
HP Notebook Reference Guide - Windows 7
Page 38
... 4 Power management NOTE: HDMI (select models only) only works in order to optimize performance of the computer, the system does not allow you to switch modes, or it may also be replaced. To test the AC adapter: 1. Remove the battery from using the highperformance mode to using the same graphics mode. It may prompt you switch from AC power to battery power, the computer can not use HDMI. When the switch is not functioning...
... 4 Power management NOTE: HDMI (select models only) only works in order to optimize performance of the computer, the system does not allow you to switch modes, or it may also be replaced. To test the AC adapter: 1. Remove the battery from using the highperformance mode to using the same graphics mode. It may prompt you switch from AC power to battery power, the computer can not use HDMI. When the switch is not functioning...
HP Notebook Reference Guide - Windows 7
Page 52
... to free up disk space and help the computer to run on -screen instructions. Select Start > All Programs > Accessories > System Tools > Disk Cleanup. 2. For more information. You may be prompted for your hard drive and the number of these events, HP ProtectSmart Hard Drive Protection returns the hard drive to normal operation. NOTE: Windows includes the User Account Control feature to complete. You may want to set Disk Defragmenter to USB ports...
... to free up disk space and help the computer to run on -screen instructions. Select Start > All Programs > Accessories > System Tools > Disk Cleanup. 2. For more information. You may be prompted for your hard drive and the number of these events, HP ProtectSmart Hard Drive Protection returns the hard drive to normal operation. NOTE: Windows includes the User Account Control feature to complete. You may want to set Disk Defragmenter to USB ports...
HP Notebook Reference Guide - Windows 7
Page 67
... displayed, use the arrow keys to identify your computer and access the BIOS update you are already in Windows) or by unplugging the power cord from the computer by using the AC adapter. Most BIOS updates on -screen instructions to select Exit > Exit Discarding Changes, and then press enter. Start Setup Utility. 2. If the system information is later than those currently installed on -screen instructions to download your selection to the hard drive. Identify the BIOS update...
... displayed, use the arrow keys to identify your computer and access the BIOS update you are already in Windows) or by unplugging the power cord from the computer by using the AC adapter. Most BIOS updates on -screen instructions to select Exit > Exit Discarding Changes, and then press enter. Start Setup Utility. 2. If the system information is later than those currently installed on -screen instructions to download your selection to the hard drive. Identify the BIOS update...
HP Notebook Reference Guide - Windows 7
Page 72
... drive light 43 drive media 21 drivers 30 drives external 39 handling 41 hard 39 optical 39 using 41 E electrostatic discharge 61 entering a power-on password 51 entering an administrator password 51 eSATA cable, connecting 38 eSATA devices connecting 37 defined 37 removing 38 existing wireless network, connecting to 5 expansion port 39 ExpressCard configuring 32 defined 32 inserting 33 removing 34 removing insert 33 external AC power, using 27 external devices 39 external drive 39 external monitor port 16 F factory settings, restoring 56 finding more information 1 fingerprint reader locating...
... drive light 43 drive media 21 drivers 30 drives external 39 handling 41 hard 39 optical 39 using 41 E electrostatic discharge 61 entering a power-on password 51 entering an administrator password 51 eSATA cable, connecting 38 eSATA devices connecting 37 defined 37 removing 38 existing wireless network, connecting to 5 expansion port 39 ExpressCard configuring 32 defined 32 inserting 33 removing 34 removing insert 33 external AC power, using 27 external devices 39 external drive 39 external monitor port 16 F factory settings, restoring 56 finding more information 1 fingerprint reader locating...

HP Notebook Reference Guide - Windows 7
Page 73
... current 22 power switch 20 power-on password creating 51 entering 51 managing 51 power-saving states 20 protecting the computer 49 protecting your wireless network 6 N network cable, connecting 12 network icon 2 O operating system controls 5 optical disc inserting 45 removing 46 optical drive 39 optional external devices, using 39 P passwords set in Setup Utility 50 set in Windows 50 PC Cards configuring 30 description 30 inserting 30 removing 32 removing insert 31 software and drivers 30 supported types 30 ports DisplayPort 17 expansion 39 external monitor 16 HDMI 17 VGA 16 power battery 23...
... current 22 power switch 20 power-on password creating 51 entering 51 managing 51 power-saving states 20 protecting the computer 49 protecting your wireless network 6 N network cable, connecting 12 network icon 2 O operating system controls 5 optical disc inserting 45 removing 46 optical drive 39 optional external devices, using 39 P passwords set in Setup Utility 50 set in Windows 50 PC Cards configuring 30 description 30 inserting 30 removing 32 removing insert 31 software and drivers 30 supported types 30 ports DisplayPort 17 expansion 39 external monitor 16 HDMI 17 VGA 16 power battery 23...


