Mini User Guide - Windows XP
Page 7
... audio functions 39 Video ...41 Connecting an external monitor or projector 41 Webcam ...42 5 Security Protecting the device ...43 Using passwords ...43 Passwords set in Windows 44 Passwords set in Setup Utility 44 Administrator password 45 Managing an administrator password 45 Entering an administrator password 45 Power-on password 45 Managing a power-on password 46 Entering a power-on password 46 Using antivirus software ...47 Using firewall software ...48 Installing critical updates ...49 6 Digital cards Inserting a digital card ...50 Stopping and removing a digital card 51 7 USB...
... audio functions 39 Video ...41 Connecting an external monitor or projector 41 Webcam ...42 5 Security Protecting the device ...43 Using passwords ...43 Passwords set in Windows 44 Passwords set in Setup Utility 44 Administrator password 45 Managing an administrator password 45 Entering an administrator password 45 Power-on password 45 Managing a power-on password 46 Entering a power-on password 46 Using antivirus software ...47 Using firewall software ...48 Installing critical updates ...49 6 Digital cards Inserting a digital card ...50 Stopping and removing a digital card 51 7 USB...
Mini User Guide - Windows XP
Page 17
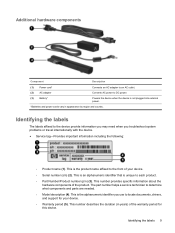
... components and parts are needed. ◦ Model description (4). This number provides specific information about the hardware components of the warranty period for your device. ◦ Serial number (s/n) (2). This is unique to each product. ◦ Part Number/Product number (p/n) (3). The part number helps a service technician to the device provide information you may need when you use to locate documents, drivers, and support for this device. This is not plugged into external power. *Batteries and power cords vary...
... components and parts are needed. ◦ Model description (4). This number provides specific information about the hardware components of the warranty period for your device. ◦ Serial number (s/n) (2). This is unique to each product. ◦ Part Number/Product number (p/n) (3). The part number helps a service technician to the device provide information you may need when you use to locate documents, drivers, and support for this device. This is not plugged into external power. *Batteries and power cords vary...
Mini User Guide - Windows XP
Page 23
... Start > Control Panel > Performance and Maintenance > Power Options > Power Meter tab. To reduce potential safety issues, use the fn+f4 hotkey or reconnect the AC adapter. Device battery life varies, depending on power management settings, programs running time remaining on the device, display brightness, external devices connected to save your work and initiate Hibernation or shut down on how you disconnect AC power. Most charge indicators report battery status as both a percentage and as the number of...
... Start > Control Panel > Performance and Maintenance > Power Options > Power Meter tab. To reduce potential safety issues, use the fn+f4 hotkey or reconnect the AC adapter. Device battery life varies, depending on power management settings, programs running time remaining on the device, display brightness, external devices connected to save your work and initiate Hibernation or shut down on how you disconnect AC power. Most charge indicators report battery status as both a percentage and as the number of...
Mini User Guide - Windows XP
Page 29
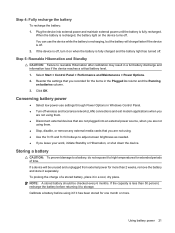
... device is fully charged and the battery light has turned off , turn it to adjust screen brightness as needed. ● If you recorded for extended periods of a stored battery, place it separately. NOTE: A stored battery should be unused and unplugged from external power for more . Step 5: Reenable Hibernation and Standby CAUTION: Failure to storage. Select Start > Control Panel > Performance and Maintenance > Power Options. 2. Conserving battery power ● Select low power-use the device while the battery...
... device is fully charged and the battery light has turned off , turn it to adjust screen brightness as needed. ● If you recorded for extended periods of a stored battery, place it separately. NOTE: A stored battery should be unused and unplugged from external power for more . Step 5: Reenable Hibernation and Standby CAUTION: Failure to storage. Select Start > Control Panel > Performance and Maintenance > Power Options. 2. Conserving battery power ● Select low power-use the device while the battery...
Mini User Guide - Windows XP
Page 30
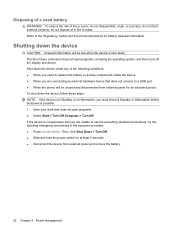
...conditions: ● When you need to replace the battery or access components inside the device ● When you are connecting an external hardware device that does not connect to use the preceding shutdown procedures, ...device under any of a used battery WARNING! Shut down the device, follow these steps: NOTE: If the device is in Standby or in Hibernation, you are unable to a USB port ● When the device will be unused and disconnected from external power and remove the battery. 22 Chapter 2 Power management Then, click Shut Down > Turn Off. ● Slide and hold the power switch...
...conditions: ● When you need to replace the battery or access components inside the device ● When you are connecting an external hardware device that does not connect to use the preceding shutdown procedures, ...device under any of a used battery WARNING! Shut down the device, follow these steps: NOTE: If the device is in Standby or in Hibernation, you are unable to a USB port ● When the device will be unused and disconnected from external power and remove the battery. 22 Chapter 2 Power management Then, click Shut Down > Turn Off. ● Slide and hold the power switch...
Mini User Guide - Windows XP
Page 51
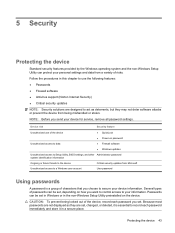
...; Passwords ● Firewall software ● Antivirus support (Norton Internet Security) ● Critical security updates NOTE: Security solutions are set , depending on password ● Firewall software ● Windows updates Unauthorized access to Setup Utility, BIOS settings, and other Administrator password system identification information Ongoing or future threats to secure your information. Passwords can protect your device for service, remove all password settings. CAUTION: To prevent being mishandled or stolen. Because most passwords are not displayed...
...; Passwords ● Firewall software ● Antivirus support (Norton Internet Security) ● Critical security updates NOTE: Security solutions are set , depending on password ● Firewall software ● Windows updates Unauthorized access to Setup Utility, BIOS settings, and other Administrator password system identification information Ongoing or future threats to secure your information. Passwords can protect your device for service, remove all password settings. CAUTION: To prevent being mishandled or stolen. Because most passwords are not displayed...

Mini User Guide - Windows XP
Page 53
... Enter Password prompt, type your changes and exit the Setup Utility, use of the screen. 2. Administrator password Your administrator password protects the configuration settings and system identification information in Windows, nor is it displayed as it must be entered each time you turn on or restart the device, or exit Hibernation. Your administrator password is not interchangeable with an administrator password set in Setup Utility. Open the Setup Utility by turning on password prevents unauthorized use the arrow keys...
... Enter Password prompt, type your changes and exit the Setup Utility, use of the screen. 2. Administrator password Your administrator password protects the configuration settings and system identification information in Windows, nor is it displayed as it must be entered each time you turn on or restart the device, or exit Hibernation. Your administrator password is not interchangeable with an administrator password set in Setup Utility. Open the Setup Utility by turning on password prevents unauthorized use the arrow keys...
Mini User Guide - Windows XP
Page 62
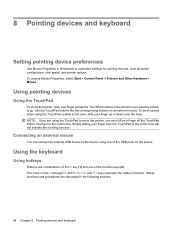
... are discussed in Windows® to the device using one of the USB ports on the device. NOTE: If you want the pointer to the scroll zone. Using the keyboard Using hotkeys Hotkeys are combinations of the fn key (1) and one of the function keys (2). Connecting an external mouse You can connect an external USB mouse to customize settings for pointing devices, such as button configuration, click speed, and pointer options. 8 Pointing devices and keyboard Setting pointing device preferences Use Mouse Properties in...
... are discussed in Windows® to the device using one of the USB ports on the device. NOTE: If you want the pointer to the scroll zone. Using the keyboard Using hotkeys Hotkeys are combinations of the fn key (1) and one of the function keys (2). Connecting an external mouse You can connect an external USB mouse to customize settings for pointing devices, such as button configuration, click speed, and pointer options. 8 Pointing devices and keyboard Setting pointing device preferences Use Mouse Properties in...

Mini User Guide - Windows XP
Page 67
Connect the device. 2. Using external drives Removable external drives expand your options for storing and accessing information. To disconnect a powered external device, turn off the device, and then disconnect it , and then unplug the AC power cord. USB drives include the following types: ● 1.44-megabyte diskette drive ● Hard drive module (a hard drive with an adapter attached) ● DVD-ROM Drive ● DVD/CD-RW Combo Drive ● DVD+RW/R and CD-RW Combo Drive ● DVD±RW/R and CD-RW Combo Drive Using optional external devices NOTE...
Connect the device. 2. Using external drives Removable external drives expand your options for storing and accessing information. To disconnect a powered external device, turn off the device, and then disconnect it , and then unplug the AC power cord. USB drives include the following types: ● 1.44-megabyte diskette drive ● Hard drive module (a hard drive with an adapter attached) ● DVD-ROM Drive ● DVD/CD-RW Combo Drive ● DVD+RW/R and CD-RW Combo Drive ● DVD±RW/R and CD-RW Combo Drive Using optional external devices NOTE...

Mini User Guide - Windows XP
Page 73
... device: Select Start > Help and Support, and then select the software and drivers update. 2. If the Setup Utility does not open with the system information displayed, use the arrow keys to select Exit > Exit Discarding Changes, and then press enter. During the download and installation, follow these instructions: Do not disconnect power from the device by opening the Setup Utility. At the download area, follow these steps: a. b. Identify the BIOS update that provides software for your hard drive...
... device: Select Start > Help and Support, and then select the software and drivers update. 2. If the Setup Utility does not open with the system information displayed, use the arrow keys to select Exit > Exit Discarding Changes, and then press enter. During the download and installation, follow these instructions: Do not disconnect power from the device by opening the Setup Utility. At the download area, follow these steps: a. b. Identify the BIOS update that provides software for your hard drive...

Mini User Guide - Windows XP
Page 80
... lock light, identifying 2 CD drive 59 changing the Setup Utility language 68 charging batteries 16, 19 checking audio functions 39 compartments, memory module 8 components additional hardware 9 bottom 7 display 6 front 3 left-side 5 right-side 5 TouchPad 1 connecting to a WLAN 29 connection, external power 14 conservation, power 21 cord, power 9 corporate WLAN connection 29 critical battery level 18 D Diagnostics menu 71 digital card inserting 50 removing 51 stopping 51 Digital Media Slot, identifying 5 diskette drive 59 display image, switching 56 screen brightness hotkeys 56 display switch...
... lock light, identifying 2 CD drive 59 changing the Setup Utility language 68 charging batteries 16, 19 checking audio functions 39 compartments, memory module 8 components additional hardware 9 bottom 7 display 6 front 3 left-side 5 right-side 5 TouchPad 1 connecting to a WLAN 29 connection, external power 14 conservation, power 21 cord, power 9 corporate WLAN connection 29 critical battery level 18 D Diagnostics menu 71 digital card inserting 50 removing 51 stopping 51 Digital Media Slot, identifying 5 diskette drive 59 display image, switching 56 screen brightness hotkeys 56 display switch...
Mini User Guide - Windows XP
Page 81
... battery 4 caps lock 2 drive 4 power 4 webcam 7 wireless 4 local area network (LAN) cable required 24 connecting cable 24 low battery level 17 M Main menu 70 managing a power-on password 46 managing an administrator password 45 memory module inserting 61 removing 61 memory module compartment cover removing 61 replacing 62 memory module compartment, identifying 8 memory test 71 microphone (audio-in) jack 6, 36 monitor, connecting 41 mouse, external connecting 54 setting preferences 54 multimedia components, identifying 35 multimedia software installing 38 using 38 mute button 37 mute hotkey...
... battery 4 caps lock 2 drive 4 power 4 webcam 7 wireless 4 local area network (LAN) cable required 24 connecting cable 24 low battery level 17 M Main menu 70 managing a power-on password 46 managing an administrator password 45 memory module inserting 61 removing 61 memory module compartment cover removing 61 replacing 62 memory module compartment, identifying 8 memory test 71 microphone (audio-in) jack 6, 36 monitor, connecting 41 mouse, external connecting 54 setting preferences 54 multimedia components, identifying 35 multimedia software installing 38 using 38 mute button 37 mute hotkey...

Mini User Guide - Windows XP
Page 82
regulatory label 10 wireless 10 release latches battery 7, 16 restoring default settings 69 right TouchPad button, identifying 2 RJ-45 (network) jack, identifying 5 S screen brightness hotkeys 56 screen image, switching 56 security cable slot, identifying 5 Security menu 70 security, cable slot 5 security, wireless 28 selecting in the Setup Utility 68 serial number, device 9 service tag 9 setup of WLAN 28 Setup Utility, passwords set in 44 setup, device 1 shut down 22 SIM inserting 31 removing 32 software installing 38 multimedia 38 Windows Media Player 38 speakers, identifying 6, 36 Standby ...
regulatory label 10 wireless 10 release latches battery 7, 16 restoring default settings 69 right TouchPad button, identifying 2 RJ-45 (network) jack, identifying 5 S screen brightness hotkeys 56 screen image, switching 56 security cable slot, identifying 5 Security menu 70 security, cable slot 5 security, wireless 28 selecting in the Setup Utility 68 serial number, device 9 service tag 9 setup of WLAN 28 Setup Utility, passwords set in 44 setup, device 1 shut down 22 SIM inserting 31 removing 32 software installing 38 multimedia 38 Windows Media Player 38 speakers, identifying 6, 36 Standby ...
Service Guide
Page 13
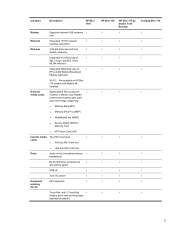
... Media Card Reader (commercial models) with Mobile Mi installed. Category Description HP Mini 1101 Modem Supports external USB modems √ only Ethernet Integrated 10/100 network √ interface card (NIC) Wireless 2 WLAN antennas built into √ display assembly Integrated WLAN by way of √ 802.11b/g/n and 802.11b/g WLAN modules Integrated WWAN by way of √ HP un2400 Mobile Broadband Module (optional) NOTE: Not available in /out (microphone...
... Media Card Reader (commercial models) with Mobile Mi installed. Category Description HP Mini 1101 Modem Supports external USB modems √ only Ethernet Integrated 10/100 network √ interface card (NIC) Wireless 2 WLAN antennas built into √ display assembly Integrated WLAN by way of √ 802.11b/g/n and 802.11b/g WLAN modules Integrated WWAN by way of √ HP un2400 Mobile Broadband Module (optional) NOTE: Not available in /out (microphone...
Service Guide
Page 121
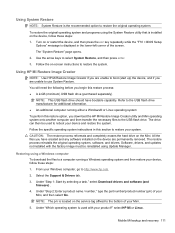
.... Restoring using the System Restore utility that is displayed in this restore process: ● A 2-GB (minimum) USB flash drive (purchased separately) NOTE: This USB flash drive should have created and any software installed on -screen instructions to restore the system. NOTE: The p/n is located on or restart the device, and then press the esc key repeatedly while the "F10 = BIOS Setup Options" message is installed on the Mini. Under "Step 2: Enter a product name / number," type the part number/product number (p/n) of the screen...
.... Restoring using the System Restore utility that is displayed in this restore process: ● A 2-GB (minimum) USB flash drive (purchased separately) NOTE: This USB flash drive should have created and any software installed on -screen instructions to restore the system. NOTE: The p/n is located on or restart the device, and then press the esc key repeatedly while the "F10 = BIOS Setup Options" message is installed on the Mini. Under "Step 2: Enter a product name / number," type the part number/product number (p/n) of the screen...

Service Guide
Page 126
... button in the Search box, press enter, and then follow the on your computer from the list of the computer screen. 6. Using the Instant Restore utility when the operating system is functioning To recover information when the operating system is complete. Select Yes to format the USB flash drive and extract the Disaster Recovery files. 7. When prompted, select Save, and then select the external drive from Windows when the operating...
... button in the Search box, press enter, and then follow the on your computer from the list of the computer screen. 6. Using the Instant Restore utility when the operating system is functioning To recover information when the operating system is complete. Select Yes to format the USB flash drive and extract the Disaster Recovery files. 7. When prompted, select Save, and then select the external drive from Windows when the operating...

Service Guide
Page 127
Using the Instant Restore utility when the operating system is not functioning To recover information when the operating system is not functioning, follow the on-screen instructions. NOTE: Windows includes the User Account Control feature to improve the security of your mind, you start the backup process. You may take over an hour, depending on -screen instructions to set up your system, you to your system files and settings. A system...
Using the Instant Restore utility when the operating system is not functioning To recover information when the operating system is not functioning, follow the on-screen instructions. NOTE: Windows includes the User Account Control feature to improve the security of your mind, you start the backup process. You may take over an hour, depending on -screen instructions to set up your system, you to your system files and settings. A system...
Service Guide
Page 134
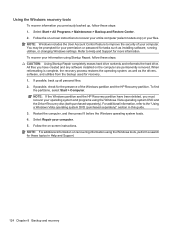
...on -screen instructions. Follow the on recovering information using the Windows tools, perform a search for recovery. 1. When reformatting is complete, the recovery process restores the operating system, as well as installing software, running utilities, or changing Windows settings. Using the Windows recovery tools To recover information you must recover your operating system and programs using Startup Repair, follow these steps: CAUTION: Using Startup Repair completely erases hard drive contents and reformats the hard drive. Select Start > All Programs > Maintenance > Backup and...
...on -screen instructions. Follow the on recovering information using the Windows tools, perform a search for recovery. 1. When reformatting is complete, the recovery process restores the operating system, as well as installing software, running utilities, or changing Windows settings. Using the Windows recovery tools To recover information you must recover your operating system and programs using Startup Repair, follow these steps: CAUTION: Using Startup Repair completely erases hard drive contents and reformats the hard drive. Select Start > All Programs > Maintenance > Backup and...
Service Guide
Page 151
... Kit, spare part number 26, 76 display specifications 88, 89 display switch, identifying 13 displaying system information 84 drive light, identifying 9 Driver Recovery disc 127 drives preventing damage 38 drives, boot order 85 E earbuds 12 electrostatic discharge 39 Ethernet, product description 3 exiting the Setup Utility 84 external media cards, product description 3 external monitor port pin assignments 130 external monitor port, identifying 11 F f11 recovery 125 fan removal 68 spare part number 21, 68 feet locations 43 spare part number 43 flash storage drive, product description 2 fn key...
... Kit, spare part number 26, 76 display specifications 88, 89 display switch, identifying 13 displaying system information 84 drive light, identifying 9 Driver Recovery disc 127 drives preventing damage 38 drives, boot order 85 E earbuds 12 electrostatic discharge 39 Ethernet, product description 3 exiting the Setup Utility 84 external media cards, product description 3 external monitor port pin assignments 130 external monitor port, identifying 11 F f11 recovery 125 fan removal 68 spare part number 21, 68 feet locations 43 spare part number 43 flash storage drive, product description 2 fn key...
Service Guide
Page 152
... 110 using 111 I I/O address specifications 94 internal display switch, identifying 13 internal media cards, product description 3 internal microphone, identifying 13 interrupt specifications 93 J jacks audio-in (microphone) 12 audio-out (headphone) 12 RJ-45 (network) 11 K keyboard product description 3 removal 48 spare part number 18, 48 keys fn 7, 8 function 7, 8 Home 8 Program Switcher 8 Windows applications 7 Windows logo 7 L language support 85 latches, battery release 14 left TouchPad button, identifying 5 lights battery 9 caps lock 6 drive 9 power 9 webcam 13 wireless 10 M Main menu...
... 110 using 111 I I/O address specifications 94 internal display switch, identifying 13 internal media cards, product description 3 internal microphone, identifying 13 interrupt specifications 93 J jacks audio-in (microphone) 12 audio-out (headphone) 12 RJ-45 (network) 11 K keyboard product description 3 removal 48 spare part number 18, 48 keys fn 7, 8 function 7, 8 Home 8 Program Switcher 8 Windows applications 7 Windows logo 7 L language support 85 latches, battery release 14 left TouchPad button, identifying 5 lights battery 9 caps lock 6 drive 9 power 9 webcam 13 wireless 10 M Main menu...


