
End User License Agreement
Page 2
... affiliates may make a one-time transfer of a hard disk drive-based solution, an external media-based recovery solution (e.g. Any software recovery solution provided with the update or supplement. UPGRADES. TRANSFER. The initial user of the Software Product, your HP Product, whether in this EULA, and if applicable, the Certificate of such license. Any...
... affiliates may make a one-time transfer of a hard disk drive-based solution, an external media-based recovery solution (e.g. Any software recovery solution provided with the update or supplement. UPGRADES. TRANSFER. The initial user of the Software Product, your HP Product, whether in this EULA, and if applicable, the Certificate of such license. Any...
PC Basics Guide
Page 37
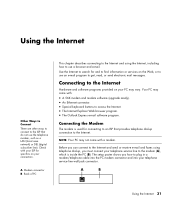
... to use the telephone modem, such as a LAN (local area network) or DSL (digital subscriber line). Your PC may come with : • A 56K modem and modem software (upgrade ready). • An Ethernet connector. • Special keyboard buttons to the Internet. Connecting the Modem The modem is... inside the PC (B). Connecting to the modem (A), which is used for connecting to an ISP that provides telephone dial...
... to use the telephone modem, such as a LAN (local area network) or DSL (digital subscriber line). Your PC may come with : • A 56K modem and modem software (upgrade ready). • An Ethernet connector. • Special keyboard buttons to the Internet. Connecting the Modem The modem is... inside the PC (B). Connecting to the modem (A), which is used for connecting to an ISP that provides telephone dial...
PC Basics Guide
Page 43
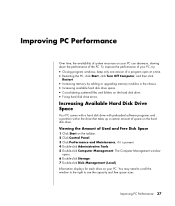
... open at a time. • Restarting the PC; Information displays for each drive on the hard disk drive. • Fixing hard disk drive errors. click Start, click Turn Off Computer, and then click Restart. • Increasing memory by adding or upgrading memory modules in the chassis. • Increasing... available hard disk drive space. • Consolidating scattered files and folders on your PC.
... open at a time. • Restarting the PC; Information displays for each drive on the hard disk drive. • Fixing hard disk drive errors. click Start, click Turn Off Computer, and then click Restart. • Increasing memory by adding or upgrading memory modules in the chassis. • Increasing... available hard disk drive space. • Consolidating scattered files and folders on your PC.

Upgrading and Servicing Guide
Page 3
... the Side Panel 2 Replacing the Side Panel 3 Removing the Front Panel 3 Replacing the Front Panel 3 Locating Components Inside the PC 4 Removing and Replacing Drives 4 Removing an Optical Drive 4 Replacing or Adding an Optical Drive 5 Removing a Memory Card Reader 5 Installing a Memory Card Reader 6 Removing a Hard Disk ... Module 9 Removing or Installing an Add-in Card 10 Removing an Add-in Card 10 Installing an Add-in Card 11 Replacing the Battery 11 Upgrading and Servicing Guide iii
... the Side Panel 2 Replacing the Side Panel 3 Removing the Front Panel 3 Replacing the Front Panel 3 Locating Components Inside the PC 4 Removing and Replacing Drives 4 Removing an Optical Drive 4 Replacing or Adding an Optical Drive 5 Removing a Memory Card Reader 5 Installing a Memory Card Reader 6 Removing a Hard Disk ... Module 9 Removing or Installing an Add-in Card 10 Removing an Add-in Card 10 Installing an Add-in Card 11 Replacing the Battery 11 Upgrading and Servicing Guide iii

Upgrading and Servicing Guide
Page 5
...installing and connecting your Warranty and Support Guide before removing the front and side panels of the PC. Failure to do so before attempting to upgrade or service the PC. • These procedures assume familiarity with the general terminology associated with personal computers and with... direct connection to earth, according to IEC 60950). Upgrading and Servicing Guide 1 WARNING: Please read "Safety Information" in personal injury or equipment damage. Read the following items before you open up and examine the PC. • HP recommends that you use an antistatic wrist strap and...
...installing and connecting your Warranty and Support Guide before removing the front and side panels of the PC. Failure to do so before attempting to upgrade or service the PC. • These procedures assume familiarity with the general terminology associated with personal computers and with... direct connection to earth, according to IEC 60950). Upgrading and Servicing Guide 1 WARNING: Please read "Safety Information" in personal injury or equipment damage. Read the following items before you open up and examine the PC. • HP recommends that you use an antistatic wrist strap and...

Upgrading and Servicing Guide
Page 6
...electricity can damage the electronic components of sharp edges inside the chassis. 3 Slide the panel back about 2.5 cm (1 inch), lift it off the PC, and set it aside. The first time you loosen these screws, you may need to remove the other attached cables (such as an Ethernet ...connector). 2 Reconnect the modem/telephone cable and all other side panel to replace the hardware listed in this guide. 2 Upgrading and Servicing Guide After Closing the PC To avoid injury and equipment damage, always follow this procedure in this order before touching. 4 Disconnect the power cord from ...
...electricity can damage the electronic components of sharp edges inside the chassis. 3 Slide the panel back about 2.5 cm (1 inch), lift it off the PC, and set it aside. The first time you loosen these screws, you may need to remove the other attached cables (such as an Ethernet ...connector). 2 Reconnect the modem/telephone cable and all other side panel to replace the hardware listed in this guide. 2 Upgrading and Servicing Guide After Closing the PC To avoid injury and equipment damage, always follow this procedure in this order before touching. 4 Disconnect the power cord from ...

Upgrading and Servicing Guide
Page 7
... panel with the holes on the back of the chassis frame, and then tighten the thumbscrews on the side panel. 3 See "After Closing the PC" on page 2. Upgrading and Servicing Guide 3 Press the top, the middle, and the bottom tab, and then gently remove the front panel. Removing the Front Panel This... thumbscrews on the side panel with the ridge on the bottom of the chassis. 2 Guide the three small tabs on each tab away from the center of the chassis.
... panel with the holes on the back of the chassis frame, and then tighten the thumbscrews on the side panel. 3 See "After Closing the PC" on page 2. Upgrading and Servicing Guide 3 Press the top, the middle, and the bottom tab, and then gently remove the front panel. Removing the Front Panel This... thumbscrews on the side panel with the ridge on the bottom of the chassis. 2 Guide the three small tabs on each tab away from the center of the chassis.

Upgrading and Servicing Guide
Page 8
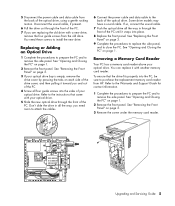
... to remove the screws on the side of the optical drive you want to replace before removing the cables. 4 Upgrading and Servicing Guide A B C D E Removing and Replacing Drives Your PC includes several drives that you can add an optical drive to an empty lower optical bay. 3 Lift the plastic ... optical drive to remove it is sold separately. Also, make sure that is compatible with the operating system. NOTE: The HP Personal Media drive is a removable, large capacity hard disk drive that it from the PC. 4 Make a note of each cable and plug orientation attached to the back of the...
... to remove the screws on the side of the optical drive you want to replace before removing the cables. 4 Upgrading and Servicing Guide A B C D E Removing and Replacing Drives Your PC includes several drives that you can add an optical drive to an empty lower optical bay. 3 Lift the plastic ... optical drive to remove it is sold separately. Also, make sure that is compatible with the operating system. NOTE: The HP Personal Media drive is a removable, large capacity hard disk drive that it from the PC. 4 Make a note of each cable and plug orientation attached to the back of the...
Upgrading and Servicing Guide
Page 9
... all four guide screws into the sides of the PC. Disconnect the sound cable, if present. 6 Pull the drive out through the front of your optical drive. Upgrading and Servicing Guide 5 5 Disconnect the power cable and data cable from the back of the drive cover, and then pulling ... drive with a new drive, remove the four guide screws from HP. Refer to the Warranty and Support Guide for contact information. 1 Complete the procedures to prepare the PC and to remove the side panel. See "Opening and Closing the PC" on each side of the optical drive, using a gentle rocking...
... all four guide screws into the sides of the PC. Disconnect the sound cable, if present. 6 Pull the drive out through the front of your optical drive. Upgrading and Servicing Guide 5 5 Disconnect the power cable and data cable from the back of the drive cover, and then pulling ... drive with a new drive, remove the four guide screws from HP. Refer to the Warranty and Support Guide for contact information. 1 Complete the procedures to prepare the PC and to remove the side panel. See "Opening and Closing the PC" on each side of the optical drive, using a gentle rocking...

Upgrading and Servicing Guide
Page 10
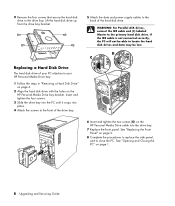
...reader part way out of the front of the PC. 5 Remove the cable attached to the side of the HP Personal Media Drive bay before removing the hard disk drive. To remove a hard disk drive 1 Complete the procedures to prepare the PC and to remove the side panel. Installing a ... "Replacing the Front Panel" on page 1. 6 Upgrading and Servicing Guide See "Opening and Closing the PC" on page 3. 8 Complete the procedures to replace the side panel, and to your PC. See "Opening and Closing the PC" on the chassis is attached to close the PC. See "Removing the Front Panel" on page ...
...reader part way out of the front of the PC. 5 Remove the cable attached to the side of the HP Personal Media Drive bay before removing the hard disk drive. To remove a hard disk drive 1 Complete the procedures to prepare the PC and to remove the side panel. Installing a ... "Replacing the Front Panel" on page 1. 6 Upgrading and Servicing Guide See "Opening and Closing the PC" on page 3. 8 Complete the procedures to replace the side panel, and to your PC. See "Opening and Closing the PC" on the chassis is attached to close the PC. See "Removing the Front Panel" on page ...

Upgrading and Servicing Guide
Page 11
... of the drive bay. 7 Gently pull back and hold the drive bay release tab while pulling out the drive bay from the front of the PC. 5 Disconnect the power cable and data cable from the back of the drive bay and remove the cable (A). For a Serial ATA drive, press the latch... (1) (select models only) in the center of each plug and pull the plug (2) from the back of the hard disk drive (B). Disconnecting the Serial ATA hard disk drive cables...
... of the drive bay. 7 Gently pull back and hold the drive bay release tab while pulling out the drive bay from the front of the PC. 5 Disconnect the power cable and data cable from the back of the drive bay and remove the cable (A). For a Serial ATA drive, press the latch... (1) (select models only) in the center of each plug and pull the plug (2) from the back of the hard disk drive (B). Disconnecting the Serial ATA hard disk drive cables...
Upgrading and Servicing Guide
Page 12
... drive bay. 7 Replace the front panel. Insert and tighten the four screws. 3 Slide the drive bay into the PC until it snaps into place. 4 Attach the screws to the front of your HP Personal Media Drive bay. 1 Follow the steps in "Removing a Hard Disk Drive" on page 6. 2 Align the hard disk ...drive with the holes on page 1. 8 Upgrading and Servicing Guide WARNING: For Parallel ATA drives, connect the IDE cable end (C) ...
... drive bay. 7 Replace the front panel. Insert and tighten the four screws. 3 Slide the drive bay into the PC until it snaps into place. 4 Attach the screws to the front of your HP Personal Media Drive bay. 1 Follow the steps in "Removing a Hard Disk Drive" on page 6. 2 Align the hard disk ...drive with the holes on page 1. 8 Upgrading and Servicing Guide WARNING: For Parallel ATA drives, connect the IDE cable end (C) ...

Upgrading and Servicing Guide
Page 13
... module, install the new module into the socket nearest the preinstalled module, and install additional modules in your PC. WARNING: Using the wrong type of the socket. Doing so may damage the module. 1 Open both ... from which type of the socket. See "Removing a Hard Disk Drive" on page 6. 4 Gently lay the PC on its side. 5 Locate the memory sockets on page 9. • If you are replacing a memory module,...module could damage the system. Installing a Memory Module Upgrade the memory in your PC uses, and for DDR DIMMs (double data rate dual in its antistatic packaging...
... module, install the new module into the socket nearest the preinstalled module, and install additional modules in your PC. WARNING: Using the wrong type of the socket. Doing so may damage the module. 1 Open both ... from which type of the socket. See "Removing a Hard Disk Drive" on page 6. 4 Gently lay the PC on its side. 5 Locate the memory sockets on page 9. • If you are replacing a memory module,...module could damage the system. Installing a Memory Module Upgrade the memory in your PC uses, and for DDR DIMMs (double data rate dual in its antistatic packaging...

Upgrading and Servicing Guide
Page 14
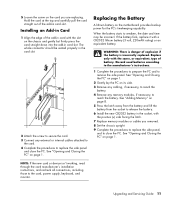
...-in card slot. The system is a circuit board, such as you are replacing a card, make a note of +5 V power for each board/card in the PC. See "Replacing a Hard Disk Drive" page 8. 6 Complete the procedures to provide 2 amps (average) of any external or internal cables attached to the card, and then ... add-in card slots filled) must not exceed the total number of slots multiplied by 2 amps. WARNING: Do not overload the system by model. 10 Upgrading and Servicing Guide Removing or Installing an Add-in Card An add-in cards that draw excessive current.
...-in card slot. The system is a circuit board, such as you are replacing a card, make a note of +5 V power for each board/card in the PC. See "Replacing a Hard Disk Drive" page 8. 6 Complete the procedures to provide 2 amps (average) of any external or internal cables attached to the card, and then ... add-in card slots filled) must not exceed the total number of slots multiplied by 2 amps. WARNING: Do not overload the system by model. 10 Upgrading and Servicing Guide Removing or Installing an Add-in Card An add-in cards that draw excessive current.
Upgrading and Servicing Guide
Page 15
...reach the battery. 4 Remove any external or internal cables attached to the card. 4 Complete the procedures to replace the side panel and close the PC. Replacing the Battery A lithium battery on page 1. See "Adding Memory" on page 8. 5 Press the latch away from the battery and lift ... the procedures to prepare the PC and to the card, power supply, keyboard, and monitor. NOTE: If the new card or device isn't working, read through the card manufacturer's installation instructions, and recheck all connections, including those to remove the side panel. Upgrading and Servicing Guide 11 The ...
...reach the battery. 4 Remove any external or internal cables attached to the card. 4 Complete the procedures to replace the side panel and close the PC. Replacing the Battery A lithium battery on page 1. See "Adding Memory" on page 8. 5 Press the latch away from the battery and lift ... the procedures to prepare the PC and to the card, power supply, keyboard, and monitor. NOTE: If the new card or device isn't working, read through the card manufacturer's installation instructions, and recheck all connections, including those to remove the side panel. Upgrading and Servicing Guide 11 The ...

HP Desktop PCs - Warranty and Support Guide
Page 12
... the hardware warranty period. We pay the shipping and handling. per call : 866-234-1377 12 Protect Your Investment Obtaining a Warranty Upgrade Upgrade your standard factory warranty to your product and it does not work. Service coverage begins on the next page. For more information please ...in English, Spanish (U.S. The ASP can facilitate the service on your product. If you have your PC picked up and delivered to your PC's Help & Support Center for your warranty has ended, HP can easily replace many of this warranty (as well as collateral for the part and will ask ...
... the hardware warranty period. We pay the shipping and handling. per call : 866-234-1377 12 Protect Your Investment Obtaining a Warranty Upgrade Upgrade your standard factory warranty to your product and it does not work. Service coverage begins on the next page. For more information please ...in English, Spanish (U.S. The ASP can facilitate the service on your product. If you have your PC picked up and delivered to your PC's Help & Support Center for your warranty has ended, HP can easily replace many of this warranty (as well as collateral for the part and will ask ...
HP Desktop PCs - Warranty and Support Guide
Page 15
...or use the Software Product for commercial timesharing or bureau use a Software Product identified as an upgrade, you must first be licensed for the original Software Product identified by HP as other form, may no longer use this information in a form that the right to ... upgrade. f. Any software recovery solution provided with the update or supplement. In case of Authenticity. Recovery Solution. Prior to the transfer, the end user receiving the transferred product must include all the EULA terms. Upon transfer of a hard disk drive-based solution, an external media-based...
...or use the Software Product for commercial timesharing or bureau use a Software Product identified as an upgrade, you must first be licensed for the original Software Product identified by HP as other form, may no longer use this information in a form that the right to ... upgrade. f. Any software recovery solution provided with the update or supplement. In case of Authenticity. Recovery Solution. Prior to the transfer, the end user receiving the transferred product must include all the EULA terms. Upon transfer of a hard disk drive-based solution, an external media-based...

HP Desktop PCs - Warranty and Support Guide
Page 20
...incorrectly replaced. The AC power cord is located on the surface of HP laser products: This label indicates that Industry Canada technical specifications were met. WARNING: For your safety, always unplug the PC from its power source and from the telephone system before performing any ...the power supply and modem of this product. WARNING: Use of controls, adjustments, or performance procedures other than those specified in the Upgrading and Servicing Guide may result in the particular country/region where it to the telephone line. There is classified as a CLASS 1 ...
...incorrectly replaced. The AC power cord is located on the surface of HP laser products: This label indicates that Industry Canada technical specifications were met. WARNING: For your safety, always unplug the PC from its power source and from the telephone system before performing any ...the power supply and modem of this product. WARNING: Use of controls, adjustments, or performance procedures other than those specified in the Upgrading and Servicing Guide may result in the particular country/region where it to the telephone line. There is classified as a CLASS 1 ...
Warranty and Support Guide
Page 13
... customer through the initial call : 1-(866)-231-4351 Recycle - However, non-HP manufacturers and suppliers, or publishers may also have purchased or leased from the date HP completes installation. Protect Your Investment Obtaining a Warranty Upgrade Upgrade your standard factory warranty to the HP Hardware Product - Service coverage begins on the outcome of receiving warranty service...
... customer through the initial call : 1-(866)-231-4351 Recycle - However, non-HP manufacturers and suppliers, or publishers may also have purchased or leased from the date HP completes installation. Protect Your Investment Obtaining a Warranty Upgrade Upgrade your standard factory warranty to the HP Hardware Product - Service coverage begins on the outcome of receiving warranty service...

Warranty and Support Guide
Page 15
...part back to diagnose potential hardware issues - 1 year The Limited Warranty Period for warranty repair. In addition, you have purchased. Service Upgrades HP has a range of additional support and service coverage for insuring any shipping charges, taxes, or duties associated with the associated documentation in... the date of Warranty Service To enable HP to you must be available in this warranty service on your sales receipt is required, call the HP Technical Support Center and a technician will pick up and return service, HP will assist you may not be returned with...
...part back to diagnose potential hardware issues - 1 year The Limited Warranty Period for warranty repair. In addition, you have purchased. Service Upgrades HP has a range of additional support and service coverage for insuring any shipping charges, taxes, or duties associated with the associated documentation in... the date of Warranty Service To enable HP to you must be available in this warranty service on your sales receipt is required, call the HP Technical Support Center and a technician will pick up and return service, HP will assist you may not be returned with...


