
Start Here Guide
Page 8
...power supply (UPS). Using surge protection Help protect your monitor, computer, and accessories by connecting all power cords for your computer and peripheral devices (such as a monitor, printer, or scanner) to a surge protection device such as well. Use those if your equipment if surge protection fails. Use a power strip whose manufacturer offers a damage replacement... policy that replaces your computer has a television tuner installed. Some surge protection devices...
...power supply (UPS). Using surge protection Help protect your monitor, computer, and accessories by connecting all power cords for your computer and peripheral devices (such as a monitor, printer, or scanner) to a surge protection device such as well. Use those if your equipment if surge protection fails. Use a power strip whose manufacturer offers a damage replacement... policy that replaces your computer has a television tuner installed. Some surge protection devices...

Getting Started Guide
Page 12
... inputs and outputs for mouse, keyboard, digital cameras, or other devices with surge protection or an uninterruptible power supply (UPS). Use those if your equipment if surge protection fails. the power strip must be specifically labeled as well. Other peripheral devices, such as the monitor, keyboard, and mouse... Many surge protection devices have surge protection for lightning spikes to the back of your system. Not all , connectors. Use a power strip whose manufacturer offers a damage replacement policy that replaces your computer has a television tuner installed.
... inputs and outputs for mouse, keyboard, digital cameras, or other devices with surge protection or an uninterruptible power supply (UPS). Use those if your equipment if surge protection fails. the power strip must be specifically labeled as well. Other peripheral devices, such as the monitor, keyboard, and mouse... Many surge protection devices have surge protection for lightning spikes to the back of your system. Not all , connectors. Use a power strip whose manufacturer offers a damage replacement policy that replaces your computer has a television tuner installed.

Limited Warranty and Support Guide
Page 14
... near an AC outlet. WARNING: Always disconnect the modem cord from the AC power outlet. For your computer cover. Laser Safety Statement Class 1 LED Product The CD and DVD drives contain a laser system and are inside the power supply and modem of used batteries according to CATV System Installer This reminder is incorrectly replaced.
... near an AC outlet. WARNING: Always disconnect the modem cord from the AC power outlet. For your computer cover. Laser Safety Statement Class 1 LED Product The CD and DVD drives contain a laser system and are inside the power supply and modem of used batteries according to CATV System Installer This reminder is incorrectly replaced.

Upgrading and Servicing Guide
Page 6
...procedure in this guide. 2 Upgrading and Servicing Guide Ensure that you installed an add-in this order after closing the PC: 1 Reconnect the power cord. WARNING: Beware of static electricity by the card manufacturer. 6 See "Before Opening the PC" on page 1. 7 Loosen the two ...components of personal injury from electrical shock or hot surfaces, disconnect the power cord from the wall outlet, and allow the internal system components to replace the hardware listed in card, install any software drivers supplied by briefly touching a grounded metal object. WARNING: To reduce the ...
...procedure in this guide. 2 Upgrading and Servicing Guide Ensure that you installed an add-in this order after closing the PC: 1 Reconnect the power cord. WARNING: Beware of static electricity by the card manufacturer. 6 See "Before Opening the PC" on page 1. 7 Loosen the two ...components of personal injury from electrical shock or hot surfaces, disconnect the power cord from the wall outlet, and allow the internal system components to replace the hardware listed in card, install any software drivers supplied by briefly touching a grounded metal object. WARNING: To reduce the ...

Upgrading and Servicing Guide
Page 12
Lift the hard disk drive up from the drive bay bracket. 5 Attach the data and power supply cables to the back of your PC attaches to the front of the drive bay. 6 The Personal Media Drive bay connector has a special keying feature and can only be lost. Insert and tighten the four screws.... with the holes on page 1. 8 Upgrading and Servicing Guide See "Replacing the Front Panel" on the connector and insert the cable into the drive bay. 7 Replace the front panel. See "Opening and Closing the PC" on the HP Personal Media Drive bay bracket. 9 Remove the four screws that secure the hard ...
Lift the hard disk drive up from the drive bay bracket. 5 Attach the data and power supply cables to the back of your PC attaches to the front of the drive bay. 6 The Personal Media Drive bay connector has a special keying feature and can only be lost. Insert and tighten the four screws.... with the holes on page 1. 8 Upgrading and Servicing Guide See "Replacing the Front Panel" on the connector and insert the cable into the drive bay. 7 Replace the front panel. See "Opening and Closing the PC" on the HP Personal Media Drive bay bracket. 9 Remove the four screws that secure the hard ...
Upgrading and Servicing Guide
Page 17
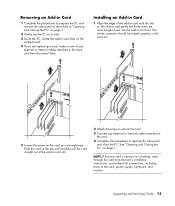
...card. 4 Complete the procedures to replace the side panel and close the PC. Installing an Add-in Card 1 Align the edge of the add-in card slot. 2 Attach the screw to secure the card. 3 Connect any external or internal cables attached to the card, power supply, keyboard, and monitor. See "...Opening and Closing the PC" on the card you are replacing. Hold the card at the top and carefully pull the card straight out of the add-in card...
...card. 4 Complete the procedures to replace the side panel and close the PC. Installing an Add-in Card 1 Align the edge of the add-in card slot. 2 Attach the screw to secure the card. 3 Connect any external or internal cables attached to the card, power supply, keyboard, and monitor. See "...Opening and Closing the PC" on the card you are replacing. Hold the card at the top and carefully pull the card straight out of the add-in card...


