

User Guide
Page 3
...and bottom 4 Before taking pictures...4 Install the batteries...4 Turn on the camera...4 Choose the language...5 Set the region...5 Set the date and time...5 Install and format an optional memory card 6 Install the software...6 Using your camera...7 2 Taking pictures and recording video clips Taking ...pictures...8 Recording video clips...9 Instant Review...9 Auto focus and exposure...9 Focusing on the subject...10 Optimizing focus...10 Using Focus Lock...11 Optimizing exposure...11 Using zoom...11 Optical zoom...12 Digital zoom...
...and bottom 4 Before taking pictures...4 Install the batteries...4 Turn on the camera...4 Choose the language...5 Set the region...5 Set the date and time...5 Install and format an optional memory card 6 Install the software...6 Using your camera...7 2 Taking pictures and recording video clips Taking ...pictures...8 Recording video clips...9 Instant Review...9 Auto focus and exposure...9 Focusing on the subject...10 Optimizing focus...10 Using Focus Lock...11 Optimizing exposure...11 Using zoom...11 Optical zoom...12 Digital zoom...
User Guide
Page 4
... images directly to a printer 27 7 Using HP Photosmart Express Using the Photosmart Express Menu 29 Marking images for printing...29 Buying prints online...30 Sharing images...31 Setting up online destinations in the camera 31 Sending images to online destinations 31 8 Using the Camera Setup Menu 33 9 Troubleshooting Resetting the camera...34 Problems and solutions...34...
... images directly to a printer 27 7 Using HP Photosmart Express Using the Photosmart Express Menu 29 Marking images for printing...29 Buying prints online...30 Sharing images...31 Setting up online destinations in the camera 31 Sending images to online destinations 31 8 Using the Camera Setup Menu 33 9 Troubleshooting Resetting the camera...34 Problems and solutions...34...
User Guide
Page 6
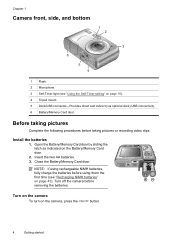
Before taking pictures or recording video clips. Insert the two AA batteries. 3. Close the Battery/Memory Card door. Turn off the camera before taking pictures Complete the following procedures before removing the batteries. Install the batteries 1. NOTE: If using rechargeable NiMH batteries, fully charge the batteries before using them the first time (see "Using the Self-Timer setting...
Before taking pictures or recording video clips. Insert the two AA batteries. 3. Close the Battery/Memory Card door. Turn off the camera before taking pictures Complete the following procedures before removing the batteries. Install the batteries 1. NOTE: If using rechargeable NiMH batteries, fully charge the batteries before using them the first time (see "Using the Self-Timer setting...
User Guide
Page 8
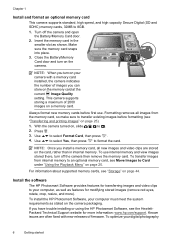
... the camera and open the Battery/Memory Card door. 2. NOTE: Once you install a memory card, all images from internal memory to transfer existing images before first use internal memory and view images stored there, turn on the camera. If...HP Photosmart Software, your camera with new releases of 2000 images on page 25). 1. NOTE: When you have trouble installing or using the HP Photosmart Software, see "Transferring and printing images" on a memory card. Press . 3. To use . For information about supported memory cards, see Move Images to your digital...
... the camera and open the Battery/Memory Card door. 2. NOTE: Once you install a memory card, all images from internal memory to transfer existing images before first use internal memory and view images stored there, turn on the camera. If...HP Photosmart Software, your camera with new releases of 2000 images on page 25). 1. NOTE: When you have trouble installing or using the HP Photosmart Software, see "Transferring and printing images" on a memory card. Press . 3. To use . For information about supported memory cards, see Move Images to your digital...

User Guide
Page 10
...indicator. • Video Record indicator. 2 12 • When taking pictures, pictures remaining count. 0:15 • When recording video clips, time remaining. 3 Battery level indicator (see "Power indicators" on page 42). 4 Memory card indicator. 5 Focus brackets (see "Auto focus and exposure" on page 9). Press the ...in Video Record. Taking pictures You can take pictures when you are in Picture Capture and you can take a picture when the camera is locked (see "Auto focus and exposure" on page 9). 4. 2 Taking pictures and recording video clips You can record video...
...indicator. • Video Record indicator. 2 12 • When taking pictures, pictures remaining count. 0:15 • When recording video clips, time remaining. 3 Battery level indicator (see "Power indicators" on page 42). 4 Memory card indicator. 5 Focus brackets (see "Auto focus and exposure" on page 9). Press the ...in Video Record. Taking pictures You can take pictures when you are in Picture Capture and you can take a picture when the camera is locked (see "Auto focus and exposure" on page 9). 4. 2 Taking pictures and recording video clips You can record video...

User Guide
Page 20
... clips in a panoramic sequence. 6 Image tagged as Favorite (see "Tagging images as described here. For information about each image or video clip. 1 Playback indicator. 2 Battery indicator (see "Power indicators" on page 42). 3 Memory card indicator. 4 1 of 30 Number of this image or video clip out of the total number of..." 3 on page 25). 18 Reviewing images and video clips Slide to print (see "Using the Design Gallery Menu" on page 29). 9 Number of electronic Photosmart Share destinations (see "Using 1 HP Photosmart Express" on page 22. 1. press to pause a clip.
... clips in a panoramic sequence. 6 Image tagged as Favorite (see "Tagging images as described here. For information about each image or video clip. 1 Playback indicator. 2 Battery indicator (see "Power indicators" on page 42). 3 Memory card indicator. 4 1 of 30 Number of this image or video clip out of the total number of..." 3 on page 25). 18 Reviewing images and video clips Slide to print (see "Using the Design Gallery Menu" on page 29). 9 Number of electronic Photosmart Share destinations (see "Using 1 HP Photosmart Express" on page 22. 1. press to pause a clip.
User Guide
Page 27
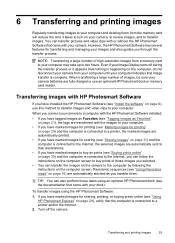
... use this method to transfer images and video clips to a printer and/or the Internet. 2. When you connect your camera to a computer with the HP Photosmart Software installed: • If you have tagged images as Favorites (see "Tagging images as Favorites" on page 21), ...screen to buy prints of images, be sure your camera batteries are automatically stitched as prints (see "Using HP Photosmart Express" on page 6), use an optional HP Photosmart dock or memory card reader. To transfer images using an optional HP Photosmart dock (see the documentation that the computer is connected ...
... use this method to transfer images and video clips to a printer and/or the Internet. 2. When you connect your camera to a computer with the HP Photosmart Software installed: • If you have tagged images as Favorites (see "Tagging images as Favorites" on page 21), ...screen to buy prints of images, be sure your camera batteries are automatically stitched as prints (see "Using HP Photosmart Express" on page 6), use an optional HP Photosmart dock or memory card reader. To transfer images using an optional HP Photosmart dock (see the documentation that the computer is connected ...

User Guide
Page 35
... press to the computer" on page 26. • Digital Camera (Default)-Recognizes the camera as a digital camera using PTP (Picture Transfer Protocol). • Disk Drive-Recognizes the camera as button presses and shutter clicks) off if you change...Camera Setup Menu is available from the Picture Capture, Video Record, and Playback menus. 1. Display Brightness-Adjusts the brightness of the Image Display. • Automatic (Default)-For automatic adjustment of Image Display brightness based on page 5. See "Set the date and time" on lighting conditions. • Low-For extending battery...
... press to the computer" on page 26. • Digital Camera (Default)-Recognizes the camera as a digital camera using PTP (Picture Transfer Protocol). • Disk Drive-Recognizes the camera as button presses and shutter clicks) off if you change...Camera Setup Menu is available from the Picture Capture, Video Record, and Playback menus. 1. Display Brightness-Adjusts the brightness of the Image Display. • Automatic (Default)-For automatic adjustment of Image Display brightness based on page 5. See "Set the date and time" on lighting conditions. • Low-For extending battery...
User Guide
Page 36
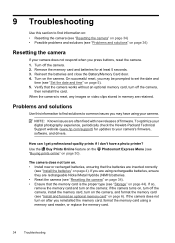
... digital photography experience, periodically check the Hewlett-Packard Technical Support website (www.hp.com/support) for at least 5 seconds. 3. if the camera turns on, turn off the camera, install the memory card, turn on. • Install new or recharged batteries, ensuring that the batteries are rechargeable Nickel Metal Hydride (NiMH) batteries. • Reset the camera (see "Resetting the camera...
... digital photography experience, periodically check the Hewlett-Packard Technical Support website (www.hp.com/support) for at least 5 seconds. 3. if the camera turns on, turn off the camera, install the memory card, turn on. • Install new or recharged batteries, ensuring that the batteries are rechargeable Nickel Metal Hydride (NiMH) batteries. • Reset the camera (see "Resetting the camera...
User Guide
Page 37
... an optional memory card" on page 6). Transfer images from the camera to your computer, then format the memory card. • Power-on time in an optional HP Photosmart dock does not work, replace the batteries. I have to recharge the NiMH batteries frequently. • New batteries or batteries that have not been charged recently must be recharged to...
... an optional memory card" on page 6). Transfer images from the camera to your computer, then format the memory card. • Power-on time in an optional HP Photosmart dock does not work, replace the batteries. I have to recharge the NiMH batteries frequently. • New batteries or batteries that have not been charged recently must be recharged to...
User Guide
Page 40
... starts automatically when you have affected the camera. Open the HP Photosmart Camera settings in "Connecting to my Macintosh. I connect to the computer" on page 26. Close the HP Photosmart Software, remove the camera from the optional dock or disconnect the camera from the camera to 5 minutes). Then examine the camera and the batteries for signs of the ordinary, turn off...
... starts automatically when you have affected the camera. Open the HP Photosmart Camera settings in "Connecting to my Macintosh. I connect to the computer" on page 26. Close the HP Photosmart Software, remove the camera from the optional dock or disconnect the camera from the camera to 5 minutes). Then examine the camera and the batteries for signs of the ordinary, turn off...

User Guide
Page 41
... (followed by data on page 34). Transfer all images stored on the memory card, then format the card (see "Resetting the camera" on battery types and performance)-AA-400 The HP Photosmart Software takes a long time before it is ready to start transferring images. Having a large number of the following error messages when using...
... (followed by data on page 34). Transfer all images stored on the memory card, then format the card (see "Resetting the camera" on battery types and performance)-AA-400 The HP Photosmart Software takes a long time before it is ready to start transferring images. Having a large number of the following error messages when using...
User Guide
Page 43
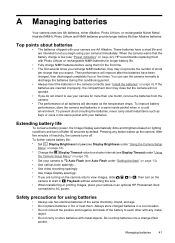
... decrease as keys or coins in an optional HP Photosmart dock connected to a shorter interval (see Display Brightness under "Using the Camera Setup Menu" on page 33). • Set your camera in the same pocket with metal objects. Managing batteries 41 A Managing batteries Your camera uses two AA batteries, either Alkaline, Photo Lithium, or rechargeable Nickel Metal Hydride...
... decrease as keys or coins in an optional HP Photosmart dock connected to a shorter interval (see Display Brightness under "Using the Camera Setup Menu" on page 33). • Set your camera in the same pocket with metal objects. Managing batteries 41 A Managing batteries Your camera uses two AA batteries, either Alkaline, Photo Lithium, or rechargeable Nickel Metal Hydride...

User Guide
Page 44
... take (see "Top points about batteries, go to www.hp.com/support and search on usage, battery type, and battery manufacturer. CAUTION: Risk of used batteries according to the instructions. Camera will soon power down . NOTE: For more information about batteries" on AC power. Dispose of explosion if battery is without batteries for the battery to feel warm), changes color...
... take (see "Top points about batteries, go to www.hp.com/support and search on usage, battery type, and battery manufacturer. CAUTION: Risk of used batteries according to the instructions. Camera will soon power down . NOTE: For more information about batteries" on AC power. Dispose of explosion if battery is without batteries for the battery to feel warm), changes color...

User Guide
Page 45
...month Heavy use of flash, frequent pictures Poor Heavy use of video Poor Heavy use of Image Display Poor Overall battery life Poor Low temperature/winter use Poor Infrequent use (without dock) Fair Infrequent use (with dock) Fair Want to recharge... Good Good Good Fair Fair Fair Good Good Recharging NiMH batteries You can recharge optional NiMH batteries with an optional HP quick recharger or with your HP quick recharger or HP Photosmart dock. Recharging NiMH batteries 43 For information about recharging NiMH batteries, as well as safety precautions when recharging, see the ...
...month Heavy use of flash, frequent pictures Poor Heavy use of video Poor Heavy use of Image Display Poor Overall battery life Poor Low temperature/winter use Poor Infrequent use (without dock) Fair Infrequent use (with dock) Fair Want to recharge... Good Good Good Fair Fair Fair Good Good Recharging NiMH batteries You can recharge optional NiMH batteries with an optional HP quick recharger or with your HP quick recharger or HP Photosmart dock. Recharging NiMH batteries 43 For information about recharging NiMH batteries, as well as safety precautions when recharging, see the ...

User Guide
Page 47
... that can be stored in internal memory or on a memory card will vary depending on page 14), go to www.hp.com/support, select your language and region, enter your camera model number in the Search: Product field, click Product Information, then click Specifications. (continued) Compression format • &#...96 mm (W) by 24 mm (D) by 62 mm (H) (3.77 in by .94 in by 2.44 in) Weight 225 grams (7.93 ounces) without battery Power Power source: two AA batteries (Alkaline, Photo Lithium, or rechargeable NiMH) Temperature range Operational: 0° to 40° C (32° to 104° F) at 15...
... that can be stored in internal memory or on a memory card will vary depending on page 14), go to www.hp.com/support, select your language and region, enter your camera model number in the Search: Product field, click Product Information, then click Specifications. (continued) Compression format • &#...96 mm (W) by 24 mm (D) by 62 mm (H) (3.77 in by .94 in by 2.44 in) Weight 225 grams (7.93 ounces) without battery Power Power source: two AA batteries (Alkaline, Photo Lithium, or rechargeable NiMH) Temperature range Operational: 0° to 40° C (32° to 104° F) at 15...

User Guide
Page 48
...Back button 3 batteries conserving 41 install 4 performance 42 top points about use 41 battery door 4 Beach mode 14 borders 23 Burst setting 15, 17 C camera dimensions 45 parts 3, 4 specifications 44 turn on/off 4 weight 45 Camera Setup Menu 33 Camera Sounds 33 Close...digital zoom 12 dimensions 45 direct print 27 Display Brightness 33 Display Timeout 33 E e-mail images 31 exposure 11 F F-number 44 Favorites 21 flash red-eye reduction 13 setting 13 Flash button 3 focal length 44 focus auto focus 9 brackets 9 focus lock 11 optimizing 10 format memory card 6 G getting assistance 40 H HP Photosmart...
...Back button 3 batteries conserving 41 install 4 performance 42 top points about use 41 battery door 4 Beach mode 14 borders 23 Burst setting 15, 17 C camera dimensions 45 parts 3, 4 specifications 44 turn on/off 4 weight 45 Camera Setup Menu 33 Camera Sounds 33 Close...digital zoom 12 dimensions 45 direct print 27 Display Brightness 33 Display Timeout 33 E e-mail images 31 exposure 11 F F-number 44 Favorites 21 flash red-eye reduction 13 setting 13 Flash button 3 focal length 44 focus auto focus 9 brackets 9 focus lock 11 optimizing 10 format memory card 6 G getting assistance 40 H HP Photosmart...
User Guide
Page 49
... record video clips 9 red-eye removal 20 Region 5 remaining pictures count 8 removing red eyes 20 reviewing images 18 S safety precautions for batteries 41 selecting images for destinations 31 selecting images for printing 29 Self-Timer light 4 Self-Timer setting 14, 16 sending individual images 31 set... destinations 31 share pictures 29 Shutter button 3, 9 shutter speed 44 slideshow 21 Snow mode 14 software install 6 solving problems 34 sounds of camera 33 space remaining in memory 8 specifications 44 State Selector 3 Steady Photo mode 14 storage 44 Sunset mode 14 support process 40 T Theatre ...
... record video clips 9 red-eye removal 20 Region 5 remaining pictures count 8 removing red eyes 20 reviewing images 18 S safety precautions for batteries 41 selecting images for destinations 31 selecting images for printing 29 Self-Timer light 4 Self-Timer setting 14, 16 sending individual images 31 set... destinations 31 share pictures 29 Shutter button 3, 9 shutter speed 44 slideshow 21 Snow mode 14 software install 6 solving problems 34 sounds of camera 33 space remaining in memory 8 specifications 44 State Selector 3 Steady Photo mode 14 storage 44 Sunset mode 14 support process 40 T Theatre ...
Quick Start Guide
Page 3
English Contents 1 Getting started Viewing the electronic User Guide 4 Camera top and back 6 Camera front, side, and bottom 7 2 Setting up your camera Install the batteries 8 Turn on the camera 9 Choose the language 9 Set the region 9 Set the date and time 9 Install and format an optional memory card...........10 Install the software 11 Windows 11 ... images and video clips Review images and video clips 15 Delete an image 15 5 Transferring and printing images Transfer images 16 Print images from the camera 16 6 Camera quick reference 18 3
English Contents 1 Getting started Viewing the electronic User Guide 4 Camera top and back 6 Camera front, side, and bottom 7 2 Setting up your camera Install the batteries 8 Turn on the camera 9 Choose the language 9 Set the region 9 Set the date and time 9 Install and format an optional memory card...........10 Install the software 11 Windows 11 ... images and video clips Review images and video clips 15 Delete an image 15 5 Transferring and printing images Transfer images 16 Print images from the camera 16 6 Camera quick reference 18 3

Quick Start Guide
Page 4
... the essential features of the power indicator icons • Getting assistance from HP • Troubleshooting • Camera specifications Viewing the electronic User Guide The electronic User Guide is on page 4). For detailed information about camera features, see the electronic User Guide (see Viewing the electronic User Guide on the HP Photosmart Software CD. 4 HP Photosmart M730 series Digital Camera
... the essential features of the power indicator icons • Getting assistance from HP • Troubleshooting • Camera specifications Viewing the electronic User Guide The electronic User Guide is on page 4). For detailed information about camera features, see the electronic User Guide (see Viewing the electronic User Guide on the HP Photosmart Software CD. 4 HP Photosmart M730 series Digital Camera


