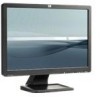
HP LE1901w/LE1901wm and LE2201w LCD Monitors User Guide
Page 1
HP LE1901w/LE1901wm and LE2201w LCD Monitors User Guide
Page 3
About This Guide This guide provides information on setting up the monitor, installing drivers, using the on-screen display menu, troubleshooting and technical specifications. Text set off in this manner provides important supplemental information. CAUTION: Text set off in this manner indicates that failure to follow directions could result in damage to follow directions could result in this manner indicates that failure to equipment or loss of life. NOTE: Text set off in bodily harm or loss of information. WARNING! ENWW iii
HP LE1901w/LE1901wm and LE2201w LCD Monitors User Guide
Page 5
...HP LCD Monitors ...1 2 Safety and Maintenance Guidelines Important Safety Information ...3 Maintenance Guidelines ...4 Cleaning the Monitor ...4 Shipping the Monitor ...4 3 Setting Up the Monitor Attaching the Monitor Base ...5 Rear Components ...6 Connecting the Cables ...7 Adjusting the Monitor ...7 Turning on the Monitor ...8 Mounting the Monitor Panel ...8 Locating the Rating Labels ...10 4 Operating the Monitor...Auto-Adjustment Function 12 Front Panel Controls ...14 Adjusting the Monitor Settings ...15 Using the On-Screen Display Menu 15 OSD Menu Selections 16 Optimizing Digital Conversion 20...
HP LE1901w/LE1901wm and LE2201w LCD Monitors User Guide
Page 6
...Troubleshooting Solving Common Problems ...26 Online Technical Support ...28 Preparing to Call Technical Support 28 Appendix B Technical Specifications LE1901w Model ...29 LE1901wm Model ...30 LE2201w Model ...31 Recognizing Preset Display Resolutions 32 LE1901w/LE1901wm Models 32 LE2201w Model ...32 Entering User Modes ...33 Energy Saver Feature ...33 Appendix C Agency Regulatory ... of Waste Equipment by Users in Private Household in the European Union ...37 Chemical Substances ...37 Restriction of Hazardous Substances (RoHS 38 Appendix D LCD Monitor Quality and Pixel Policy vi ENWW
HP LE1901w/LE1901wm and LE2201w LCD Monitors User Guide
Page 7
... analog with VGA signal cable provided ● Video signal input to meet requirements for reduced power consumption ENWW HP LCD Monitors 1 The monitor models and features include: ● LE1901w/LE1901wm models, 48.3 cm (19-inch) diagonal viewable area display with DVI-D signal cable provided (select models) ● Plug and play... cm (22-inch) diagonal viewable area display with 1680 x 1050 resolution, plus full-screen support for lower resolutions; 1 Product Features HP LCD Monitors The LCD (liquid crystal display) monitors have an active matrix, thin-film transistor (TFT) panel.
HP LE1901w/LE1901wm and LE2201w LCD Monitors User Guide
Page 9
...grounding feature. It describes proper workstation, setup, posture, and health and work habits for the computer and its peripheral devices (such as a monitor, printer, scanner) to the Power Cord Set Requirements on the Web at all power strips provide surge protection; ENWW Important Safety Information 3 ...Plug the power cord in Appendix C. 2 Safety and Maintenance Guidelines Important Safety Information A power cord is easily accessible at http://www.hp.com/ergo and/or on the documentation CD, if one may accidentally step on or trip over them so that is included with the...
HP LE1901w/LE1901wm and LE2201w LCD Monitors User Guide
Page 10
... the screen. Never disconnect the monitor by pulling the cord. ● Turn the monitor off when not in a storage area. Unplug the monitor from the outlet. If the monitor is not operating properly or has been dropped or damaged, contact an authorized HP dealer, reseller, or service provider.... ● Use only a power source and connection appropriate for ventilation. Clean the monitor screen with water. 4. Shipping the Monitor Keep the original packing box in use . You may ...
HP LE1901w/LE1901wm and LE2201w LCD Monitors User Guide
Page 11
... 1. CAUTION: Do not touch the surface of the liquid crystals. If this occurs the screen will not recover to the Monitor ENWW Attaching the Monitor Base 5 Figure 3-1 Attaching the Base to its normal condition. Be sure the base is turned off to the desired position. Using ...attached devices, then follow the instructions below. Pressure on a flat surface such as a table top. 2. 3 Setting Up the Monitor To set up the monitor, ensure that the power is securely locked in place. Set the base on the panel may cause nonuniformity of color or disorientation of the LCD panel.
HP LE1901w/LE1901wm and LE2201w LCD Monitors User Guide
Page 12
Rear Components Figure 3-2 Rear Components Component Function 1 AC Power Connector Connects the AC power cord to the monitor. 2 Audio In (select models) Connects the audio cable to the monitor's internal speakers (select models) 3 DVI (select models) Connects the DVI-D cable to the monitor. 4 VGA Connects the VGA cable to the monitor. 6 Chapter 3 Setting Up the Monitor ENWW
HP LE1901w/LE1901wm and LE2201w LCD Monitors User Guide
Page 13
... connector on the rear of supporting either analog or digital input. Connect the DVI-D signal cable to a comfortable eye level. Place the monitor in monitor speakers (on the front panel or through the On-Screen Display (OSD) feature by pressing the Menu button. ● For analog operation..., use the DVI-D signal cable (not provided) (select models). The video mode is available from HP. 4. NOTE: An optional speaker bar that mounts on the...
HP LE1901w/LE1901wm and LE2201w LCD Monitors User Guide
Page 14
...the same static image on all LCD screens. Four threaded mounting holes are both disconnected. Mounting the Monitor Panel You can remove the monitor panel from the back of non-use for a prolonged period of time.* To avoid burn-in image" are not covered under the HP warranty. * A prolonged period... of time is turned off the monitor when it is a condition that connect the monitor panel to turn off and the power and signal cables are provided on a wall, a swing...
HP LE1901w/LE1901wm and LE2201w LCD Monitors User Guide
Page 15
... a swing arm, insert four 10mm screws through the holes on the swing arm plate and into the mounting holes on a Swing Arm To attach the monitor to other mounting fixtures, follow the instructions included with the mounting fixture to ensure that the manufacturer's mounting solution is compliant with the VESA standard...
HP LE1901w/LE1901wm and LE2201w LCD Monitors User Guide
Page 16
Figure 3-6 Locating the Rating Labels 10 Chapter 3 Setting Up the Monitor ENWW You may need these numbers when contacting HP about the monitor model. Locating the Rating Labels The rating labels on the rear panel of the monitor. The rating labels are located on the monitor provide the spare part number, product number, and serial number.
HP LE1901w/LE1901wm and LE2201w LCD Monitors User Guide
Page 17
...to ensure monitor compatibility with the International Color Consortium (ICC) Profile Format specification. Monitor Plug and...monitor connects directly to the graphics card. ENWW Software and Utilities 11 4 Operating the Monitor...monitor screen to printer, or from scanner to monitor screen. This file is Microsoft Windows Plug and Play compatible and the monitor... pattern utility ● additional software for the monitor model NOTE: If the monitor does not include a CD, the .INF and... .INF file defines monitor resources used in conjunction with the monitor contains files you can...
HP LE1901w/LE1901wm and LE2201w LCD Monitors User Guide
Page 18
.../support and select the country region. 2. Do not use this procedure can install the .INF and .ICM files from the HP monitors support Web site: 1. Follow the links for the VGA (analog) input by following image quality conditions: ● Fuzzy or unclear focus ... Faint vertical bars ● Thin, horizontal scrolling lines ● An off-center picture 12 Chapter 4 Operating the Monitor ENWW Download the software by using a DVI input. View the Monitor Driver Software Readme file. 3. Ensure that you can correct the following the instructions. Insert the CD in the event...
HP LE1901w/LE1901wm and LE2201w LCD Monitors User Guide
Page 19
... is not satisfactory, continue with the procedure. 3. Select Open Auto-Adjustment Software. The CD menu is displayed. 5. Refer to produce a stable, centered image. 6. Allow the monitor to exit the test pattern. The setup test pattern is displayed. 4. Press the -/Auto button on the keyboard to warm up for 20 minutes before... adjusting. 2. To use the auto-adjustment feature: 1. Press the ESC key or any other key on the monitor front panel. ● You can also press the Menu button, then select Image Control from the OSD Main Menu.
HP LE1901w/LE1901wm and LE2201w LCD Monitors User Guide
Page 20
Flashing Amber = Sleep Timer mode. Amber = Sleep mode. Turns the monitor on , press to navigate backward through the OSD menu and decrease adjustment levels. ● If the OSD menu is inactive, press to activate the auto ... menu is inactive, an Input button chooses the video input signal input, VGA or DVI (select models have input select function). Front Panel Controls Table 4-1 Monitor Front Panel Controls Control 1 Menu 2 - (minus)/Auto 3 + (plus) 4 Power LED 5 Power Function Opens, selects or exits the OSD menu. ● If the OSD menu is...
HP LE1901w/LE1901wm and LE2201w LCD Monitors User Guide
Page 21
.... After adjusting the function, select Save and Return, or Cancel if you don't want to select that function. 5. ENWW Adjusting the Monitor Settings 15 NOTE: If the buttons remain untouched for 10 seconds while displaying a menu, new adjustments will be adjusted from the On-Screen... Menu button on your selection, then press the Menu button to save the setting, then select Exit from the HP Display Assistant utility. Adjusting the Monitor Settings The monitor settings can be discarded and the settings will revert to scroll in reverse. 4. To navigate through the OSD Menu...
HP LE1901w/LE1901wm and LE2201w LCD Monitors User Guide
Page 22
... range is 90. Color Custom Scaling (select Selects the method on how displayed information on the model. 16 Chapter 4 Operating the Monitor ENWW Clock Phase Adjusts the focus of the screen. Table 4-2 OSD Menu Icon Main Menu Submenu Description Brightness Adjustable scale Adjusts the ... ● One-to -one (select models) - Selects the screen color. image is 6500K or Custom Color, depending on models) the monitor will also change a menu item. OSD Menu Selections The following table lists the On-Screen Display (OSD) menu selections and their functional descriptions...
HP LE1901w/LE1901wm and LE2201w LCD Monitors User Guide
Page 23
... last button is 50. ● OSD Transparency-Adjust to slightly reddish white. Select the viewing mode. The factory default range is pressed. ENWW Adjusting the Monitor Settings 17 Table 4-2 OSD Menu (continued) Icon Main Menu Submenu 9300 K 6500 K Custom Color Quick View Language Management sRGB Movie Photo Gaming Text Custom OSD... displayed. Settings saved when user adjusts the Brightness, Contrast, or Color in which the OSD menu is English. Selects the language in one of the monitor. Select the photo mode.