
Setup Guide
Page 9
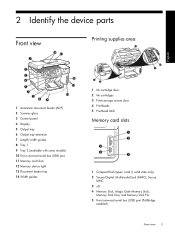
... serial bus (USB) port 11 Memory card slots 12 Memory device light 13 Document feeder tray 14 Width guides 1 Ink cartridge door 2 Ink cartridges 3 Print-carriage access door 4 Printheads 5 Printhead latch Memory card slots 1 Compact flash (types I and II, solid state only) 2 Secure Digital, MultimediaCard (MMC), Secure MMC 3 xD 4 Memory Stick...
... serial bus (USB) port 11 Memory card slots 12 Memory device light 13 Document feeder tray 14 Width guides 1 Ink cartridge door 2 Ink cartridges 3 Print-carriage access door 4 Printheads 5 Printhead latch Memory card slots 1 Compact flash (types I and II, solid state only) 2 Secure Digital, MultimediaCard (MMC), Secure MMC 3 xD 4 Memory Stick...
User Guide
Page 18
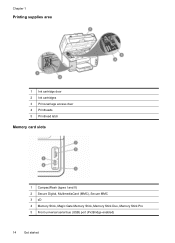
Chapter 1 Printing supplies area 1 Ink cartridge door 2 Ink cartridges 3 Print-carriage access door 4 Printheads 5 Printhead latch Memory card slots 1 CompactFlash (types I and II) 2 Secure Digital, MultimediaCard (MMC), Secure MMC 3 xD 4 Memory Stick, Magic Gate Memory Stick, Memory Stick Duo, Memory Stick Pro 5 Front universal serial bus (USB) port (PictBridge-enabled) 14 Get started
Chapter 1 Printing supplies area 1 Ink cartridge door 2 Ink cartridges 3 Print-carriage access door 4 Printheads 5 Printhead latch Memory card slots 1 CompactFlash (types I and II) 2 Secure Digital, MultimediaCard (MMC), Secure MMC 3 xD 4 Memory Stick, Magic Gate Memory Stick, Memory Stick Duo, Memory Stick Pro 5 Front universal serial bus (USB) port (PictBridge-enabled) 14 Get started
User Guide
Page 151
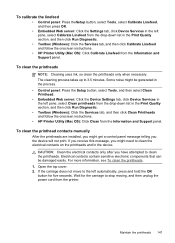
...the Services tab, and then click Calibrate Linefeed and follow the onscreen instructions. • HP Printer Utility (Mac OS): Click Clean from the Information and Support panel. Open the top cover. 2. If the carriage does not move to the left automatically, press and hold the OK button for the... carriage to 3.5 minutes. Some noise might need to clean the printheads. CAUTION: Clean the electrical contacts ...
...the Services tab, and then click Calibrate Linefeed and follow the onscreen instructions. • HP Printer Utility (Mac OS): Click Clean from the Information and Support panel. Open the top cover. 2. If the carriage does not move to the left automatically, press and hold the OK button for the... carriage to 3.5 minutes. Some noise might need to clean the printheads. CAUTION: Clean the electrical contacts ...
User Guide
Page 154
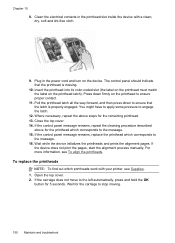
Insert the printhead into its color-coded slot (the label on the printhead must match the label on the ...printhead which corresponds to stop moving. 150 Maintain and troubleshoot Where necessary, repeat the above for 5 seconds. If the carriage does not move to engage the latch. 12. Wait for the remaining printhead. 13. If the control panel message ...the printhead latch). If the control panel message remains, repeat the cleaning procedure described above steps for the carriage to the message. 16. To replace the printheads NOTE: To find out which printheads work with a clean, dry...
Insert the printhead into its color-coded slot (the label on the printhead must match the label on the ...printhead which corresponds to stop moving. 150 Maintain and troubleshoot Where necessary, repeat the above for 5 seconds. If the carriage does not move to engage the latch. 12. Wait for the remaining printhead. 13. If the control panel message ...the printhead latch). If the control panel message remains, repeat the cleaning procedure described above steps for the carriage to the message. 16. To replace the printheads NOTE: To find out which printheads work with a clean, dry...
User Guide
Page 198
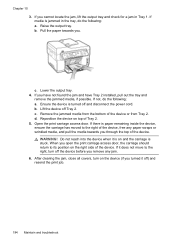
... of the device, free any jam. 6. If media is turned off Tray 2. Raise the output tray. If not, do the following : a. Open the print carriage access door. b. Lift the device off and disconnect the power cord. WARNING! Lower the output tray. 4. Remove the jammed media from the bottom of Tray...off ) and resend the print job. 194 Maintain and troubleshoot Pull the paper towards you turned it is on and the carriage is paper remaining inside the device, ensure the carriage has moved to its position on the device (if you through the top of the device. d. If it does not...
... of the device, free any jam. 6. If media is turned off Tray 2. Raise the output tray. If not, do the following : a. Open the print carriage access door. b. Lift the device off and disconnect the power cord. WARNING! Lower the output tray. 4. Remove the jammed media from the bottom of Tray...off ) and resend the print job. 194 Maintain and troubleshoot Pull the paper towards you turned it is on and the carriage is paper remaining inside the device, ensure the carriage has moved to its position on the device (if you through the top of the device. d. If it does not...
User Guide
Page 208
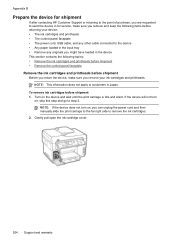
... and warranty NOTE: This information does not apply to step 2. NOTE: If the device does not turn on the device and wait until the print carriage is idle and silent. To remove ink cartridges before returning your ink cartridges and printheads. Turn on , skip this step and go to customers in... Japan. Appendix B Prepare the device for shipment If after contacting HP Customer Support or returning to the point of purchase, you are requested to send the device in for service, make sure you remove and keep...
... and warranty NOTE: This information does not apply to step 2. NOTE: If the device does not turn on the device and wait until the print carriage is idle and silent. To remove ink cartridges before returning your ink cartridges and printheads. Turn on , skip this step and go to customers in... Japan. Appendix B Prepare the device for shipment If after contacting HP Customer Support or returning to the point of purchase, you are requested to send the device in for service, make sure you remove and keep...
User Guide
Page 209
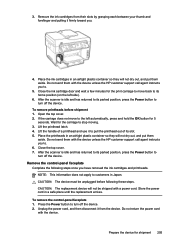
... position, press the Power button to . 5. Do not return the power cord with the device unless the HP customer support call agent instructs you to turn off the device. Prepare the device for the carriage to its slot. 5. Open the top cover. 2. Close the top cover. 7. Remove the control-panel ... with a power cord. Press the Power button to the left side). 6. Close the ink cartridge door and wait a few minutes for the print carriage to move to turn off the device. 2. Place the printheads in an airtight plastic container so they will not dry out, and put them aside...
... position, press the Power button to . 5. Do not return the power cord with the device unless the HP customer support call agent instructs you to turn off the device. Prepare the device for the carriage to its slot. 5. Open the top cover. 2. Close the top cover. 7. Remove the control-panel ... with a power cord. Press the Power button to the left side). 6. Close the ink cartridge door and wait a few minutes for the print carriage to move to turn off the device. 2. Place the printheads in an airtight plastic container so they will not dry out, and put them aside...
User Guide
Page 239
... settings 47 version 201 warranty 203 print quality diagnostic page 145 troubleshoot 162 Print quality diagnostic page 145 print-carriage access door, locating 14 printer driver accessories settings 22 settings 47 version 201 warranty 203 printhead latch, locating...part numbers 199 remove 204 replace 150 status 87, 97, 145 supported 208 troubleshoot 159 warranty 203 privacy, HP Instant Support 95 processor specifications 209 Proof Sheet button control panel button 17 proof sheet button 17 proof sheets...in memory 74 photos to a program 54 settings for 57 slow 170 Start Color Photo button 17 235
... settings 47 version 201 warranty 203 print quality diagnostic page 145 troubleshoot 162 Print quality diagnostic page 145 print-carriage access door, locating 14 printer driver accessories settings 22 settings 47 version 201 warranty 203 printhead latch, locating...part numbers 199 remove 204 replace 150 status 87, 97, 145 supported 208 troubleshoot 159 warranty 203 privacy, HP Instant Support 95 processor specifications 209 Proof Sheet button control panel button 17 proof sheet button 17 proof sheets...in memory 74 photos to a program 54 settings for 57 slow 170 Start Color Photo button 17 235


