Quick Setup Guide
Page 1
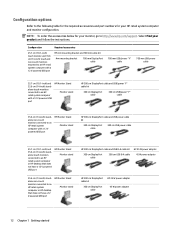
...Monitors attached to HP RP9 G1 Retail Systems HP L7014 Retail Point of Sale Monitors attached to HP RP9 G1 Retail Systems OR HP L7010t, L7014t, L7016t Retail Point of Sale Touch Monitors attached to HP RP5 or RP5800 Retail Systems, or an HP Desktop Mini OR HP L7014 Retail Point of Sale Monitors 39.6 cm/15.6-inch W0Q45AA HP... 300cm DisplayPort cable V4P97AA Arm mounting bracket 700 mm DisplayPort cable HP 300 cm DisplayPort ...
...Monitors attached to HP RP9 G1 Retail Systems HP L7014 Retail Point of Sale Monitors attached to HP RP9 G1 Retail Systems OR HP L7010t, L7014t, L7016t Retail Point of Sale Touch Monitors attached to HP RP5 or RP5800 Retail Systems, or an HP Desktop Mini OR HP L7014 Retail Point of Sale Monitors 39.6 cm/15.6-inch W0Q45AA HP... 300cm DisplayPort cable V4P97AA Arm mounting bracket 700 mm DisplayPort cable HP 300 cm DisplayPort ...

User Guide
Page 3
... in damage to property damage). IMPORTANT: Indicates information considered important but not hazard-related (for completing a task. About This Guide This guide provides information on monitor features, setting up the monitor, and technical specifications.
... in damage to property damage). IMPORTANT: Indicates information considered important but not hazard-related (for completing a task. About This Guide This guide provides information on monitor features, setting up the monitor, and technical specifications.
User Guide
Page 5
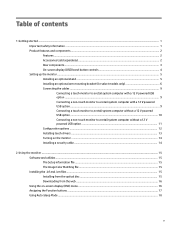
... models only 6 Connecting the cables ...9 Connecting a touch monitor to a retail system computer with a 12 V powered USB option ...9 Connecting a non-touch monitor to a retail system computer with a 12 V powered USB option ...9 Connecting a touch monitor to a retail system computer without a 12 V powered ...a 12 V powered USB option ...11 Configuration options ...12 Installing touch drivers ...13 Turning on the monitor ...14 Installing a security cable ...14 2 Using the monitor ...15 Software and utilities ...15 The Setup information file ...15 The Image Color Matching file ...15 Installing...
... models only 6 Connecting the cables ...9 Connecting a touch monitor to a retail system computer with a 12 V powered USB option ...9 Connecting a non-touch monitor to a retail system computer with a 12 V powered USB option ...9 Connecting a touch monitor to a retail system computer without a 12 V powered ...a 12 V powered USB option ...11 Configuration options ...12 Installing touch drivers ...13 Turning on the monitor ...14 Installing a security cable ...14 2 Using the monitor ...15 Software and utilities ...15 The Setup information file ...15 The Image Color Matching file ...15 Installing...
User Guide
Page 6
... lockouts ...20 Product support ...21 Preparing to call technical support ...21 Locating the serial number and product number 22 4 Maintaining the monitor ...23 Maintenance guidelines ...23 Cleaning the monitor ...23 Shipping the monitor ...23 Appendix A Technical specifications ...24 25.7 cm/10.1-inch model ...24 35.6 cm/14-inch model ...24 39.6 cm/15...
... lockouts ...20 Product support ...21 Preparing to call technical support ...21 Locating the serial number and product number 22 4 Maintaining the monitor ...23 Maintenance guidelines ...23 Cleaning the monitor ...23 Shipping the monitor ...23 Appendix A Technical specifications ...24 25.7 cm/10.1-inch model ...24 35.6 cm/14-inch model ...24 39.6 cm/15...
User Guide
Page 7
...• Plug the power cord into a grounded (earthed) 3-pin outlet. Consider placing the monitor in your safety, do not place anything on the power label to properly support your HP LCD monitor. Look on power cords or cables. Do not disable the power cord grounding pin, for computer.... NOTE: This product is easily accessible at http://www.hp.com/ergo. Not all power cords for entertainment purposes. If another cord is an important safety feature. For your documentation kit. WARNING! Install the monitor near an AC outlet that is suitable for the computer and...
...• Plug the power cord into a grounded (earthed) 3-pin outlet. Consider placing the monitor in your safety, do not place anything on the power label to properly support your HP LCD monitor. Look on power cords or cables. Do not disable the power cord grounding pin, for computer.... NOTE: This product is easily accessible at http://www.hp.com/ergo. Not all power cords for entertainment purposes. If another cord is an important safety feature. For your documentation kit. WARNING! Install the monitor near an AC outlet that is suitable for the computer and...
User Guide
Page 8
... cable ● On-screen display (OSD) adjustments in several languages for easy setup and screen optimization ● HP Display Assistant for adjusting monitor settings and enabling theft deterrence feature (refer to the Product Notices provided on the optical disc included with 1366 x...image size while preserving original aspect ratio ● 39.6 cm (15.6-inch) touch monitor with your monitor or at http://www.hp.com/ support). ● Software and documentation disc that includes monitor drivers and product documentation ● Energy saver feature to meet requirements for reduced power...
... cable ● On-screen display (OSD) adjustments in several languages for easy setup and screen optimization ● HP Display Assistant for adjusting monitor settings and enabling theft deterrence feature (refer to the Product Notices provided on the optical disc included with 1366 x...image size while preserving original aspect ratio ● 39.6 cm (15.6-inch) touch monitor with your monitor or at http://www.hp.com/ support). ● Software and documentation disc that includes monitor drivers and product documentation ● Energy saver feature to meet requirements for reduced power...

User Guide
Page 9
... for 25.7 cm (10.1-inch), 35.6 cm (14-inch), and 39.6 cm (15.6-inch) touch monitors ● HP 300 cm DisplayPort cable and USB power cable kit for the 35.6 cm (14-inch) non-touch monitor ● HP 300 cm DisplayPort cable and USB B-A cable kit for 25.7 cm (10.1-inch), 35.6 cm (14...-inch), and 39.6 cm (15.6-inch) touch monitors ● HP 45 W power adapter Rear components Component Function (1) USB 2.0 Type-B upstream port (touch...
... for 25.7 cm (10.1-inch), 35.6 cm (14-inch), and 39.6 cm (15.6-inch) touch monitors ● HP 300 cm DisplayPort cable and USB power cable kit for the 35.6 cm (14-inch) non-touch monitor ● HP 300 cm DisplayPort cable and USB B-A cable kit for 25.7 cm (10.1-inch), 35.6 cm (14...-inch), and 39.6 cm (15.6-inch) touch monitors ● HP 45 W power adapter Rear components Component Function (1) USB 2.0 Type-B upstream port (touch...
User Guide
Page 11
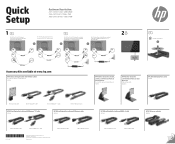
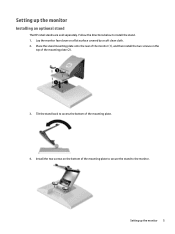
Place the stand mounting plate onto the rear of the monitor (1), and then install the two screws on the top of the mounting plate. 4. Setting up the monitor Installing an optional stand The HP retail stands are sold separately. Tilt the stand back to access the bottom of the mounting plate (2). 3. Follow the directions below to the monitor. Lay the monitor face down on the bottom of the mounting plate to secure the stand to install the stand. 1. Setting up the monitor 5 Install the two screws on a flat surface covered by a soft clean cloth. 2.
Place the stand mounting plate onto the rear of the monitor (1), and then install the two screws on the top of the mounting plate. 4. Setting up the monitor Installing an optional stand The HP retail stands are sold separately. Tilt the stand back to access the bottom of the mounting plate (2). 3. Follow the directions below to the monitor. Lay the monitor face down on the bottom of the mounting plate to secure the stand to install the stand. 1. Setting up the monitor 5 Install the two screws on a flat surface covered by a soft clean cloth. 2.
User Guide
Page 12
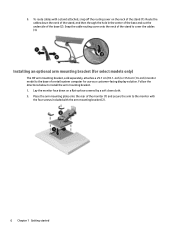
... as a customer-facing display solution. Route the cables down on the neck of the stand (1). Snap the cable routing cover onto the neck of the monitor (1) and secure the arm to the base of the base (2). Follow the directions below to cover the cables (3). Lay the... of the base and out the underside of a retail system computer for select models only) The HP arm mounting bracket, sold separately, attaches a 25.7 cm (10.1-inch) or 35.6 cm (14-inch) monitor model to the monitor with the four screws included with a stand attached, snap off the routing cover on a flat surface...
... as a customer-facing display solution. Route the cables down on the neck of the stand (1). Snap the cable routing cover onto the neck of the monitor (1) and secure the arm to the base of the base (2). Follow the directions below to cover the cables (3). Lay the... of the base and out the underside of a retail system computer for select models only) The HP arm mounting bracket, sold separately, attaches a 25.7 cm (10.1-inch) or 35.6 cm (14-inch) monitor model to the monitor with the four screws included with a stand attached, snap off the routing cover on a flat surface...

User Guide
Page 13
... the front of the retail system computer base (1), and then secure the bracket with the screw (2). Route the cables through the center retainer on the monitor. Slide the arm mounting bracket onto the underside of the arm (1) and attach the cables to the rear I/O on the arm (2) and then through the... onto the arm to cover the cables (4). 4. Lay the retail system computer face down on a flat surface covered by a soft clean cloth. 5. Setting up the monitor 7
... the front of the retail system computer base (1), and then secure the bracket with the screw (2). Route the cables through the center retainer on the monitor. Slide the arm mounting bracket onto the underside of the arm (1) and attach the cables to the rear I/O on the arm (2) and then through the... onto the arm to cover the cables (4). 4. Lay the retail system computer face down on a flat surface covered by a soft clean cloth. 5. Setting up the monitor 7

User Guide
Page 14
NOTE: For more information on connecting the cables to the retail system computer, refer to the retail system computer's rear I/O. Route the cables from the monitor's arm mounting bracket up through the center hole in the base of the retail system computer and connect the cables to the documentation included with the computer. 8 Chapter 1 Getting started 6.
NOTE: For more information on connecting the cables to the retail system computer, refer to the retail system computer's rear I/O. Route the cables from the monitor's arm mounting bracket up through the center hole in the base of the retail system computer and connect the cables to the documentation included with the computer. 8 Chapter 1 Getting started 6.

User Guide
Page 15
... a retail system computer with a 12 V powered USB option), connect the following cables. ● DisplayPort cable - Setting up the monitor with a 12 V powered USB option If you are available from HP. Connecting a non-touch monitor to the retail system computer (with a 12 V powered USB option, connect the following cables. ● DisplayPort cable - See Configuration...
... a retail system computer with a 12 V powered USB option), connect the following cables. ● DisplayPort cable - Setting up the monitor with a 12 V powered USB option If you are available from HP. Connecting a non-touch monitor to the retail system computer (with a 12 V powered USB option, connect the following cables. ● DisplayPort cable - See Configuration...

User Guide
Page 16
... - Connect the barrel end of the power cable to the power connector on the rear of the monitor and connect the powered USB end of the cable to a retail system computer or HP desktop computer that does not have a 12 V powered USB port, connect the following cables. ●...; DisplayPort cable - Connecting a touch monitor to a retail system computer without a 12 V powered USB option If you are using a touch monitor as a stand-alone display connected to ...
... - Connect the barrel end of the power cable to the power connector on the rear of the monitor and connect the powered USB end of the cable to a retail system computer or HP desktop computer that does not have a 12 V powered USB port, connect the following cables. ●...; DisplayPort cable - Connecting a touch monitor to a retail system computer without a 12 V powered USB option If you are using a touch monitor as a stand-alone display connected to ...

User Guide
Page 17
...AC outlet. Connect the DC end of the 45 W power adapter cable to the rear of the monitor and connect the AC power cable to the power adapter and to a retail system computer or HP desktop computer that does not have a 12 V powered USB port, connect the following cables. ●... DisplayPort cable - Setting up the monitor 11 Connecting a non-touch monitor to a retail system computer without a 12 V powered USB option If ...
...AC outlet. Connect the DC end of the 45 W power adapter cable to the rear of the monitor and connect the AC power cable to the power adapter and to a retail system computer or HP desktop computer that does not have a 12 V powered USB port, connect the following cables. ●... DisplayPort cable - Setting up the monitor 11 Connecting a non-touch monitor to a retail system computer without a 12 V powered USB option If ...
User Guide
Page 18
...700 mm USB power cable 25.7 cm (10.1-inch) and 35.6 cm (14-inch) standalone touch monitors connected to an HP retail system computer with a 12 V powered USB port HP Monitor Stand Monitor stand HP 300 cm DisplayPort cable and USB/power "Y" cable kit 300 cm DisplayPort cable 300 cm USB/power "Y"... cable 35.6 cm (14-inch) standalone non-touch monitor connected to an HP retail system computer with a 12 V powered USB port HP Monitor Stand Monitor stand HP 300 cm DisplayPort cable and USB power cable kit 300 cm DisplayPort cable 300 cm USB power ...
...700 mm USB power cable 25.7 cm (10.1-inch) and 35.6 cm (14-inch) standalone touch monitors connected to an HP retail system computer with a 12 V powered USB port HP Monitor Stand Monitor stand HP 300 cm DisplayPort cable and USB/power "Y" cable kit 300 cm DisplayPort cable 300 cm USB/power "Y"... cable 35.6 cm (14-inch) standalone non-touch monitor connected to an HP retail system computer with a 12 V powered USB port HP Monitor Stand Monitor stand HP 300 cm DisplayPort cable and USB power cable kit 300 cm DisplayPort cable 300 cm USB power ...
User Guide
Page 19
...the "beep on touch" for the 25.7 cm (10.1-inch), 35.6 cm (14-inch), and 39.6 cm (15.6-inch) touch monitors, you can download the latest driver from the HP support website. The driver may be included on -screen instructions to download the driver. Select Find your product and follow the...DisplayPort cable 300 cm USB/power "Y" cable 39.6 cm (15.6-inch) stand-alone touch monitor connected to an HP retail system computer or HP desktop that does not have a 12 V powered USB port HP Compact Stand Compact stand HP 300 cm DisplayPort cable and USB B-A cable kit 300 cm DisplayPort cable 300 cm USB...
...the "beep on touch" for the 25.7 cm (10.1-inch), 35.6 cm (14-inch), and 39.6 cm (15.6-inch) touch monitors, you can download the latest driver from the HP support website. The driver may be included on -screen instructions to download the driver. Select Find your product and follow the...DisplayPort cable 300 cm USB/power "Y" cable 39.6 cm (15.6-inch) stand-alone touch monitor connected to an HP retail system computer or HP desktop that does not have a 12 V powered USB port HP Compact Stand Compact stand HP 300 cm DisplayPort cable and USB B-A cable kit 300 cm DisplayPort cable 300 cm USB...
User Guide
Page 20
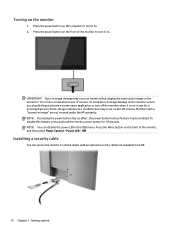
... optional security cable lock available from HP. 14 Chapter 1 Getting started To disable this feature, press and hold the monitor power button for 12 or more consecutive hours of the monitor to turn off the monitor when it on the monitor 1. Installing a security cable You can disable the power LED ... screens. Press the Menu button on . NOTE: You can secure the monitor to a fixed object with a "burned-in image" are not covered under the HP warranty. Turning on . 2. To avoid burn-in use for a prolonged period of the monitor, and then select Power Control > Power LED > Off. Press the...
... optional security cable lock available from HP. 14 Chapter 1 Getting started To disable this feature, press and hold the monitor power button for 12 or more consecutive hours of the monitor to turn off the monitor when it on the monitor 1. Installing a security cable You can disable the power LED ... screens. Press the Menu button on . NOTE: You can secure the monitor to a fixed object with a "burned-in image" are not covered under the HP warranty. Turning on . 2. To avoid burn-in use for a prolonged period of the monitor, and then select Power Control > Power LED > Off. Press the...
User Guide
Page 21
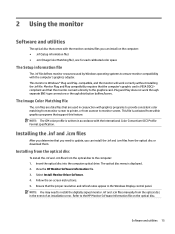
... Windows operating systems to ensure monitor compatibility with graphics programs to provide consistent color matching from monitor screen to printer, or from scanner to monitor screen. Installing the .inf and .icm files After you determine that you need to the HP Monitor Software Information file on the ... utilities The optical disc that comes with the monitor contains files you can install the .inf and .icm files from the optical disc or download them. View the HP Monitor Software Information file. 3. compliant and that the monitor connects directly to the graphics card. NOTE: ...
... Windows operating systems to ensure monitor compatibility with graphics programs to provide consistent color matching from monitor screen to printer, or from scanner to monitor screen. Installing the .inf and .icm files After you determine that you need to the HP Monitor Software Information file on the ... utilities The optical disc that comes with the monitor contains files you can install the .inf and .icm files from the optical disc or download them. View the HP Monitor Software Information file. 3. compliant and that the monitor connects directly to the graphics card. NOTE: ...
User Guide
Page 22
... open the OSD. 3. Adjusts the video input signal. Adjusts the on the monitor's bezel. You can download the latest version of .inf and .icm files from the HP monitors support web site. 1. Exits the OSD menu screen. 16 Chapter 2 Using the monitor Selects and adjusts the screen color. Downloading from the web If you...
... open the OSD. 3. Adjusts the video input signal. Adjusts the on the monitor's bezel. You can download the latest version of .inf and .icm files from the HP monitors support web site. 1. Exits the OSD menu screen. 16 Chapter 2 Using the monitor Selects and adjusts the screen color. Downloading from the web If you...

User Guide
Page 24
...Sleep Mode that allows you activate the mouse or keyboard). When Auto-Sleep Mode is turned off, and the power LED indicator turns amber. The monitor will enter a reduced power state when the host computer signals low power mode (absence of power when in the OSD. In the OSD menu ...select Power Control > Auto-Sleep Mode > Off. 18 Chapter 2 Using the monitor The monitor draws less than 0.5 W of either horizontal or vertical sync signal). Press one of the four OSD bezel buttons to activate the buttons, and then press...
...Sleep Mode that allows you activate the mouse or keyboard). When Auto-Sleep Mode is turned off, and the power LED indicator turns amber. The monitor will enter a reduced power state when the host computer signals low power mode (absence of power when in the OSD. In the OSD menu ...select Power Control > Auto-Sleep Mode > Off. 18 Chapter 2 Using the monitor The monitor draws less than 0.5 W of either horizontal or vertical sync signal). Press one of the four OSD bezel buttons to activate the buttons, and then press...