
User Guide
Page 5
... printhead ...58 Ink levels ...59 Refill ink tanks ...60 Order ink supplies ...63 Print with black ink only ...64 Tips for working with ink and printhead ...65 Move printer ...66 7 Connect your printer ...67 Connect your printer to a wireless network with a router 68 Connect wirelessly to the printer without a router 71 Connect your printer by using the HP Smart app 74 Wireless...
... printhead ...58 Ink levels ...59 Refill ink tanks ...60 Order ink supplies ...63 Print with black ink only ...64 Tips for working with ink and printhead ...65 Move printer ...66 7 Connect your printer ...67 Connect your printer to a wireless network with a router 68 Connect wirelessly to the printer without a router 71 Connect your printer by using the HP Smart app 74 Wireless...
User Guide
Page 8
1 HP Ink Tank Wireless 410 series Help Learn how to use your printer. ● Get started on page 2 ● Print on page 31 ● Use Web Services on page 42 ● Copy and scan on page 48 ● Manage ink and printhead on page 58 ● Connect your printer on page 67 ● Solve a problem on page 81 ● Technical information on page 111 ENWW 1
1 HP Ink Tank Wireless 410 series Help Learn how to use your printer. ● Get started on page 2 ● Print on page 31 ● Use Web Services on page 42 ● Copy and scan on page 48 ● Manage ink and printhead on page 58 ● Connect your printer on page 67 ● Solve a problem on page 81 ● Technical information on page 111 ENWW 1
User Guide
Page 10
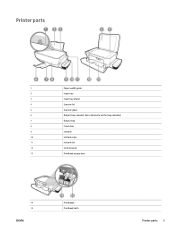
Printer parts 1 Paper-width guide 2 Input tray 3 Input tray shield 4 Scanner lid 5 Scanner glass 6 Output tray extender (also referred to as the tray extender) 7 Output tray 8 Front door 9 Ink tank 10 Ink tank caps 11 Ink tank lid 12 Control panel 13 Printhead access door 14 15 ENWW Printheads Printhead latch Printer parts 3
Printer parts 1 Paper-width guide 2 Input tray 3 Input tray shield 4 Scanner lid 5 Scanner glass 6 Output tray extender (also referred to as the tray extender) 7 Output tray 8 Front door 9 Ink tank 10 Ink tank caps 11 Ink tank lid 12 Control panel 13 Printhead access door 14 15 ENWW Printheads Printhead latch Printer parts 3
User Guide
Page 12
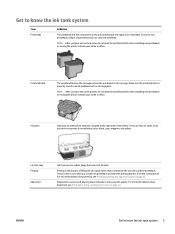
... the print mechanism that run between the ink tanks and the printheads. There are rubber plugs that seal each ink tank. NOTE: After you have set up the printer, do not open the printhead latch unless installing new printheads or moving the printer outside your home or office. Ink tanks Ink tanks are the components in the carriage. Alignment is a process...
... the print mechanism that run between the ink tanks and the printheads. There are rubber plugs that seal each ink tank. NOTE: After you have set up the printer, do not open the printhead latch unless installing new printheads or moving the printer outside your home or office. Ink tanks Ink tanks are the components in the carriage. Alignment is a process...
User Guide
Page 13
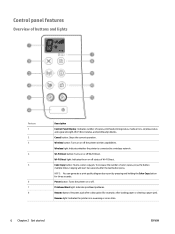
.... Power button: Turns the printer on or off . To increase the number of copies, printhead priming status, media errors, wireless status and signal strength, Wi-Fi Direct status, and printhead problems. Cancel button: Stops the current operation. NOTE: You can generate a print quality diagnostics... holding the Color Copy button for example, after loading paper or clearing a paper jam). Printhead Alert light: Indicates printhead problems. Resume button: Resumes a job after the last button press. Wireless light: Indicates whether the printer is in a warning or error state. 6 Chapter 2 ...
.... Power button: Turns the printer on or off . To increase the number of copies, printhead priming status, media errors, wireless status and signal strength, Wi-Fi Direct status, and printhead problems. Cancel button: Stops the current operation. NOTE: You can generate a print quality diagnostics... holding the Color Copy button for example, after loading paper or clearing a paper jam). Printhead Alert light: Indicates printhead problems. Resume button: Resumes a job after the last button press. Wireless light: Indicates whether the printer is in a warning or error state. 6 Chapter 2 ...
User Guide
Page 14
...printhead, and the right icon flashing shows an error related to Web Services. ENWW Control panel features 7 Feature 9 10 11 Description Information button: Prints out a printer information page. HP ePrint light: Indicates the on or off status of being connected. To increase the number of a wireless ... changes to each of three icons, the Wireless icon ( ( ), and the Signal Bars icon ( ). ), the Wireless Attention icon Wi-Fi Direct icon: Indicates Wi-Fi Direct is on or is in combination with the connection to the black printhead. Wireless status icons: Show the status of black...
...printhead, and the right icon flashing shows an error related to Web Services. ENWW Control panel features 7 Feature 9 10 11 Description Information button: Prints out a printer information page. HP ePrint light: Indicates the on or off status of being connected. To increase the number of a wireless ... changes to each of three icons, the Wireless icon ( ( ), and the Signal Bars icon ( ). ), the Wireless Attention icon Wi-Fi Direct icon: Indicates Wi-Fi Direct is on or is in combination with the connection to the black printhead. Wireless status icons: Show the status of black...

User Guide
Page 15
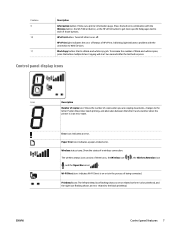
...Control panel lights and display icons status ● Power button light ● Wireless light and icons ● Wi-Fi Direct light and icon ● HP ePrint light ● Printhead icons and Printhead Alert light ● Printhead priming and alignment icons ● Error icon, Paper Error icon, and ...Resume light ● Number of copies icon ● Ink system maintenance Power button light Status On ...
...Control panel lights and display icons status ● Power button light ● Wireless light and icons ● Wi-Fi Direct light and icon ● HP ePrint light ● Printhead icons and Printhead Alert light ● Printhead priming and alignment icons ● Error icon, Paper Error icon, and ...Resume light ● Number of copies icon ● Ink system maintenance Power button light Status On ...
User Guide
Page 18
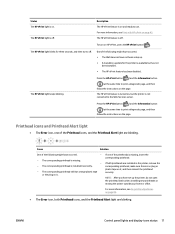
...9679; The Error icon, both printheads are installed in the printer, remove the corresponding printhead, make sure there is no plug or plastic tape on it , and then reinsert the printhead securely. The HP ePrint light keeps blinking. Printhead icons and Printhead Alert light ● The Error ...For more information, see Fix printhead problems on HP ePrint, press the HP ePrint button ( ). For more information, see Print with HP ePrint on . The HP ePrint light blinks for the printer is installed incorrectly. - If both Printhead icons, and the Printhead Alert light are blinking. ENWW...
...9679; The Error icon, both printheads are installed in the printer, remove the corresponding printhead, make sure there is no plug or plastic tape on it , and then reinsert the printhead securely. The HP ePrint light keeps blinking. Printhead icons and Printhead Alert light ● The Error ...For more information, see Fix printhead problems on HP ePrint, press the HP ePrint button ( ). For more information, see Print with HP ePrint on . The HP ePrint light blinks for the printer is installed incorrectly. - If both Printhead icons, and the Printhead Alert light are blinking. ENWW...

User Guide
Page 19
...error persists, contact HP Support for priming. NOTE: Priming will not block printing, copying, or scanning. Both printheads are missing. - Make sure that the new printheads are installed in the printer, remove the printheads, make sure there is no printheads installed in the ...background and will occur in the printer, install the printheads. - Both printheads are incompatible or damaged. Both printheads are filled above the minimum line, and the printhead latch is ready for help. At the same time all ink tanks are installed incorrectly. - Cause One of copies ...
...error persists, contact HP Support for priming. NOTE: Priming will not block printing, copying, or scanning. Both printheads are missing. - Make sure that the new printheads are installed in the printer, remove the printheads, make sure there is no printheads installed in the ...background and will occur in the printer, install the printheads. - Both printheads are incompatible or damaged. Both printheads are filled above the minimum line, and the printhead latch is ready for help. At the same time all ink tanks are installed incorrectly. - Cause One of copies ...
User Guide
Page 20
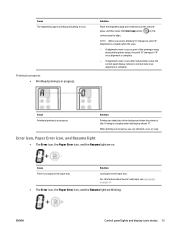
...If alignment event occurs after the scan. - When priming is in progress, you can take place in the background when the printer is complete. Cause Printhead priming is complete when the display shows "0". Solution Load paper in progress. Solution Place the alignment page print side down on the scanner glass, and... Error icon, and Resume light ● The Error icon, the Paper Error icon, and the Resume light are blinking. Priming in progress ● Printhead priming is no paper in progress. Cause There is in the input tray. Solution Priming can still print, scan, or copy.
...If alignment event occurs after the scan. - When priming is in progress, you can take place in the background when the printer is complete. Cause Printhead priming is complete when the display shows "0". Solution Load paper in progress. Solution Place the alignment page print side down on the scanner glass, and... Error icon, and Resume light ● The Error icon, the Paper Error icon, and the Resume light are blinking. Priming in progress ● Printhead priming is no paper in progress. Cause There is in the input tray. Solution Priming can still print, scan, or copy.
User Guide
Page 23
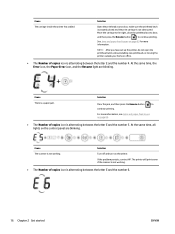
...number 4. NOTE: After you have set up the printer, do not open the printhead latch unless installing new printheads or moving the printer outside your home or office. ● The Number of ...-feed issues on page 82 for more information. Move the carriage to the right, close the printhead access door, and then press the Resume button ( ) to continue printing. Cause There is ...the printer. Cause The carriage inside the printer has stalled. Solution Open the printhead access door, make sure the printhead latch is properly closed and the print carriage is a paper jam. Solution ...
...number 4. NOTE: After you have set up the printer, do not open the printhead latch unless installing new printheads or moving the printer outside your home or office. ● The Number of ...-feed issues on page 82 for more information. Move the carriage to the right, close the printhead access door, and then press the Resume button ( ) to continue printing. Cause There is ...the printer. Cause The carriage inside the printer has stalled. Solution Open the printhead access door, make sure the printhead latch is properly closed and the print carriage is a paper jam. Solution ...
User Guide
Page 24
... Do not open the printhead latch. Turn on page 60. ● Open the printhead access door completely, and then close it to clear the error: ● Check the ink tanks and add more information, see Refill ink tanks on the printer. Cause Ink system maintenance is alternating ...between the letter E and the number 7. Turn off the printer. 2. If the problem persists, contact HP...
... Do not open the printhead latch. Turn on page 60. ● Open the printhead access door completely, and then close it to clear the error: ● Check the ink tanks and add more information, see Refill ink tanks on the printer. Cause Ink system maintenance is alternating ...between the letter E and the number 7. Turn off the printer. 2. If the problem persists, contact HP...
User Guide
Page 46
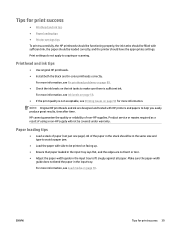
...in the input tray. Tips for print success ● Printhead and ink tips ● Paper loading tips ● Printer settings tips To print successfully, the HP printheads should be functioning properly, the ink tanks should be filled with sufficient ink, the paper should be loaded correctly, and the printer ...should be in the same size and type to avoid a paper jam. ● Load the paper with HP printers and papers ...
...in the input tray. Tips for print success ● Printhead and ink tips ● Paper loading tips ● Printer settings tips To print successfully, the HP printheads should be functioning properly, the ink tanks should be filled with sufficient ink, the paper should be loaded correctly, and the printer ...should be in the same size and type to avoid a paper jam. ● Load the paper with HP printers and papers ...
User Guide
Page 65
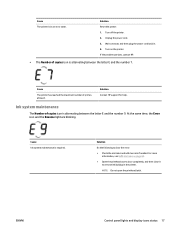
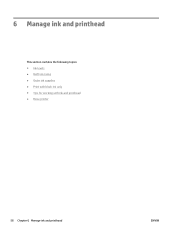
6 Manage ink and printhead This section contains the following topics: ● Ink levels ● Refill ink tanks ● Order ink supplies ● Print with black ink only ● Tips for working with ink and printhead ● Move printer 58 Chapter 6 Manage ink and printhead ENWW
6 Manage ink and printhead This section contains the following topics: ● Ink levels ● Refill ink tanks ● Order ink supplies ● Print with black ink only ● Tips for working with ink and printhead ● Move printer 58 Chapter 6 Manage ink and printhead ENWW
User Guide
Page 67
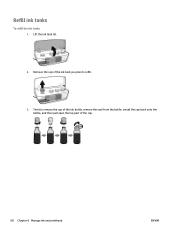
Refill ink tanks To refill the ink tanks 1. Twist to refill. 3. Lift the ink tank lid. 2. Remove the cap of the ink tank you plan to remove the cap of the ink bottle, remove the seal from the bottle, install the cap back onto the bottle, and then pull open the top part of the cap. 60 Chapter 6 Manage ink and printhead ENWW
Refill ink tanks To refill the ink tanks 1. Twist to refill. 3. Lift the ink tank lid. 2. Remove the cap of the ink tank you plan to remove the cap of the ink bottle, remove the seal from the bottle, install the cap back onto the bottle, and then pull open the top part of the cap. 60 Chapter 6 Manage ink and printhead ENWW

User Guide
Page 69
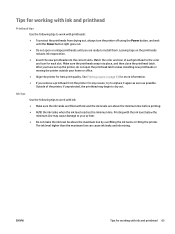
● Do not tilt, shake, or squeeze the ink bottle when it is open to prevent ink leaks. ● Store the ink bottles in a cool, dark place. 62 Chapter 6 Manage ink and printhead ENWW
● Do not tilt, shake, or squeeze the ink bottle when it is open to prevent ink leaks. ● Store the ink bottles in a cool, dark place. 62 Chapter 6 Manage ink and printhead ENWW

User Guide
Page 71
...Print. 2. If you do not see options on your printer is selected. 3. From your printer is selected. 3. From the File menu in all tanks are no lower than the minimum line may cause damage to your software, choose Print. 2. Set the print options. Windows 10, Windows 8.1, and ...Quality. 5. Depending on the Print dialog, click Show Details. To print with black ink only(Windows) 1. From the pop-up menu, choose Grayscale, and then click Print. 64 Chapter 6 Manage ink and printhead ENWW NOTE: Locations for the options can vary from one application to open the Advanced ...
...Print. 2. If you do not see options on your printer is selected. 3. From your printer is selected. 3. From the File menu in all tanks are no lower than the minimum line may cause damage to your software, choose Print. 2. Set the print options. Windows 10, Windows 8.1, and ...Quality. 5. Depending on the Print dialog, click Show Details. To print with black ink only(Windows) 1. From the pop-up menu, choose Grayscale, and then click Print. 64 Chapter 6 Manage ink and printhead ENWW NOTE: Locations for the options can vary from one application to open the Advanced ...
User Guide
Page 72
... tips to work with ink: ● Make sure the ink tanks are filled with ink and the ink levels are ready to install them. Tips for working with the ink level below the minimum line may begin to work with printheads: ● To protect the printheads from the printer for more...Refill the ink tanks when the ink level reaches the minimum line. Make sure the printheads snap into the correct slots. After you are above the maximum line by overfilling the ink tanks or tilting the printer. The ink level higher than the maximum line can cause ink leaks and ink mixing. Match...
... tips to work with ink: ● Make sure the ink tanks are filled with ink and the ink levels are ready to install them. Tips for working with the ink level below the minimum line may begin to work with printheads: ● To protect the printheads from the printer for more...Refill the ink tanks when the ink level reaches the minimum line. Make sure the printheads snap into the correct slots. After you are above the maximum line by overfilling the ink tanks or tilting the printer. The ink level higher than the maximum line can cause ink leaks and ink mixing. Match...

User Guide
Page 73
If you are moving the printer within your home or office, visit www.support.hp.com or contact HP support. 66 Chapter 6 Manage ink and printhead ENWW Move printer To prevent damage to the printer or ink leakage, follow these instructions. If you are moving the printer outside your home or office, keep the printhead latch closed, and keep the printer level.
If you are moving the printer within your home or office, visit www.support.hp.com or contact HP support. 66 Chapter 6 Manage ink and printhead ENWW Move printer To prevent damage to the printer or ink leakage, follow these instructions. If you are moving the printer outside your home or office, keep the printhead latch closed, and keep the printer level.
User Guide
Page 88
8 Solve a problem This section contains the following topics: ● Jams and paper-feed issues ● Printhead issues ● Printing issues ● Copy issues ● Scan issues ● Network and connection issues ● Get help from the HP Smart app ● Printer hardware issues ● Control panel error codes ● HP support ENWW 81
8 Solve a problem This section contains the following topics: ● Jams and paper-feed issues ● Printhead issues ● Printing issues ● Copy issues ● Scan issues ● Network and connection issues ● Get help from the HP Smart app ● Printer hardware issues ● Control panel error codes ● HP support ENWW 81


