
Upgrading and Servicing Guide
Page 5
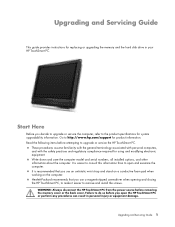
...recommended that you decide to upgrade or service the computer, refer to open the HP TouchSmart PC or perform any procedures can result in your HP TouchSmart PC. WARNING: Always disconnect the HP TouchSmart PC from the power source before removing the memory cover or the back cover. ...compliance required for product information. It is easier to consult this information than to the product specifications for replacing or upgrading the memory and the hard disk drive in personal injury or equipment damage. Write down and save the computer model and serial numbers, all ...
...recommended that you decide to upgrade or service the computer, refer to open the HP TouchSmart PC or perform any procedures can result in your HP TouchSmart PC. WARNING: Always disconnect the HP TouchSmart PC from the power source before removing the memory cover or the back cover. ...compliance required for product information. It is easier to consult this information than to the product specifications for replacing or upgrading the memory and the hard disk drive in personal injury or equipment damage. Write down and save the computer model and serial numbers, all ...

Upgrading and Servicing Guide
Page 18
... recovery procedure, refer to prepare the HP TouchSmart PC. See "Start Here" on the hard disk drive to cool before touching them. 2 Locate the hard disk drive EMI shield (A), and then lift the shield up any personal files on page 1. Failure to load the factory-installed files. After replacing the hard disk drive, you need to run System Recovery...
... recovery procedure, refer to prepare the HP TouchSmart PC. See "Start Here" on the hard disk drive to cool before touching them. 2 Locate the hard disk drive EMI shield (A), and then lift the shield up any personal files on page 1. Failure to load the factory-installed files. After replacing the hard disk drive, you need to run System Recovery...
Getting Started Guide
Page 11
Replace the connector cover by aligning the hooks on the right edge of the HP TouchSmart PC Features and configurations vary by model A B I C D E J F G K H L M Connector Function A USB 2.0 ports (3) Connect USB devices (USB 2.0) such as printers, external hard disk drives, digital cameras, and MP3 players. Getting to the Internet through your finger under the gap on the bottom...
Replace the connector cover by aligning the hooks on the right edge of the HP TouchSmart PC Features and configurations vary by model A B I C D E J F G K H L M Connector Function A USB 2.0 ports (3) Connect USB devices (USB 2.0) such as printers, external hard disk drives, digital cameras, and MP3 players. Getting to the Internet through your finger under the gap on the bottom...
Getting Started Guide
Page 23
Make sure your hardware and software are compatible with the operating system.* Upgrading your HP TouchSmart PC hardware To find detailed instructions on removing and replacing the memory and the hard disk drive for your computer. See www.microsoft.com/windowsvista/getready/hardwarereqs.mspx and www.microsoft.com/windowsvista/getready/capable.mspx for updated software and...
Make sure your hardware and software are compatible with the operating system.* Upgrading your HP TouchSmart PC hardware To find detailed instructions on removing and replacing the memory and the hard disk drive for your computer. See www.microsoft.com/windowsvista/getready/hardwarereqs.mspx and www.microsoft.com/windowsvista/getready/capable.mspx for updated software and...
Getting Started Guide
Page 12
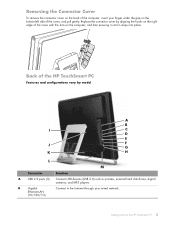
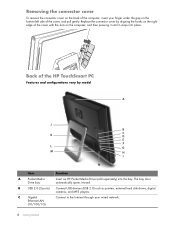
Back of the HP TouchSmart PC Features and configurations vary by aligning the hooks on the right edge of the cover with the slots on the bottom-left side of ... door automatically opens inward. Removing the connector cover To remove the connector cover on the back of the cover, and pull gently. Replace the connector cover by model A J B K C D E F L G M H I N Item Function A Pocket Media Drive bay Insert an HP Pocket Media Drive (sold separately) into place. B USB 2.0 (3 ports) Connect USB devices (USB 2.0) such as printers, external...
Back of the HP TouchSmart PC Features and configurations vary by aligning the hooks on the right edge of the cover with the slots on the bottom-left side of ... door automatically opens inward. Removing the connector cover To remove the connector cover on the back of the cover, and pull gently. Replace the connector cover by model A J B K C D E F L G M H I N Item Function A Pocket Media Drive bay Insert an HP Pocket Media Drive (sold separately) into place. B USB 2.0 (3 ports) Connect USB devices (USB 2.0) such as printers, external...
Getting Started Guide
Page 24
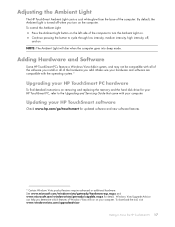
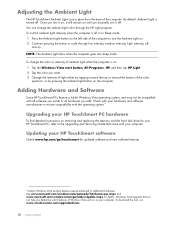
...the bottom of the computer. Adding Hardware and Software Some HP TouchSmart PCs feature a 64-bit Windows Vista operating system, and may not be compatible with your HP TouchSmart software Check www.hp.com/go/touchsmart for details. See www.microsoft.com/windowsvista/getready/hardwarereqs.mspx... to ensure compatibility with the operating system.* Upgrading your HP TouchSmart PC hardware To find detailed instructions on removing and replacing the memory and the hard disk drive for your computer. Adjusting the Ambient Light The HP TouchSmart Ambient Light casts a glow from the base of the...
...the bottom of the computer. Adding Hardware and Software Some HP TouchSmart PCs feature a 64-bit Windows Vista operating system, and may not be compatible with your HP TouchSmart software Check www.hp.com/go/touchsmart for details. See www.microsoft.com/windowsvista/getready/hardwarereqs.mspx... to ensure compatibility with the operating system.* Upgrading your HP TouchSmart PC hardware To find detailed instructions on removing and replacing the memory and the hard disk drive for your computer. Adjusting the Ambient Light The HP TouchSmart Ambient Light casts a glow from the base of the...

Getting Started Guide
Page 12
Replace the connector cover by model A J B K C D E F L G M H I N Item Function A Pocket Media Drive bay Insert an HP Pocket Media Drive (sold separately) into place. Back of the HP TouchSmart PC Features and configurations vary by aligning the hooks on the right edge of the cover with the slots on the bottom-left side of... To remove the connector cover on the back of the cover, and pull gently. B USB 2.0 (3 ports) Connect USB devices (USB 2.0) such as printers, external hard disk drives, digital cameras, and MP3 players. The bay door automatically opens inward.
Replace the connector cover by model A J B K C D E F L G M H I N Item Function A Pocket Media Drive bay Insert an HP Pocket Media Drive (sold separately) into place. Back of the HP TouchSmart PC Features and configurations vary by aligning the hooks on the right edge of the cover with the slots on the bottom-left side of... To remove the connector cover on the back of the cover, and pull gently. B USB 2.0 (3 ports) Connect USB devices (USB 2.0) such as printers, external hard disk drives, digital cameras, and MP3 players. The bay door automatically opens inward.

Getting Started Guide
Page 24
... or additional hardware. Adding Hardware and Software Some HP TouchSmart PCs feature a 64-bit Windows Vista operating system, and may not be compatible with the mouse, right-click) the optical drive, and then tap Eject. Updating your computer. The slim-slot optical drive does not have a disc tray. To download ... or intensity of ambient light when the computer is on, and then press the eject button (A) on the side of the disc drive. Check with your HP TouchSmart PC hardware To find detailed instructions on removing and replacing the memory and the hard disk drive for details.
... or additional hardware. Adding Hardware and Software Some HP TouchSmart PCs feature a 64-bit Windows Vista operating system, and may not be compatible with the mouse, right-click) the optical drive, and then tap Eject. Updating your computer. The slim-slot optical drive does not have a disc tray. To download ... or intensity of ambient light when the computer is on, and then press the eject button (A) on the side of the disc drive. Check with your HP TouchSmart PC hardware To find detailed instructions on removing and replacing the memory and the hard disk drive for details.
Upgrade and Service Guide
Page 5
... and other information about the computer. Upgrading and Servicing Guide This guide provides instructions for replacing or upgrading the memory and the hard disk drive in personal injury or equipment damage. It is recommended that you open and examine the computer.... It is easier to consult this information than to do so before you use an antistatic wrist strap and stand on a conductive foam pad when working on the computer. Failure to open the HP TouchSmart...
... and other information about the computer. Upgrading and Servicing Guide This guide provides instructions for replacing or upgrading the memory and the hard disk drive in personal injury or equipment damage. It is recommended that you open and examine the computer.... It is easier to consult this information than to do so before you use an antistatic wrist strap and stand on a conductive foam pad when working on the computer. Failure to open the HP TouchSmart...

Upgrade and Service Guide
Page 19
...the Limited Warranty, Support, and System Recovery Guide included with your HP TouchSmart PC. For details about the recovery procedure, refer to do so may result in data loss. B A Upgrading and Servicing Guide 15 After replacing the hard disk drive, you need to run System Recovery using the shield loop. ...as a DVD. WARNING: To reduce the risk of the way (B), using recovery discs to cool before touching them. 2 Locate the hard disk drive EMI shield (A), and then lift the shield up any personal files on page 1. See "Start Here" on the hard disk drive to prepare the HP TouchSmart PC.
...the Limited Warranty, Support, and System Recovery Guide included with your HP TouchSmart PC. For details about the recovery procedure, refer to do so may result in data loss. B A Upgrading and Servicing Guide 15 After replacing the hard disk drive, you need to run System Recovery using the shield loop. ...as a DVD. WARNING: To reduce the risk of the way (B), using recovery discs to cool before touching them. 2 Locate the hard disk drive EMI shield (A), and then lift the shield up any personal files on page 1. See "Start Here" on the hard disk drive to prepare the HP TouchSmart PC.


