HP TouchSmart Desktop PCs - User Guide
Page 4
... HP TouchSmart PC 45 Preparing the HP TouchSmart PC 45 Before opening the HP TouchSmart PC 46 After closing the HP TouchSmart PC 46 Removing the rear cover ...47 Replacing the rear cover ...48 Removing the vertical cover ...48 Replacing the vertical cover ...49 Adding Memory...49 Removing a memory module...49 Installing a memory module ...50 Removing and Replacing the Hard Disk Drive 51 Removing the hard...
... HP TouchSmart PC 45 Preparing the HP TouchSmart PC 45 Before opening the HP TouchSmart PC 46 After closing the HP TouchSmart PC 46 Removing the rear cover ...47 Replacing the rear cover ...48 Removing the vertical cover ...48 Replacing the vertical cover ...49 Adding Memory...49 Removing a memory module...49 Installing a memory module ...50 Removing and Replacing the Hard Disk Drive 51 Removing the hard...
HP TouchSmart Desktop PCs - User Guide
Page 10
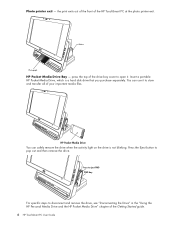
... specific steps to open it to pop out and then remove the drive. Press the Eject button to store and transfer all of the HP TouchSmart PC at the photo printer exit. + - You can safely remove the drive when the activity light on the drive is a hard disk drive that you purchase separately. Press to eject PMD PMD bay...
... specific steps to open it to pop out and then remove the drive. Press the Eject button to store and transfer all of the HP TouchSmart PC at the photo printer exit. + - You can safely remove the drive when the activity light on the drive is a hard disk drive that you purchase separately. Press to eject PMD PMD bay...
HP TouchSmart Desktop PCs - User Guide
Page 40
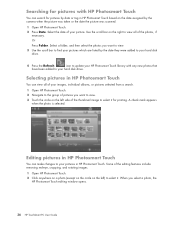
... of the editing features include removing red-eye, cropping, and rotating images. 1 Open HP Photosmart Touch. 2 Click anywhere on a photo (except on the circle on the date assigned by the date they were added to your hard disk drive. 4 Press the Refresh icon to update your HP Photosmart Touch library with HP Photosmart Touch You can...
... of the editing features include removing red-eye, cropping, and rotating images. 1 Open HP Photosmart Touch. 2 Click anywhere on a photo (except on the circle on the date assigned by the date they were added to your hard disk drive. 4 Press the Refresh icon to update your HP Photosmart Touch library with HP Photosmart Touch You can...
HP TouchSmart Desktop PCs - User Guide
Page 50
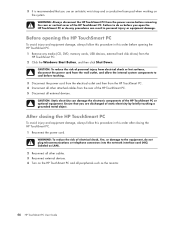
...To reduce the risk of electrical shock, fire, or damage to cool before you open the HP TouchSmart PC or do any media (CD, DVD, memory cards, USB devices, external hard disk drives) from the wall outlet, and allow the internal system components to the equipment, do so ... the power cord from the HP TouchSmart PC. 2 Click the Windows Start Button, and then click Shut Down. CAUTION: Static electricity can result in this order before removing the rear or vertical cover of the HP TouchSmart PC or optional equipment. After closing the HP TouchSmart PC. 1 Reconnect the power...
...To reduce the risk of electrical shock, fire, or damage to cool before you open the HP TouchSmart PC or do any media (CD, DVD, memory cards, USB devices, external hard disk drives) from the wall outlet, and allow the internal system components to the equipment, do so ... the power cord from the HP TouchSmart PC. 2 Click the Windows Start Button, and then click Shut Down. CAUTION: Static electricity can result in this order before removing the rear or vertical cover of the HP TouchSmart PC or optional equipment. After closing the HP TouchSmart PC. 1 Reconnect the power...
HP TouchSmart Desktop PCs - User Guide
Page 52
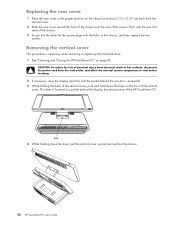
CAUTION: To reduce the risk of personal injury from electrical shock or hot surfaces, disconnect the power cord from the chassis. 48 HP TouchSmart PC User Guide Lever 4 While holding the back of the chassis. 3 Ensure that the holes for the screws align with the ... with the holes in the chassis, and then replace the two screws. Removing the vertical cover This procedure is necessary when removing or replacing the hard disk drive. 1 See "Opening and Closing the HP TouchSmart PC" on the front of the HP TouchSmart PC. This lever is located in a pocket behind the monitor is accessible...
CAUTION: To reduce the risk of personal injury from electrical shock or hot surfaces, disconnect the power cord from the chassis. 48 HP TouchSmart PC User Guide Lever 4 While holding the back of the chassis. 3 Ensure that the holes for the screws align with the ... with the holes in the chassis, and then replace the two screws. Removing the vertical cover This procedure is necessary when removing or replacing the hard disk drive. 1 See "Opening and Closing the HP TouchSmart PC" on the front of the HP TouchSmart PC. This lever is located in a pocket behind the monitor is accessible...
HP TouchSmart Desktop PCs - User Guide
Page 55
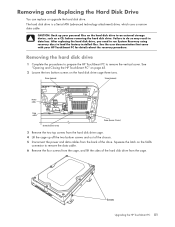
...on the hard disk drive cage three turns. The hard disk drive is a Serial ATA (advanced technology attachment) drive, which uses a narrow data cable. Removing the hard disk drive 1 Complete the procedures to prepare the HP TouchSmart PC to load the factory-installed files. See "Opening and Closing the HP TouchSmart PC" on... page 45. 2 Loosen the two bottom screws on the hard disk drive to an external storage device, such as a CD, before removing the hard disk drive. Failure to remove the data cable. 6 Remove the four screws from the cage....
...on the hard disk drive cage three turns. The hard disk drive is a Serial ATA (advanced technology attachment) drive, which uses a narrow data cable. Removing the hard disk drive 1 Complete the procedures to prepare the HP TouchSmart PC to load the factory-installed files. See "Opening and Closing the HP TouchSmart PC" on... page 45. 2 Loosen the two bottom screws on the hard disk drive to an external storage device, such as a CD, before removing the hard disk drive. Failure to remove the data cable. 6 Remove the four screws from the cage....
HP TouchSmart Desktop PCs - User Guide
Page 56
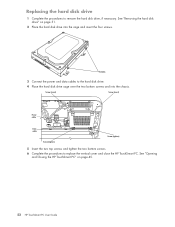
... tighten the two bottom screws. 6 Complete the procedures to remove the hard disk drive, if necessary. See "Removing the hard disk drive" on page 45. 52 HP TouchSmart PC User Guide See "Opening and Closing the HP TouchSmart PC" on page 51. 2 Place the hard disk drive into the chassis. Replacing the hard disk drive 1 Complete the procedures to replace the vertical cover and...
... tighten the two bottom screws. 6 Complete the procedures to remove the hard disk drive, if necessary. See "Removing the hard disk drive" on page 45. 52 HP TouchSmart PC User Guide See "Opening and Closing the HP TouchSmart PC" on page 51. 2 Place the hard disk drive into the chassis. Replacing the hard disk drive 1 Complete the procedures to replace the vertical cover and...
HP TouchSmart Desktop PCs - User Guide
Page 59
...finding UG- 25 Guide, see Television Program Guide H Hard Disk Drive Troubleshooting, TM- 12 Hard Disk Drive upgrade UG- 51 Hardware Installation Troubleshooting, TM- 12-13 Hardware...HP Pocket Media Drive GS-67 bay UG- 6 using UG- 6 HP printer Y-cable UG- 5 HP SmartCalendar adding user accounts UG- 32 creating voice notes UG- 33 deleting an event UG- 32 using UG- 25, 29 HP SmartCenter accessing the two-day weather forecast UG- 27 adding or removing... what is, using UG- 24 HP SmartCenter button UG- 2 using to open HP SmartCenter UG- 26 HP Total Care Advisor GS-17 HP TouchSmart PC screen cleaning UG- 23 I...
...finding UG- 25 Guide, see Television Program Guide H Hard Disk Drive Troubleshooting, TM- 12 Hard Disk Drive upgrade UG- 51 Hardware Installation Troubleshooting, TM- 12-13 Hardware...HP Pocket Media Drive GS-67 bay UG- 6 using UG- 6 HP printer Y-cable UG- 5 HP SmartCalendar adding user accounts UG- 32 creating voice notes UG- 33 deleting an event UG- 32 using UG- 25, 29 HP SmartCenter accessing the two-day weather forecast UG- 27 adding or removing... what is, using UG- 24 HP SmartCenter button UG- 2 using to open HP SmartCenter UG- 26 HP Total Care Advisor GS-17 HP TouchSmart PC screen cleaning UG- 23 I...


