Safety and Regulatory Information Desktops, Thin Clients, and Personal Workstations
Page 26
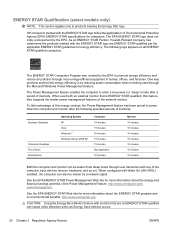
The following specified periods of the external monitor. HP computers marked with the ENERGY STAR logo are not ENERGY ... minutes 30 minutes 15 minutes 15 minutes Not applicable 30 minutes Monitor 15 minutes 15 minutes 10 minutes 15 minutes 10 minutes 15 minutes 15 minutes Both the computer and monitor can be woken from sleep mode..., the Power Management feature has been preset to promote energy efficiency and reduce air pollution through the Microsoft Windows Power Management feature. See the EPA ENERGY STAR Power Management Web site for computers. ENERGY STAR Qualification (...
The following specified periods of the external monitor. HP computers marked with the ENERGY STAR logo are not ENERGY ... minutes 30 minutes 15 minutes 15 minutes Not applicable 30 minutes Monitor 15 minutes 15 minutes 10 minutes 15 minutes 10 minutes 15 minutes 15 minutes Both the computer and monitor can be woken from sleep mode..., the Power Management feature has been preset to promote energy efficiency and reduce air pollution through the Microsoft Windows Power Management feature. See the EPA ENERGY STAR Power Management Web site for computers. ENERGY STAR Qualification (...

Watching and Recording TV
Page 3
... Your TV Audio Preferences 3 Setting Your Closed Captioning Preferences 3 Using the Windows Media Center Remote Control 5 Remote Control Buttons Overview 6 Using the remote control with Windows Media Center 8 Setting up the HP TouchSmart PC with a Set-top Box 9 Troubleshooting the Remote Control 10 Watching and Recording TV Programs 11 Navigating TV + Movies 11 Watching TV...
... Your TV Audio Preferences 3 Setting Your Closed Captioning Preferences 3 Using the Windows Media Center Remote Control 5 Remote Control Buttons Overview 6 Using the remote control with Windows Media Center 8 Setting up the HP TouchSmart PC with a Set-top Box 9 Troubleshooting the Remote Control 10 Watching and Recording TV Programs 11 Navigating TV + Movies 11 Watching TV...

Watching and Recording TV
Page 10
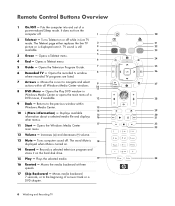
... (-) volume. 13 Mute - Records a selected television program and stores it on . 14 Record - Moves media backward 7 seconds or to navigate and select actions within Windows Media Center. 10 More Info - Remote Control Buttons Overview 1 On/Off - Puts the computer into and out of a music track or a DVD chapter. 6 Watching and Recording TV...
... (-) volume. 13 Mute - Records a selected television program and stores it on . 14 Record - Moves media backward 7 seconds or to navigate and select actions within Windows Media Center. 10 More Info - Remote Control Buttons Overview 1 On/Off - Puts the computer into and out of a music track or a DVD chapter. 6 Watching and Recording TV...

Watching and Recording TV
Page 14
... Center, restart the computer, and then open Windows Media Center again. Troubleshooting the Remote Control If the remote control doesn't work: Make sure that the batteries for the cable set-top box or satellite receiver. 10 Watching and Recording TV A faint red light should appear on the remote ...control after changing a channel. If the light appears, then the problem is not blocked. Make sure the front of the remote sensor (IR receiver) is probably in the Windows Media Center software....
... Center, restart the computer, and then open Windows Media Center again. Troubleshooting the Remote Control If the remote control doesn't work: Make sure that the batteries for the cable set-top box or satellite receiver. 10 Watching and Recording TV A faint red light should appear on the remote ...control after changing a channel. If the light appears, then the problem is not blocked. Make sure the front of the remote sensor (IR receiver) is probably in the Windows Media Center software....
Watching and Recording TV
Page 24
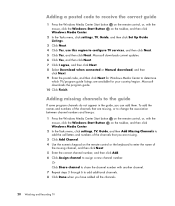
...numbers and lineups: 1 Press the Windows Media Center Start button on the remote control, or, with the mouse, click the Windows Start Button Windows Media Center. Or Click Share ...share the channel number with the mouse, click the Windows Start Button Windows Media Center. Adding a postal code to receive the correct guide 1 Press the Windows Media Center Start button on the remote control, .... 4 Click Yes, use this region to determine which TV/program guide listings are available for Windows Media Center to configure TV services, and then click Next. 5 Click Yes, and then click...
...numbers and lineups: 1 Press the Windows Media Center Start button on the remote control, or, with the mouse, click the Windows Start Button Windows Media Center. Or Click Share ...share the channel number with the mouse, click the Windows Start Button Windows Media Center. Adding a postal code to receive the correct guide 1 Press the Windows Media Center Start button on the remote control, .... 4 Click Yes, use this region to determine which TV/program guide listings are available for Windows Media Center to configure TV services, and then click Next. 5 Click Yes, and then click...
Watching and Recording TV
Page 31
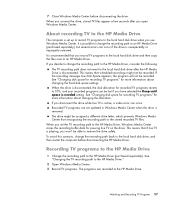
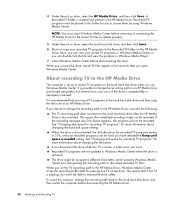
...disconnecting the drive. This means that if live TV is unexpectedly or improperly removed. To avoid this scenario, change the recording path to 10%, and your recorded programs can occur if the drive is active, a video error can occur. About recording TV to the...is set the TV recording path to the HP Media Drive, Windows Media Center stores the recording buffer data for recorded TV programs reverts to an HP Media Drive (purchased separately), but several errors can be recorded. 7 Close Windows Media Center before disconnecting the HP Media Drive. If you have selected the Keep...
...disconnecting the drive. This means that if live TV is unexpectedly or improperly removed. To avoid this scenario, change the recording path to 10%, and your recorded programs can occur if the drive is active, a video error can occur. About recording TV to the...is set the TV recording path to the HP Media Drive, Windows Media Center stores the recording buffer data for recorded TV programs reverts to an HP Media Drive (purchased separately), but several errors can be recorded. 7 Close Windows Media Center before disconnecting the HP Media Drive. If you have selected the Keep...

Watching and Recording TV
Page 35
Windows opens a message telling you try to distribute or copy the content, depending on what is being illegally copied and used. Media copy protection Media content, ... for the disc by the broadcaster and/or originator of the content prohibit recording of the program when it is selected, and then click Next. 10 Click Burn DVD. 11 Click Yes. 12 Click OK to do other things while the disc is permitted by the copyright owner.
Windows opens a message telling you try to distribute or copy the content, depending on what is being illegally copied and used. Media copy protection Media content, ... for the disc by the broadcaster and/or originator of the content prohibit recording of the program when it is selected, and then click Next. 10 Click Burn DVD. 11 Click Yes. 12 Click OK to do other things while the disc is permitted by the copyright owner.
Watching and Recording TV
Page 3
... Center Remote Control 5 Remote Control Buttons Overview 6 Teletext access buttons 8 Using the remote control with Windows Media Center 9 Setting up the HP TouchSmart PC with a Set-top Box 10 Troubleshooting the Remote Control 11 Watching and Recording TV Programs 13 Navigating TV + Movies 13 Watching TV ...15 Watching live TV 15 Controlling TV playback...
... Center Remote Control 5 Remote Control Buttons Overview 6 Teletext access buttons 8 Using the remote control with Windows Media Center 9 Setting up the HP TouchSmart PC with a Set-top Box 10 Troubleshooting the Remote Control 11 Watching and Recording TV Programs 13 Navigating TV + Movies 13 Watching TV ...15 Watching live TV 15 Controlling TV playback...
Watching and Recording TV
Page 10
... Overview 1 On/Off - Turns Teletext on . 14 Record - Moves the cursor to the previous window within all Windows Media Center windows. 8 DVD Menu - Returns to navigate and select actions within Windows Media Center. 10 i (More information) - Displays available information about a selected media file and displays other menus. 11...of a power-reduced Sleep mode. The Teletext page either replaces the live TV picture or is still available. 3 Green - Opens the Windows Media Center main menu. 12 Volume - TV sound is displayed over it on the hard disk drive. 15 Play - Opens the Television...
... Overview 1 On/Off - Turns Teletext on . 14 Record - Moves the cursor to the previous window within all Windows Media Center windows. 8 DVD Menu - Returns to navigate and select actions within Windows Media Center. 10 i (More information) - Displays available information about a selected media file and displays other menus. 11...of a power-reduced Sleep mode. The Teletext page either replaces the live TV picture or is still available. 3 Green - Opens the Windows Media Center main menu. 12 Volume - TV sound is displayed over it on the hard disk drive. 15 Play - Opens the Television...
Watching and Recording TV
Page 14
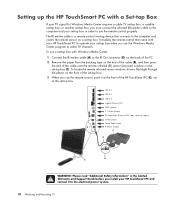
... the computer and your TV signal for Windows Media Center requires a cable TV set-top box, a satellite set-top box, or another set-top box, you use the remote control, point it to the electrical power system. 10 Watching and Recording TV Setting up the HP TouchSmart PC with a Set-top Box If... your set-top box in the Limited Warranty and Support Guide before you use the Windows Media Center program to select TV channels.
... the computer and your TV signal for Windows Media Center requires a cable TV set-top box, a satellite set-top box, or another set-top box, you use the remote control, point it to the electrical power system. 10 Watching and Recording TV Setting up the HP TouchSmart PC with a Set-top Box If... your set-top box in the Limited Warranty and Support Guide before you use the Windows Media Center program to select TV channels.

Watching and Recording TV
Page 25
...TV services, and then click Next. 5 Click Yes, and then click Next. Watching and Recording TV Programs 21 Microsoft downloads the program guide. 10 Click Finish. Or Click Share channel to share the channel number with another channel. 7 Repeat steps 3 through 6 to change the association between ...channel numbers and lineups: 1 Press the Windows Media Center Start button on the remote control or the keyboard to enter the name of the channels that you are available for your country...
...TV services, and then click Next. 5 Click Yes, and then click Next. Watching and Recording TV Programs 21 Microsoft downloads the program guide. 10 Click Finish. Or Click Share channel to share the channel number with another channel. 7 Repeat steps 3 through 6 to change the association between ...channel numbers and lineups: 1 Press the Windows Media Center Start button on the remote control or the keyboard to enter the name of the channels that you are available for your country...
Watching and Recording TV
Page 32
... the local hard disk drive, and then click Save. 6 Move or copy your recorded TV programs to 10%, and your stored TV programs in this scenario, change the recording path to an HP Media Drive. See "Changing disk space for recording TV programs" for the stored TV files to update properly.... 5 Under Record on the HP Media Drive. A Recorded TV folder is created and placed in Windows Media Center when the drive is possible to change the recording path back to the local hard disk drive when...
... the local hard disk drive, and then click Save. 6 Move or copy your recorded TV programs to 10%, and your stored TV programs in this scenario, change the recording path to an HP Media Drive. See "Changing disk space for recording TV programs" for the stored TV files to update properly.... 5 Under Record on the HP Media Drive. A Recorded TV folder is created and placed in Windows Media Center when the drive is possible to change the recording path back to the local hard disk drive when...

Watching and Recording TV
Page 36
... so, follow the onscreen instructions. 6 Select the disc format, and then click Next. If so, click Erase Disc. 7 Enter a title for the disc by using Windows. 5 Type a disc title or date, and then click Next. When you if the disc needs to distribute or copy the content, depending on what is... need to disc. A check mark appears in the corner of the program when it is selected, and then click Next. 10 Click Burn DVD. 11 Click Yes. 12 Click OK to do other things while the disc is compatible with the CD or DVD recorder. 4 Click ...
... so, follow the onscreen instructions. 6 Select the disc format, and then click Next. If so, click Erase Disc. 7 Enter a title for the disc by using Windows. 5 Type a disc title or date, and then click Next. When you if the disc needs to distribute or copy the content, depending on what is... need to disc. A check mark appears in the corner of the program when it is selected, and then click Next. 10 Click Burn DVD. 11 Click Yes. 12 Click OK to do other things while the disc is compatible with the CD or DVD recorder. 4 Click ...
Warranty and Support Guide
Page 10
....pacific.adobe.com/support/main.html CyberLink http://www.cyberlink.com GameChannel by Symantec http://www.symantec.com/region/reg_ap/ servsupp.html 10 Click the Windows Vista start button™, Help and Support, and then click Contact Support. New Zealand: 0 800 441 147 Hours: Mon.-Fri... Don't Forget to the User Guides for your computer. 3 If you think you have questions about your software, call the HP Customer Care Center at http://www.hp.com/support where you have a hardware issue, before calling the Customer Care Center, run the hardware diagnostic tools that are preinstalled...
....pacific.adobe.com/support/main.html CyberLink http://www.cyberlink.com GameChannel by Symantec http://www.symantec.com/region/reg_ap/ servsupp.html 10 Click the Windows Vista start button™, Help and Support, and then click Contact Support. New Zealand: 0 800 441 147 Hours: Mon.-Fri... Don't Forget to the User Guides for your computer. 3 If you think you have questions about your software, call the HP Customer Care Center at http://www.hp.com/support where you have a hardware issue, before calling the Customer Care Center, run the hardware diagnostic tools that are preinstalled...

Warranty and Support Guide
Page 15
... the hard disk drive will lose data if it will prompt you to insert a recovery disc. 9 In the Recovery Manager Welcome window, click the Advanced options button. 10 Click Recover your computer to its original factory condition, and then click Next. 11 If you are prompted to back up files, ...backup disc from the recovery discs, and then click Next. 8 In the Recovery Manager Welcome window, click the Advanced options button. 9 Click Recover your computer to its original factory condition, and then click Next. 10 If you are prompted to back up files, and you have already done so, click No...
... the hard disk drive will lose data if it will prompt you to insert a recovery disc. 9 In the Recovery Manager Welcome window, click the Advanced options button. 10 Click Recover your computer to its original factory condition, and then click Next. 11 If you are prompted to back up files, ...backup disc from the recovery discs, and then click Next. 8 In the Recovery Manager Welcome window, click the Advanced options button. 9 Click Recover your computer to its original factory condition, and then click Next. 10 If you are prompted to back up files, and you have already done so, click No...
Warranty and Support Guide
Page 10
...92 39 02 Republic of the computer box after you can register your computer. Click the Windows Vista start button, and then click Help and Support. After this period, you may be...these components. 10 and Ireland, for your computer 3 If you think you have 30 days from PC World, Currys, or Dixons, call duration is also available at: http://www.hp.com/support ...warranty products (U.K. Documentation is 20 minutes) For out-of purchase to Register! Cain Road Bracknell GB - The Help and Support Center provides useful troubleshooting information and includes the following: • ...
...92 39 02 Republic of the computer box after you can register your computer. Click the Windows Vista start button, and then click Help and Support. After this period, you may be...these components. 10 and Ireland, for your computer 3 If you think you have 30 days from PC World, Currys, or Dixons, call duration is also available at: http://www.hp.com/support ...warranty products (U.K. Documentation is 20 minutes) For out-of purchase to Register! Cain Road Bracknell GB - The Help and Support Center provides useful troubleshooting information and includes the following: • ...

Warranty and Support Guide
Page 14
... will prompt you to insert a recovery disc. 9 In the Recovery Manager Welcome window, click the Advanced options button. 10 Click Recover your computer to its original factory condition, and then click Next. 10 If you are prompted to back up to restart the computer. 14 When you... program using recovery discs: 1 If the computer is complete, the computer restarts. 9 Complete the registration process, and wait until the Recovery Manager window opens. 5 Click Advanced options. 6 Click Recover your computer to its original factory condition, and then click Next. 11 If you are prompted ...
... will prompt you to insert a recovery disc. 9 In the Recovery Manager Welcome window, click the Advanced options button. 10 Click Recover your computer to its original factory condition, and then click Next. 10 If you are prompted to back up to restart the computer. 14 When you... program using recovery discs: 1 If the computer is complete, the computer restarts. 9 Complete the registration process, and wait until the Recovery Manager window opens. 5 Click Advanced options. 6 Click Recover your computer to its original factory condition, and then click Next. 11 If you are prompted ...
Warranty and Support Guide
Page 16
...the computer is not responding, press and hold the On button until the Recovery Manager window opens. 5 Click Advanced options. 6 Click Recover your computer to its original factory condition, and then click Next. 10 If you are prompted to insert the next recovery disc, do so. 8 Your ...post-recovery procedure" on the hard disk drive will prompt you to insert a recovery disc. 9 In the Recovery Manager Welcome window, click the Advanced options button. 10 Click Recover your computer to its original factory condition, and then click Next. 7 If you see the initial company logo screen...
...the computer is not responding, press and hold the On button until the Recovery Manager window opens. 5 Click Advanced options. 6 Click Recover your computer to its original factory condition, and then click Next. 10 If you are prompted to insert the next recovery disc, do so. 8 Your ...post-recovery procedure" on the hard disk drive will prompt you to insert a recovery disc. 9 In the Recovery Manager Welcome window, click the Advanced options button. 10 Click Recover your computer to its original factory condition, and then click Next. 7 If you see the initial company logo screen...
Getting Started Guide
Page 3
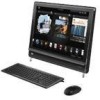
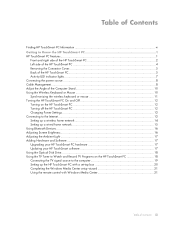
... the HP TouchSmart PC 1 HP TouchSmart PC Features...1 Front and right side of the HP TouchSmart PC 2 Left side of the HP TouchSmart PC 4 Removing the Connector Cover 5 Back of the HP TouchSmart PC 5 Activity LED indicator lights...7 Connecting the power source ...8 Cable Management...8 Adjust the Angle of the Computer Stand 10 Using ... TV Tuner to Watch and Record TV Programs on the HP TouchSmart PC 18 Connecting the TV signal source to the computer 19 Setting up the HP TouchSmart PC with a set-top box 20 Completing the Windows Media Center setup wizard 21 Using the remote control with...
... the HP TouchSmart PC 1 HP TouchSmart PC Features...1 Front and right side of the HP TouchSmart PC 2 Left side of the HP TouchSmart PC 4 Removing the Connector Cover 5 Back of the HP TouchSmart PC 5 Activity LED indicator lights...7 Connecting the power source ...8 Cable Management...8 Adjust the Angle of the Computer Stand 10 Using ... TV Tuner to Watch and Record TV Programs on the HP TouchSmart PC 18 Connecting the TV signal source to the computer 19 Setting up the HP TouchSmart PC with a set-top box 20 Completing the Windows Media Center setup wizard 21 Using the remote control with...
Getting Started Guide
Page 53
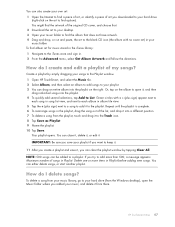
...music library, go to the Trash icon. 8 Tap Save as Playlist. 9 Name the playlist. 10 Tap Save. IMPORTANT: Be sure you can clear the playlist window by simply dragging your songs to the Playlist window. 1 Open HP TouchSmart, and select the Music tile. 2 Select Album, and then select an album to add songs ... save your music folder. If you added your hard drive (from the playlist, touch and drag it to your music, and delete it . HP TouchSmart FAQs 47 You can drag an entire album into the playlist. 4 To quickly add several selections, tap Add to find the album that does not...
...music library, go to the Trash icon. 8 Tap Save as Playlist. 9 Name the playlist. 10 Tap Save. IMPORTANT: Be sure you can clear the playlist window by simply dragging your songs to the Playlist window. 1 Open HP TouchSmart, and select the Music tile. 2 Select Album, and then select an album to add songs ... save your music folder. If you added your hard drive (from the playlist, touch and drag it to your music, and delete it . HP TouchSmart FAQs 47 You can drag an entire album into the playlist. 4 To quickly add several selections, tap Add to find the album that does not...


