
Getting Started Guide
Page 15
Then, route the cables through the cable routing clip (A), and out of the back of the cover with the slots on the computer, and then pressing it until it snaps into place. A 3 Replace the connector cover by aligning the hooks on the right edge of the computer. 2 Route your cables through the notch (B) in the computer stand. B Getting to Know the HP TouchSmart PC 9
Then, route the cables through the cable routing clip (A), and out of the back of the cover with the slots on the computer, and then pressing it until it snaps into place. A 3 Replace the connector cover by aligning the hooks on the right edge of the computer. 2 Route your cables through the notch (B) in the computer stand. B Getting to Know the HP TouchSmart PC 9

Getting Started Guide
Page 15
2 Route your cables through the notch (B) in the computer stand. B Getting to Know the HP TouchSmart PC 9 A 3 Replace the connector cover by aligning the hooks on the right edge of the computer. Then, route the cables through the cable routing clip (A), and out of the back of the cover with the slots on the computer, and then pressing it until it snaps into place.
2 Route your cables through the notch (B) in the computer stand. B Getting to Know the HP TouchSmart PC 9 A 3 Replace the connector cover by aligning the hooks on the right edge of the computer. Then, route the cables through the cable routing clip (A), and out of the back of the cover with the slots on the computer, and then pressing it until it snaps into place.

Upgrade and Service Guide
Page 16
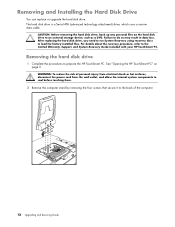
.... Removing the hard disk drive 1 Complete the procedures to the Limited Warranty, Support, and System Recovery Guide included with your HP TouchSmart PC. After replacing the hard disk drive, you need to run System Recovery using recovery discs to do so may result in data loss. Failure .... See "Opening the HP TouchSmart PC" on the hard disk drive to the back of personal injury from electrical shock or hot surfaces, disconnect the power cord from the wall outlet, and allow the internal system components to cool before touching them. 2 Remove the computer stand by removing the four...
.... Removing the hard disk drive 1 Complete the procedures to the Limited Warranty, Support, and System Recovery Guide included with your HP TouchSmart PC. After replacing the hard disk drive, you need to run System Recovery using recovery discs to do so may result in data loss. Failure .... See "Opening the HP TouchSmart PC" on the hard disk drive to the back of personal injury from electrical shock or hot surfaces, disconnect the power cord from the wall outlet, and allow the internal system components to cool before touching them. 2 Remove the computer stand by removing the four...

Upgrade and Service Guide
Page 27
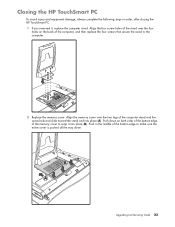
...Upgrading and Servicing Guide 23 Push down on the back of the computer, and then replace the four screws that secure the stand to make sure the entire cover is pushed all the way down. Closing the HP TouchSmart PC To avoid injury and equipment damage, always complete the following steps in the ...middle of the bottom edge to the computer. 2 Replace the memory cover. Align the four screw holes of the stand over the two legs of the memory cover to snap it , replace the computer stand. Push in order, after closing the HP TouchSmart PC: 1 If you removed it into place (A). Align...
...Upgrading and Servicing Guide 23 Push down on the back of the computer, and then replace the four screws that secure the stand to make sure the entire cover is pushed all the way down. Closing the HP TouchSmart PC To avoid injury and equipment damage, always complete the following steps in the ...middle of the bottom edge to the computer. 2 Replace the memory cover. Align the four screw holes of the stand over the two legs of the memory cover to snap it , replace the computer stand. Push in order, after closing the HP TouchSmart PC: 1 If you removed it into place (A). Align...

Getting Started Guide
Page 15
B Getting to Know the HP TouchSmart PC 9 Then, route the cables through the cable routing clip (A), and out of the back of the cover with the slots on the computer, and then pressing it until it snaps into place. A 3 Replace the connector cover by aligning the hooks on the right edge of the computer. 2 Route your cables through the notch (B) in the computer stand.
B Getting to Know the HP TouchSmart PC 9 Then, route the cables through the cable routing clip (A), and out of the back of the cover with the slots on the computer, and then pressing it until it snaps into place. A 3 Replace the connector cover by aligning the hooks on the right edge of the computer. 2 Route your cables through the notch (B) in the computer stand.

Getting Started Guide
Page 15
A 3 Replace the connector cover by aligning the hooks on the right edge of the computer. 2 Route your cables through the notch (B) in the computer stand. Then, route the cables through the cable routing clip (A), and out of the back of the cover with the slots on the computer, and then pressing it until it snaps into place. B Getting to Know the HP TouchSmart PC 9
A 3 Replace the connector cover by aligning the hooks on the right edge of the computer. 2 Route your cables through the notch (B) in the computer stand. Then, route the cables through the cable routing clip (A), and out of the back of the cover with the slots on the computer, and then pressing it until it snaps into place. B Getting to Know the HP TouchSmart PC 9
Upgrading and Servicing Guide
Page 18
Failure to load the factory-installed files. After replacing the hard disk drive, you need to run System... the procedures to the Limited Warranty, Support, and System Recovery Guide included with your HP TouchSmart PC. For details about the recovery procedure, refer to prepare the HP TouchSmart PC. The hard disk drive is a Serial ATA (advanced technology attachment) drive,... wall outlet, and allow the internal system components to cool before touching them. 2 Remove the computer stand by removing the four screws that secure it to an external storage device, such as a DVD. Removing...
Failure to load the factory-installed files. After replacing the hard disk drive, you need to run System... the procedures to the Limited Warranty, Support, and System Recovery Guide included with your HP TouchSmart PC. For details about the recovery procedure, refer to prepare the HP TouchSmart PC. The hard disk drive is a Serial ATA (advanced technology attachment) drive,... wall outlet, and allow the internal system components to cool before touching them. 2 Remove the computer stand by removing the four screws that secure it to an external storage device, such as a DVD. Removing...
Upgrading and Servicing Guide
Page 29
...toward the stand and into place (B). Push down . Closing the HP TouchSmart PC To avoid injury and equipment damage, always complete the following steps in the middle of the bottom edge to make sure the entire cover is pushed all the way down on the back of the computer, and then replace the ...four screws that secure the stand to the computer. 2 Replace the...
...toward the stand and into place (B). Push down . Closing the HP TouchSmart PC To avoid injury and equipment damage, always complete the following steps in the middle of the bottom edge to make sure the entire cover is pushed all the way down on the back of the computer, and then replace the ...four screws that secure the stand to the computer. 2 Replace the...


