Notebook PC User Guide - Windows 7
Page 6
... Adding new locations when traveling 25 Solving travel connection problems 26 Connecting to a local area network ...27 3 Pointing devices and keyboard Using the TouchPad ...28 Turning the TouchPad on and off ...29 Using TouchPad gestures ...29 Scrolling ...30 Pinching ...30 Rotating ......31 Setting pointing device preferences 31 Using the keyboard ...32 Cleaning the TouchPad and keyboard 34 4 Multimedia Multimedia features ...35 Identifying your multimedia components 36 Adjusting the volume ...37 Using the media activity...
... Adding new locations when traveling 25 Solving travel connection problems 26 Connecting to a local area network ...27 3 Pointing devices and keyboard Using the TouchPad ...28 Turning the TouchPad on and off ...29 Using TouchPad gestures ...29 Scrolling ...30 Pinching ...30 Rotating ......31 Setting pointing device preferences 31 Using the keyboard ...32 Cleaning the TouchPad and keyboard 34 4 Multimedia Multimedia features ...35 Identifying your multimedia components 36 Adjusting the volume ...37 Using the media activity...

Notebook PC User Guide - Windows 7
Page 15
... the default printer. Components 5 Launches CyberLink PowerDVD. Launches your default e-mail client. Displays the Windows Start menu. Sends the currently-active document to Using the keyboard on page 32 for items where the cursor is positioned. Executes frequently-used system actions. Launches the calculator application. Opens a new e-mail in this section...
... the default printer. Components 5 Launches CyberLink PowerDVD. Launches your default e-mail client. Displays the Windows Start menu. Sends the currently-active document to Using the keyboard on page 32 for items where the cursor is positioned. Executes frequently-used system actions. Launches the calculator application. Opens a new e-mail in this section...

Notebook PC User Guide - Windows 7
Page 38
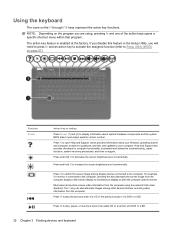
Moves the pointer and selects or activates items on an external mouse. 28 Chapter 3 Pointing devices and keyboard Component (1) TouchPad off indicator (2) TouchPad zone (3) Left TouchPad button (4) Right TouchPad button Description When lit, indicates that the TouchPad is turned off. Functions like the left button on an external mouse. Functions like the right button on the screen. 3 Pointing devices and keyboard Using the TouchPad The following illustration and table describe the computer TouchPad.
Moves the pointer and selects or activates items on an external mouse. 28 Chapter 3 Pointing devices and keyboard Component (1) TouchPad off indicator (2) TouchPad zone (3) Left TouchPad button (4) Right TouchPad button Description When lit, indicates that the TouchPad is turned off. Functions like the left button on an external mouse. Functions like the right button on the screen. 3 Pointing devices and keyboard Using the TouchPad The following illustration and table describe the computer TouchPad.

Notebook PC User Guide - Windows 7
Page 40
... moving up , down on items such as PDFs, images, and photos. Pinching Pinching allows you to decrease an object's size. 30 Chapter 3 Pointing devices and keyboard Scrolling Scrolling is controlled by holding two fingers apart on the TouchPad, and then pull the fingers together to zoom in or out on a page...
... moving up , down on items such as PDFs, images, and photos. Pinching Pinching allows you to decrease an object's size. 30 Chapter 3 Pointing devices and keyboard Scrolling Scrolling is controlled by holding two fingers apart on the TouchPad, and then pull the fingers together to zoom in or out on a page...
Notebook PC User Guide - Windows 7
Page 42
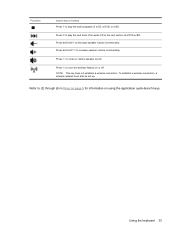
...you are receiving video information from the computer using , pressing fn and one of a DVD or a BD. 32 Chapter 3 Pointing devices and keyboard For example, if a monitor is enabled at the factory. Press and hold f2 to your Windows operating system and computer, answers to questions, ...tutorials, and updates to decrease the screen brightness level incrementally. Using the keyboard The icons on the program you will need to press fn and an action key to activate the assigned function (refer to increase...
...you are receiving video information from the computer using , pressing fn and one of a DVD or a BD. 32 Chapter 3 Pointing devices and keyboard For example, if a monitor is enabled at the factory. Press and hold f2 to your Windows operating system and computer, answers to questions, ...tutorials, and updates to decrease the screen brightness level incrementally. Using the keyboard The icons on the program you will need to press fn and an action key to activate the assigned function (refer to increase...
Notebook PC User Guide - Windows 7
Page 43
... a DVD or BD. Press and hold f9 to decrease speaker volume incrementally. To establish a wireless connection, a wireless network must also be set up. Using the keyboard 33 NOTE: This key does not establish a wireless connection. Function Action key or hotkey Press f7 to mute or restore speaker sound. Press and hold...
... a DVD or BD. Press and hold f9 to decrease speaker volume incrementally. To establish a wireless connection, a wireless network must also be set up. Using the keyboard 33 NOTE: This key does not establish a wireless connection. Function Action key or hotkey Press f7 to mute or restore speaker sound. Press and hold...
Notebook PC User Guide - Windows 7
Page 44
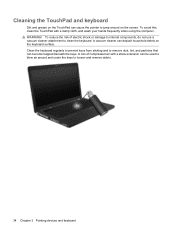
...to remove dust, lint, and particles that can of electric shock or damage to internal components, do not use a vacuum cleaner attachment to clean the keyboard. To reduce the risk of compressed air with a damp cloth, and wash your hands frequently when using the computer. A vacuum cleaner can deposit ...on the screen. To avoid this, clean the TouchPad with a straw extension can be used to blow air around on the keyboard surface. Cleaning the TouchPad and keyboard Dirt and grease on the TouchPad can cause the pointer to jump around and under the keys to loosen and remove debris. ...
...to remove dust, lint, and particles that can of electric shock or damage to internal components, do not use a vacuum cleaner attachment to clean the keyboard. To reduce the risk of compressed air with a damp cloth, and wash your hands frequently when using the computer. A vacuum cleaner can deposit ...on the screen. To avoid this, clean the TouchPad with a straw extension can be used to blow air around on the keyboard surface. Cleaning the TouchPad and keyboard Dirt and grease on the TouchPad can cause the pointer to jump around and under the keys to loosen and remove debris. ...
Notebook PC User Guide - Windows 7
Page 57
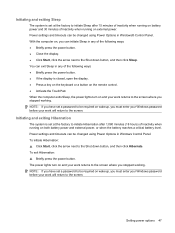
Initiating and exiting Sleep The system is closed, open the display. ● Press a key on the keyboard or a button on and your work will return to the screen where you can exit Sleep in any of inactivity when running on wakeup, you ...
Initiating and exiting Sleep The system is closed, open the display. ● Press a key on the keyboard or a button on and your work will return to the screen where you can exit Sleep in any of inactivity when running on wakeup, you ...

Notebook PC User Guide - Windows 7
Page 74
... you are included with the procedures to media. The airport security devices that must be handled with cleaning products. Do not enter information using the keyboard or move a computer that the battery is the only source of the drive. Security devices with , shipping, or storing a drive. Remove media from a drive before...
... you are included with the procedures to media. The airport security devices that must be handled with cleaning products. Do not enter information using the keyboard or move a computer that the battery is the only source of the drive. Security devices with , shipping, or storing a drive. Remove media from a drive before...
Notebook PC User Guide - Windows 7
Page 81
... right of information or damage to a disc, observe the following guidelines: Before writing to a disc, connect the computer to a disc. Do not use the computer keyboard or move the computer while the computer is writing to a reliable external power source. Insert the disc you created ejects automatically. Observing the copyright warning...
... right of information or damage to a disc, observe the following guidelines: Before writing to a disc, connect the computer to a disc. Do not use the computer keyboard or move the computer while the computer is writing to a reliable external power source. Insert the disc you created ejects automatically. Observing the copyright warning...

Notebook PC User Guide - Windows 7
Page 94
... is usually included with the device. 7 External devices and external media cards Using a USB device A USB port connects an optional external device, such as a USB keyboard, mouse, drive, printer, scanner, or hub, to the computer or to the USB port. To add more information about device-specific software, refer to the...
... is usually included with the device. 7 External devices and external media cards Using a USB device A USB port connects an optional external device, such as a USB keyboard, mouse, drive, printer, scanner, or hub, to the computer or to the USB port. To add more information about device-specific software, refer to the...

Notebook PC User Guide - Windows 7
Page 110
..., change the system time and date. ● View identification information about the computer. ● View specification information about the processor, memory size, system BIOS, and keyboard controller version (select models only). Main menu Select System information To do this chapter may not be supported by your changes from the current session...
..., change the system time and date. ● View identification information about the computer. ● View specification information about the processor, memory size, system BIOS, and keyboard controller version (select models only). Main menu Select System information To do this chapter may not be supported by your changes from the current session...
Service Guide
Page 8
... 43 Component replacement procedures 44 Serial number ...44 Computer feet ...45 Battery ...46 Hard drive ...47 Optical drive ...50 WLAN module ...52 Memory module ...55 Keyboard ...57 Top cover ...59 Speaker assembly ...62 Power button board ...63 TouchPad button board ...64 Modem module ...65 USB board ...67 Power connector ...69 Display...
... 43 Component replacement procedures 44 Serial number ...44 Computer feet ...45 Battery ...46 Hard drive ...47 Optical drive ...50 WLAN module ...52 Memory module ...55 Keyboard ...57 Top cover ...59 Speaker assembly ...62 Power button board ...63 TouchPad button board ...64 Modem module ...65 USB board ...67 Power connector ...69 Display...

Service Guide
Page 15
...Serviceability End-user replaceable parts: AC adapter Battery (system) Hard drive Memory module Optical drive Mini-card devices Discrete √ √ √ √ √ HP G62 UMA √ Compaq Presario CQ62 Discrete √ √ √ √ √ √ Compaq Presario CQ62 UMA √ √ √ √...√ √ √ √ √ √ √ √ √ √ √ √ √ √ √ √ √ ENWW 5 Category Description HP G62 Keyboard/pointing Full-size keyboard, 39.62-cm(15.6-
...Serviceability End-user replaceable parts: AC adapter Battery (system) Hard drive Memory module Optical drive Mini-card devices Discrete √ √ √ √ √ HP G62 UMA √ Compaq Presario CQ62 Discrete √ √ √ √ √ √ Compaq Presario CQ62 UMA √ √ √ √...√ √ √ √ √ √ √ √ √ √ √ √ √ √ √ √ √ ENWW 5 Category Description HP G62 Keyboard/pointing Full-size keyboard, 39.62-cm(15.6-

Service Guide
Page 31
...9679; HP G62 biscotti computer models ● HP G62 biscotti computer models with webcam ● HP G62 silver computer models (for model 1.0 only) ● HP G62 silver computer models with webcam (for model 1.0 only) ● HP G62 matte black computer models (for model 1.0 only) ● HP G62 matte ...15.6-in) High Definition (HD), light-emitting diode (LED) display assembly for use with webcam (for models 1.1 and 1.2 only) Power button board Keyboard (includes keyboard cable) for use in: ● Canada ● Japan (for models 1.1 and 1.2 only) ● Korea ● North America ●...
...9679; HP G62 biscotti computer models ● HP G62 biscotti computer models with webcam ● HP G62 silver computer models (for model 1.0 only) ● HP G62 silver computer models with webcam (for model 1.0 only) ● HP G62 matte black computer models (for model 1.0 only) ● HP G62 matte ...15.6-in) High Definition (HD), light-emitting diode (LED) display assembly for use with webcam (for models 1.1 and 1.2 only) Power button board Keyboard (includes keyboard cable) for use in: ● Canada ● Japan (for models 1.1 and 1.2 only) ● Korea ● North America ●...

Service Guide
Page 44
...with Presario CQ62 with webcam and microphone modules Display enclosure for use with HP G62 biscotti computer models Display bezel for use with HP G62 with microphone module only Display bezel for use with HP G62 with webcam and microphone modules Display enclosure for use with Presario CQ62 matte... black computer models Display hinge kit (includes left and right display hinges) Wireless antenna kit (includes wireless antenna transceivers and cable) Display screw kit Display rubber kit Keyboard for ...
...with Presario CQ62 with webcam and microphone modules Display enclosure for use with HP G62 biscotti computer models Display bezel for use with HP G62 with microphone module only Display bezel for use with HP G62 with webcam and microphone modules Display enclosure for use with Presario CQ62 matte... black computer models Display hinge kit (includes left and right display hinges) Wireless antenna kit (includes wireless antenna transceivers and cable) Display screw kit Display rubber kit Keyboard for ...
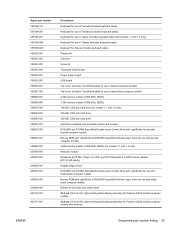
Service Guide
Page 45
...-001 600652-001 600849-001 602170-001 602171-001 Description Keyboard for use in Canada (includes keyboard cable) Keyboard for use in Thailand (includes keyboard cable) Keyboard for use in Japan (includes keyboard cable) (for models 1.1 and 1.2 only) Keyboard for use in Taiwan (includes keyboard cable) Keyboard for Korea (includes keyboard cable) Plastics kit Cable kit Screw kit Touchpad button...
...-001 600652-001 600849-001 602170-001 602171-001 Description Keyboard for use in Canada (includes keyboard cable) Keyboard for use in Thailand (includes keyboard cable) Keyboard for use in Japan (includes keyboard cable) (for models 1.1 and 1.2 only) Keyboard for use in Taiwan (includes keyboard cable) Keyboard for Korea (includes keyboard cable) Plastics kit Cable kit Screw kit Touchpad button...

Service Guide
Page 67
...computer is off or in Thailand Spare part number 595199-121 595199-291 595199-AD1 595199-001 595199-AB1 595199-281 Before removing the keyboard: 1. Disconnect all external devices connected to the computer. Remove the three Phillips PM2.5×5.0 and three Phillips PM2.5x6.5 screws that secure ... the computer. 3. Remove the battery (see WLAN module on page 47) 6. ENWW Component replacement procedures 57 Remove the keyboard: 1. Disconnect the power from the computer by first disconnecting the power cord from the AC outlet and then disconnecting the AC adapter from the computer...
...computer is off or in Thailand Spare part number 595199-121 595199-291 595199-AD1 595199-001 595199-AB1 595199-281 Before removing the keyboard: 1. Disconnect all external devices connected to the computer. Remove the three Phillips PM2.5×5.0 and three Phillips PM2.5x6.5 screws that secure ... the computer. 3. Remove the battery (see WLAN module on page 47) 6. ENWW Component replacement procedures 57 Remove the keyboard: 1. Disconnect the power from the computer by first disconnecting the power cord from the AC outlet and then disconnecting the AC adapter from the computer...

Service Guide
Page 68
... and replacement procedures ENWW Reverse this procedure to which the keyboard cable is attached and disconnect the keyboard cable (2) from the system board. 8. Open the computer as far as possible. 5. Lift the rear edge of the keyboard using a thin flat-bladed screwdriver. 6. 3. Turn the... computer display-side up with the front toward you. 4. Remove the keyboard. Release the tabs along the left (1) and right (2) edges of the keyboard (3), and set the keyboard back towards the display (4). 7.
... and replacement procedures ENWW Reverse this procedure to which the keyboard cable is attached and disconnect the keyboard cable (2) from the system board. 8. Open the computer as far as possible. 5. Lift the rear edge of the keyboard using a thin flat-bladed screwdriver. 6. 3. Turn the... computer display-side up with the front toward you. 4. Remove the keyboard. Release the tabs along the left (1) and right (2) edges of the keyboard (3), and set the keyboard back towards the display (4). 7.

Service Guide
Page 69
... off or in Hibernation, turn on page 52). Shut down through the operating system. 2. Remove the following components: a. d. Keyboard (see Optical drive on page 57). f. ENWW Component replacement procedures 59 b. Optical drive (see Keyboard on page 50). e. Disconnect all external devices connected to the computer. 3. Remove the switch cover: 1. Hard drive (See...
... off or in Hibernation, turn on page 52). Shut down through the operating system. 2. Remove the following components: a. d. Keyboard (see Optical drive on page 57). f. ENWW Component replacement procedures 59 b. Optical drive (see Keyboard on page 50). e. Disconnect all external devices connected to the computer. 3. Remove the switch cover: 1. Hard drive (See...


