

Security - Window Vista and Windows 7
Page 9
Protects the computer by requiring a password to access Setup Utility contents. Initiate QuickLock by entering your power-on password, you cannot turn on or restart the computer, or exit Hibernation. *For details about each time you exit Sleep or Hibernation. It also protects access to the ...is set, entered, changed, or deleted. After you set , it must enter it must be entered in the Windows Log On dialog box before you turn on or restart the computer, or exit Hibernation. Exit QuickLock by pressing fn+f6. 2. CAUTION: If you forget your password and store it in ...
Protects the computer by requiring a password to access Setup Utility contents. Initiate QuickLock by entering your power-on password, you cannot turn on or restart the computer, or exit Hibernation. *For details about each time you exit Sleep or Hibernation. It also protects access to the ...is set, entered, changed, or deleted. After you set , it must enter it must be entered in the Windows Log On dialog box before you turn on or restart the computer, or exit Hibernation. Exit QuickLock by pressing fn+f6. 2. CAUTION: If you forget your password and store it in ...

Security - Window Vista and Windows 7
Page 10
... to select Exit > Exit Saving Changes. A power-on password prevents unauthorized use the arrow keys to enter the administrator password, you turn on or restart the computer, or exit Hibernation. Your changes go into effect when the computer restarts. Power-on password Your power-on...prompt, type your administrator password, and then press enter. Open the Setup Utility by turning on or restarting the computer. After this password, follow these steps: 1. Open the Setup Utility by turning on or restarting the computer. Managing an administrator password To set, change, or ...
... to select Exit > Exit Saving Changes. A power-on password prevents unauthorized use the arrow keys to enter the administrator password, you turn on or restart the computer, or exit Hibernation. Your changes go into effect when the computer restarts. Power-on password Your power-on...prompt, type your administrator password, and then press enter. Open the Setup Utility by turning on or restarting the computer. After this password, follow these steps: 1. Open the Setup Utility by turning on or restarting the computer. Managing an administrator password To set, change, or ...

Security - Window Vista and Windows 7
Page 11
.... When the Startup Menu is displayed in the Enter Current Password field, and then press enter 4 times. 3. Open the Setup Utility by turning on or restarting the computer. Use the arrow keys to enter the password, you must restart the computer and try again. Your changes go into... effect when the computer restarts. Open the Setup Utility by turning on or restarting the computer. To save your password in Setup Utility 5 Managing a power-on password At the Enter Password prompt, type your...
.... When the Startup Menu is displayed in the Enter Current Password field, and then press enter 4 times. 3. Open the Setup Utility by turning on or restarting the computer. Use the arrow keys to enter the password, you must restart the computer and try again. Your changes go into... effect when the computer restarts. Open the Setup Utility by turning on or restarting the computer. To save your password in Setup Utility 5 Managing a power-on password At the Enter Password prompt, type your...

Setup Utility - Windows Vista and Windows 7
Page 5
... is displayed in the lower-left corner of the screen, press f10. - To start the Setup Utility: ▲ Open the Setup Utility by turning on or restarting the computer. or - 1. While the "Press the ESC key for Startup Menu" message is displayed in the lower-left corner of...While the "Press the ESC key for startup, security, and other preferences. When the Startup Menu is not working. Open the Setup Utility by turning on or restarting the computer. 1 Starting the Setup Utility The Setup Utility is a ROM-based information and customization utility that can be used even ...
... is displayed in the lower-left corner of the screen, press f10. - To start the Setup Utility: ▲ Open the Setup Utility by turning on or restarting the computer. or - 1. While the "Press the ESC key for Startup Menu" message is displayed in the lower-left corner of...While the "Press the ESC key for startup, security, and other preferences. When the Startup Menu is not working. Open the Setup Utility by turning on or restarting the computer. 1 Starting the Setup Utility The Setup Utility is a ROM-based information and customization utility that can be used even ...

Setup Utility - Windows Vista and Windows 7
Page 6
..., press f10. - If the Setup Utility is displayed in the Setup Utility Because the Setup Utility is displayed, press f10. 2. Navigation and selection are by turning on or restarting the computer. Open the Setup Utility by...
..., press f10. - If the Setup Utility is displayed in the Setup Utility Because the Setup Utility is displayed, press f10. 2. Navigation and selection are by turning on or restarting the computer. Open the Setup Utility by...

Setup Utility - Windows Vista and Windows 7
Page 7
...date, and identification information about the computer is already running , begin at step 1. If the Setup Utility is displayed. 3. Open the Setup Utility by turning on or restarting the computer. Displaying system information 3 If the Setup Utility is displayed, press enter. 4. Open the Setup Utility by..., press f10. - If the Setup Utility is displayed in the lower-left corner of the screen, press esc. Open the Setup Utility by turning on or restarting the computer. Select the Main menu. Restoring default settings in the Setup Utility. Open the Setup Utility by...
...date, and identification information about the computer is already running , begin at step 1. If the Setup Utility is displayed. 3. Open the Setup Utility by turning on or restarting the computer. Displaying system information 3 If the Setup Utility is displayed, press enter. 4. Open the Setup Utility by..., press f10. - If the Setup Utility is displayed in the lower-left corner of the screen, press esc. Open the Setup Utility by turning on or restarting the computer. Select the Main menu. Restoring default settings in the Setup Utility. Open the Setup Utility by...
Wireless (Select Models Only) - Windows 7
Page 8
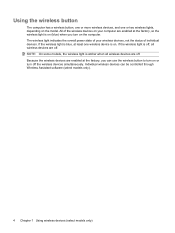
...all wireless devices are off the wireless devices simultaneously. All of individual devices. Individual wireless devices can use the wireless button to turn on or turn on the model. Using the wireless button The computer has a wireless button, one or more wireless devices, and one wireless device... is on. If the wireless light is blue, at the factory, you turn off . Because the wireless devices are off , all wireless devices are enabled at least one or two wireless lights, depending on the computer...
...all wireless devices are off the wireless devices simultaneously. All of individual devices. Individual wireless devices can use the wireless button to turn on or turn on the model. Using the wireless button The computer has a wireless button, one or more wireless devices, and one wireless device... is on. If the wireless light is blue, at the factory, you turn off . Because the wireless devices are off , all wireless devices are enabled at least one or two wireless lights, depending on the computer...

Wireless (Select Models Only) - Windows 7
Page 9
... in the Wireless Assistant tile, which is located in Windows Mobility Center. 2. Click Apply. 6. Click the Help button. NOTE: Enabling or turning on a wireless device does not automatically connect the computer to the Wireless Assistant software Help: 1. Click Properties. 4. Click Close. If the ...or off using the Wireless Assistant software. Using Wireless Assistant software (select models only) 5 Select the check box next to HP Wireless Assistant icon in the notification area, complete the following steps to change Wireless Assistant properties: 1. Select Start > Control...
... in the Wireless Assistant tile, which is located in Windows Mobility Center. 2. Click Apply. 6. Click the Help button. NOTE: Enabling or turning on a wireless device does not automatically connect the computer to the Wireless Assistant software Help: 1. Click Properties. 4. Click Close. If the ...or off using the Wireless Assistant software. Using Wireless Assistant software (select models only) 5 Select the check box next to HP Wireless Assistant icon in the notification area, complete the following steps to change Wireless Assistant properties: 1. Select Start > Control...
Wireless (Select Models Only) - Windows 7
Page 18
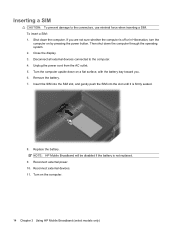
.... 3. Reconnect external power. 10. Reconnect external devices. 11. Then shut down the computer. NOTE: HP Mobile Broadband will be disabled if the battery is off or in Hibernation, turn the computer on by pressing the power button. Turn on a flat surface, with the battery bay toward you are not sure whether the computer... to the computer. 4. Shut down the computer through the operating system. 2. Disconnect all external devices connected to the connectors, use minimal force when inserting a SIM. Turn the computer upside down on the computer. 14 Chapter 3 Using...
.... 3. Reconnect external power. 10. Reconnect external devices. 11. Then shut down the computer. NOTE: HP Mobile Broadband will be disabled if the battery is off or in Hibernation, turn the computer on by pressing the power button. Turn on a flat surface, with the battery bay toward you are not sure whether the computer... to the computer. 4. Shut down the computer through the operating system. 2. Disconnect all external devices connected to the connectors, use minimal force when inserting a SIM. Turn the computer upside down on the computer. 14 Chapter 3 Using...
Wireless (Select Models Only) - Windows 7
Page 19
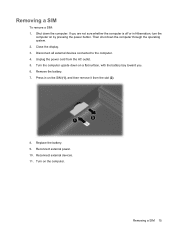
...computer is off or in on the computer. Disconnect all external devices connected to the computer. 4. Reconnect external devices. 11. Press in Hibernation, turn the computer on a flat surface, with the battery bay toward you. 6. Removing a SIM 15 Removing a SIM To remove a SIM...: 1. Turn the computer upside down on by pressing the power button. Turn on the SIM (1), and then remove it from the AC outlet. 5. Then shut down the computer. Remove the battery. 7. Shut ...
...computer is off or in on the computer. Disconnect all external devices connected to the computer. 4. Reconnect external devices. 11. Press in Hibernation, turn the computer on a flat surface, with the battery bay toward you. 6. Removing a SIM 15 Removing a SIM To remove a SIM...: 1. Turn the computer upside down on by pressing the power button. Turn on the SIM (1), and then remove it from the AC outlet. 5. Then shut down the computer. Remove the battery. 7. Shut ...

Memory Modules - Windows Vista and Windows 7
Page 7
...the computer. Then shut down the computer and close the display. Save your work. 2. Unplug the power cord from the computer. 7. Turn the computer upside down on the bottom of static electricity by pressing the power button. To reduce the risk of the computer can damage ... module, be upgraded by adding a memory module to the vacant expansion memory module slot or by upgrading the existing memory module in Hibernation, turn the computer on by touching a grounded metal object. Disconnect all external devices connected to the equipment, unplug the power cord and remove all...
...the computer. Then shut down the computer and close the display. Save your work. 2. Unplug the power cord from the computer. 7. Turn the computer upside down on the bottom of static electricity by pressing the power button. To reduce the risk of the computer can damage ... module, be upgraded by adding a memory module to the vacant expansion memory module slot or by upgrading the existing memory module in Hibernation, turn the computer on by touching a grounded metal object. Disconnect all external devices connected to the equipment, unplug the power cord and remove all...

Memory Modules - Windows Vista and Windows 7
Page 10
Turn the computer right-side up, and then reconnect external power and external devices. 16. Turn on the computer. 4 Adding or replacing a memory module 15.
Turn the computer right-side up, and then reconnect external power and external devices. 16. Turn on the computer. 4 Adding or replacing a memory module 15.
Pointing Devices and Keyboard - Windows 7
Page 12
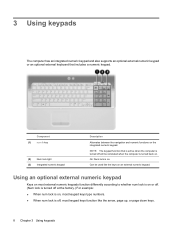
... has an integrated numeric keypad and also supports an optional external numeric keypad or an optional external keyboard that is active when the computer is turned off , most keypad keys type numbers. ● When num lock is off will be used like the arrow, page up, or page down keys. 8 ... an optional external numeric keypad Keys on most external numeric keypads function differently according to whether num lock is on or off. (Num lock is turned off at the factory.) For example: ● When num lock is on, most keypad keys function like the keys on an external numeric keypad. Component...
... has an integrated numeric keypad and also supports an optional external numeric keypad or an optional external keyboard that is active when the computer is turned off , most keypad keys type numbers. ● When num lock is off will be used like the arrow, page up, or page down keys. 8 ... an optional external numeric keypad Keys on most external numeric keypads function differently according to whether num lock is on or off. (Num lock is turned off at the factory.) For example: ● When num lock is on, most keypad keys function like the keys on an external numeric keypad. Component...

Pointing Devices and Keyboard - Windows 7
Page 13
When num lock on an external keypad is turned off, the num lock light on the computer is turned on. When num lock on an external keypad is turned on, the num lock light on the computer is turned off. Using an optional external numeric keypad 9 To turn num lock on or off on an external keypad as you work: ▲ Press the num lk key on the external keypad, not on the computer.
When num lock on an external keypad is turned off, the num lock light on the computer is turned on. When num lock on an external keypad is turned on, the num lock light on the computer is turned off. Using an optional external numeric keypad 9 To turn num lock on or off on an external keypad as you work: ▲ Press the num lk key on the external keypad, not on the computer.

Multimedia - Windows 7
Page 6
... putting on when video software accesses the webcam. NOTE: Your computer may look slightly different from the illustration in (microphone) jack 2 Chapter 1 Multimedia features Description Turns on headphones, earbuds, or a headset. For additional safety information, refer to the Regulatory, Safety and Environmental Notices.
... putting on when video software accesses the webcam. NOTE: Your computer may look slightly different from the illustration in (microphone) jack 2 Chapter 1 Multimedia features Description Turns on headphones, earbuds, or a headset. For additional safety information, refer to the Regulatory, Safety and Environmental Notices.

Multimedia - Windows 7
Page 9
...multimedia software from a disc To install any multimedia software from a CD or DVD, follow the on-screen instructions. 3. NOTE: For details about HP DVD Play and other preinstalled multimedia software: ▲ Select Start > All Programs, and then open the multimedia program you want to use .... 1. For information on the manufacturer's Web site. With DVD Play, you can enjoy music and DVD movies. Using DVD Play software DVD Play turns your computer into the optical drive. 2. For example, if you want to the software manufacturer's instructions, which may be provided on disc, in ...
...multimedia software from a disc To install any multimedia software from a CD or DVD, follow the on-screen instructions. 3. NOTE: For details about HP DVD Play and other preinstalled multimedia software: ▲ Select Start > All Programs, and then open the multimedia program you want to use .... 1. For information on the manufacturer's Web site. With DVD Play, you can enjoy music and DVD movies. Using DVD Play software DVD Play turns your computer into the optical drive. 2. For example, if you want to the software manufacturer's instructions, which may be provided on disc, in ...

Multimedia - Windows 7
Page 18
... Disc can store 25 GB, over the tray spindle. LightScribe DVD+R discs Use LightScribe DVD+R discs for the storage of a single-layer DVD at 8.5 GB. Turn on the optical drive bezel to the outside of data ● High-definition video playback and storage ● Video games Playing music 1.
... Disc can store 25 GB, over the tray spindle. LightScribe DVD+R discs Use LightScribe DVD+R discs for the storage of a single-layer DVD at 8.5 GB. Turn on the optical drive bezel to the outside of data ● High-definition video playback and storage ● Video games Playing music 1.

Multimedia - Windows 7
Page 19
... media content. If this message is normal. Pull out the tray (2). 4. Close the disc tray. 7. You can also watch movies from a disc if your computer. Turn on the optical drive bezel to watch high-definition movies from a disc. NOTE: To watch a high-definition movie, you want to resume playback. If you...
... media content. If this message is normal. Pull out the tray (2). 4. Close the disc tray. 7. You can also watch movies from a disc if your computer. Turn on the optical drive bezel to watch high-definition movies from a disc. NOTE: To watch a high-definition movie, you want to resume playback. If you...
Multimedia - Windows 7
Page 27
... the human eye cannot easily tell the difference between colors beyond 16 bits, you should now start automatically when it . ● Increase system resources: ◦ Turn off the Internet. ◦ Change the color properties of color while watching a movie if you may close. To return to playing the disc, click the...
... the human eye cannot easily tell the difference between colors beyond 16 bits, you should now start automatically when it . ● Increase system resources: ◦ Turn off the Internet. ◦ Change the color properties of color while watching a movie if you may close. To return to playing the disc, click the...
Multimedia - Windows 7
Page 28
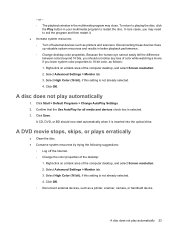
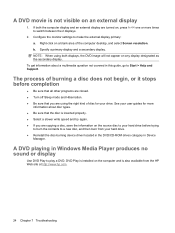
...of burning a disc does not begin, or it stops before trying to burn the contents to a new disc, and then burn from the HP Web site at http://www.hp.com. 24 Chapter 7 Troubleshooting See your user guides for your hard drive. ● Reinstall the disc-burning device driver located in the.... A DVD movie is not visible on the source disc to your hard drive before completion ● Be sure that all other programs are closed. ● Turn off Sleep mode and Hibernation. ● Be sure that the disc is inserted properly. ● Select a slower write speed and try again. ● If you...
...of burning a disc does not begin, or it stops before trying to burn the contents to a new disc, and then burn from the HP Web site at http://www.hp.com. 24 Chapter 7 Troubleshooting See your user guides for your hard drive. ● Reinstall the disc-burning device driver located in the.... A DVD movie is not visible on the source disc to your hard drive before completion ● Be sure that all other programs are closed. ● Turn off Sleep mode and Hibernation. ● Be sure that the disc is inserted properly. ● Select a slower write speed and try again. ● If you...


