Backup and Recovery - Windows 7
Page 5
... software setup. Tools provided by restoring the computer to recover your most current backup. With Recovery Manager, you can recover your system on the hard drive or from a dedicated recovery partition (select models only) on a regular basis to factory settings in the window. 1 Recovery discs have been included for the presence of a recovery partition, select Start, right-click Computer, click Manage, and then click Disk Management. Use these discs to an earlier state. ● Recovering a program or driver (Recovery Manager software...
... software setup. Tools provided by restoring the computer to recover your most current backup. With Recovery Manager, you can recover your system on the hard drive or from a dedicated recovery partition (select models only) on a regular basis to factory settings in the window. 1 Recovery discs have been included for the presence of a recovery partition, select Start, right-click Computer, click Manage, and then click Disk Management. Use these discs to an earlier state. ● Recovering a program or driver (Recovery Manager software...
Software Update - Windows Vista and Windows 7
Page 5
... this guide: 1. Install the updates. 1 Updating software Updated versions of the software provided with the hardware devices, and provides for tasks such as installing applications, running utilities, or changing Windows settings. If your permission or password for data transfer among hardware devices, including the time and date. Prepare for more information. 2. NOTE: The computer system BIOS is connected to Windows Help for a system BIOS update by identifying the BIOS version currently installed on the HP...
... this guide: 1. Install the updates. 1 Updating software Updated versions of the software provided with the hardware devices, and provides for tasks such as installing applications, running utilities, or changing Windows settings. If your permission or password for data transfer among hardware devices, including the time and date. Prepare for more information. 2. NOTE: The computer system BIOS is connected to Windows Help for a system BIOS update by identifying the BIOS version currently installed on the HP...

Software Update - Windows Vista and Windows 7
Page 6
... download. 3. Access the page on the screen to the hard drive. 2 Updating software Identify the BIOS update that provides software for your selection to download your computer: Select Start > Help and Support, and then click the link for software, driver, and BIOS updates. 2. If the Setup Utility does not open with the system information displayed, use the arrow keys to reliable external power using the AC adapter. While the "Press the ESC key for displaying BIOS information: 1. Do not download or install a BIOS update...
... download. 3. Access the page on the screen to the hard drive. 2 Updating software Identify the BIOS update that provides software for your selection to download your computer: Select Start > Help and Support, and then click the link for software, driver, and BIOS updates. 2. If the Setup Utility does not open with the system information displayed, use the arrow keys to reliable external power using the AC adapter. While the "Press the ESC key for displaying BIOS information: 1. Do not download or install a BIOS update...
Software Update - Windows Vista and Windows 7
Page 8
... may be able to http://www.hp.com/support, and select your Internet browser, go to download the driver and install it later. Select your specific product from the models listed. 4. NOTE: In some locations you want a specific SoftPaq, enter the SoftPaq number in the Search box, and then press enter. - After the file is displayed, click an updated driver to open a window containing additional information. 6. If prompted to...
... may be able to http://www.hp.com/support, and select your Internet browser, go to download the driver and install it later. Select your specific product from the models listed. 4. NOTE: In some locations you want a specific SoftPaq, enter the SoftPaq number in the Search box, and then press enter. - After the file is displayed, click an updated driver to open a window containing additional information. 6. If prompted to...
Wireless (Select Models Only) - Windows 7
Page 22
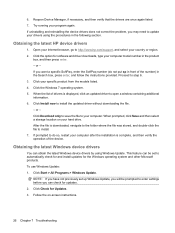
... Troubleshooting wireless connection problems Some possible causes for wireless connection problems include the following: ● Network configuration (SSID or security) has been changed. ● Wireless device is not listed in this chapter to diagnose and repair a computer that device drivers are included with select computer models only. If wireless networking is not installed correctly or has been disabled. ● Wireless device or router hardware has failed. ● Wireless device encountered interference from other devices. NOTE: Wireless networking devices are installed for...
... Troubleshooting wireless connection problems Some possible causes for wireless connection problems include the following: ● Network configuration (SSID or security) has been changed. ● Wireless device is not listed in this chapter to diagnose and repair a computer that device drivers are included with select computer models only. If wireless networking is not installed correctly or has been disabled. ● Wireless device or router hardware has failed. ● Wireless device encountered interference from other devices. NOTE: Wireless networking devices are installed for...
Wireless (Select Models Only) - Windows 7
Page 23
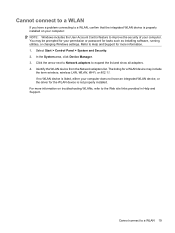
... Start > Control Panel > System and Security. 2. The listing for a WLAN device may be prompted for your computer does not have a problem connecting to a WLAN, confirm that the integrated WLAN device is properly installed on troubleshooting WLANs, refer to the Web site links provided in Help and Support. If no WLAN device is listed, either your permission or password for tasks such as installing software, running utilities, or changing Windows settings...
... Start > Control Panel > System and Security. 2. The listing for a WLAN device may be prompted for your computer does not have a problem connecting to a WLAN, confirm that the integrated WLAN device is properly installed on troubleshooting WLANs, refer to the Web site links provided in Help and Support. If no WLAN device is listed, either your permission or password for tasks such as installing software, running utilities, or changing Windows settings...

Drives - Windows 7
Page 13
... more efficiently. To run Disk Defragmenter: 1. Select Start > All Programs > Accessories > System Tools > Disk Cleanup. 2. Disk Defragmenter consolidates the fragmented files and folders on -screen instructions. HP recommends defragmenting your permission or password for more efficiently. Disk Defragmenter is easy to Help and Support for tasks such as installing software, running utilities, or changing Windows settings. Click Defragment disk. You may want to set Disk Defragmenter to run more...
... more efficiently. To run Disk Defragmenter: 1. Select Start > All Programs > Accessories > System Tools > Disk Cleanup. 2. Disk Defragmenter consolidates the fragmented files and folders on -screen instructions. HP recommends defragmenting your permission or password for more efficiently. Disk Defragmenter is easy to Help and Support for tasks such as installing software, running utilities, or changing Windows settings. Click Defragment disk. You may want to set Disk Defragmenter to run more...

Drives - Windows 7
Page 14
... all external devices connected to the computer (1). 10 Chapter 4 Replacing the hard drive Then shut down the computer before removing the hard drive from the computer. 7. Turn the computer upside down the computer and close the display. 3. Save your work. 2. Do not remove the hard drive while the computer is off or in Hibernation. Shut down on by pressing the power button. Remove the battery from the hard drive bay. Remove the...
... all external devices connected to the computer (1). 10 Chapter 4 Replacing the hard drive Then shut down the computer before removing the hard drive from the computer. 7. Turn the computer upside down the computer and close the display. 3. Save your work. 2. Do not remove the hard drive while the computer is off or in Hibernation. Shut down on by pressing the power button. Remove the battery from the hard drive bay. Remove the...
Drives - Windows 7
Page 21
... again listed. 7. Repeat for software and driver downloads, type your computer model number in the Search box, press enter, and follow these steps: 1. Click the option for any discs from the models listed. 4. Click Install now to step 6. 3. Then in the following section. Proceed to install the updated driver without downloading the file. - A device driver must be reinstalled 17 A device driver must be reinstalled To reinstall a device driver, follow the instructions provided. In the Device Manager window...
... again listed. 7. Repeat for software and driver downloads, type your computer model number in the Search box, press enter, and follow these steps: 1. Click the option for any discs from the models listed. 4. Click Install now to step 6. 3. Then in the following section. Proceed to install the updated driver without downloading the file. - A device driver must be reinstalled 17 A device driver must be reinstalled To reinstall a device driver, follow the instructions provided. In the Device Manager window...
Drives - Windows 7
Page 22
... the operation of the device. To use Windows Update: 1. When prompted, click Save and then select a storage location on -screen instructions. 18 Chapter 5 Troubleshooting If prompted to do so, restart your computer after the installation is set to automatically check for updates. 2. This feature can be prompted to your hardware drivers, as well as for updates. 3. You can check for and install Microsoft device drivers when new devices are connected to enter settings...
... the operation of the device. To use Windows Update: 1. When prompted, click Save and then select a storage location on -screen instructions. 18 Chapter 5 Troubleshooting If prompted to do so, restart your computer after the installation is set to automatically check for updates. 2. This feature can be prompted to your hardware drivers, as well as for updates. 3. You can check for and install Microsoft device drivers when new devices are connected to enter settings...
Drives - Windows 7
Page 23
... 6 D device drivers HP drivers 17 Windows drivers 18 Disk Cleanup software 9 Disk Defragmenter software 9 disk performance 9 drives caring for 1 hard 10, 11 optical 2 drives, optical drive 3 DVD burning 7, 16 changing region setting 6 copying 7 drive 2 playing 5 removing 8 DVD drive 3 H hard disk drive installing 11 removing 10 replacing 10 hard drive installing 11 removing 10 replacing 10 M maintenance Disk Cleanup 9 Disk Defragmenter 9 O optical disc Blu-ray 5 removing 8 using 3, 4 optical drive identifying 2 P playing a CD or DVD 5 R region codes, DVD 6 S software Disk Cleanup 9 Disk...
... 6 D device drivers HP drivers 17 Windows drivers 18 Disk Cleanup software 9 Disk Defragmenter software 9 disk performance 9 drives caring for 1 hard 10, 11 optical 2 drives, optical drive 3 DVD burning 7, 16 changing region setting 6 copying 7 drive 2 playing 5 removing 8 DVD drive 3 H hard disk drive installing 11 removing 10 replacing 10 hard drive installing 11 removing 10 replacing 10 M maintenance Disk Cleanup 9 Disk Defragmenter 9 O optical disc Blu-ray 5 removing 8 using 3, 4 optical drive identifying 2 P playing a CD or DVD 5 R region codes, DVD 6 S software Disk Cleanup 9 Disk...
Notebook Tour - Windows 7
Page 14
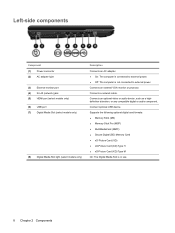
... following optional digital card formats: ● Memory Stick (MS) ● Memory Stick Pro (MSP) ● MultiMediaCard (MMC) ● Secure Digital (SD) Memory Card ● xD-Picture Card (XD) ● xD-Picture Card (XD) Type H ● xD-Picture Card (XD) Type M On: The Digital Media Slot is not connected to external power. Left-side components Component (1) Power connector (2) AC adapter light (3) External monitor port (4) RJ-45 (network) jack (5) HDMI port (select models only) (6) USB port (7) Digital Media Slot (select models only) (8) Digital Media Slot light (select models only...
... following optional digital card formats: ● Memory Stick (MS) ● Memory Stick Pro (MSP) ● MultiMediaCard (MMC) ● Secure Digital (SD) Memory Card ● xD-Picture Card (XD) ● xD-Picture Card (XD) Type H ● xD-Picture Card (XD) Type M On: The Digital Media Slot is not connected to external power. Left-side components Component (1) Power connector (2) AC adapter light (3) External monitor port (4) RJ-45 (network) jack (5) HDMI port (select models only) (6) USB port (7) Digital Media Slot (select models only) (8) Digital Media Slot light (select models only...
Pointing Devices and Keyboard - Windows 7
Page 5
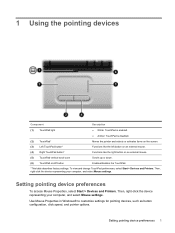
...button on an external mouse. (5) TouchPad vertical scroll zone Scrolls up or down. (6) TouchPad on/off button Enables/disables the TouchPad. *This table describes factory settings. Setting pointing device preferences To access Mouse Properties, select Start > Devices and Printers. To view and change TouchPad preferences, select Start > Devices and Printers. Then, right-click the device representing your computer, and select Mouse settings. Use Mouse Properties in Windows® to customize settings for pointing devices, such as button configuration, click speed, and pointer options...
...button on an external mouse. (5) TouchPad vertical scroll zone Scrolls up or down. (6) TouchPad on/off button Enables/disables the TouchPad. *This table describes factory settings. Setting pointing device preferences To access Mouse Properties, select Start > Devices and Printers. To view and change TouchPad preferences, select Start > Devices and Printers. Then, right-click the device representing your computer, and select Mouse settings. Use Mouse Properties in Windows® to customize settings for pointing devices, such as button configuration, click speed, and pointer options...
Multimedia - Windows 7
Page 13
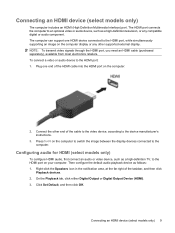
..., and then click Playback devices. 2. Connect the other supported external display. Click Set Default, and then click OK. Configuring audio for HDMI (select models only) To configure HDMI audio, first connect an audio or video device, such as follows: 1. Press fn+f4 on the computer display or any compatible digital or audio component. The HDMI port connects the computer to the HDMI port: 1. NOTE: To transmit video signals through the HDMI port, you need an HDMI cable (purchased separately), available from...
..., and then click Playback devices. 2. Connect the other supported external display. Click Set Default, and then click OK. Configuring audio for HDMI (select models only) To configure HDMI audio, first connect an audio or video device, such as follows: 1. Press fn+f4 on the computer display or any compatible digital or audio component. The HDMI port connects the computer to the HDMI port: 1. NOTE: To transmit video signals through the HDMI port, you need an HDMI cable (purchased separately), available from...
Multimedia - Windows 7
Page 30
.../support, and select your hard drive. Click the Windows 7 operating system. 5. Follow the on your country or region. 2. NOTE: If you have not previously set up Windows Update, you want a specific SoftPaq, enter the SoftPaq number (do so, restart your Internet browser, go to automatically check for and install updates for updates. 2. 6. or - Open your computer after the installation is complete, and then verify the operation of drivers is downloaded...
.../support, and select your hard drive. Click the Windows 7 operating system. 5. Follow the on your country or region. 2. NOTE: If you have not previously set up Windows Update, you want a specific SoftPaq, enter the SoftPaq number (do so, restart your Internet browser, go to automatically check for and install updates for updates. 2. 6. or - Open your computer after the installation is complete, and then verify the operation of drivers is downloaded...
Power Management - Windows 7
Page 5
... the remote control (select models only). ● Activate the TouchPad. Power settings and timeouts can be changed using Power Options in the Sleep state, the computer initiates Hibernation. Using power-saving states 1 When Sleep is in the Sleep state for an extended period or if the battery reaches a critical battery level while in Windows® Control Panel. Your work is closed, open the display. ● Press a key on the keyboard or button on the hard drive and the...
... the remote control (select models only). ● Activate the TouchPad. Power settings and timeouts can be changed using Power Options in the Sleep state, the computer initiates Hibernation. Using power-saving states 1 When Sleep is in the Sleep state for an extended period or if the battery reaches a critical battery level while in Windows® Control Panel. Your work is closed, open the display. ● Press a key on the keyboard or button on the hard drive and the...
Power Management - Windows 7
Page 18
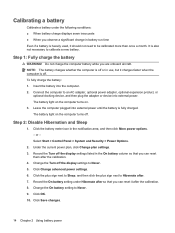
... battery light on . 3. Click the plus sign next to Sleep, and then click the plus sign next to Never. 5. Click OK. 10. To fully charge the battery: 1. Step 2: Disable Hibernation and Sleep 1. Select Start > Control Panel > System and Security > Power Options. 2. Record the Turn off the display settings listed in the On battery column so that you can reset them after . 7. Change the Turn off . Change the On battery setting to calibrate a new battery. Connect the...
... battery light on . 3. Click the plus sign next to Sleep, and then click the plus sign next to Never. 5. Click OK. 10. To fully charge the battery: 1. Step 2: Disable Hibernation and Sleep 1. Select Start > Control Panel > System and Security > Power Options. 2. Record the Turn off the display settings listed in the On battery column so that you can reset them after . 7. Change the Turn off . Change the On battery setting to calibrate a new battery. Connect the...
Power Management - Windows 7
Page 19
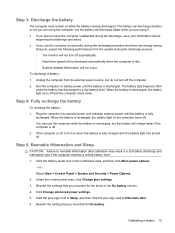
... battery column. 4. Reenter the setting that you use the computer while the battery is recharging, but do not turn off automatically. ◦ Hard drive speed will not decrease automatically when the computer is idle. ◦ System-initiated Hibernation will charge faster if the computer is fully charged and the battery light has turned off the computer. 2. Click Change advanced power settings. 5. or - Step 3: Discharge the battery...
... battery column. 4. Reenter the setting that you use the computer while the battery is recharging, but do not turn off automatically. ◦ Hard drive speed will not decrease automatically when the computer is idle. ◦ System-initiated Hibernation will charge faster if the computer is fully charged and the battery light has turned off the computer. 2. Click Change advanced power settings. 5. or - Step 3: Discharge the battery...
Power Management - Windows 7
Page 24
..., and then click the Power button. ● Press the power button and hold for at least 5 seconds. ● Disconnect the computer from external power for an extended period Although you are connecting an external hardware device that does not connect to use the Windows Shut down . The Shut down command closes all open programs, including the operating system, and then turns off the display and computer. If...
..., and then click the Power button. ● Press the power button and hold for at least 5 seconds. ● Disconnect the computer from external power for an extended period Although you are connecting an external hardware device that does not connect to use the Windows Shut down . The Shut down command closes all open programs, including the operating system, and then turns off the display and computer. If...

HP Notebook Hard Drives & Solid State Drives Identifying, Preventing, Diagnosing and Recovering from Drive Failures Care and Mai
Page 6
... Host Controller (AHCI) Interface. Intel Matrix Storage Manager Driver provides support for adding SATA drivers to RIS (Remote Installation Service) installation points include: Adding SATA drivers to installation CDs, building an image, and switching to SATA AHCI mode Using Sysprep with Serial ATA hard disk drives. To download the latest version of the Intel Matrix Storage Technology driver: http://www8.hp.com/us/en/support-drivers.html Installing SATA drivers SATA Native Mode...
... Host Controller (AHCI) Interface. Intel Matrix Storage Manager Driver provides support for adding SATA drivers to RIS (Remote Installation Service) installation points include: Adding SATA drivers to installation CDs, building an image, and switching to SATA AHCI mode Using Sysprep with Serial ATA hard disk drives. To download the latest version of the Intel Matrix Storage Technology driver: http://www8.hp.com/us/en/support-drivers.html Installing SATA drivers SATA Native Mode...


