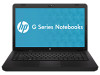

Getting Started - Windows 7
Page 6
... restore points 37 Create a system restore point 37 Restore to a previous date and time 37 7 Customer support Contacting customer support ...38 Labels ...39 8 Specifications Input power ...40 Operating environment ...40 Index ...42 vi
... restore points 37 Create a system restore point 37 Restore to a previous date and time 37 7 Customer support Contacting customer support ...38 Labels ...39 8 Specifications Input power ...40 Operating environment ...40 Index ...42 vi

Getting Started - Windows 7
Page 8
...For information about Quick Setup poster ● How to set up the computer ● How to identify computer components HP Notebook Reference Guide ● Power management features To access this guide: ● Electrical and mechanical safety information Select Start > Help and Support > ... Help and ● Software, driver, and BIOS updates Support. ● Troubleshooting tools NOTE: For country- Worldwide Telephone Numbers booklet HP support telephone numbers This booklet is provided with several resources to help ● Software, driver, and BIOS (Setup Utility) updates &#...
...For information about Quick Setup poster ● How to set up the computer ● How to identify computer components HP Notebook Reference Guide ● Power management features To access this guide: ● Electrical and mechanical safety information Select Start > Help and Support > ... Help and ● Software, driver, and BIOS updates Support. ● Troubleshooting tools NOTE: For country- Worldwide Telephone Numbers booklet HP support telephone numbers This booklet is provided with several resources to help ● Software, driver, and BIOS (Setup Utility) updates &#...
Getting Started - Windows 7
Page 12
On: Caps lock is on. ● On: The computer is on . ● Amber: All wireless devices are off . Component (1) TouchPad light (2) Caps lock light (3) Power light (4) Wireless light Description ● Off: TouchPad is on. ● Amber: TouchPad is on . ● Blinking: The computer is in the Sleep state. ● Off: The computer is off or in Hibernation. ● White: An integrated wireless device, such as a wireless local area network (WLAN) device and/or a Bluetooth® device, is off . 6 Chapter 2 Getting to know your computer
On: Caps lock is on. ● On: The computer is on . ● Amber: All wireless devices are off . Component (1) TouchPad light (2) Caps lock light (3) Power light (4) Wireless light Description ● Off: TouchPad is on. ● Amber: TouchPad is on . ● Blinking: The computer is in the Sleep state. ● Off: The computer is off or in Hibernation. ● White: An integrated wireless device, such as a wireless local area network (WLAN) device and/or a Bluetooth® device, is off . 6 Chapter 2 Getting to know your computer

Getting Started - Windows 7
Page 13
...This table describes factory settings. If the computer has stopped responding and Windows® shutdown procedures are ineffective, press and hold the power button for at least 5 seconds to open Help and Support. To learn more about changing factory settings, press f1 to turn on... to exit Sleep. ● When the computer is off, press the button to turn off the computer. Component Description (1) Speaker grill (2) Power button* Two integrated speakers produce sound. ● When the computer is in this section. Button and speakers NOTE: Your computer may look slightly...
...This table describes factory settings. If the computer has stopped responding and Windows® shutdown procedures are ineffective, press and hold the power button for at least 5 seconds to open Help and Support. To learn more about changing factory settings, press f1 to turn on... to exit Sleep. ● When the computer is off, press the button to turn off the computer. Component Description (1) Speaker grill (2) Power button* Two integrated speakers produce sound. ● When the computer is in this section. Button and speakers NOTE: Your computer may look slightly...

Getting Started - Windows 7
Page 15
... side NOTE: Your computer may look slightly different from the illustration in Sleep mode. ● White: The computer is connected to external power. ● Amber: The computer is charging. ● Off: The computer is not connected to act as a deterrent, but it .... ● Blinking white: The computer is in this section. Connects an AC adapter. Right side 9 Blinking: The optical drive is designed to external power. NOTE: The security cable is being mishandled or stolen. Component (1) Optical drive (select models only) (2) Optical drive light (select models only) (3) ...
... side NOTE: Your computer may look slightly different from the illustration in Sleep mode. ● White: The computer is connected to external power. ● Amber: The computer is charging. ● Off: The computer is not connected to act as a deterrent, but it .... ● Blinking white: The computer is in this section. Connects an AC adapter. Right side 9 Blinking: The optical drive is designed to external power. NOTE: The security cable is being mishandled or stolen. Component (1) Optical drive (select models only) (2) Optical drive light (select models only) (3) ...

Getting Started - Windows 7
Page 16
Connects a network cable. Produces sound when connected to know your computer On: The hard drive is in use. 10 Chapter 2 Getting to optional powered stereo speakers, headphones, earbuds, a headset, or television audio. Connect an optional USB device. To reduce the risk of personal injury, adjust the volume before putting ...
Connects a network cable. Produces sound when connected to know your computer On: The hard drive is in use. 10 Chapter 2 Getting to optional powered stereo speakers, headphones, earbuds, a headset, or television audio. Connect an optional USB device. To reduce the risk of personal injury, adjust the volume before putting ...

Getting Started - Windows 7
Page 20
Additional hardware Component Description (1) Power cord* Connects an AC adapter to an AC outlet. (2) AC adapter Converts AC power to DC power. (3) Battery* Powers the computer when the computer is not plugged into external power. *Batteries and power cords vary in appearance by region and country. 14 Chapter 2 Getting to know your computer
Additional hardware Component Description (1) Power cord* Connects an AC adapter to an AC outlet. (2) AC adapter Converts AC power to DC power. (3) Battery* Powers the computer when the computer is not plugged into external power. *Batteries and power cords vary in appearance by region and country. 14 Chapter 2 Getting to know your computer
Getting Started - Windows 7
Page 32
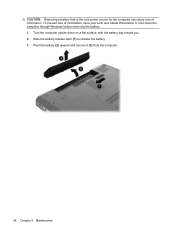
Slide the battery release latch (1) to release the battery 3. Pivot the battery (2) upward and remove it (3) from the computer. 26 Chapter 5 Maintenance Turn the computer upside down the computer through Windows before removing the battery. 1. CAUTION: Removing a battery that is the sole power source for the computer can cause loss of information, save your work and initiate Hibernation or shut down on a flat surface, with the battery bay toward you. 2. To prevent loss of information.
Slide the battery release latch (1) to release the battery 3. Pivot the battery (2) upward and remove it (3) from the computer. 26 Chapter 5 Maintenance Turn the computer upside down the computer through Windows before removing the battery. 1. CAUTION: Removing a battery that is the sole power source for the computer can cause loss of information, save your work and initiate Hibernation or shut down on a flat surface, with the battery bay toward you. 2. To prevent loss of information.
Getting Started - Windows 7
Page 33
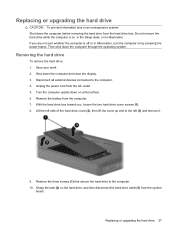
... the Sleep state, or in Hibernation, turn the computer on a flat surface. 6. Replacing or upgrading the hard drive 27 Shut down on by pressing the power button. Disconnect all external devices connected to the left (3) and remove it. 9. Remove the battery from the system board. Remove the three screws (1) that secure... drive while the computer is off or in Hibernation. Then shut down the computer before removing the hard drive from the AC outlet. 5. Unplug the power cord from the hard drive bay.
... the Sleep state, or in Hibernation, turn the computer on a flat surface. 6. Replacing or upgrading the hard drive 27 Shut down on by pressing the power button. Disconnect all external devices connected to the left (3) and remove it. 9. Remove the battery from the system board. Remove the three screws (1) that secure... drive while the computer is off or in Hibernation. Then shut down the computer before removing the hard drive from the AC outlet. 5. Unplug the power cord from the hard drive bay.
Getting Started - Windows 7
Page 35
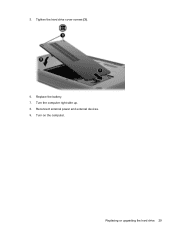
Turn the computer right-side up. 8. Replace the battery. 7. 5. Reconnect external power and external devices. 9. Tighten the hard drive cover screws (3). 6. Turn on the computer. Replacing or upgrading the hard drive 29
Turn the computer right-side up. 8. Replace the battery. 7. 5. Reconnect external power and external devices. 9. Tighten the hard drive cover screws (3). 6. Turn on the computer. Replacing or upgrading the hard drive 29
Getting Started - Windows 7
Page 36
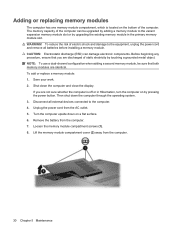
.... 5. To reduce the risk of the computer. Save your work. 2. WARNING! Disconnect all external devices connected to the equipment, unplug the power cord and remove all batteries before installing a memory module. Lift the memory module compartment cover (2) away from the computer. 30 Chapter 5 Maintenance...adding a second memory module, be upgraded by adding a memory module to the vacant expansion memory module slot or by pressing the power button. If you are discharged of the computer can damage electronic components. Turn the computer upside down on the bottom of electric ...
.... 5. To reduce the risk of the computer. Save your work. 2. WARNING! Disconnect all external devices connected to the equipment, unplug the power cord and remove all batteries before installing a memory module. Lift the memory module compartment cover (2) away from the computer. 30 Chapter 5 Maintenance...adding a second memory module, be upgraded by adding a memory module to the vacant expansion memory module slot or by pressing the power button. If you are discharged of the computer can damage electronic components. Turn the computer upside down on the bottom of electric ...
Getting Started - Windows 7
Page 38
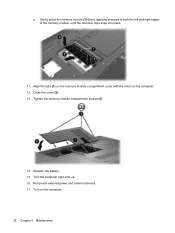
Reconnect external power and external devices. 17. c. Replace the battery. 15. Turn on the computer. 12. Turn the computer right-side up. 16. Close the cover (2). 13. Tighten the memory module compartment screws (3). 14. Gently press the memory module (3) down, applying pressure to both the left and right edges of the memory module, until the retention clips snap into place. 11. Align the tabs (1) on the memory module compartment cover with the notch on the computer. 32 Chapter 5 Maintenance
Reconnect external power and external devices. 17. c. Replace the battery. 15. Turn on the computer. 12. Turn the computer right-side up. 16. Close the cover (2). 13. Tighten the memory module compartment screws (3). 14. Gently press the memory module (3) down, applying pressure to both the left and right edges of the memory module, until the retention clips snap into place. 11. Align the tabs (1) on the memory module compartment cover with the notch on the computer. 32 Chapter 5 Maintenance

Getting Started - Windows 7
Page 41
...Only one set of recovery discs can exit the program before using Recovery Manager. ● Recovery Manager recovers only software that you use HP Recovery Manager to its original factory state. The next time you open Recovery Manager, you have previously backed up to 20 discs may be... the computer to continue the disc creation process. Software not provided with Recovery Manager software. ● The computer must be connected to AC power during this computer must be created per computer. ● Number each disc before inserting it into the optical drive. ● If necessary,...
...Only one set of recovery discs can exit the program before using Recovery Manager. ● Recovery Manager recovers only software that you use HP Recovery Manager to its original factory state. The next time you open Recovery Manager, you have previously backed up to 20 discs may be... the computer to continue the disc creation process. Software not provided with Recovery Manager software. ● The computer must be connected to AC power during this computer must be created per computer. ● Number each disc before inserting it into the optical drive. ● If necessary,...

Getting Started - Windows 7
Page 43
... Restore. 2. When to create restore points ● Before you add or extensively modify software or hardware ● Periodically, whenever the computer is connected to AC power before you want to a restore point (created at a specific point in time. Click the System Protection tab. 4. You also can then recover back to that...
... Restore. 2. When to create restore points ● Before you add or extensively modify software or hardware ● Periodically, whenever the computer is connected to AC power before you want to a restore point (created at a specific point in time. Click the System Protection tab. 4. You also can then recover back to that...
Getting Started - Windows 7
Page 46
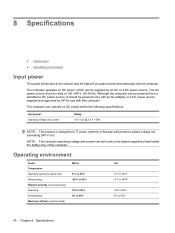
...% 5% to 95% 40 Chapter 8 Specifications The computer operates on DC power within the following specifications. Although the computer can operate on DC power, which can be supplied by HP for IT power systems in this computer. 8 Specifications ● Input power ● Operating environment Input power The power information in Norway with phase-to-phase voltage not exceeding...
...% 5% to 95% 40 Chapter 8 Specifications The computer operates on DC power within the following specifications. Although the computer can operate on DC power, which can be supplied by HP for IT power systems in this computer. 8 Specifications ● Input power ● Operating environment Input power The power information in Norway with phase-to-phase voltage not exceeding...
Getting Started - Windows 7
Page 48
...lock light, identifying 6 compartments memory module 13 components additional hardware 14 bottom 13 display 11 left-side 10 right-side 9 top 5 connector, power 9 cord, power 14 D drive light, identifying 10 drives optical drive 9 E esc key, identifying 8 external monitor port, identifying 10 F f11 36 fn ... recovery 34 H hard drive installing 28 light 10 removing 27 hard drive bay, identifying 13 headphone jack, identifying 10 I input power 40 integrated webcam light, identifying 11 integrated webcam, identifying 11 internal microphones, identifying 11 Internet connection setup 17 ISP, using 16...
...lock light, identifying 6 compartments memory module 13 components additional hardware 14 bottom 13 display 11 left-side 10 right-side 9 top 5 connector, power 9 cord, power 14 D drive light, identifying 10 drives optical drive 9 E esc key, identifying 8 external monitor port, identifying 10 F f11 36 fn ... recovery 34 H hard drive installing 28 light 10 removing 27 hard drive bay, identifying 13 headphone jack, identifying 10 I input power 40 integrated webcam light, identifying 11 integrated webcam, identifying 11 internal microphones, identifying 11 Internet connection setup 17 ISP, using 16...

Getting Started - Windows 7
Page 49
... optical drive identifying 9 light 9 P pinching TouchPad gesture 24 pointing devices, setting preferences 21 ports external monitor 10 USB 9, 10 VGA 10 power button, identifying 7 power connector, identifying 9 power cord, identifying 14 power light, identifying 6 product name and number, computer 39 R recovering a program or driver 34 recovering from the dedicated recovery partition 35 recovering from...
... optical drive identifying 9 light 9 P pinching TouchPad gesture 24 pointing devices, setting preferences 21 ports external monitor 10 USB 9, 10 VGA 10 power button, identifying 7 power connector, identifying 9 power cord, identifying 14 power light, identifying 6 product name and number, computer 39 R recovering a program or driver 34 recovering from the dedicated recovery partition 35 recovering from...

HP Notebook User Guide - SuSE Linux
Page 6
......26 Checking your audio functions 26 Webcam (select models only) ...26 Video ...27 VGA ...27 6 Power management Shutting down the computer ...28 Setting power options ...29 Using power-saving states 29 Initiating and exiting Suspend 29 Initiating and exiting Hibernation 29 Using the... Power icon ...30 Using power management 30 Viewing the current power management settings 30 Changing the current power management settings 30 Using battery power ...30 Displaying the remaining battery charge 31 Inserting or removing ...
......26 Checking your audio functions 26 Webcam (select models only) ...26 Video ...27 VGA ...27 6 Power management Shutting down the computer ...28 Setting power options ...29 Using power-saving states 29 Initiating and exiting Suspend 29 Initiating and exiting Hibernation 29 Using the... Power icon ...30 Using power management 30 Viewing the current power management settings 30 Changing the current power management settings 30 Using battery power ...30 Displaying the remaining battery charge 31 Inserting or removing ...

HP Notebook User Guide - SuSE Linux
Page 8
... before completion 62 Contacting customer support ...62 Labels ...63 Appendix B Routine care Cleaning the display ...65 Cleaning the TouchPad and keyboard 66 Appendix C Specifications Input power ...67 Operating environment ...67 Appendix D Electrostatic discharge Index ...70 viii
... before completion 62 Contacting customer support ...62 Labels ...63 Appendix B Routine care Cleaning the display ...65 Cleaning the TouchPad and keyboard 66 Appendix C Specifications Input power ...67 Operating environment ...67 Appendix D Electrostatic discharge Index ...70 viii

HP Notebook User Guide - SuSE Linux
Page 13
Component (1) TouchPad light (2) Caps lock light (3) Power light (4) Wireless light Description ● Off: TouchPad is on. ● Amber: TouchPad is on . ● Blinking: The computer is in the Suspend state. ● Off: The computer is off or in Hibernation. ● White: An integrated wireless device, such as a wireless local area network (WLAN) device and/or a Bluetooth® device, is off . Top 5 On: Caps lock is on. ● On: The computer is on . ● Amber: All wireless devices are off .
Component (1) TouchPad light (2) Caps lock light (3) Power light (4) Wireless light Description ● Off: TouchPad is on. ● Amber: TouchPad is on . ● Blinking: The computer is in the Suspend state. ● Off: The computer is off or in Hibernation. ● White: An integrated wireless device, such as a wireless local area network (WLAN) device and/or a Bluetooth® device, is off . Top 5 On: Caps lock is on. ● On: The computer is on . ● Amber: All wireless devices are off .


