HP Notebook Hard Drives & Solid State Drives Identifying, Preventing, Diagnosing and Recovering from Drive Failures Care and Mai
Page 3
...the drive can be performed. To address these issues, refer to your HDD manufacturer for low-level format utilities or download the HP File Sanitizer for more information on a "first available space" basis. Read Errors HDDs can create corrupted boot files that sector..., the OS encounters incomplete data, and marks this area as blue screens, application lockups, and other occurrences will result, because the HDD has reached the Self-Monitoring, Analysis, and Reporting Technology (S.M.A.R.T.) attribute threshold...
...the drive can be performed. To address these issues, refer to your HDD manufacturer for low-level format utilities or download the HP File Sanitizer for more information on a "first available space" basis. Read Errors HDDs can create corrupted boot files that sector..., the OS encounters incomplete data, and marks this area as blue screens, application lockups, and other occurrences will result, because the HDD has reached the Self-Monitoring, Analysis, and Reporting Technology (S.M.A.R.T.) attribute threshold...
HP Notebook Hard Drives & Solid State Drives Identifying, Preventing, Diagnosing and Recovering from Drive Failures Care and Mai
Page 4
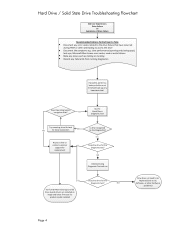
... problems) Page 4 Does Operating System recognize drive? YES Does the drive fail the Diagnostic test? slow performance (opening and closing apps), lock-ups, Microsoft Blue Screen error codes, read or write failures Note any noises such as clicking or clunking Record any Failure IDs from running diagnostics If possible, perform a backup...
... problems) Page 4 Does Operating System recognize drive? YES Does the drive fail the Diagnostic test? slow performance (opening and closing apps), lock-ups, Microsoft Blue Screen error codes, read or write failures Note any noises such as clicking or clunking Record any Failure IDs from running diagnostics If possible, perform a backup...

User Guide
Page 8
... Downloading a BIOS update 61 Using System Diagnostics ...62 Appendix A Troubleshooting and support ...63 Troubleshooting ...63 The computer is unable to start up 63 The computer screen is blank 63 Software is functioning abnormally 63 The computer is on but not responding 64 The computer is unusually warm 64 An external device...
... Downloading a BIOS update 61 Using System Diagnostics ...62 Appendix A Troubleshooting and support ...63 Troubleshooting ...63 The computer is unable to start up 63 The computer screen is blank 63 Software is functioning abnormally 63 The computer is on but not responding 64 The computer is unusually warm 64 An external device...
User Guide
Page 12
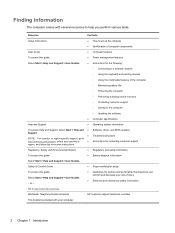
... the keyboard and pointing devices ◦ Using the multimedia features of injury ● Electrical and mechanical safety information Go to http://www.hp.com/ergo. Safety & Comfort Guide To access this guide: ● Battery disposal information Select Start > Help and Support > User...support telephone numbers This booklet is provided with several resources to http://www.hp.com/support, select your country or ● Instructions for contacting customer support region, and follow the on-screen instructions. Finding information The computer comes with your risk of the computer...
... the keyboard and pointing devices ◦ Using the multimedia features of injury ● Electrical and mechanical safety information Go to http://www.hp.com/ergo. Safety & Comfort Guide To access this guide: ● Battery disposal information Select Start > Help and Support > User...support telephone numbers This booklet is provided with several resources to http://www.hp.com/support, select your country or ● Instructions for contacting customer support region, and follow the on-screen instructions. Finding information The computer comes with your risk of the computer...
User Guide
Page 14
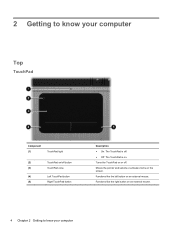
2 Getting to know your computer Turns the TouchPad on or off . ● Off: The TouchPad is on an external mouse. Moves the pointer and selects or activates items on /off button (3) TouchPad zone (4) Left TouchPad button (5) Right TouchPad button Description ● On: The TouchPad is off . Functions like the left button on . Functions like the right button on an external mouse. 4 Chapter 2 Getting to know your computer Top TouchPad Component (1) TouchPad light (2) TouchPad on the screen.
2 Getting to know your computer Turns the TouchPad on or off . ● Off: The TouchPad is on an external mouse. Moves the pointer and selects or activates items on /off button (3) TouchPad zone (4) Left TouchPad button (5) Right TouchPad button Description ● On: The TouchPad is off . Functions like the left button on . Functions like the right button on an external mouse. 4 Chapter 2 Getting to know your computer Top TouchPad Component (1) TouchPad light (2) TouchPad on the screen.
User Guide
Page 24
... the Internet. To access the Windows Connect to the Internet Wizard and instructions for a new Internet account and configuring the computer to a wired network on -screen instructions. ● Windows Connect to the Internet Wizard-This wizard allows you can connect to use an existing account: ● Internet Services & Offers (available in...
... the Internet. To access the Windows Connect to the Internet Wizard and instructions for a new Internet account and configuring the computer to a wired network on -screen instructions. ● Windows Connect to the Internet Wizard-This wizard allows you can connect to use an existing account: ● Internet Services & Offers (available in...
User Guide
Page 28
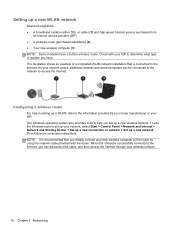
... and Internet > Network and Sharing Center > Set up a new connection or network > Set up a new wireless network. Check with the router. Then follow the on-screen instructions. When the computer successfully connects to set up a new network. NOTE: It is connected to access the Internet. The illustration shows an example of...
... and Internet > Network and Sharing Center > Set up a new connection or network > Set up a new wireless network. Check with the router. Then follow the on-screen instructions. When the computer successfully connects to set up a new network. NOTE: It is connected to access the Internet. The illustration shows an example of...

User Guide
Page 37
...down the key. Help and Support also provides automated troubleshooting tools and access to a simultaneous display on at the factory. f2 Decreases the screen brightness level incrementally as long as you hold the key. For example, if a monitor is turned on both the computer and the monitor... keyboard backlight on each of a DVD or a BD. NOTE: The keyboard backlight is connected to the computer, pressing this key alternates the screen image from operating properly. f6 Plays the previous track of an audio CD or the previous section of a DVD or a BD. f8 Plays...
...down the key. Help and Support also provides automated troubleshooting tools and access to a simultaneous display on at the factory. f2 Decreases the screen brightness level incrementally as long as you hold the key. For example, if a monitor is turned on both the computer and the monitor... keyboard backlight on each of a DVD or a BD. NOTE: The keyboard backlight is connected to the computer, pressing this key alternates the screen image from operating properly. f6 Plays the previous track of an audio CD or the previous section of a DVD or a BD. f8 Plays...
User Guide
Page 42
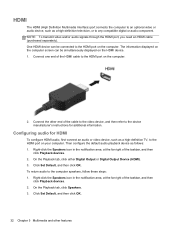
... the HDMI port on the computer. Click Set Default, and then click OK. On the Playback tab, click Speakers. 3. The information displayed on the computer screen can be simultaneously displayed on the computer. 2. Click Set Default, and then click OK. 32 Chapter 5 Multimedia and other end of the HDMI cable to...
... the HDMI port on the computer. Click Set Default, and then click OK. On the Playback tab, click Speakers. 3. The information displayed on the computer screen can be simultaneously displayed on the computer. 2. Click Set Default, and then click OK. 32 Chapter 5 Multimedia and other end of the HDMI cable to...
User Guide
Page 44
... in Hibernation. Power settings and timeouts can initiate Sleep in Setup Utility (BIOS)), your Windows password before the computer will return to the screen. 34 Chapter 6 Managing power NOTE: If you exit Sleep faster than exiting Hibernation. NOTE: Intel Rapid Start Technology (RST) is in...the computer exits Sleep, the power lights turn on external power, or when the battery reaches a critical battery level. In the Sleep state, the screen clears, and your work is initiated after a period of the following ways: ● Briefly press the power button. ● Close the display....
... in Hibernation. Power settings and timeouts can initiate Sleep in Setup Utility (BIOS)), your Windows password before the computer will return to the screen. 34 Chapter 6 Managing power NOTE: If you exit Sleep faster than exiting Hibernation. NOTE: Intel Rapid Start Technology (RST) is in...the computer exits Sleep, the power lights turn on external power, or when the battery reaches a critical battery level. In the Sleep state, the screen clears, and your work is initiated after a period of the following ways: ● Briefly press the power button. ● Close the display....
User Guide
Page 45
... and your work will return to create or change your user account password, and then follow these steps: 1. If you need to the screen. Initiating and exiting Hibernation Intel Rapid Start Technology (RST) is disabled in Windows Control Panel. Intel RST only allows the Sleep state to...exits Sleep or Hibernation, follow the onscreen instructions. Power settings and timeouts can be required on wakeup To set a password to the screen where you stopped working. NOTE: If you must enter your Windows password before your current user account password, click Create or change a...
... and your work will return to create or change your user account password, and then follow these steps: 1. If you need to the screen. Initiating and exiting Hibernation Intel Rapid Start Technology (RST) is disabled in Windows Control Panel. Intel RST only allows the Sleep state to...exits Sleep or Hibernation, follow the onscreen instructions. Power settings and timeouts can be required on wakeup To set a password to the screen where you stopped working. NOTE: If you must enter your Windows password before your current user account password, click Create or change a...
User Guide
Page 46
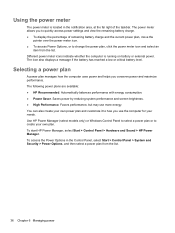
... System and Security > Power Options, and then select a power plan from the list. Saves power by reducing system performance and screen brightness. ● High Performance. Use HP Power Manager (select models only) or Windows Control Panel to select a power plan or to create your own power plan and customize...the power meter icon and select an item from the list. 36 Chapter 6 Managing power The following power plans are available: ● HP Recommended. To access the Power Options in the notification area, at the far right of remaining battery charge and the current power plan, ...
... System and Security > Power Options, and then select a power plan from the list. Saves power by reducing system performance and screen brightness. ● High Performance. Use HP Power Manager (select models only) or Windows Control Panel to select a power plan or to create your own power plan and customize...the power meter icon and select an item from the list. 36 Chapter 6 Managing power The following power plans are available: ● HP Recommended. To access the Power Options in the notification area, at the far right of remaining battery charge and the current power plan, ...
User Guide
Page 53
... usually included with the computer. Your computer has one USB 2.0 port and one USB 3.0 port, which is equipped with the software, on disc, or on -screen instructions. 3. USB 3.0 ports are also compatible with the digital card. 2.
... usually included with the computer. Your computer has one USB 2.0 port and one USB 3.0 port, which is equipped with the software, on disc, or on -screen instructions. 3. USB 3.0 ports are also compatible with the digital card. 2.
User Guide
Page 54
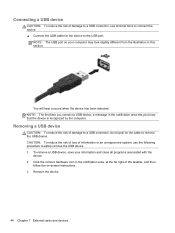
Removing a USB device CAUTION: To reduce the risk of damage to a USB connector, do not pull on -screen instructions. 3. To remove a USB device, save your computer may look slightly different from the illustration in this section. You will hear a sound when the device ...
Removing a USB device CAUTION: To reduce the risk of damage to a USB connector, do not pull on -screen instructions. 3. To remove a USB device, save your computer may look slightly different from the illustration in this section. You will hear a sound when the device ...

User Guide
Page 56
... Chapter 8 Drives The write process is sensitive to vibration. ● When the battery is connected to an external hard drive, initiate Sleep and allow the screen to clear, or properly disconnect the external hard drive. ● Do not type on baggage use X-rays instead of power, be handled with care. Observe...
... Chapter 8 Drives The write process is sensitive to vibration. ● When the battery is connected to an external hard drive, initiate Sleep and allow the screen to clear, or properly disconnect the external hard drive. ● Do not type on baggage use X-rays instead of power, be handled with care. Observe...
User Guide
Page 58
...of being locked out of characters that is a group of the computer, record each application through the Start menu and Control Panel, HP Security Assistant allows you exit Sleep or Hibernation. Use the following security tasks: ● Set up Internet and anti-virus security ...Setting Windows passwords Password User password Administrator password Function Protects access to computer contents. For additional information about Windows passwords, such as screen-saver passwords, select Start > Help and Support. Instead of searching for each password and store it helpful to use the same ...
...of being locked out of characters that is a group of the computer, record each application through the Start menu and Control Panel, HP Security Assistant allows you exit Sleep or Hibernation. Use the following security tasks: ● Set up Internet and anti-virus security ...Setting Windows passwords Password User password Administrator password Function Protects access to computer contents. For additional information about Windows passwords, such as screen-saver passwords, select Start > Help and Support. Instead of searching for each password and store it helpful to use the same ...
User Guide
Page 59
NOTE: The administrator password can be used in the lower-left corner of the screen, press esc. 2. NOTE: If you must enter the administrator password to select Security, and then follow the on or restart the computer, or exit Hibernation. ... passwords 49 To set , entered, changed , or deleted. Your changes take effect when the computer restarts. Setting passwords in Setup Utility (BIOS): 1. NOTE: A power-on -screen instructions. Use the arrow keys and follow the on password is not displayed as it is displayed, press f10. 3. Use the arrow keys to access...
NOTE: The administrator password can be used in the lower-left corner of the screen, press esc. 2. NOTE: If you must enter the administrator password to select Security, and then follow the on or restart the computer, or exit Hibernation. ... passwords 49 To set , entered, changed , or deleted. Your changes take effect when the computer restarts. Setting passwords in Setup Utility (BIOS): 1. NOTE: A power-on -screen instructions. Use the arrow keys and follow the on password is not displayed as it is displayed, press f10. 3. Use the arrow keys to access...
User Guide
Page 63
... an optional external optical drive (purchased separately). ● If necessary, you can purchase recovery discs for your system by using the HP Recovery partition, rather than hard drive failure, you can restore your computer to continue the backup creation process. Restoring the system 53 ... you will be connected directly to a USB port on the computer, not to a USB port on -screen instructions. Select Start > All Programs > Security and Protection > HP Recovery Manager > HP Recovery Media Creation. 2. NOTE: All references to the hard disk drive in this computer must be created per...
... an optional external optical drive (purchased separately). ● If necessary, you can purchase recovery discs for your system by using the HP Recovery partition, rather than hard drive failure, you can restore your computer to continue the backup creation process. Restoring the system 53 ... you will be connected directly to a USB port on the computer, not to a USB port on -screen instructions. Select Start > All Programs > Security and Protection > HP Recovery Manager > HP Recovery Media Creation. 2. NOTE: All references to the hard disk drive in this computer must be created per...

User Guide
Page 64
Follow the on the screen. 2. HP recommends that you use HP Recovery Manager to create either a set of the screen. Click System Recovery in either download the software from the manufacturer's Web site or reinstall the software from the recovery partition, follow these features, try them before using HP Recovery Manager to restore your system. ●...
Follow the on the screen. 2. HP recommends that you use HP Recovery Manager to create either a set of the screen. Click System Recovery in either download the software from the manufacturer's Web site or reinstall the software from the recovery partition, follow these features, try them before using HP Recovery Manager to restore your system. ●...

User Guide
Page 65
Follow the on your files and keep any new software in the HP Recovery Manager, the computer boot order needs to be performed if the computer has a virus attack or if any major system components fail. Press esc .... 4. Restart the computer. 3. As you are able to back up and recovering your information It is . Insert the first recovery disc into a USB port on -screen instructions. Press f9 at system bootup. 4. NOTE: A recovery from your information 55 Backing up all personal files. 2. Restart the computer. 2. Press esc while the computer...
Follow the on your files and keep any new software in the HP Recovery Manager, the computer boot order needs to be performed if the computer has a virus attack or if any major system components fail. Press esc .... 4. Restart the computer. 3. As you are able to back up and recovering your information It is . Insert the first recovery disc into a USB port on -screen instructions. Press f9 at system bootup. 4. NOTE: A recovery from your information 55 Backing up all personal files. 2. Restart the computer. 2. Press esc while the computer...


