HP ENVY 17 - Maintenance and Service Guide
Page 6
... Memory module ...42 Secondary hard drive 44 WLAN module ...48 Keyboard ...50 Top cover ...52 Power button board 55 USB/Card Reader board 56 Optical drive ...57 Power connector cable 59 System board ...60 Fan/heat sink assembly 64 Processor ...66 Speakers ...68 Subwoofer ...69 Display assembly ...70 5 Setup Utility (BIOS) ...77 Starting Setup Utility ...77 Using Setup Utility ...77 Changing the language of Setup Utility 77 Navigating and selecting in Setup Utility 78 Display system information 78 Restoring factory default settings in Setup Utility 78 Exiting Setup Utility 78 Updating...
... Memory module ...42 Secondary hard drive 44 WLAN module ...48 Keyboard ...50 Top cover ...52 Power button board 55 USB/Card Reader board 56 Optical drive ...57 Power connector cable 59 System board ...60 Fan/heat sink assembly 64 Processor ...66 Speakers ...68 Subwoofer ...69 Display assembly ...70 5 Setup Utility (BIOS) ...77 Starting Setup Utility ...77 Using Setup Utility ...77 Changing the language of Setup Utility 77 Navigating and selecting in Setup Utility 78 Display system information 78 Restoring factory default settings in Setup Utility 78 Exiting Setup Utility 78 Updating...
HP ENVY 17 - Maintenance and Service Guide
Page 10
typical brightness: 300 nits 17.3-in ) thicknesses Customer-accessible Supports dual hard drive configuration, including solid-state drive (SSD) Serial ATA Accelerometer (HP Mobile Data Protection System 3D) RAID 0/1 Support 2 Chapter 1 Product description ENWW typical brightness: 200 nits All display assemblies include 2 wireless local area network (WLAN) antenna cables Supports flush display panel cover Supports 16:9 ultra wide aspect ratio Lighted logo on top bezel 2 customer-accessible/upgradable memory module slots Supports dual-channel memory Supports up to 8192 GB of...
typical brightness: 300 nits 17.3-in ) thicknesses Customer-accessible Supports dual hard drive configuration, including solid-state drive (SSD) Serial ATA Accelerometer (HP Mobile Data Protection System 3D) RAID 0/1 Support 2 Chapter 1 Product description ENWW typical brightness: 200 nits All display assemblies include 2 wireless local area network (WLAN) antenna cables Supports flush display panel cover Supports 16:9 ultra wide aspect ratio Lighted logo on top bezel 2 customer-accessible/upgradable memory module slots Supports dual-channel memory Supports up to 8192 GB of...
HP ENVY 17 - Maintenance and Service Guide
Page 12
... Ethernet Wireless External media card Ports Keyboard/ pointing devices Power requirements Description Integrated 10/100/1000 GB network interface card (NIC) Integrated wireless local area network (WLAN) options by way of wireless module: Two WLAN antennas built into display assembly Support for the following WLAN formats: ● Broadcom 43224 802.11a/b/g/n 2x2 WiFi Adapter ● Intel Centrino Advanced-N 6200 802.11a/b/g/n WLAN module Integrated personal area network (PAN) options by way of Bluetooth® module: Support...
... Ethernet Wireless External media card Ports Keyboard/ pointing devices Power requirements Description Integrated 10/100/1000 GB network interface card (NIC) Integrated wireless local area network (WLAN) options by way of wireless module: Two WLAN antennas built into display assembly Support for the following WLAN formats: ● Broadcom 43224 802.11a/b/g/n 2x2 WiFi Adapter ● Intel Centrino Advanced-N 6200 802.11a/b/g/n WLAN module Integrated personal area network (PAN) options by way of Bluetooth® module: Support...
HP ENVY 17 - Maintenance and Service Guide
Page 20
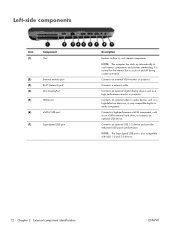
...external hard drive, or connects an optional USB device. Connects an external VGA monitor or projector. NOTE: The SuperSpeed USB port is normal for the internal fan to cycle on and off during routine operation. Connects a network cable. NOTE: The computer fan starts up automatically to cool internal components. Connects an optional USB 3.0 device and provides enhanced USB power performance. Connects an optional digital display device such as a high performance monitor or projector. Left-side components Item (1) Component Vent (2) External monitor port (3) RJ-45 (network) jack...
...external hard drive, or connects an optional USB device. Connects an external VGA monitor or projector. NOTE: The SuperSpeed USB port is normal for the internal fan to cycle on and off during routine operation. Connects a network cable. NOTE: The computer fan starts up automatically to cool internal components. Connects an optional USB 3.0 device and provides enhanced USB power performance. Connects an optional digital display device such as a high performance monitor or projector. Left-side components Item (1) Component Vent (2) External monitor port (3) RJ-45 (network) jack...

HP ENVY 17 - Maintenance and Service Guide
Page 46
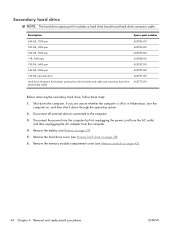
..., turn the computer on page 38). Loosen the two captive Phillips screws that secure the hard drive cover to the computer. 3. Disconnect all external devices connected to the computer. 38 Chapter 4 Removal and replacement procedures ENWW Remove the memory module compartment cover (see Primary hard drive on , and then shut it down the computer. Primary hard drive NOTE: The hard drive spare part kit includes a hard drive bracket and hard drive connector cable. Remove the hard drive cover (see Memory module...
..., turn the computer on page 38). Loosen the two captive Phillips screws that secure the hard drive cover to the computer. 3. Disconnect all external devices connected to the computer. 38 Chapter 4 Removal and replacement procedures ENWW Remove the memory module compartment cover (see Primary hard drive on , and then shut it down the computer. Primary hard drive NOTE: The hard drive spare part kit includes a hard drive bracket and hard drive connector cable. Remove the hard drive cover (see Memory module...
HP ENVY 17 - Maintenance and Service Guide
Page 52
Shut down through the operating system. 2. Remove the battery (see Battery on page 38). 6. Remove the hard drive cover (see Memory module on , and then shut it down the computer. Remove the memory module compartment cover (see Primary hard drive on page 37). 5. Disconnect all external devices connected to the computer. 3. Disconnect the power from the computer by first unplugging the power cord from the AC outlet and then unplugging the AC...
Shut down through the operating system. 2. Remove the battery (see Battery on page 38). 6. Remove the hard drive cover (see Memory module on , and then shut it down the computer. Remove the memory module compartment cover (see Primary hard drive on page 37). 5. Disconnect all external devices connected to the computer. 3. Disconnect the power from the computer by first unplugging the power cord from the AC outlet and then unplugging the AC...
HP ENVY 17 - Maintenance and Service Guide
Page 88
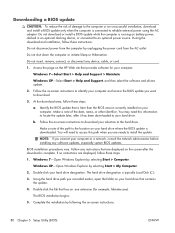
... displayed, follow these steps: a. During the download and installation, follow these steps: 1. Follow the on battery power, docked in an optional docking device, or connected to a network, consult the network administrator before installing any device, cable, or cord. 1. NOTE: If you want to download your computer. The hard drive designation is running on -screen instructions to the hard drive. Double-click the file that is connected to the location on -screen instructions. 80 Chapter 5 Setup Utility (BIOS...
... displayed, follow these steps: a. During the download and installation, follow these steps: 1. Follow the on battery power, docked in an optional docking device, or connected to a network, consult the network administrator before installing any device, cable, or cord. 1. NOTE: If you want to download your computer. The hard drive designation is running on -screen instructions to the hard drive. Double-click the file that is connected to the location on -screen instructions. 80 Chapter 5 Setup Utility (BIOS...

HP ENVY 17 - Maintenance and Service Guide
Page 114
... 8 Windows logo 8 L left-side components 12 light components 9 lights battery 14 caps lock 9 drive 11 mute 9 power 9, 11 TouchPad off indicator webcam 6 wireless 9 9, 10 M mass storage device, spare part numbers 24 memory module product description 2 removal 42 spare part numbers 20, 27, 42 memory module compartment 15 memory module compartment cover illustrated 23 removal 42 microphone location 6 product description 3 microphone jack connector pinout 93 location 13 mini DisplayPort 12 model description 17, 36 model name 1 monitor port connector pinout 94 location 12 mute light 9 N network...
... 8 Windows logo 8 L left-side components 12 light components 9 lights battery 14 caps lock 9 drive 11 mute 9 power 9, 11 TouchPad off indicator webcam 6 wireless 9 9, 10 M mass storage device, spare part numbers 24 memory module product description 2 removal 42 spare part numbers 20, 27, 42 memory module compartment 15 memory module compartment cover illustrated 23 removal 42 microphone location 6 product description 3 microphone jack connector pinout 93 location 13 mini DisplayPort 12 model description 17, 36 model name 1 monitor port connector pinout 94 location 12 mute light 9 N network...
HP ENVY 17 - Maintenance and Service Guide
Page 115
...1 display panel 2 Ethernet 4 external media cards 4 graphics 1 hard drives 2 keyboard 4 memory module 2 microphone 3 operating system 5 optical drives 3 pointing device 4 ports 4 power requirements 4 processors 1 product name 1 security 5 serviceability 5 video 3 wireless 4 product name 1, 17, 35 product number 17, 35 R removal/replacement preliminaries 30 procedures 35 right-side components 14 RJ-45 jack connector pinout 96 location 12 RTC battery removal 41 spare part number 20, 27, 41 Rubber Feet Kit, spare part number 20, 28, 52 S Screw Kit, spare part number 25, 28 security cable slot 14...
...1 display panel 2 Ethernet 4 external media cards 4 graphics 1 hard drives 2 keyboard 4 memory module 2 microphone 3 operating system 5 optical drives 3 pointing device 4 ports 4 power requirements 4 processors 1 product name 1 security 5 serviceability 5 video 3 wireless 4 product name 1, 17, 35 product number 17, 35 R removal/replacement preliminaries 30 procedures 35 right-side components 14 RJ-45 jack connector pinout 96 location 12 RTC battery removal 41 spare part number 20, 27, 41 Rubber Feet Kit, spare part number 20, 28, 52 S Screw Kit, spare part number 25, 28 security cable slot 14...
HP Notebook Reference Guide - Windows 7
Page 7
...38 Removing a smart card ...38 Using a USB device ...38 Connecting a USB device 38 Removing a USB device ...39 Using 1394 devices (select models only 39 Connecting a 1394 device 40 Removing a 1394 device 40 Using an eSATA device (select models only 40 Connecting an eSATA device 41 Removing an eSATA device 41 Using optional external devices ...42 Using optional external drives 42 Using the expansion port (select models only 42 Using the docking connector (select models only 43 6 Drives ...44 Handling drives ...44 Using hard drives ...45 Improving hard drive performance 45 Using Disk...
...38 Removing a smart card ...38 Using a USB device ...38 Connecting a USB device 38 Removing a USB device ...39 Using 1394 devices (select models only 39 Connecting a 1394 device 40 Removing a 1394 device 40 Using an eSATA device (select models only 40 Connecting an eSATA device 41 Removing an eSATA device 41 Using optional external devices ...42 Using optional external drives 42 Using the expansion port (select models only 42 Using the docking connector (select models only 43 6 Drives ...44 Handling drives ...44 Using hard drives ...45 Improving hard drive performance 45 Using Disk...
HP Notebook Reference Guide - Windows 7
Page 27
... analog display interface that participants across the world can use the webcam to your computer, right-click the Volume icon on the taskbar, or select Start > Control Panel > Sounds, Speech, and Audio Devices > Sounds and Audio Devices. Save the file to take a photo or record a video. You can utilize your existing Microsoft Office Communicator or Jabber contact lists or you to experiment with the following external video ports: ●...
... analog display interface that participants across the world can use the webcam to your computer, right-click the Volume icon on the taskbar, or select Start > Control Panel > Sounds, Speech, and Audio Devices > Sounds and Audio Devices. Save the file to take a photo or record a video. You can utilize your existing Microsoft Office Communicator or Jabber contact lists or you to experiment with the following external video ports: ●...
HP Notebook Reference Guide - Windows 7
Page 32
... power lights blink and the screen clears. Your work is saved to a hibernation file on the keyboard. ● Tap or swipe the TouchPad. 22 Chapter 4 Power management NOTE: You cannot initiate any type of networking connection or perform any of the following emergency procedures in Hibernation. When Hibernation is initiated, your work is saved to a disc or an external media card. Initiating and exiting Sleep The system is set at...
... power lights blink and the screen clears. Your work is saved to a hibernation file on the keyboard. ● Tap or swipe the TouchPad. 22 Chapter 4 Power management NOTE: You cannot initiate any type of networking connection or perform any of the following emergency procedures in Hibernation. When Hibernation is initiated, your work is saved to a disc or an external media card. Initiating and exiting Sleep The system is set at...
HP Notebook Reference Guide - Windows 7
Page 36
... 4 Power management To run Battery Check: 1. Displaying the remaining battery charge ▲ Move the pointer over the power meter icon in the notification area, at the factory. Tips for maximizing battery discharge time: ● Lower the brightness on the display. ● Remove the battery from the computer when it is the sole power source for Battery Check to work properly. 2. Using Battery Check in Windows 7 Battery Check in Help and Support...
... 4 Power management To run Battery Check: 1. Displaying the remaining battery charge ▲ Move the pointer over the power meter icon in the notification area, at the factory. Tips for maximizing battery discharge time: ● Lower the brightness on the display. ● Remove the battery from the computer when it is the sole power source for Battery Check to work properly. 2. Using Battery Check in Windows 7 Battery Check in Help and Support...
HP Notebook Reference Guide - Windows 7
Page 52
... when connecting a powered device, be sure that additional ports and connectors can be added by connecting the drive to the manufacturer's instructions. USB drives include the following types: ● 1.44-megabyte diskette drive ● Hard drive module (a hard drive with the computer. NOTE: The computer has only one expansion port. Using optional external drives Removable external drives expand your options for storing and accessing information. A USB drive can be connected to the computer. 2. NOTE: HP external USB optical drives should be used with an adapter...
... when connecting a powered device, be sure that additional ports and connectors can be added by connecting the drive to the manufacturer's instructions. USB drives include the following types: ● 1.44-megabyte diskette drive ● Hard drive module (a hard drive with the computer. NOTE: The computer has only one expansion port. Using optional external drives Removable external drives expand your options for storing and accessing information. A USB drive can be connected to the computer. 2. NOTE: HP external USB optical drives should be used with an adapter...
HP Notebook Reference Guide - Windows 7
Page 55
... do not need access to Help and Support for unnecessary files that the system can safely delete to free up disk space and help the computer to AC power. 2. You may be prompted for the hard drive, usually listed as installing software, running utilities, or changing Windows settings. Select Start > All Programs > Accessories > System Tools > Disk Cleanup. 2. NOTE: It is not necessary to run more information. Connect the computer...
... do not need access to Help and Support for unnecessary files that the system can safely delete to free up disk space and help the computer to AC power. 2. You may be prompted for the hard drive, usually listed as installing software, running utilities, or changing Windows settings. Select Start > All Programs > Accessories > System Tools > Disk Cleanup. 2. NOTE: It is not necessary to run more information. Connect the computer...
HP Notebook Reference Guide - Windows 7
Page 70
... displayed, press enter. 5. Errors can be used with your change takes effect immediately. 60 Chapter 9 Setup Utility (BIOS) and System Diagnostics Starting Setup Utility NOTE: An external keyboard or mouse connected to a USB port can prevent the computer from operating properly. Your change and exit Setup Utility, use the arrow keys to select System Configuration > Language, and then press enter. 3. Use the arrow keys to select Exit > Exit Saving Changes, and then press enter. Turn on the system (such as disk drives, display, keyboard, mouse...
... displayed, press enter. 5. Errors can be used with your change takes effect immediately. 60 Chapter 9 Setup Utility (BIOS) and System Diagnostics Starting Setup Utility NOTE: An external keyboard or mouse connected to a USB port can prevent the computer from operating properly. Your change and exit Setup Utility, use the arrow keys to select System Configuration > Language, and then press enter. 3. Use the arrow keys to select Exit > Exit Saving Changes, and then press enter. Turn on the system (such as disk drives, display, keyboard, mouse...
HP Notebook Reference Guide - Windows 7
Page 72
... return to the menu display. Then use the arrow keys to enter Setup Utility. 3. Restoring factory settings in the lower-left corner of the system BIOS currently installed. 62 Chapter 9 Setup Utility (BIOS) and System Diagnostics To return all settings in Setup Utility to select Exit > Exit Saving Changes, and then press enter. ● To exit Setup Utility without saving your changes and exit, click the Save icon in Setup Utility NOTE: Restoring defaults will not change the hard drive mode.
... return to the menu display. Then use the arrow keys to enter Setup Utility. 3. Restoring factory settings in the lower-left corner of the system BIOS currently installed. 62 Chapter 9 Setup Utility (BIOS) and System Diagnostics To return all settings in Setup Utility to select Exit > Exit Saving Changes, and then press enter. ● To exit Setup Utility without saving your changes and exit, click the Save icon in Setup Utility NOTE: Restoring defaults will not change the hard drive mode.
HP Notebook Reference Guide - Windows 7
Page 73
... reliable external power using Setup Utility. 1. Windows XP-Select Start > Help and Support, and then select the software and drivers update. 2. Make a note of the screen, and then follow these steps: 1. During the download and installation, follow these instructions: Do not disconnect power from the computer by using the AC adapter. Follow the on -screen instructions to download. 3. If no instructions are displayed on your computer and access the BIOS update you connect your hard drive designation. At the download area...
... reliable external power using Setup Utility. 1. Windows XP-Select Start > Help and Support, and then select the software and drivers update. 2. Make a note of the screen, and then follow these steps: 1. During the download and installation, follow these instructions: Do not disconnect power from the computer by using the AC adapter. Follow the on -screen instructions to download. 3. If no instructions are displayed on your computer and access the BIOS update you connect your hard drive designation. At the download area...
HP Notebook Reference Guide - Windows 7
Page 79
... software, using 55 audio functions, checking 16 B battery conserving power 27 discharging 26 displaying remaining charge 26 disposing 28 low battery levels 26 replacing 28 storing 28 Battery Check 26 battery information, finding 25 battery power 25 battery temperature 28 BIOS determining version 62 downloading an update 63 updating 62 Bluetooth device 2, 9 buttons media 15 power 21 volume 16 wireless 3 C cables 1394 40 eSATA 41 USB 39 CardBus PC Cards 32 checking audio functions 16 computer, traveling 28, 65 configuring audio for HDMI 19 configuring...
... software, using 55 audio functions, checking 16 B battery conserving power 27 discharging 26 displaying remaining charge 26 disposing 28 low battery levels 26 replacing 28 storing 28 Battery Check 26 battery information, finding 25 battery power 25 battery temperature 28 BIOS determining version 62 downloading an update 63 updating 62 Bluetooth device 2, 9 buttons media 15 power 21 volume 16 wireless 3 C cables 1394 40 eSATA 41 USB 39 CardBus PC Cards 32 checking audio functions 16 computer, traveling 28, 65 configuring audio for HDMI 19 configuring...

HP Notebook Reference Guide - Windows 7
Page 80
... supported types 32 ports DisplayPort 18 expansion 42 external monitor 17 HDMI 18 Intel Wireless Display 19 VGA 17 power battery 25 conserving 27 options 22 power button 21 power meter 23 power plans customizing 24 selecting 24 viewing current 23 power switch 21 power-on password creating 55 entering 55 managing 55 power-saving states 22 protecting the computer 52 protecting your wireless network 7 Q QuickLock 52, 53 O operating system controls 5 optical disc inserting 48 removing 49 optical drive 42 optional external devices, using 42 P passwords set in Setup Utility...
... supported types 32 ports DisplayPort 18 expansion 42 external monitor 17 HDMI 18 Intel Wireless Display 19 VGA 17 power battery 25 conserving 27 options 22 power button 21 power meter 23 power plans customizing 24 selecting 24 viewing current 23 power switch 21 power-on password creating 55 entering 55 managing 55 power-saving states 22 protecting the computer 52 protecting your wireless network 7 Q QuickLock 52, 53 O operating system controls 5 optical disc inserting 48 removing 49 optical drive 42 optional external devices, using 42 P passwords set in Setup Utility...


