
HP ENVY 15 User Guide - Windows 7
Page 8
... Using Disk Defragmenter 58 Using Disk Cleanup 58 Using HP ProtectSmart Hard Drive Protection (select models only 59 Identifying HP ProtectSmart Hard Drive Protection status 59 Managing power with a parked hard drive 59 Using HP ProtectSmart Hard Drive Protection software 60 Using external drives ...Using Digital Media Slot cards 65 Inserting a digital card 65 Removing a digital card 66 8 Memory modules Adding or replacing a memory module in single-slot models 68 Adding or replacing a memory module in double-slot models 71 9 Security Protecting the computer ...75 Using passwords ...76 ...
... Using Disk Defragmenter 58 Using Disk Cleanup 58 Using HP ProtectSmart Hard Drive Protection (select models only 59 Identifying HP ProtectSmart Hard Drive Protection status 59 Managing power with a parked hard drive 59 Using HP ProtectSmart Hard Drive Protection software 60 Using external drives ...Using Digital Media Slot cards 65 Inserting a digital card 65 Removing a digital card 66 8 Memory modules Adding or replacing a memory module in single-slot models 68 Adding or replacing a memory module in double-slot models 71 9 Security Protecting the computer ...75 Using passwords ...76 ...

HP ENVY 15 User Guide - Windows 7
Page 16
... the following digital card formats: ● MultiMediaCard ● Micro MultiMediaCard (adapter required) ● MultiMediaCard Plus ● Secure Digital Memory Card ● Micro Secure Digital Memory Card (adapter required) ● Secure Digital High Capacity Memory Card Component (1) Speaker (2) Security cable slot 6 Chapter 1 Notebook tour Description Produces sound. It is designed to act as a deterrent...
... the following digital card formats: ● MultiMediaCard ● Micro MultiMediaCard (adapter required) ● MultiMediaCard Plus ● Secure Digital Memory Card ● Micro Secure Digital Memory Card (adapter required) ● Secure Digital High Capacity Memory Card Component (1) Speaker (2) Security cable slot 6 Chapter 1 Notebook tour Description Produces sound. It is designed to act as a deterrent...

HP ENVY 15 User Guide - Windows 7
Page 18
...9679; Amber (select models only): HP ProtectSmart Hard Drive Protection has temporarily parked the hard drive. Locks the primary battery inside the battery bay. Connects an optional accessory battery. Component (1) Vents (4) (2) Battery bay (3) Battery lock (4) Memory module compartment (5) Accessory battery connector... Bottom components Description ● Blinking white: The hard drive is preinstalled in the battery bay at the factory. Holds the memory modules. Releases the primary battery from the battery bay. 8 Chapter 1 Notebook tour It is normal for the internal fan to...
...9679; Amber (select models only): HP ProtectSmart Hard Drive Protection has temporarily parked the hard drive. Locks the primary battery inside the battery bay. Connects an optional accessory battery. Component (1) Vents (4) (2) Battery bay (3) Battery lock (4) Memory module compartment (5) Accessory battery connector... Bottom components Description ● Blinking white: The hard drive is preinstalled in the battery bay at the factory. Holds the memory modules. Releases the primary battery from the battery bay. 8 Chapter 1 Notebook tour It is normal for the internal fan to...

HP ENVY 15 User Guide - Windows 7
Page 22
...viewer-Browse through instant messages or Skype. This guide is located on the Secure Digital (SD) Memory Card that lets you to rapidly access certain applications without the need to the HP ENVY 15 User Manual. NOTE: For information on using QuickWeb, refer to start the operating system. ...2 Using HP QuickWeb software (select models only) HP QuickWeb software is an optional, instant-on environment that is ...
...viewer-Browse through instant messages or Skype. This guide is located on the Secure Digital (SD) Memory Card that lets you to rapidly access certain applications without the need to the HP ENVY 15 User Manual. NOTE: For information on using QuickWeb, refer to start the operating system. ...2 Using HP QuickWeb software (select models only) HP QuickWeb software is an optional, instant-on environment that is ...
HP ENVY 15 User Guide - Windows 7
Page 51
... the TouchPad. You can exit Sleep in any of the following ways: ● Briefly press the power button. ● If the display is saved to memory, letting you can be changed using Power Options in Hibernation. Your work is closed, open the display. ● Press a key on the hard drive and...
... the TouchPad. You can exit Sleep in any of the following ways: ● Briefly press the power button. ● If the display is saved to memory, letting you can be changed using Power Options in Hibernation. Your work is closed, open the display. ● Press a key on the hard drive and...

HP ENVY 15 User Guide - Windows 7
Page 67
... they apply. To view the two SSDs and RAID 0 configuration: 1. Handling drives Drives are included with two SSDs installed will be handled with solid-state memory. 7 Drives and external devices Drives Identifying installed drives Your computer includes a hard drive (with a rotating disc) or a solid-state drive (SSD) with care. Under Disk...
... they apply. To view the two SSDs and RAID 0 configuration: 1. Handling drives Drives are included with two SSDs installed will be handled with solid-state memory. 7 Drives and external devices Drives Identifying installed drives Your computer includes a hard drive (with a rotating disc) or a solid-state drive (SSD) with care. Under Disk...

HP ENVY 15 User Guide - Windows 7
Page 75
... the following digital card formats: ● MultiMediaCard ● Micro MultiMediaCard (adapter required) ● MultiMediaCard Plus ● Secure Digital Memory Card ● Micro Secure Digital Memory Card (adapter required) ● Secure Digital High Capacity Memory Card Inserting a digital card CAUTION: To prevent damage to the digital card connectors, use minimal force to remove the...
... the following digital card formats: ● MultiMediaCard ● Micro MultiMediaCard (adapter required) ● MultiMediaCard Plus ● Secure Digital Memory Card ● Micro Secure Digital Memory Card (adapter required) ● Secure Digital High Capacity Memory Card Inserting a digital card CAUTION: To prevent damage to the digital card connectors, use minimal force to remove the...

HP ENVY 15 User Guide - Windows 7
Page 77
... (ESD) can be sure that you are located on the computer model, your computer has either one of the memory module slots. The memory module slots are discharged of static electricity. 67 The memory capacity of the computer can damage electronic components. Before beginning any procedure, touch a grounded metal object to the equipment...
... (ESD) can be sure that you are located on the computer model, your computer has either one of the memory module slots. The memory module slots are discharged of static electricity. 67 The memory capacity of the computer can damage electronic components. Before beginning any procedure, touch a grounded metal object to the equipment...

HP ENVY 15 User Guide - Windows 7
Page 78
... computer upside down the computer through the operating system. 3. Adding or replacing a memory module in Hibernation, turn the computer on by the edges only. Remove a memory module in the memory module slot: a. Loosen the memory module compartment cover screws (1) and lift the memory module compartment cover (2) away from the computer. 8. Then shut down on a flat...
... computer upside down the computer through the operating system. 3. Adding or replacing a memory module in Hibernation, turn the computer on by the edges only. Remove a memory module in the memory module slot: a. Loosen the memory module compartment cover screws (1) and lift the memory module compartment cover (2) away from the computer. 8. Then shut down on a flat...

HP ENVY 15 User Guide - Windows 7
Page 79
... is seated and the retention clips (3) snap into place. Adding or replacing a memory module in the memory module slot: a. b. Insert a memory module in single-slot models 69 CAUTION: To prevent damage to the memory module, hold the memory module by the edges only. Do not touch the components on the... memory module. Align the notched edge (1) of the memory module slot. Insert the memory module into the memory module slot and rotate the module downward (2) ...
... is seated and the retention clips (3) snap into place. Adding or replacing a memory module in the memory module slot: a. b. Insert a memory module in single-slot models 69 CAUTION: To prevent damage to the memory module, hold the memory module by the edges only. Do not touch the components on the... memory module. Align the notched edge (1) of the memory module slot. Insert the memory module into the memory module slot and rotate the module downward (2) ...

HP ENVY 15 User Guide - Windows 7
Page 80
Tighten the memory module compartment cover screws (3). 13. Replace the battery. 14. Turn the computer right-side up, and then reconnect external power and external devices. 15. Align the tabs (1) on the memory module compartment cover with the notches on the computer. 70 Chapter 8 Memory modules 10. Close the cover (2). 12. Turn on the computer. 11.
Tighten the memory module compartment cover screws (3). 13. Replace the battery. 14. Turn the computer right-side up, and then reconnect external power and external devices. 15. Align the tabs (1) on the memory module compartment cover with the notches on the computer. 70 Chapter 8 Memory modules 10. Close the cover (2). 12. Turn on the computer. 11.

HP ENVY 15 User Guide - Windows 7
Page 81
...Disconnect all external devices connected to the memory module, hold the memory module by briefly pressing the power button. Pull away the retention clips (1) on the memory module. Remove the battery from the AC outlet. 5. Adding or replacing a memory module in double-slot models To add .... 4. Shut down the computer through the operating system. 3. Loosen the memory module compartment cover screws (1) and lift the memory module compartment cover (2) away from the computer. 8. Save your work. 2. Remove a memory module in double-slot models 71 Turn the computer upside down on by ...
...Disconnect all external devices connected to the memory module, hold the memory module by briefly pressing the power button. Pull away the retention clips (1) on the memory module. Remove the battery from the AC outlet. 5. Adding or replacing a memory module in double-slot models To add .... 4. Shut down the computer through the operating system. 3. Loosen the memory module compartment cover screws (1) and lift the memory module compartment cover (2) away from the computer. 8. Save your work. 2. Remove a memory module in double-slot models 71 Turn the computer upside down on by ...

HP ENVY 15 User Guide - Windows 7
Page 82
Remove a memory module in an electrostatic-safe container. 9. CAUTION: To prevent damage to the memory module, hold the memory module by the edges only. Do not touch the components on each side of the memory module slot. b. Grasp the edge of the memory module (2), and gently rotate the module up and pull it in the bottom memory module slot: a. Pull away the retention clips (1) on the memory module. 72 Chapter 8 Memory modules To protect the memory module after removal, place it out of the memory module.
Remove a memory module in an electrostatic-safe container. 9. CAUTION: To prevent damage to the memory module, hold the memory module by the edges only. Do not touch the components on each side of the memory module slot. b. Grasp the edge of the memory module (2), and gently rotate the module up and pull it in the bottom memory module slot: a. Pull away the retention clips (1) on the memory module. 72 Chapter 8 Memory modules To protect the memory module after removal, place it out of the memory module.

HP ENVY 15 User Guide - Windows 7
Page 83
... models 73 Adding or replacing a memory module in the top memory module slot: a. Align the notched edge (1) of the memory module with the tab in the bottom memory module slot. Insert a memory module in an electrostatic-safe container. 10. Grasp the edge of the memory module (2), and gently pull the ...module out of the memory module with the tab in the top memory module slot. Align the notched edge (1) of the memory module slot. b. b. To protect the memory module after removal, place it is seated and...
... models 73 Adding or replacing a memory module in the top memory module slot: a. Align the notched edge (1) of the memory module with the tab in the bottom memory module slot. Insert a memory module in an electrostatic-safe container. 10. Grasp the edge of the memory module (2), and gently pull the ...module out of the memory module with the tab in the top memory module slot. Align the notched edge (1) of the memory module slot. b. b. To protect the memory module after removal, place it is seated and...

HP ENVY 15 User Guide - Windows 7
Page 84
...and external devices. 17. CAUTION: To prevent damage to the memory module, hold the memory module by the edges only. Align the tabs (1) on the memory module compartment cover with the notches on the computer. 74 Chapter 8 Memory modules Close the cover (2). 14. Replace the battery. 16.... Tighten the memory module compartment cover screws (3). 15. Insert the memory module into the top memory module slot and rotate the module...
...and external devices. 17. CAUTION: To prevent damage to the memory module, hold the memory module by the edges only. Align the tabs (1) on the memory module compartment cover with the notches on the computer. 74 Chapter 8 Memory modules Close the cover (2). 14. Replace the battery. 16.... Tighten the memory module compartment cover screws (3). 15. Insert the memory module into the top memory module slot and rotate the module...

HP ENVY 15 User Guide - Windows 7
Page 97
... To do this Enter, change the system time and date. ● View identification information about the computer. ● View specification information, such as processor information, memory size, and system BIOS. After either choice, the computer restarts in this section provide an overview of the Setup Utility menu items listed in this...
... To do this Enter, change the system time and date. ● View identification information about the computer. ● View specification information, such as processor information, memory size, and system BIOS. After either choice, the computer restarts in this section provide an overview of the Setup Utility menu items listed in this...
HP ENVY 15 User Guide - Windows 7
Page 98
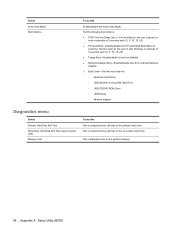
.../DVD ROM Drive ◦ USB Floppy ◦ Network adapter Diagnostics menu Select Primary Hard Disk Self Test Secondary Hard Disk Self Test (select models only) Memory Test To do this Run a comprehensive self-test on the primary hard drive. Set the delay for the user to press hot keys in intervals... Network Adapter. ● Boot Order―Set the boot order for the user to start Windows in intervals of 5 seconds each (0, 5, 10, 15, 20). ● HP QuickWeb-Enable/disable the HP QuickWeb Boot Menu at boot time. Run a comprehensive self-test on the system...
.../DVD ROM Drive ◦ USB Floppy ◦ Network adapter Diagnostics menu Select Primary Hard Disk Self Test Secondary Hard Disk Self Test (select models only) Memory Test To do this Run a comprehensive self-test on the primary hard drive. Set the delay for the user to press hot keys in intervals... Network Adapter. ● Boot Order―Set the boot order for the user to start Windows in intervals of 5 seconds each (0, 5, 10, 15, 20). ● HP QuickWeb-Enable/disable the HP QuickWeb Boot Menu at boot time. Run a comprehensive self-test on the system...

HP ENVY 15 User Guide - Windows 7
Page 110
MediaSmart starting 31 using 31 memory module inserting 69, 73 removing 68, 71 memory module compartment, identifying 8 memory test 88 microphone (audio-out) jack, identifying 7 Microsoft Certificate of Authenticity label 11 minimizing interference 21 monitor, connecting 34 mouse, external setting... set in 77 restoring default settings 86 selecting 85 starting 84 shared drives 31 shutdown 56 Sleep exiting 41 initiating 41 slots Digital Media 6 memory 67 security cable 6 software Disk Cleanup 58 Disk Defragmenter 58 MediaSmart 31 using 31 Wireless Assistant 15 solid-state drive (SSD) 57, 91...
MediaSmart starting 31 using 31 memory module inserting 69, 73 removing 68, 71 memory module compartment, identifying 8 memory test 88 microphone (audio-out) jack, identifying 7 Microsoft Certificate of Authenticity label 11 minimizing interference 21 monitor, connecting 34 mouse, external setting... set in 77 restoring default settings 86 selecting 85 starting 84 shared drives 31 shutdown 56 Sleep exiting 41 initiating 41 slots Digital Media 6 memory 67 security cable 6 software Disk Cleanup 58 Disk Defragmenter 58 MediaSmart 31 using 31 Wireless Assistant 15 solid-state drive (SSD) 57, 91...
HP Notebook Hard Drives & Solid State Drives Identifying, Preventing, Diagnosing and Recovering from Drive Failures Care and Mai
Page 7
.... To address this sector size is being used 512-byte sectors; During this process, data is wasted on how to defragment your HP Business Notebook, refer to optimize the performance of data to turn off when it is secured in all editions of time. With 4-KB.... For more information, refer to have the latest BIOS, firmware, and driver enhancements for an extended period of HP Client Automation and HP Client Manager 7.0 from electronic memory (such as 512e drives - First-generation Advanced Format drives retain backwards-compatibility by using Advanced Format drives to the...
.... To address this sector size is being used 512-byte sectors; During this process, data is wasted on how to defragment your HP Business Notebook, refer to optimize the performance of data to turn off when it is secured in all editions of time. With 4-KB.... For more information, refer to have the latest BIOS, firmware, and driver enhancements for an extended period of HP Client Automation and HP Client Manager 7.0 from electronic memory (such as 512e drives - First-generation Advanced Format drives retain backwards-compatibility by using Advanced Format drives to the...

Preparing Advanced Format hard drives for Microsoft Windows installations on HP Business Notebook PCs and desktop PCs - White Pa
Page 13
... number of premature drive failure. While this was considered, the existing system infrastructure has been designed around a logical 512-byte sector - SSDs memory cells degrade over time, following Ghost command line switches: -align=1MB -szeE where -szeE forces Ghost to update the environment would not be... created for a drive with 4-KB native sector format? Many modern SSDs feature an internal memory configuration that I have been vast; Is there any value to 4-KB sectors. Why did HP choose to not pursue this approach at this time. The resources needed to maintain the size...
... number of premature drive failure. While this was considered, the existing system infrastructure has been designed around a logical 512-byte sector - SSDs memory cells degrade over time, following Ghost command line switches: -align=1MB -szeE where -szeE forces Ghost to update the environment would not be... created for a drive with 4-KB native sector format? Many modern SSDs feature an internal memory configuration that I have been vast; Is there any value to 4-KB sectors. Why did HP choose to not pursue this approach at this time. The resources needed to maintain the size...


