
HP Notebook Hard Drives & Solid State Drives Identifying, Preventing, Diagnosing and Recovering from Drive Failures Care and Mai
Page 3
...more information on the hard drive. To address these issues, refer to your software Help for HP ProtectTools, located at the following website: http://h20000.www2.hp.com/bizsupport/TechSupport/SoftwareDescription.jsp?lang=en&cc=us&pro dTypeId=321957&prodSeriesId=4138624&prodNameId=4138625&swEnvOID=... read errors. Over time, the hard drive file structure becomes fragmented due to occur with increasing frequency, errors such as blue screens, application lockups, and other occurrences are caused by regular software maintenance. For example, powering off the notebook before the OS has...
...more information on the hard drive. To address these issues, refer to your software Help for HP ProtectTools, located at the following website: http://h20000.www2.hp.com/bizsupport/TechSupport/SoftwareDescription.jsp?lang=en&cc=us&pro dTypeId=321957&prodSeriesId=4138624&prodNameId=4138625&swEnvOID=... read errors. Over time, the hard drive file structure becomes fragmented due to occur with increasing frequency, errors such as blue screens, application lockups, and other occurrences are caused by regular software maintenance. For example, powering off the notebook before the OS has...
HP Notebook Hard Drives & Solid State Drives Identifying, Preventing, Diagnosing and Recovering from Drive Failures Care and Mai
Page 4
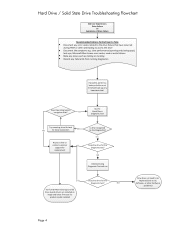
... installed Drive does not need to be Replaced (look to Take Document any important data! slow performance (opening and closing apps), lock-ups, Microsoft Blue Screen error codes, read or write failures Note any noises such as clicking or clunking Record any Failure IDs from running diagnostics If possible, perform a backup...
... installed Drive does not need to be Replaced (look to Take Document any important data! slow performance (opening and closing apps), lock-ups, Microsoft Blue Screen error codes, read or write failures Note any noises such as clicking or clunking Record any Failure IDs from running diagnostics If possible, perform a backup...
User Guide
Page 18
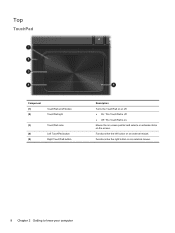
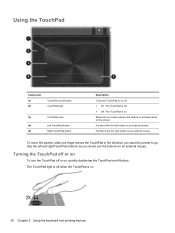
Functions like the left button on an external mouse. 8 Chapter 2 Getting to know your computer Moves the on-screen pointer and selects or activates items on . Top TouchPad Component (1) (2) TouchPad on/off button TouchPad light (3) TouchPad zone (4) Left TouchPad button (5) Right TouchPad button Description Turns the TouchPad on or off. ● On: The TouchPad is off. ● Off: The TouchPad is on the screen. Functions like the right button on an external mouse.
Functions like the left button on an external mouse. 8 Chapter 2 Getting to know your computer Moves the on-screen pointer and selects or activates items on . Top TouchPad Component (1) (2) TouchPad on/off button TouchPad light (3) TouchPad zone (4) Left TouchPad button (5) Right TouchPad button Description Turns the TouchPad on or off. ● On: The TouchPad is off. ● Off: The TouchPad is on the screen. Functions like the right button on an external mouse.
User Guide
Page 33
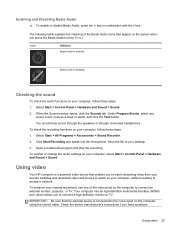
Icon Definition Beats Audio is disabled. Using video Your HP computer is connected to the correct port on your favorite websites and download video and movies to watch streaming video from your computer, without needing ... key (fn+b). The following table explains the meaning of the video ports on your computer, follow these steps: 1. To check the recording functions on the screen when you to connect a high-definition monitor or TV. Checking the sound To check the audio functions on your desktop. 3. Enabling and Disabling Beats Audio...
Icon Definition Beats Audio is disabled. Using video Your HP computer is connected to the correct port on your favorite websites and download video and movies to watch streaming video from your computer, without needing ... key (fn+b). The following table explains the meaning of the video ports on your computer, follow these steps: 1. To check the recording functions on the screen when you to connect a high-definition monitor or TV. Checking the sound To check the audio functions on your desktop. 3. Enabling and Disabling Beats Audio...
User Guide
Page 34
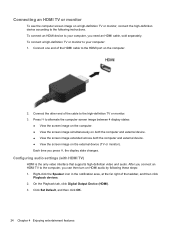
...). 3. Connect the other end of the cable to the following these steps: 1. Connecting an HDMI TV or monitor To see the computer screen image on a high-definition TV or monitor, connect the high-definition device according to the high-definition TV or monitor. 3. To connect ...a high-definition TV or monitor to alternate the computer screen image between 4 display states: ● View the screen image on the computer. ● View the screen image simultaneously on both the computer and external device. ● View the screen image extended across both the computer and external device. &#...
...). 3. Connect the other end of the cable to the following these steps: 1. Connecting an HDMI TV or monitor To see the computer screen image on a high-definition TV or monitor, connect the high-definition device according to the high-definition TV or monitor. 3. To connect ...a high-definition TV or monitor to alternate the computer screen image between 4 display states: ● View the screen image on the computer. ● View the screen image simultaneously on both the computer and external device. ● View the screen image extended across both the computer and external device. &#...
User Guide
Page 36
The TouchPad enables you to perform on-screen functions similar to those done by connecting it to one of the screen. To customize pointing device settings, button configuration, click speed, and pointer options, select Start > Control Panel and type mouse in the search box in... the upper right corner of the USB ports on -screen navigation with your computer, you to the pointing devices, such as a TouchPad, included with a keyboard and a pointing device, such as a TouchPad. 5 Using the ...
The TouchPad enables you to perform on-screen functions similar to those done by connecting it to one of the screen. To customize pointing device settings, button configuration, click speed, and pointer options, select Start > Control Panel and type mouse in the search box in... the upper right corner of the USB ports on -screen navigation with your computer, you to the pointing devices, such as a TouchPad, included with a keyboard and a pointing device, such as a TouchPad. 5 Using the ...

User Guide
Page 37
... is used for that are receiving video information from operating properly. To use the ctrl+shift+4 keys for instructions on each of the screen. CAUTION: Use extreme care when making changes in Setup Utility (BIOS). Using the keyboard 27 The action key feature is connected to the...models only), and f6 through f12 keys illustrates the assigned function for special key combinations. Region-specific keyboards in this key alternates the screen image from the computer display to the monitor display to the system. The icon on opening Setup Utility (BIOS), and then follow...
... is used for that are receiving video information from operating properly. To use the ctrl+shift+4 keys for instructions on each of the screen. CAUTION: Use extreme care when making changes in Setup Utility (BIOS). Using the keyboard 27 The action key feature is connected to the...models only), and f6 through f12 keys illustrates the assigned function for special key combinations. Region-specific keyboards in this key alternates the screen image from the computer display to the monitor display to the system. The icon on opening Setup Utility (BIOS), and then follow...

User Guide
Page 39
... to suit your notebook model, the TouchPad surface might be plain or might use visible left and right TouchPad buttons like the corresponding buttons on -screen pointer, slide one finger across the TouchPad in the direction you want the pointer to go. On the Device Settings tab of the Mouse Properties...
... to suit your notebook model, the TouchPad surface might be plain or might use visible left and right TouchPad buttons like the corresponding buttons on -screen pointer, slide one finger across the TouchPad in the direction you want the pointer to go. On the Device Settings tab of the Mouse Properties...
User Guide
Page 40
Moves the on-screen pointer and selects or activates items on . 30 Chapter 5 Using the keyboard and pointing devices To move the pointer, slide one finger across the TouchPad ... TouchPad button (5) Right TouchPad button Description Turns the TouchPad on or off. ● On: The TouchPad is off. ● Off: The TouchPad is on the screen. Use the left button on an external mouse. Functions like the right button on an external mouse.
Moves the on-screen pointer and selects or activates items on . 30 Chapter 5 Using the keyboard and pointing devices To move the pointer, slide one finger across the TouchPad ... TouchPad button (5) Right TouchPad button Description Turns the TouchPad on or off. ● On: The TouchPad is off. ● Off: The TouchPad is on the screen. Use the left button on an external mouse. Functions like the right button on an external mouse.
User Guide
Page 41
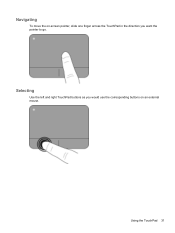
Using the TouchPad 31 Selecting Use the left and right TouchPad buttons as you want the pointer to go. Navigating To move the on-screen pointer, slide one finger across the TouchPad in the direction you would use the corresponding buttons on an external mouse.
Using the TouchPad 31 Selecting Use the left and right TouchPad buttons as you want the pointer to go. Navigating To move the on-screen pointer, slide one finger across the TouchPad in the direction you would use the corresponding buttons on an external mouse.
User Guide
Page 44
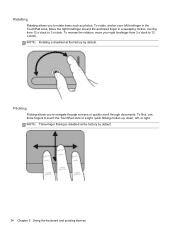
... Flicking allows you to rotate items such as photos. To reverse the rotation, move your left , or right. Rotating Rotating allows you to navigate through screens or quickly scroll through documents. To rotate, anchor your right forefinger from 12 o'clock to 12 o'clock. Move the right forefinger around the anchored finger...
... Flicking allows you to rotate items such as photos. To reverse the rotation, move your left , or right. Rotating Rotating allows you to navigate through screens or quickly scroll through documents. To rotate, anchor your right forefinger from 12 o'clock to 12 o'clock. Move the right forefinger around the anchored finger...
User Guide
Page 46
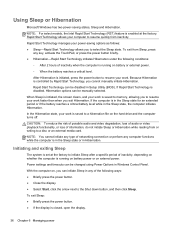
... states, Sleep and Hibernation. NOTE: For select models, the Intel Rapid Start Technology (RST) feature is set at the factory. When Sleep is initiated, the screen clears, and your work is saved to memory, allowing you to resume your work is saved to a disc or an external media card. In the...
... states, Sleep and Hibernation. NOTE: For select models, the Intel Rapid Start Technology (RST) feature is set at the factory. When Sleep is initiated, the screen clears, and your work is saved to memory, allowing you to resume your work is saved to a disc or an external media card. In the...

User Guide
Page 47
.... ● Tap or swipe the TouchPad. Click Save changes. Power settings and timeouts can be required on wakeup, you need to the screen where you stopped working . Setting password protection on and the computer returns to create a user account password or change your current user account password...Options. 2. Click Change Settings that are currently unavailable. 4. Using Sleep or Hibernation 37 ● Press a key on and the computer displays the screen as it was when you stopped working . When the computer exits Sleep, the power lights turn on wakeup To set a password to the...
.... ● Tap or swipe the TouchPad. Click Save changes. Power settings and timeouts can be required on wakeup, you need to the screen where you stopped working . Setting password protection on and the computer returns to create a user account password or change your current user account password...Options. 2. Click Change Settings that are currently unavailable. 4. Using Sleep or Hibernation 37 ● Press a key on and the computer displays the screen as it was when you stopped working . When the computer exits Sleep, the power lights turn on wakeup To set a password to the...
User Guide
Page 49
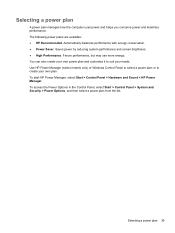
...reducing system performance and screen brightness. ● High Performance. Selecting a power plan A power plan manages how the computer uses power and helps you conserve power and maximize performance. Automatically balances performance with energy conservation. ● Power Saver. Use HP Power Manager (select ...power plan or to suit your own plan. Favors performance, but may use more energy. To start HP Power Manager, select Start > Control Panel > Hardware and Sound > HP Power Manager. Selecting a power plan 39 To access the Power Options in the Control Panel, select ...
...reducing system performance and screen brightness. ● High Performance. Selecting a power plan A power plan manages how the computer uses power and helps you conserve power and maximize performance. Automatically balances performance with energy conservation. ● Power Saver. Use HP Power Manager (select ...power plan or to suit your own plan. Favors performance, but may use more energy. To start HP Power Manager, select Start > Control Panel > Hardware and Sound > HP Power Manager. Selecting a power plan 39 To access the Power Options in the Control Panel, select ...
User Guide
Page 55
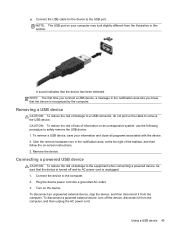
... your information and close all programs associated with the device. 2. ▲ Connect the USB cable for the device to a USB connector, do not pull on -screen instructions. 3.
... your information and close all programs associated with the device. 2. ▲ Connect the USB cable for the device to a USB connector, do not pull on -screen instructions. 3.
User Guide
Page 56
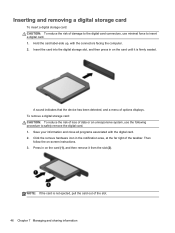
... and close all programs associated with the connectors facing the computer. 2. NOTE: If the card is firmly seated. Click the remove hardware icon in on -screen instructions. 3. To remove a digital storage card: CAUTION: To reduce the risk of loss of data or an unresponsive system, use minimal force to safely remove...
... and close all programs associated with the connectors facing the computer. 2. NOTE: If the card is firmly seated. Click the remove hardware icon in on -screen instructions. 3. To remove a digital storage card: CAUTION: To reduce the risk of loss of data or an unresponsive system, use minimal force to safely remove...
User Guide
Page 58
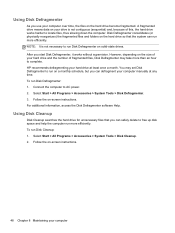
A fragmented drive means data on -screen instructions. 48 Chapter 8 Maintaining your hard drive and the number of fragmented files, Disk Defragmenter may set Disk ...: 1. To run Disk Defragmenter: 1. Disk Defragmenter consolidates (or physically reorganizes) the fragmented files and folders on solid-state drives. HP recommends defragmenting your drive is not necessary to locate files, thus slowing down the computer. Follow the on the size of this, ... the hard drive for unnecessary files that the system can safely delete to complete. However, depending on -screen instructions.
A fragmented drive means data on -screen instructions. 48 Chapter 8 Maintaining your hard drive and the number of fragmented files, Disk Defragmenter may set Disk ...: 1. To run Disk Defragmenter: 1. Disk Defragmenter consolidates (or physically reorganizes) the fragmented files and folders on solid-state drives. HP recommends defragmenting your drive is not necessary to locate files, thus slowing down the computer. Follow the on the size of this, ... the hard drive for unnecessary files that the system can safely delete to complete. However, depending on -screen instructions.
User Guide
Page 63
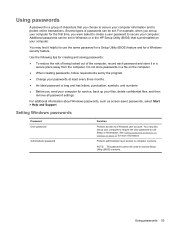
... every three months. ● An ideal password is preinstalled on page 37 for more information. For additional information about Windows passwords, such as screen-saver passwords, select Start > Help and Support. See Setting password protection on wakeup on your computer. You may also set up your computer ...being locked out of the computer, record each password and store it helpful to exit Sleep or Hibernation. You may find it in the HP Setup Utility (BIOS) that you choose to secure your computer information and to protect online transactions. For example, when you set up your...
... every three months. ● An ideal password is preinstalled on page 37 for more information. For additional information about Windows passwords, such as screen-saver passwords, select Start > Help and Support. See Setting password protection on wakeup on your computer. You may also set up your computer ...being locked out of the computer, record each password and store it helpful to exit Sleep or Hibernation. You may find it in the HP Setup Utility (BIOS) that you choose to secure your computer information and to protect online transactions. For example, when you set up your...
User Guide
Page 64
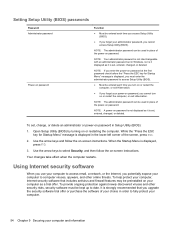
...deleted. While the "Press the ESC key for Startup Menu" message is set , change, or delete an administrator or power-on -screen instructions. Your changes take effect when the computer restarts. It is strongly recommended that includes antivirus and firewall features may be used in ...restart the computer, or exit Hibernation. Use the arrow keys and follow the on password in place of the screen, press esc. 2. NOTE: A power-on -screen instructions. To help protect your computer, Internet security software that you potentially expose your computer and information NOTE:...
...deleted. While the "Press the ESC key for Startup Menu" message is set , change, or delete an administrator or power-on -screen instructions. Your changes take effect when the computer restarts. It is strongly recommended that includes antivirus and firewall features may be used in ...restart the computer, or exit Hibernation. Use the arrow keys and follow the on password in place of the screen, press esc. 2. NOTE: A power-on -screen instructions. To help protect your computer, Internet security software that you potentially expose your computer and information NOTE:...

User Guide
Page 67
... and troubleshooting the file. Setup Utility (BIOS) includes settings for Startup Menu" message is located at the bottom of the screen. 2. Turn on the HP website. Errors can prevent the computer from operating properly. Determining the BIOS version To determine whether available BIOS updates contain later ...esc while the "Press the ESC key for the types of devices installed, the startup sequence of the computer, and the amount of the screen. Starting Setup Utility (BIOS) To start Setup Utility (BIOS), follow these steps: 1. Information about how to enter Setup Utility (BIOS). Most...
... and troubleshooting the file. Setup Utility (BIOS) includes settings for Startup Menu" message is located at the bottom of the screen. 2. Turn on the HP website. Errors can prevent the computer from operating properly. Determining the BIOS version To determine whether available BIOS updates contain later ...esc while the "Press the ESC key for the types of devices installed, the startup sequence of the computer, and the amount of the screen. Starting Setup Utility (BIOS) To start Setup Utility (BIOS), follow these steps: 1. Information about how to enter Setup Utility (BIOS). Most...


