User Guide - Windows 8
Page 5
... 1 Starting right ...1 Best practices ...1 Fun things to do ...2 More HP resources ...3 2 Getting to know your computer ...4 Finding your hardware and software information 4 Locating hardware ...4 Locating software ...4 Right side ...5 Left side ...6 Display ...8 Top ...9 TouchPad ...9 Lights ...10 Buttons and speakers ...11 Keys ...13 Bottom ...14 Labels ...16 3 Connecting to a network ...17 Connecting to a wireless network ...17 Using the wireless controls 17 Using the wireless button 17 Using operating system controls 18 Using a WLAN ...18 Using an Internet service provider 18 Setting...
... 1 Starting right ...1 Best practices ...1 Fun things to do ...2 More HP resources ...3 2 Getting to know your computer ...4 Finding your hardware and software information 4 Locating hardware ...4 Locating software ...4 Right side ...5 Left side ...6 Display ...8 Top ...9 TouchPad ...9 Lights ...10 Buttons and speakers ...11 Keys ...13 Bottom ...14 Labels ...16 3 Connecting to a network ...17 Connecting to a wireless network ...17 Using the wireless controls 17 Using the wireless button 17 Using operating system controls 18 Using a WLAN ...18 Using an Internet service provider 18 Setting...

User Guide - Windows 8
Page 7
... keyboard and mouse ...39 Using the keys ...40 Using the action keys 40 Using Microsoft Windows 8 shortcut keys 41 Using the hot keys (select models only 42 Using the integrated numeric keypad 42 6 Managing power ...43 Initiating Sleep and Hibernation ...43 Intel Rapid Start Technology (select models only 43 Initiating and exiting Sleep 44 Enabling and exiting user-initiated hibernation 44 Setting password protection on wakeup 45 Using the power meter and power settings 45 Running on battery power ...45 Removing a user-replaceable battery...
... keyboard and mouse ...39 Using the keys ...40 Using the action keys 40 Using Microsoft Windows 8 shortcut keys 41 Using the hot keys (select models only 42 Using the integrated numeric keypad 42 6 Managing power ...43 Initiating Sleep and Hibernation ...43 Intel Rapid Start Technology (select models only 43 Initiating and exiting Sleep 44 Enabling and exiting user-initiated hibernation 44 Setting password protection on wakeup 45 Using the power meter and power settings 45 Running on battery power ...45 Removing a user-replaceable battery...
User Guide - Windows 8
Page 8
... hard drive 60 Replacing the secondary hard drive (select models only 62 Using HP 3D DriveGuard (select models only 64 Using Disk Defragmenter 64 Using Disk Cleanup ...65 Adding or replacing memory modules 65 Updating programs and drivers ...69 Cleaning your computer ...69 Cleaning the display, sides, and cover 69 Cleaning the TouchPad and keyboard 69 Traveling with or shipping your computer 70 9 Securing your computer and information 71 Using passwords ...71 Setting Windows passwords 72 Setting Setup Utility (BIOS) passwords 72 Using...
... hard drive 60 Replacing the secondary hard drive (select models only 62 Using HP 3D DriveGuard (select models only 64 Using Disk Defragmenter 64 Using Disk Cleanup ...65 Adding or replacing memory modules 65 Updating programs and drivers ...69 Cleaning your computer ...69 Cleaning the display, sides, and cover 69 Cleaning the TouchPad and keyboard 69 Traveling with or shipping your computer 70 9 Securing your computer and information 71 Using passwords ...71 Setting Windows passwords 72 Setting Setup Utility (BIOS) passwords 72 Using...

User Guide - Windows 8
Page 28
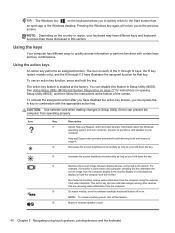
... right edge of the TouchPad or touch screen (select models only) to a network, manage wireless networks, and diagnose and repair network problems. To use operating system controls: Mode Steps 1. NOTE: The terms wireless router and wireless access point are often used interchangeably. ● A large-scale WLAN, such as a corporate or public WLAN, typically uses wireless access points that are setting up the modem, install a network cable to connect your computer, you can access a wireless local area network (WLAN), which allows...
... right edge of the TouchPad or touch screen (select models only) to a network, manage wireless networks, and diagnose and repair network problems. To use operating system controls: Mode Steps 1. NOTE: The terms wireless router and wireless access point are often used interchangeably. ● A large-scale WLAN, such as a corporate or public WLAN, typically uses wireless access points that are setting up the modem, install a network cable to connect your computer, you can access a wireless local area network (WLAN), which allows...
User Guide - Windows 8
Page 50
... key in Setup Utility (BIOS). The action key feature is connected to a simultaneous display on each of the screen. Errors can disable this feature. f6 Mutes or restores speaker sound. 40 Chapter 5 Navigating using the external VGA video standard. TIP: The Windows key on . To use an action key function, press and hold down the key. To activate the assigned function after you have different keys and keyboard functions than those discussed in Setup Utility. Icon Key Description f1 Opens...
... key in Setup Utility (BIOS). The action key feature is connected to a simultaneous display on each of the screen. Errors can disable this feature. f6 Mutes or restores speaker sound. 40 Chapter 5 Navigating using the external VGA video standard. TIP: The Windows key on . To use an action key function, press and hold down the key. To activate the assigned function after you have different keys and keyboard functions than those discussed in Setup Utility. Icon Key Description f1 Opens...

User Guide - Windows 8
Page 61
...Using a USB device 51 Some computers have more information about connecting external wireless devices, see the manufacturer's instructions. Some devices use a powered port. A Universal Serial Bus (USB) flash drive, connected to charge connected USB devices. Be sure to purchase devices that allows you to read or write to use, see Connecting to run; USB 3.0 ports, also known as an optical drive or hard drive, or insert a digital storage card directly from your phone or camera. NOTE: A USB charging port (also referred to as a USB keyboard, mouse, external drive...
...Using a USB device 51 Some computers have more information about connecting external wireless devices, see the manufacturer's instructions. Some devices use a powered port. A Universal Serial Bus (USB) flash drive, connected to charge connected USB devices. Be sure to purchase devices that allows you to read or write to use, see Connecting to run; USB 3.0 ports, also known as an optical drive or hard drive, or insert a digital storage card directly from your phone or camera. NOTE: A USB charging port (also referred to as a USB keyboard, mouse, external drive...

User Guide - Windows 8
Page 75
... memory module slots. However, depending on -screen instructions. Connect the computer to AC power. 2. Adding or replacing memory modules Adding memory can run more efficiently. When your productivity slows down the computer. Select Settings, and then select Defragment and optimize your computer. From the Start screen, type d, and then type disk in the search box. Disk Defragmenter consolidates (or physically reorganizes) the fragmented files and folders on the hard drive...
... memory module slots. However, depending on -screen instructions. Connect the computer to AC power. 2. Adding or replacing memory modules Adding memory can run more efficiently. When your productivity slows down the computer. Select Settings, and then select Defragment and optimize your computer. From the Start screen, type d, and then type disk in the search box. Disk Defragmenter consolidates (or physically reorganizes) the fragmented files and folders on the hard drive...
User Guide - Windows 8
Page 82
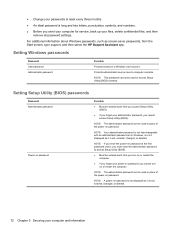
... ideal password is set , entered, changed , or deleted. 72 Chapter 9 Securing your computer and information Protects administrator-level access to a Windows user account. NOTE: If you enter the power-on or restart the computer. NOTE: The administrator password can be used in Windows, nor is it displayed as screen-saver passwords, from the Start screen, type support, and then select the HP Support Assistant app. NOTE: This password cannot be used to access Setup Utility (BIOS). ●...
... ideal password is set , entered, changed , or deleted. 72 Chapter 9 Securing your computer and information Protects administrator-level access to a Windows user account. NOTE: If you enter the power-on or restart the computer. NOTE: The administrator password can be used in Windows, nor is it displayed as screen-saver passwords, from the Start screen, type support, and then select the HP Support Assistant app. NOTE: This password cannot be used to access Setup Utility (BIOS). ●...
User Guide - Windows 8
Page 88
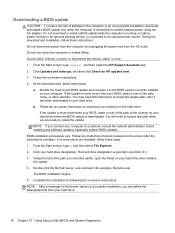
... -screen instructions to download your computer to a network, consult the network administrator before installing any software updates, especially system BIOS updates. Using the hard drive path you are revealed, follow these instructions: Do not disconnect power from the computer by following the on -screen instructions. 4. Follow the on -screen instructions. Follow the on battery power, docked in an optional docking device, or connected to an optional power source. During the download and installation, follow these steps: a. From the Start screen, type...
... -screen instructions to download your computer to a network, consult the network administrator before installing any software updates, especially system BIOS updates. Using the hard drive path you are revealed, follow these instructions: Do not disconnect power from the computer by following the on -screen instructions. 4. Follow the on -screen instructions. Follow the on battery power, docked in an optional docking device, or connected to an optional power source. During the download and installation, follow these steps: a. From the Start screen, type...
User Guide - Windows 8
Page 92
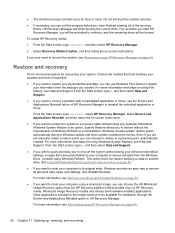
... options for using Windows System Restore, see Help and Support. From the Start screen, type recovery, select HP Recovery Manager, select Drivers and Applications Reinstall, and then follow the on-screen instructions. Even if you did not manually create a restore point, you can choose the HP Minimized Image Recovery option from the HP Recovery partition (select models only) or HP Recovery media. For more information and steps for recovering your system. For more information and steps for quick and easy recovery...
... options for using Windows System Restore, see Help and Support. From the Start screen, type recovery, select HP Recovery Manager, select Drivers and Applications Reinstall, and then follow the on-screen instructions. Even if you did not manually create a restore point, you can choose the HP Minimized Image Recovery option from the HP Recovery partition (select models only) or HP Recovery media. For more information and steps for recovering your system. For more information and steps for quick and easy recovery...

User Guide - Windows 8
Page 100
... backlight keyboard 40 switch screen image 40 volume down 41 volume mute 40 volume up 41 wireless 41 airport security devices 59 antivirus software, using 74 audio functions, checking 26 audio-out (headphone) jacks 5, 23 battery power 45 battery release latch 14 battery temperature 47 battery, identifying 14 Beats Audio 25, 42 hot key 25 Beats Audio Control Panel 25 BIOS determining version 77 downloading an update 78 updating 77 Bluetooth device 17 label 16 Bluetooth device 20 boot order changing HP Recovery Manager 85 bottom 16 buttons left TouchPad 9 optical drive eject 5 power...
... backlight keyboard 40 switch screen image 40 volume down 41 volume mute 40 volume up 41 wireless 41 airport security devices 59 antivirus software, using 74 audio functions, checking 26 audio-out (headphone) jacks 5, 23 battery power 45 battery release latch 14 battery temperature 47 battery, identifying 14 Beats Audio 25, 42 hot key 25 Beats Audio Control Panel 25 BIOS determining version 77 downloading an update 78 updating 77 Bluetooth device 17 label 16 Bluetooth device 20 boot order changing HP Recovery Manager 85 bottom 16 buttons left TouchPad 9 optical drive eject 5 power...

User Guide - Windows 8
Page 101
... removing 66 replacing 65 memory module service door, removing 66 microphone, connecting 25 minimized image creating 84 recovery 85 mouse, external setting preferences 29 mute light, identifying 10 N network jack, identifying 6 num lock key, identifying 42 O operating environment 88 optical disc inserting 55 removing 55 optical drive eject button, identifying 5 optical drive, identifying 5 optional external devices, using 52 original system recovery 84 P passwords Setup Utility (BIOS) 72 Windows 72 pinching touch screen gesture 36 TouchPad gesture 31 ports HDMI 6, 24, 27 Intel Wireless Display...
... removing 66 replacing 65 memory module service door, removing 66 microphone, connecting 25 minimized image creating 84 recovery 85 mouse, external setting preferences 29 mute light, identifying 10 N network jack, identifying 6 num lock key, identifying 42 O operating environment 88 optical disc inserting 55 removing 55 optical drive eject button, identifying 5 optical drive, identifying 5 optional external devices, using 52 original system recovery 84 P passwords Setup Utility (BIOS) 72 Windows 72 pinching touch screen gesture 36 TouchPad gesture 31 ports HDMI 6, 24, 27 Intel Wireless Display...

User Guide - Windows 8
Page 102
... restore, Windows File History 82 right-edge swipe 37 RJ-45 (network) jack, identifying 6 rotating TouchPad gesture 32 S scrolling TouchPad gesture 31 security cable lock, installing 75 security cable slot, identifying 6 security, wireless 19 serial number 16 service labels, locating 16 setting password protection on wakeup 45 setup of WLAN 19 Setup Utility (BIOS) passwords 72 shipping the computer 70 shutdown 50 Sleep exiting 44 initiating 44 slots memory card 6 security cable 6 software critical updates 75 CyberLink PowerDVD 28 Disk Cleanup 65 Disk...
... restore, Windows File History 82 right-edge swipe 37 RJ-45 (network) jack, identifying 6 rotating TouchPad gesture 32 S scrolling TouchPad gesture 31 security cable lock, installing 75 security cable slot, identifying 6 security, wireless 19 serial number 16 service labels, locating 16 setting password protection on wakeup 45 setup of WLAN 19 Setup Utility (BIOS) passwords 72 shipping the computer 70 shutdown 50 Sleep exiting 44 initiating 44 slots memory card 6 security cable 6 software critical updates 75 CyberLink PowerDVD 28 Disk Cleanup 65 Disk...
HP ENVY 17 Notebook PC HP ENVY TouchSmart m7 Notebook PC HP ENVY TouchSmart 17 Notebook PC - Maintenance and Service Guide
Page 16
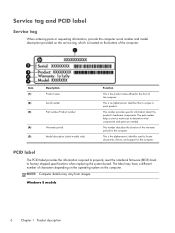
... Product name Serial number Part number/Product number (4) Warranty period (5) Model description (select models only) Function This is the product name affixed to factory shipped specifications when replacing the system board. PCID label The PCID label provides the information required to properly reset the notebook firmware (BIOS) back to the front of the computer. Windows 8 models 6 Chapter 1 Product description This number describes the duration of the computer. Service tag and...
... Product name Serial number Part number/Product number (4) Warranty period (5) Model description (select models only) Function This is the product name affixed to factory shipped specifications when replacing the system board. PCID label The PCID label provides the information required to properly reset the notebook firmware (BIOS) back to the front of the computer. Windows 8 models 6 Chapter 1 Product description This number describes the duration of the computer. Service tag and...
HP ENVY 17 Notebook PC HP ENVY TouchSmart m7 Notebook PC HP ENVY TouchSmart 17 Notebook PC - Maintenance and Service Guide
Page 47
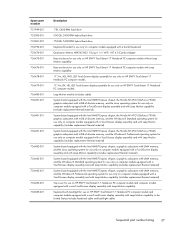
... with UMA memory, and the Windows 8 Professional operating system for use only on computer models equipped with a TouchScreen display assembly and with Leap Motion capability (includes replacement thermal material) Top cover for use on HP ENVY TouchSmart 17 Notebook PC computer models and computer models equipped with a non-TouchScreen display assembly with Leap Motion capability Keyboard with backlight for use on HP ENVY TouchSmart 17 Notebook PC computer models and computer models equipped with...
... with UMA memory, and the Windows 8 Professional operating system for use only on computer models equipped with a TouchScreen display assembly and with Leap Motion capability (includes replacement thermal material) Top cover for use on HP ENVY TouchSmart 17 Notebook PC computer models and computer models equipped with a non-TouchScreen display assembly with Leap Motion capability Keyboard with backlight for use on HP ENVY TouchSmart 17 Notebook PC computer models and computer models equipped with...
HP ENVY 17 Notebook PC HP ENVY TouchSmart m7 Notebook PC HP ENVY TouchSmart 17 Notebook PC - Maintenance and Service Guide
Page 82
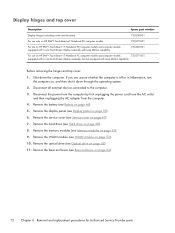
...). 72 Chapter 6 Removal and replacement procedures for Authorized Service Provider parts If you are unsure whether the computer is off or in Hibernation, turn the computer on HP ENVY TouchSmart 17 Notebook PC computer models and computer models 720271-001 equipped with a non-TouchScreen display assembly, but not equipped with Leap Motion capability Before removing the hinges and top cover: 1. Disconnect the power from the...
...). 72 Chapter 6 Removal and replacement procedures for Authorized Service Provider parts If you are unsure whether the computer is off or in Hibernation, turn the computer on HP ENVY TouchSmart 17 Notebook PC computer models and computer models 720271-001 equipped with a non-TouchScreen display assembly, but not equipped with Leap Motion capability Before removing the hinges and top cover: 1. Disconnect the power from the...
HP ENVY 17 Notebook PC HP ENVY TouchSmart m7 Notebook PC HP ENVY TouchSmart 17 Notebook PC - Maintenance and Service Guide
Page 111
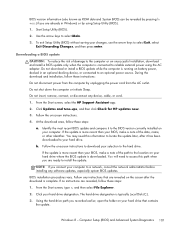
..., remove, connect, or disconnect any instructions that contains the update. Identify the most recent BIOS update and compare it has been downloaded to your computer to a network, consult the network administrator before installing any software updates, especially system BIOS updates. If the update is downloaded. Follow any device, cable, or cord. 1. The hard drive designation is connected to reliable external power using Setup Utility (BIOS). 1. Using the hard drive path you connect your hard drive. Windows 8 - Do not shut down the computer or initiate Sleep...
..., remove, connect, or disconnect any instructions that contains the update. Identify the most recent BIOS update and compare it has been downloaded to your computer to a network, consult the network administrator before installing any software updates, especially system BIOS updates. If the update is downloaded. Follow any device, cable, or cord. 1. The hard drive designation is connected to reliable external power using Setup Utility (BIOS). 1. Using the hard drive path you connect your hard drive. Windows 8 - Do not shut down the computer or initiate Sleep...
HP ENVY 17 Notebook PC HP ENVY TouchSmart m7 Notebook PC HP ENVY TouchSmart 17 Notebook PC - Maintenance and Service Guide
Page 119
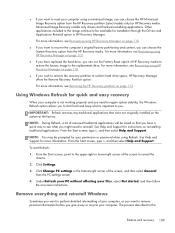
... the HP Recovery partition (select models only) or HP Recovery media. From the Start screen, type h, and then select Help and Support. ● If you want to reset your computer using a minimized image, you can choose the HP Minimized Image Recovery option from the PC settings screen. 4. Minimized Image Recovery installs only drivers and hardware-enabling applications. For more information, see what is not working properly and you need to reinstall. For more information, see Recovering using...
... the HP Recovery partition (select models only) or HP Recovery media. From the Start screen, type h, and then select Help and Support. ● If you want to reset your computer using a minimized image, you can choose the HP Minimized Image Recovery option from the PC settings screen. 4. Minimized Image Recovery installs only drivers and hardware-enabling applications. For more information, see what is not working properly and you need to reinstall. For more information, see Recovering using...
HP ENVY 17 Notebook PC HP ENVY TouchSmart m7 Notebook PC HP ENVY TouchSmart 17 Notebook PC - Maintenance and Service Guide
Page 127
...-ray Disc ROM with SuperMulti DVD±R/RW Double-Layer Combo Drive removal 55 spare part numbers 26, 29, 55 boot order changing HP Recovery Manager 112 buttons left TouchPad 13 optical drive eject 16 power 10 right TouchPad 13 C caps lock light, identifying 13 chipset, product description 1 components bottom 17 display 8 left side 14 right side 15 computer major components 19 computer reset 109 computer specifications 103 connector, power 16 D deleted files, restoring display assembly spare part number...
...-ray Disc ROM with SuperMulti DVD±R/RW Double-Layer Combo Drive removal 55 spare part numbers 26, 29, 55 boot order changing HP Recovery Manager 112 buttons left TouchPad 13 optical drive eject 16 power 10 right TouchPad 13 C caps lock light, identifying 13 chipset, product description 1 components bottom 17 display 8 left side 14 right side 15 computer major components 19 computer reset 109 computer specifications 103 connector, power 16 D deleted files, restoring display assembly spare part number...

HP ENVY 17 Notebook PC HP ENVY TouchSmart m7 Notebook PC HP ENVY TouchSmart 17 Notebook PC - Maintenance and Service Guide
Page 129
... 1 display panel 2 Ethernet 3 external memory cards 4 external optical drive 3 graphics 1 hard drives 2 internal cards 4 keyboard 4 memory module 2 microphone 3 operating system 5 optical drive 3 pointing device 4 ports 4 power requirements 5 processors 1 product name 1 serviceability 5 solid-state drive 3 wireless 4 product name 1 R recovery 108, 109 discs 107, 112 HP Recovery Manager 110 media 112 starting 111 supported discs 107 system 110 USB flash drive 112 using HP Recovery media 108 recovery media creating 107 creating using HP Recovery Manager 108 recovery partition 111 removing 112...
... 1 display panel 2 Ethernet 3 external memory cards 4 external optical drive 3 graphics 1 hard drives 2 internal cards 4 keyboard 4 memory module 2 microphone 3 operating system 5 optical drive 3 pointing device 4 ports 4 power requirements 5 processors 1 product name 1 serviceability 5 solid-state drive 3 wireless 4 product name 1 R recovery 108, 109 discs 107, 112 HP Recovery Manager 110 media 112 starting 111 supported discs 107 system 110 USB flash drive 112 using HP Recovery media 108 recovery media creating 107 creating using HP Recovery Manager 108 recovery partition 111 removing 112...


