HP ENVY 15 User Guide - Windows 7
Page 6
... ...30 Adjusting the volume ...30 Using the media activity keys 31 Multimedia software ...31 Using HP MediaSmart software 32 Using multimedia software 32 Installing multimedia software from a disc 32 Audio ...33 Connecting external audio devices 33 Checking your audio functions 33 Using Beats Audio ...34 Identifying Beats Audio icons 35 Video ...36 Connecting an external monitor or projector 36 Connecting an HDMI device 37 Configuring audio for HDMI 38 Webcam ...39 Webcam tips ...39 Adjusting webcam properties 39 Using the ambient light sensor ...41 Using adaptive brightness 41 vi
... ...30 Adjusting the volume ...30 Using the media activity keys 31 Multimedia software ...31 Using HP MediaSmart software 32 Using multimedia software 32 Installing multimedia software from a disc 32 Audio ...33 Connecting external audio devices 33 Checking your audio functions 33 Using Beats Audio ...34 Identifying Beats Audio icons 35 Video ...36 Connecting an external monitor or projector 36 Connecting an HDMI device 37 Configuring audio for HDMI 38 Webcam ...39 Webcam tips ...39 Adjusting webcam properties 39 Using the ambient light sensor ...41 Using adaptive brightness 41 vi

HP ENVY 15 User Guide - Windows 7
Page 8
... not open 63 Sharing optical drives ...64 External devices ...66 Using a USB device ...66 Connecting a USB device 66 Removing a USB device 66 Using an eSATA device ...67 Connecting an eSATA device 67 Removing an eSATA device 67 Using Digital Media Slot cards 68 Inserting a digital card 68 Removing a digital card 69 8 Memory modules Adding or replacing a memory module in single-slot models 71 Adding or replacing a memory module in double-slot models 74 9 Security Protecting the computer ...78 Using passwords ...79 Setting passwords in Windows 79 Setting passwords in Setup Utility 80...
... not open 63 Sharing optical drives ...64 External devices ...66 Using a USB device ...66 Connecting a USB device 66 Removing a USB device 66 Using an eSATA device ...67 Connecting an eSATA device 67 Removing an eSATA device 67 Using Digital Media Slot cards 68 Inserting a digital card 68 Removing a digital card 69 8 Memory modules Adding or replacing a memory module in single-slot models 71 Adding or replacing a memory module in double-slot models 74 9 Security Protecting the computer ...78 Using passwords ...79 Setting passwords in Windows 79 Setting passwords in Setup Utility 80...
HP ENVY 15 User Guide - Windows 7
Page 21
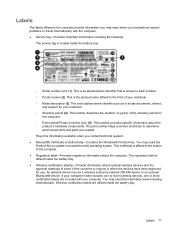
... affixed to update or troubleshoot the operating system. You may be a wireless local area network (WLAN) device or an optional Bluetooth® device. This is located inside the battery bay. The part number helps a service technician to each product. ◦ Product name (2). Wireless certification labels are needed. This is an alphanumeric identifier that is affixed to the bottom of Authenticity-Contains the Windows® Product Key. This certificate...
... affixed to update or troubleshoot the operating system. You may be a wireless local area network (WLAN) device or an optional Bluetooth® device. This is located inside the battery bay. The part number helps a service technician to each product. ◦ Product name (2). Wireless certification labels are needed. This is an alphanumeric identifier that is affixed to the bottom of Authenticity-Contains the Windows® Product Key. This certificate...

HP ENVY 15 User Guide - Windows 7
Page 30
... the icon, and then click Troubleshooting from the menu. Windows resets your computer model number in the search box. 4. The driver must have the current codes to http://www.hp.com/support. 2. Network icon for wireless connection problems include the following: ● Network configuration (SSID or security) has been changed. ● Wireless device is not installed correctly or has been disabled. ● Wireless device or router hardware has failed. ● Wireless device encountered interference from the...
... the icon, and then click Troubleshooting from the menu. Windows resets your computer model number in the search box. 4. The driver must have the current codes to http://www.hp.com/support. 2. Network icon for wireless connection problems include the following: ● Network configuration (SSID or security) has been changed. ● Wireless device is not installed correctly or has been disabled. ● Wireless device or router hardware has failed. ● Wireless device encountered interference from the...

HP ENVY 15 User Guide - Windows 7
Page 33
... TouchPad buttons like the corresponding buttons on and off, quickly double-tap the TouchPad off . Setting pointing device preferences Use Mouse Properties in the direction you want the pointer to go . 4 Pointing devices and keyboard Using pointing devices NOTE: In addition to the TouchPad, you can also connect an external USB mouse to customize settings for pointing devices, such as button configuration, click speed, and pointer options. If the TouchPad off indicator is amber, the TouchPad...
... TouchPad buttons like the corresponding buttons on and off, quickly double-tap the TouchPad off . Setting pointing device preferences Use Mouse Properties in the direction you want the pointer to go . 4 Pointing devices and keyboard Using pointing devices NOTE: In addition to the TouchPad, you can also connect an external USB mouse to customize settings for pointing devices, such as button configuration, click speed, and pointer options. If the TouchPad off indicator is amber, the TouchPad...
HP ENVY 15 User Guide - Windows 7
Page 36
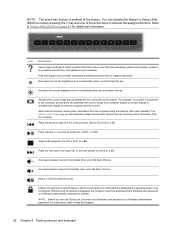
... be accessed until a Windows user password or a Windows administrator password is entered. Switches the screen image among other devices that are receiving video information from the computer using the external VGA video standard. For instructions, refer to Setup Utility (BIOS) on both the computer and the monitor. Help and Support also provides automated troubleshooting and links to activate the assigned function. Stops audio playback of a DVD or a BD. Mutes or restores speaker sound. The switch screen image key can use QuickLock...
... be accessed until a Windows user password or a Windows administrator password is entered. Switches the screen image among other devices that are receiving video information from the computer using the external VGA video standard. For instructions, refer to Setup Utility (BIOS) on both the computer and the monitor. Help and Support also provides automated troubleshooting and links to activate the assigned function. Stops audio playback of a DVD or a BD. Mutes or restores speaker sound. The switch screen image key can use QuickLock...
HP ENVY 15 User Guide - Windows 7
Page 51
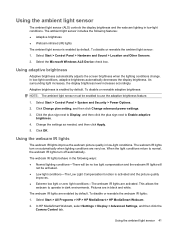
Select Start > Control Panel > Hardware and Sound > Location and Other Sensors. 2. Select the Microsoft Windows ALS Device check box. Adaptive brightness is enabled by default. To disable or reenable adaptive brightness: NOTE: The ambient light sensor must be activated. ● Low light conditions-The Low Light Compensation function is enabled by default. Click OK. Pictures are very low. Change the settings as needed, and then click Apply. 5. In HP MediaSmart Webcam, select Settings > Display > Advanced Settings, and then click the Camera Control tab...
Select Start > Control Panel > Hardware and Sound > Location and Other Sensors. 2. Select the Microsoft Windows ALS Device check box. Adaptive brightness is enabled by default. To disable or reenable adaptive brightness: NOTE: The ambient light sensor must be activated. ● Low light conditions-The Low Light Compensation function is enabled by default. Click OK. Pictures are very low. Change the settings as needed, and then click Apply. 5. In HP MediaSmart Webcam, select Settings > Display > Advanced Settings, and then click the Camera Control tab...
HP ENVY 15 User Guide - Windows 7
Page 53
... to a disc or an external media card. CAUTION: To prevent possible audio and video degradation, loss of audio or video playback functionality, or loss of inactivity when running on external power. NOTE: You cannot initiate any type of networking connection or perform any computer functions while the computer is closed, open the display. ● Press a key on , you exit Sleep faster than exiting Hibernation. Power settings and timeouts can be changed using Power Options in...
... to a disc or an external media card. CAUTION: To prevent possible audio and video degradation, loss of audio or video playback functionality, or loss of inactivity when running on external power. NOTE: You cannot initiate any type of networking connection or perform any computer functions while the computer is closed, open the display. ● Press a key on , you exit Sleep faster than exiting Hibernation. Power settings and timeouts can be changed using Power Options in...
HP ENVY 15 User Guide - Windows 7
Page 62
... responses set using Power Options in Windows Control Panel. Preferences set at the factory. Identifying low battery levels When a battery that shows how much battery charge remains. ● Amber: The battery is charging. ● White: The computer is connected to Using the battery meter on the display. ● Check the Power saver setting in the Sleep state, and then shuts down and loses any unsaved information. 52 Chapter 6 Power management Tips for a critical battery level...
... responses set using Power Options in Windows Control Panel. Preferences set at the factory. Identifying low battery levels When a battery that shows how much battery charge remains. ● Amber: The battery is charging. ● White: The computer is connected to Using the battery meter on the display. ● Check the Power saver setting in the Sleep state, and then shuts down and loses any unsaved information. 52 Chapter 6 Power management Tips for a critical battery level...
HP ENVY 15 User Guide - Windows 7
Page 70
... Sleep and allow the screen to Help and Support for unnecessary files that the battery is sufficiently charged before writing to run more efficiently. Refer to clear, or properly disconnect the external hard drive. Disk Defragmenter consolidates the fragmented files and folders on the hard drive become fragmented. NOTE: Windows® includes the User Account Control feature to temperature or humidity extremes. For additional information, access...
... Sleep and allow the screen to Help and Support for unnecessary files that the battery is sufficiently charged before writing to run more efficiently. Refer to clear, or properly disconnect the external hard drive. Disk Defragmenter consolidates the fragmented files and folders on the hard drive become fragmented. NOTE: Windows® includes the User Account Control feature to temperature or humidity extremes. For additional information, access...
HP ENVY 15 User Guide - Windows 7
Page 72
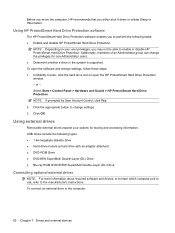
... storing and accessing information. or - Additionally, members of an Administrator group can change settings, follow these steps: 1. To open the HP ProtectSmart Hard Drive Protection window. - Using external drives Removable external drives expand your user privileges, you either shut it down or initiate Sleep or Hibernation. Select Start > Control Panel > Hardware and Sound > HP ProtectSmart Hard Drive Protection. Before you move the computer, HP recommends that you may not be able to enable or disable HP ProtectSmart Hard Drive Protection...
... storing and accessing information. or - Additionally, members of an Administrator group can change settings, follow these steps: 1. To open the HP ProtectSmart Hard Drive Protection window. - Using external drives Removable external drives expand your user privileges, you either shut it down or initiate Sleep or Hibernation. Select Start > Control Panel > Hardware and Sound > HP ProtectSmart Hard Drive Protection. Before you move the computer, HP recommends that you may not be able to enable or disable HP ProtectSmart Hard Drive Protection...
HP ENVY 15 User Guide - Windows 7
Page 91
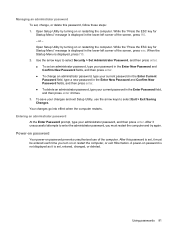
... key for Startup Menu" message is set, it is displayed, press f10. 2. Open Setup Utility by turning on or restarting the computer. After 3 unsuccessful attempts to select Security > Set Administrator Password, and then press enter. ● To set an administrator password, type your password in the Enter New Password and Confirm New Password fields, and then press enter. ● To change , or delete this password is displayed in the Enter Password field, and then press enter 4 times. 3. Using passwords 81 Use...
... key for Startup Menu" message is set, it is displayed, press f10. 2. Open Setup Utility by turning on or restarting the computer. After 3 unsuccessful attempts to select Security > Set Administrator Password, and then press enter. ● To set an administrator password, type your password in the Enter New Password and Confirm New Password fields, and then press enter. ● To change , or delete this password is displayed in the Enter Password field, and then press enter 4 times. 3. Using passwords 81 Use...
HP ENVY 15 User Guide - Windows 7
Page 100
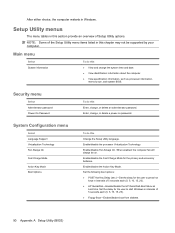
... Enter, change , or delete a power-on . Enable/disable Fan Always On. Enable/disable the Action Key Mode. Set the following boot options: ● POST Hot Key Delay (sec.)―Set the delay for the primary and accessory batteries. System Configuration menu Select Language Support Virtualization Technology Fan Always On Fast Charge Mode Action Key Mode Boot Options To do this Change the Setup Utility language. NOTE: Some of 5 seconds each (0, 5, 10, 15, 20). ● Floppy Boot―Enable/disable boot from diskette. 90 Appendix A Setup Utility (BIOS...
... Enter, change , or delete a power-on . Enable/disable Fan Always On. Enable/disable the Action Key Mode. Set the following boot options: ● POST Hot Key Delay (sec.)―Set the delay for the primary and accessory batteries. System Configuration menu Select Language Support Virtualization Technology Fan Always On Fast Charge Mode Action Key Mode Boot Options To do this Change the Setup Utility language. NOTE: Some of 5 seconds each (0, 5, 10, 15, 20). ● Floppy Boot―Enable/disable boot from diskette. 90 Appendix A Setup Utility (BIOS...

HP ENVY 15 User Guide - Windows 7
Page 103
... want to a network, consult the network administrator before installing any instructions that contains the update. 4. Open Windows Explorer by following the instructions on the screen. The hard drive designation is later than the BIOS version currently installed on the screen after it has been downloaded to the hard drive. To download a BIOS update: 1. Access the page on the HP Web site that is typically Local Disk (C:). 3. You will be downloaded. Using the hard drive path you recorded...
... want to a network, consult the network administrator before installing any instructions that contains the update. 4. Open Windows Explorer by following the instructions on the screen. The hard drive designation is later than the BIOS version currently installed on the screen after it has been downloaded to the hard drive. To download a BIOS update: 1. Access the page on the HP Web site that is typically Local Disk (C:). 3. You will be downloaded. Using the hard drive path you recorded...

HP ENVY 15 User Guide - Windows 7
Page 111
... 54 action key mode 90 action keys adjusting volume 26 audio CD, DVD, or BD controls 26 decreasing screen brightness 26 Help and Support 26 identifying 5 increasing screen brightness 26 muting speaker sound 26 QuickLock 26 switching screen image 26 using 25 volume 30 wireless 27 adaptive brightness, using 41 administrator password creating 81 entering 81 managing 81 airport security devices 60 ambient light sensor adaptive brightness 41 identifying 9 using 41 webcam IR lights 41 antennas 9 antivirus software, using 83 audio devices, connecting external 33 audio functions, checking 33 audio-in...
... 54 action key mode 90 action keys adjusting volume 26 audio CD, DVD, or BD controls 26 decreasing screen brightness 26 Help and Support 26 identifying 5 increasing screen brightness 26 muting speaker sound 26 QuickLock 26 switching screen image 26 using 25 volume 30 wireless 27 adaptive brightness, using 41 administrator password creating 81 entering 81 managing 81 airport security devices 60 ambient light sensor adaptive brightness 41 identifying 9 using 41 webcam IR lights 41 antennas 9 antivirus software, using 83 audio devices, connecting external 33 audio functions, checking 33 audio-in...

HP ENVY 15 User Guide - Windows 7
Page 112
D default settings, restoring 89 Diagnostics menu 91 digital card inserting 68 removing 69 supported formats 68 Digital Media Slot, identifying 6 Disk Cleanup software 60 Disk Defragmenter software 60 diskette drive 62 display image, switching 26 drive light 8, 61 drive media 43 drives boot order 90 connecting external 62 diskette 62 external 62 hard 62 optical 62 DVD drive 62 E encryption 17 entering a power-on password 82 entering an administrator password 81 eSATA cable, connecting 67 eSATA devices connecting 67 removing 67 eSATA port, identifying 7 esc key, identifying 6 external audio ...
D default settings, restoring 89 Diagnostics menu 91 digital card inserting 68 removing 69 supported formats 68 Digital Media Slot, identifying 6 Disk Cleanup software 60 Disk Defragmenter software 60 diskette drive 62 display image, switching 26 drive light 8, 61 drive media 43 drives boot order 90 connecting external 62 diskette 62 external 62 hard 62 optical 62 DVD drive 62 E encryption 17 entering a power-on password 82 entering an administrator password 81 eSATA cable, connecting 67 eSATA devices connecting 67 removing 67 eSATA port, identifying 7 esc key, identifying 6 external audio ...

HP ENVY 15 User Guide - Windows 7
Page 113
...-45 (network jack), identifying 7 S screen brightness keys 26 screen image, switching 26 scrolling TouchPad gesture 25 secondary hard disk self test 91 security cable slot, identifying 6 security cable, installing 86 Security menu 90 security, wireless 16 serial number, computer 11 service tag 11 setup of WLAN 16 Setup Utility changing the language 88 displaying system information 89 exiting 89 menus 90 navigating 88 passwords set in 80 restoring default settings 89 selecting 88 starting 87 shared drives 64 shutdown 58 Sleep exiting 43...
...-45 (network jack), identifying 7 S screen brightness keys 26 screen image, switching 26 scrolling TouchPad gesture 25 secondary hard disk self test 91 security cable slot, identifying 6 security cable, installing 86 Security menu 90 security, wireless 16 serial number, computer 11 service tag 11 setup of WLAN 16 Setup Utility changing the language 88 displaying system information 89 exiting 89 menus 90 navigating 88 passwords set in 80 restoring default settings 89 selecting 88 starting 87 shared drives 64 shutdown 58 Sleep exiting 43...
HP ENVY 15 - Maintenance and Service Guide
Page 18
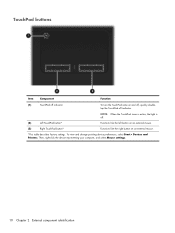
... an external mouse. (3) Right TouchPad button* Functions like the right button on and off, quickly doubletap the TouchPad off indicator. (2) Left TouchPad button* NOTE: When the TouchPad zone is active, the light is off indicator To turn the TouchPad zone on an external mouse. *This table describes factory settings. TouchPad buttons Item Component Function (1) TouchPad off . Then, right-click the device representing your computer, and select Mouse settings. 10 Chapter 2 External component identification To view and change pointing device preferences, select Start > Devices...
... an external mouse. (3) Right TouchPad button* Functions like the right button on and off, quickly doubletap the TouchPad off indicator. (2) Left TouchPad button* NOTE: When the TouchPad zone is active, the light is off indicator To turn the TouchPad zone on an external mouse. *This table describes factory settings. TouchPad buttons Item Component Function (1) TouchPad off . Then, right-click the device representing your computer, and select Mouse settings. 10 Chapter 2 External component identification To view and change pointing device preferences, select Start > Devices...

HP ENVY 15 - Maintenance and Service Guide
Page 106
... 2 audio-in jack 87 audio-out jack 87 external monitor port 88 headphone 87 microphone 87 monitor port 88 network jack 89 RJ-45 jack 89 Universal Serial Bus (USB) port 89 connectors, service considerations 30 D digital media slot 11 diskette drive precautions 30 display assembly removal 61 spare part numbers specifications 70 18, 61 display bezel spare part numbers 26, 28 display components 5 display hinge kit spare part numbers 26 display panel, product description 1 display screw kit spare part numbers 26 display switch, internal 6 drive light 12 drives, preventing damage 30 DVD±...
... 2 audio-in jack 87 audio-out jack 87 external monitor port 88 headphone 87 microphone 87 monitor port 88 network jack 89 RJ-45 jack 89 Universal Serial Bus (USB) port 89 connectors, service considerations 30 D digital media slot 11 diskette drive precautions 30 display assembly removal 61 spare part numbers specifications 70 18, 61 display bezel spare part numbers 26, 28 display components 5 display hinge kit spare part numbers 26 display panel, product description 1 display screw kit spare part numbers 26 display switch, internal 6 drive light 12 drives, preventing damage 30 DVD±...

HP ENVY 15 - Maintenance and Service Guide
Page 107
... 27 power cord set requirements 90 spare part numbers 25, 26 power cord, spare part number 25 power light 8 print options key 8 processor spare part number 20 spare part numbers 27 processor, product description 1 product description audio 2 chipset 1 display panel 1 Ethernet 2 external media cards 3 graphics 1 hard drives 2 keyboard 4 memory module 1 operating system 4 optical drives 2 pointing devices 4 ports 4 processors 1 product name 1 security 4 serviceability 4 webcam 2 wireless 3 product name 1 R removal/replacement preliminaries 29 procedures 34 right-side components 13 RJ-45 jack...
... 27 power cord set requirements 90 spare part numbers 25, 26 power cord, spare part number 25 power light 8 print options key 8 processor spare part number 20 spare part numbers 27 processor, product description 1 product description audio 2 chipset 1 display panel 1 Ethernet 2 external media cards 3 graphics 1 hard drives 2 keyboard 4 memory module 1 operating system 4 optical drives 2 pointing devices 4 ports 4 processors 1 product name 1 security 4 serviceability 4 webcam 2 wireless 3 product name 1 R removal/replacement preliminaries 29 procedures 34 right-side components 13 RJ-45 jack...


