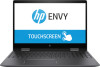
User Guide
Page 7
... Locating hardware ...4 Locating software ...4 Right side ...5 Left side ...7 Display ...10 Keyboard area ...11 TouchPad ...11 Lights ...12 Speakers ...13 Special keys ...14 Action keys ...15 Bottom ...16 Labels ...17 3 Connecting to a network ...19 Connecting to a wireless network ...19 Using the wireless controls ...19 Airplane mode key ...19 Operating system controls 19 Connecting to a WLAN ...20 Using HP Mobile Broadband (select products only 21 Using GPS (select products only) ...21 Using Bluetooth wireless devices (select products only 21 Connecting Bluetooth devices 22 Connecting...
... Locating hardware ...4 Locating software ...4 Right side ...5 Left side ...7 Display ...10 Keyboard area ...11 TouchPad ...11 Lights ...12 Speakers ...13 Special keys ...14 Action keys ...15 Bottom ...16 Labels ...17 3 Connecting to a network ...19 Connecting to a wireless network ...19 Using the wireless controls ...19 Airplane mode key ...19 Operating system controls 19 Connecting to a WLAN ...20 Using HP Mobile Broadband (select products only 21 Using GPS (select products only) ...21 Using Bluetooth wireless devices (select products only 21 Connecting Bluetooth devices 22 Connecting...

User Guide
Page 9
... only 45 Securing your wireless network ...45 Backing up your software applications and information 45 Using an optional security cable (select products only 45 9 Using Setup Utility (BIOS) ...46 Starting Setup Utility (BIOS) ...46 Updating Setup Utility (BIOS) ...46 Determining the BIOS version ...46 Downloading a BIOS update ...47 10 Using HP PC Hardware Diagnostics (UEFI) ...48 Downloading HP PC Hardware Diagnostics (UEFI) to a USB device 49 11 Backing up, restoring, and recovering ...50 Creating recovery media and backups ...50 Creating HP Recovery media (select products only 50...
... only 45 Securing your wireless network ...45 Backing up your software applications and information 45 Using an optional security cable (select products only 45 9 Using Setup Utility (BIOS) ...46 Starting Setup Utility (BIOS) ...46 Updating Setup Utility (BIOS) ...46 Determining the BIOS version ...46 Downloading a BIOS update ...47 10 Using HP PC Hardware Diagnostics (UEFI) ...48 Downloading HP PC Hardware Diagnostics (UEFI) to a USB device 49 11 Backing up, restoring, and recovering ...50 Creating recovery media and backups ...50 Creating HP Recovery media (select products only 50...

User Guide
Page 29
...; Airplane mode key (also called wireless button or wireless key) (referred to in the taskbar search box, and then select Control Panel. 2. Operating system controls The Network and Sharing Center allows you to set up a connection or network, connect to a wireless network 19 But even at the factory. In a WLAN, the mobile wireless device in your computer and a wired or wireless network connection. Connecting to a network, and diagnose and repair network problems. To use operating system controls: 1. The wireless light indicates the overall power state...
...; Airplane mode key (also called wireless button or wireless key) (referred to in the taskbar search box, and then select Control Panel. 2. Operating system controls The Network and Sharing Center allows you to set up a connection or network, connect to a wireless network 19 But even at the factory. In a WLAN, the mobile wireless device in your computer and a wired or wireless network connection. Connecting to a network, and diagnose and repair network problems. To use operating system controls: 1. The wireless light indicates the overall power state...
User Guide
Page 35
... the external device is a powerful video device that can connect wired headsets to the audioout (headphone)/audio-in (microphone) combo jack on the computer, using an HDMI cable NOTE: To connect an HDMI device to your computer, you to HP Support Assistant. To see the Regulatory, Safety and Environmental Notices. Using sound settings Use sound settings to adjust system volume, change sound settings: ▲ Type control panel in the taskbar search box, select Control Panel, select Hardware and Sound, and then select the audio control panel specific to your video...
... the external device is a powerful video device that can connect wired headsets to the audioout (headphone)/audio-in (microphone) combo jack on the computer, using an HDMI cable NOTE: To connect an HDMI device to your computer, you to HP Support Assistant. To see the Regulatory, Safety and Environmental Notices. Using sound settings Use sound settings to adjust system volume, change sound settings: ▲ Type control panel in the taskbar search box, select Control Panel, select Hardware and Sound, and then select the audio control panel specific to your video...
User Guide
Page 48
NOTE: Only internal hard drives are protected by HP 3D DriveGuard. A hard drive installed in optimal condition. NOTE: It is not necessary to run Disk Defragmenter: 1. To run Disk Defragmenter on battery power. Using Disk Defragmenter HP recommends using Disk Defragmenter to defragment your computer Connect the computer to use tools like Disk Defragmenter and Disk Cleanup. To run more efficiently. Improving performance You can safely delete to normal operation. Type defragment in the...
NOTE: Only internal hard drives are protected by HP 3D DriveGuard. A hard drive installed in optimal condition. NOTE: It is not necessary to run Disk Defragmenter: 1. To run Disk Defragmenter on battery power. Using Disk Defragmenter HP recommends using Disk Defragmenter to defragment your computer Connect the computer to use tools like Disk Defragmenter and Disk Cleanup. To run more efficiently. Improving performance You can safely delete to normal operation. Type defragment in the...
User Guide
Page 53
... the camera. Using Windows Hello (select products only) On products equipped with keyboards: ▲ Turn on or restart the tablet, and then quickly hold down button. - To set , change, or delete an administrator or power-on password in Setup Utility (BIOS): CAUTION: Use extreme care when making changes in tablet mode, cannot access Setup Utility. 1. Select Security, and then follow the on-screen instructions to sign in notebook mode and you must consist of numbers only...
... the camera. Using Windows Hello (select products only) On products equipped with keyboards: ▲ Turn on or restart the tablet, and then quickly hold down button. - To set , change, or delete an administrator or power-on password in Setup Utility (BIOS): CAUTION: Use extreme care when making changes in tablet mode, cannot access Setup Utility. 1. Select Security, and then follow the on-screen instructions to sign in notebook mode and you must consist of numbers only...
User Guide
Page 54
... include security updates. Installing software updates HP, Windows, and third-party software installed on your computer should be preinstalled on a system, all updates from the system is blocked. It is strongly recommended that does not meet those criteria is monitored and compared with a set of user-defined security criteria. Antivirus software can disable programs, utilities, or the operating system, or cause them , and in order to function abnormally...
... include security updates. Installing software updates HP, Windows, and third-party software installed on your computer should be preinstalled on a system, all updates from the system is blocked. It is strongly recommended that does not meet those criteria is monitored and compared with a set of user-defined security criteria. Antivirus software can disable programs, utilities, or the operating system, or cause them , and in order to function abnormally...
User Guide
Page 55
.... You can quickly download and install the software, which is a cloud-based IT solution that enables businesses to act as a deterrent, but it may not provide any security. To schedule a time for installing updates, select Advanced options, and then follow the on -screen instructions. 3. Using HP Touchpoint Manager (select products only) 45 To view or change the settings: 1. Select Windows Update, and then follow the device manufacturer's instructions. Securing...
.... You can quickly download and install the software, which is a cloud-based IT solution that enables businesses to act as a deterrent, but it may not provide any security. To schedule a time for installing updates, select Advanced options, and then follow the on -screen instructions. 3. Using HP Touchpoint Manager (select products only) 45 To view or change the settings: 1. Select Windows Update, and then follow the device manufacturer's instructions. Securing...
User Guide
Page 57
... on -screen instructions. 4. NOTE: If your hard drive. Follow the on the screen reports a successful installation, you can delete the downloaded file from the AC outlet. ● Do not shut down the computer or initiate Sleep. ● Do not insert, remove, connect, or disconnect any device, cable, or cord. The hard drive designation is connected to reliable external power using the AC adapter. Complete the installation by unplugging the power cord...
... on -screen instructions. 4. NOTE: If your hard drive. Follow the on the screen reports a successful installation, you can delete the downloaded file from the AC outlet. ● Do not shut down the computer or initiate Sleep. ● Do not insert, remove, connect, or disconnect any device, cable, or cord. The hard drive designation is connected to reliable external power using the AC adapter. Complete the installation by unplugging the power cord...

User Guide
Page 62
.... ● HP Recovery media must either created or that you want to remove the Recovery partition to its original factory state by using HP Recovery Manager on page 50. For software not provided with a preinstalled application or driver, use the Factory Reset option of HP Recovery Manager to reinstall the individual application or driver. ▲ Type recovery in the taskbar search box, select HP Recovery Manager, select Reinstall drivers and/or applications, and then follow the on-screen instructions. ●...
.... ● HP Recovery media must either created or that you want to remove the Recovery partition to its original factory state by using HP Recovery Manager on page 50. For software not provided with a preinstalled application or driver, use the Factory Reset option of HP Recovery Manager to reinstall the individual application or driver. ▲ Type recovery in the taskbar search box, select HP Recovery Manager, select Reinstall drivers and/or applications, and then follow the on-screen instructions. ●...

User Guide
Page 64
... quickly hold down the volume down the volume up , restoring, and recovering see Creating HP Recovery media (select products only) on -screen instructions. 54 Chapter 11 Backing up button; Type recovery in HP Recovery Manager, change the boot order: IMPORTANT: For a tablet with keyboards attached: ▲ Turn on or restart the computer or tablet, quickly press esc, and then press f9 for startup information. Select Remove Recovery Partition, and then follow the on page 50. Changing the computer boot order...
... quickly hold down the volume down the volume up , restoring, and recovering see Creating HP Recovery media (select products only) on -screen instructions. 54 Chapter 11 Backing up button; Type recovery in HP Recovery Manager, change the boot order: IMPORTANT: For a tablet with keyboards attached: ▲ Turn on or restart the computer or tablet, quickly press esc, and then press f9 for startup information. Select Remove Recovery Partition, and then follow the on page 50. Changing the computer boot order...
User Guide
Page 69
... HDMI port connecting 25 identifying 6, 7 HDMI, configuring audio 26 headphones, connecting 24 headsets, connecting 25 Hibernation exiting 33 initiated during critical battery level 36 initiating 33 high-definition devices, connecting 25, 27 HP 3D DriveGuard 38 HP Fast Charge 34 HP Mobile Broadband activating 21 IMEI number 21 MEID number 21 HP Orbit 22 HP PC Hardware Diagnostics (UEFI) using 48 HP Recovery Manager correcting boot problems 54 starting 53 HP Recovery media creating 50 recovery 53 HP Recovery partition recovery 53 removing 54 HP resources 2 HP Touchpoint Manager 45 I IMEI number...
... HDMI port connecting 25 identifying 6, 7 HDMI, configuring audio 26 headphones, connecting 24 headsets, connecting 25 Hibernation exiting 33 initiated during critical battery level 36 initiating 33 high-definition devices, connecting 25, 27 HP 3D DriveGuard 38 HP Fast Charge 34 HP Mobile Broadband activating 21 IMEI number 21 MEID number 21 HP Orbit 22 HP PC Hardware Diagnostics (UEFI) using 48 HP Recovery Manager correcting boot problems 54 starting 53 HP Recovery media creating 50 recovery 53 HP Recovery partition recovery 53 removing 54 HP resources 2 HP Touchpoint Manager 45 I IMEI number...

User Guide
Page 70
... software, using 44 J jacks audio-out (headphone)/audio-in (microphone) 7, 9 K keyboard and optional mouse using 31 keys action 14 airplane mode 15 esc 14 fn 14 Windows 14 L labels Bluetooth 18 regulatory 18 serial number 17 service 17 wireless certification 18 WLAN 18 lights AC adapter and battery light 5, 6 caps lock 12 drive 8, 9 mute 12 power 7, 8 locating information hardware 4 software 4 low battery level 35 M maintenance Disk Cleanup 38 Disk Defragmenter 38 HP 3D DriveGuard 38 updating programs and drivers 39 managing power 32 MEID number 21 memory card reader, identifying 5, 6 memory...
... software, using 44 J jacks audio-out (headphone)/audio-in (microphone) 7, 9 K keyboard and optional mouse using 31 keys action 14 airplane mode 15 esc 14 fn 14 Windows 14 L labels Bluetooth 18 regulatory 18 serial number 17 service 17 wireless certification 18 WLAN 18 lights AC adapter and battery light 5, 6 caps lock 12 drive 8, 9 mute 12 power 7, 8 locating information hardware 4 software 4 low battery level 35 M maintenance Disk Cleanup 38 Disk Defragmenter 38 HP 3D DriveGuard 38 updating programs and drivers 39 managing power 32 MEID number 21 memory card reader, identifying 5, 6 memory...

Maintenance and Service Guide
Page 6
... ...45 WLAN module ...47 Memory card reader board ...48 Speakers ...49 Display assembly ...51 Power connector cable ...60 6 Using Setup Utility (BIOS) ...61 Starting Setup Utility (BIOS) ...61 Updating Setup Utility (BIOS) ...61 Determining the BIOS version ...61 Downloading a BIOS update ...62 7 Backing up, restoring, and recovering ...63 Using Windows tools for backing up, restoring, and recovering your computer 63 Creating backups ...63 Restoring and recovering ...63 Creating HP Recovery media (select products only 64 Using HP Recovery Manager to create recovery media 64 Before you...
... ...45 WLAN module ...47 Memory card reader board ...48 Speakers ...49 Display assembly ...51 Power connector cable ...60 6 Using Setup Utility (BIOS) ...61 Starting Setup Utility (BIOS) ...61 Updating Setup Utility (BIOS) ...61 Determining the BIOS version ...61 Downloading a BIOS update ...62 7 Backing up, restoring, and recovering ...63 Using Windows tools for backing up, restoring, and recovering your computer 63 Creating backups ...63 Restoring and recovering ...63 Creating HP Recovery media (select products only 64 Using HP Recovery Manager to create recovery media 64 Before you...

Maintenance and Service Guide
Page 44
... latest BIOS prior to installing new memory may result in the socket labeled 1. Click the link for the computer model. 5. In the Enter a product name/number box, type the computer model information, and then click Search. 4. Select the operating system, and then click Next. 6. Before removing the memory module, follow the on-screen instructions. Remove the memory module: 1. Click Support & Drivers, and then click Drivers & Software. 3. If you update the computer to www.hp...
... latest BIOS prior to installing new memory may result in the socket labeled 1. Click the link for the computer model. 5. In the Enter a product name/number box, type the computer model information, and then click Search. 4. Select the operating system, and then click Next. 6. Before removing the memory module, follow the on-screen instructions. Remove the memory module: 1. Click Support & Drivers, and then click Drivers & Software. 3. If you update the computer to www.hp...
Maintenance and Service Guide
Page 55
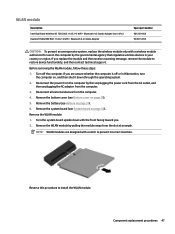
....11 AC 2×2 WiFi + Bluetooth 4.2 Combo Adapter Spare part number 901229-855 924813-855 CAUTION: To prevent an unresponsive system, replace the wireless module only with the front facing toward you replace the module and then receive a warning message, remove the module to restore device functionality, and then contact technical support. If you . 2. Before removing the WLAN module, follow these steps: 1. Remove the system board (see System board on page 31). 6.
....11 AC 2×2 WiFi + Bluetooth 4.2 Combo Adapter Spare part number 901229-855 924813-855 CAUTION: To prevent an unresponsive system, replace the wireless module only with the front facing toward you replace the module and then receive a warning message, remove the module to restore device functionality, and then contact technical support. If you . 2. Before removing the WLAN module, follow these steps: 1. Remove the system board (see System board on page 31). 6.
Maintenance and Service Guide
Page 70
... -screen instructions to reliable external power using the AC adapter. The hard drive designation is connected to download your hard drive designation. Complete the installation by unplugging the power cord from the AC outlet. ● Do not shut down the computer or initiate Sleep. ● Do not insert, remove, connect, or disconnect any device, cable, or cord. Follow the on your BIOS version, make a note of the path to install the update. The BIOS installation...
... -screen instructions to reliable external power using the AC adapter. The hard drive designation is connected to download your hard drive designation. Complete the installation by unplugging the power cord from the AC outlet. ● Do not shut down the computer or initiate Sleep. ● Do not insert, remove, connect, or disconnect any device, cable, or cord. Follow the on your BIOS version, make a note of the path to install the update. The BIOS installation...
Maintenance and Service Guide
Page 85
... 14 switch screen image 14 using 14 airplane mode key 15 antenna removal 58 spare part number 24, 59 audio adjusting volume 14 audio, product description 3 audio-out (headphone)/audio-in (microphone) combo jack, identifying 7 B backups 63 battery removal 31 spare part number 22, 31 BIOS determining version 61 downloading an update 62 starting the Setup Utility 61 updating 61 Bluetooth label 18 boot order, changing 67 bottom components 16 bottom cover removal 29 spare part number buttons ClickPad 10 components 12 power 7, 12 22, 29 C camera identifying 9 camera light, identifying 9 caps lock...
... 14 switch screen image 14 using 14 airplane mode key 15 antenna removal 58 spare part number 24, 59 audio adjusting volume 14 audio, product description 3 audio-out (headphone)/audio-in (microphone) combo jack, identifying 7 B backups 63 battery removal 31 spare part number 22, 31 BIOS determining version 61 downloading an update 62 starting the Setup Utility 61 updating 61 Bluetooth label 18 boot order, changing 67 bottom components 16 bottom cover removal 29 spare part number buttons ClickPad 10 components 12 power 7, 12 22, 29 C camera identifying 9 camera light, identifying 9 caps lock...
Maintenance and Service Guide
Page 86
... 13 internal microphones, identifying 9 J jacks audio-out (headphone)/audio-in (microphone) 7 K keyboard backlight action key 14 keyboard, product description 3 keyboard/top cover spare part numbers 20 keypad, integrated numeric 13 keys action 13 airplane mode 15 esc 13 fn 13 num lock 13 Windows 13 L labels Bluetooth 18 regulatory 18 serial number 17 service 17 wireless certification 18 WLAN 18 light components 11 lights AC adapter and battery 5 camera 9 caps lock 11 drive 8 mute 11 power 7, 11 M memory card reader board removal 48 spare part numbers 48 memory card reader board cable removal...
... 13 internal microphones, identifying 9 J jacks audio-out (headphone)/audio-in (microphone) 7 K keyboard backlight action key 14 keyboard, product description 3 keyboard/top cover spare part numbers 20 keypad, integrated numeric 13 keys action 13 airplane mode 15 esc 13 fn 13 num lock 13 Windows 13 L labels Bluetooth 18 regulatory 18 serial number 17 service 17 wireless certification 18 WLAN 18 light components 11 lights AC adapter and battery 5 camera 9 caps lock 11 drive 8 mute 11 power 7, 11 M memory card reader board removal 48 spare part numbers 48 memory card reader board cable removal...

Maintenance and Service Guide
Page 87
...cards 3 graphics 1 hard drive 2 keyboard 3 memory module 1 microphone 3 operating system 4 optical drive 3 pointing device 3 ports 3 power requirements 4 processors 1 product name 1 security 4 sensors 3 serviceability 4 solid-state drive 2 storage 2 video 3 wireless 3 product name 1 product name and number, computer 17 R recovery discs 64, 67 HP Recovery Manager 66 HP Recovery partition 65 media 67 starting 66 supported discs 64 system 66 USB flash drive 67 using HP Recovery media 65 recovery media creating using HP Cloud Recovery Download Tool 65 creating using HP Recovery Manager 65 creating...
...cards 3 graphics 1 hard drive 2 keyboard 3 memory module 1 microphone 3 operating system 4 optical drive 3 pointing device 3 ports 3 power requirements 4 processors 1 product name 1 security 4 sensors 3 serviceability 4 solid-state drive 2 storage 2 video 3 wireless 3 product name 1 product name and number, computer 17 R recovery discs 64, 67 HP Recovery Manager 66 HP Recovery partition 65 media 67 starting 66 supported discs 64 system 66 USB flash drive 67 using HP Recovery media 65 recovery media creating using HP Cloud Recovery Download Tool 65 creating using HP Recovery Manager 65 creating...


