Start Here
Page 9
...; HP Recovery media must be used as a final attempt to reclaim hard drive space, HP Recovery Manager offers the Remove Recovery Partition option. For more information, see the Get started app. ▲ Select the Start button, and then select the Get started ● HP Recovery Manager recovers only software that was installed at the factory. If you have replaced the hard drive, you can obtain recovery media for your situation and level of HP Recovery media. Choose the method that you either download...
...; HP Recovery media must be used as a final attempt to reclaim hard drive space, HP Recovery Manager offers the Remove Recovery Partition option. For more information, see the Get started app. ▲ Select the Start button, and then select the Get started ● HP Recovery Manager recovers only software that was installed at the factory. If you have replaced the hard drive, you can obtain recovery media for your situation and level of HP Recovery media. Choose the method that you either download...
Start Here
Page 11
... a USB flash drive. Type recovery in the taskbar search box, and then select HP Recovery Manager. 2. For tablets without keyboards: ▲ Turn on -screen instructions. Follow the on or restart the tablet, and then quickly hold down button; Follow these steps. 1. IMPORTANT: After you remove the HP Recovery partition, you want to boot. 4. Access BIOS: For computers or tablets with a detachable keyboard, connect the keyboard to the keyboard dock before you remove the Recovery partition, create HP Recovery media; then select f9. - Restore...
... a USB flash drive. Type recovery in the taskbar search box, and then select HP Recovery Manager. 2. For tablets without keyboards: ▲ Turn on -screen instructions. Follow the on or restart the tablet, and then quickly hold down button; Follow these steps. 1. IMPORTANT: After you remove the HP Recovery partition, you want to boot. 4. Access BIOS: For computers or tablets with a detachable keyboard, connect the keyboard to the keyboard dock before you remove the Recovery partition, create HP Recovery media; then select f9. - Restore...
Maintenance and Service Guide
Page 8
...PC Hardware Diagnostics (UEFI) to a USB device 58 8 Specifications ...60 Computer specifications ...60 9 Backing up, restoring, and recovering ...61 Creating recovery media and backups ...61 Creating HP Recovery media (select products only 61 Using Windows tools ...62 Restore and recovery ...63 Recovering using HP Recovery Manager 63 What you need to know before you get started 63 Using the HP Recovery partition (select products only 64 Using HP Recovery media to recover 64 Changing the computer boot order 65 Removing the HP Recovery partition (select products only 66 10 Power cord set...
...PC Hardware Diagnostics (UEFI) to a USB device 58 8 Specifications ...60 Computer specifications ...60 9 Backing up, restoring, and recovering ...61 Creating recovery media and backups ...61 Creating HP Recovery media (select products only 61 Using Windows tools ...62 Restore and recovery ...63 Recovering using HP Recovery Manager 63 What you need to know before you get started 63 Using the HP Recovery partition (select products only 64 Using HP Recovery media to recover 64 Changing the computer boot order 65 Removing the HP Recovery partition (select products only 66 10 Power cord set...
Maintenance and Service Guide
Page 41
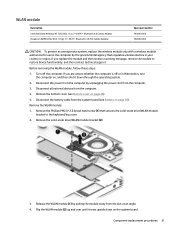
... 7265 802.11 ac 2×2 WiFi + Bluetooth 4.0 Combo Adapter Broadcom BCM943142 802.11 bgn 1×1 Wi-Fi + Bluetooth 4.0 M.2 Combo Adapter Spare part number 793840-005 792608-005 CAUTION: To prevent an unresponsive system, replace the wireless module only with a wireless module authorized for use in the computer by the governmental agency that secures the solid-state drive/WLAN module bracket to restore device functionality, and then contact technical support.
... 7265 802.11 ac 2×2 WiFi + Bluetooth 4.0 Combo Adapter Broadcom BCM943142 802.11 bgn 1×1 Wi-Fi + Bluetooth 4.0 M.2 Combo Adapter Spare part number 793840-005 792608-005 CAUTION: To prevent an unresponsive system, replace the wireless module only with a wireless module authorized for use in the computer by the governmental agency that secures the solid-state drive/WLAN module bracket to restore device functionality, and then contact technical support.
Maintenance and Service Guide
Page 60
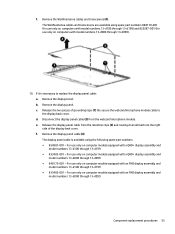
... to replace the display hinges: 50 Chapter 5 Removal and replacement procedures f. Remove the webcam/microphone module. Remove the display panel. e. Remove the display bezel. Detach the webcam/microphone module (3) from the webcam/microphone module. The webcam/microphone module is necessary to the display back cover with double-sided adhesive.) NOTE: When releasing the webcam/microphone module, make sure the microphone rubber isolators (4) do not get lost. If it is available using spare part numbers 854982-001 (for use only on computers with model numbers 13-d100...
... to replace the display hinges: 50 Chapter 5 Removal and replacement procedures f. Remove the webcam/microphone module. Remove the display panel. e. Remove the display bezel. Detach the webcam/microphone module (3) from the webcam/microphone module. The webcam/microphone module is necessary to the display back cover with double-sided adhesive.) NOTE: When releasing the webcam/microphone module, make sure the microphone rubber isolators (4) do not get lost. If it is available using spare part numbers 854982-001 (for use only on computers with model numbers 13-d100...
Maintenance and Service Guide
Page 63
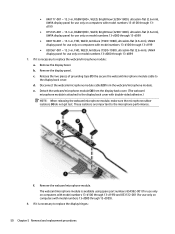
... part numbers 848170-001 (for use only on computers with model numbers 13-d100 through 13-d199) and 829287-001 (for use only on computers with an FHD display assembly and model numbers 13-d000 through 13-d099 ● 848175-001 - Disconnect the display panel cable (2) from the retention clips (3) and routing channel built into the right side of grounding tape (1) the secure the webcam/microphone module cable to replace the display panel cable: a. Remove the display panel cable (4). f. Remove...
... part numbers 848170-001 (for use only on computers with model numbers 13-d100 through 13-d199) and 829287-001 (for use only on computers with an FHD display assembly and model numbers 13-d000 through 13-d099 ● 848175-001 - Disconnect the display panel cable (2) from the retention clips (3) and routing channel built into the right side of grounding tape (1) the secure the webcam/microphone module cable to replace the display panel cable: a. Remove the display panel cable (4). f. Remove...

Maintenance and Service Guide
Page 66
..., and then select the HP Support Assistant app. - Select My PC, and then select Specifications. - or - ▲ Use Setup Utility (BIOS). Start Setup Utility (BIOS) (see Downloading a BIOS update on -screen instructions to reliable external power using the AC adapter. During the download and installation, follow these steps: a. If the update is connected to download your hard drive designation. Make a note of damage to an optional power source. The hard drive designation is running on your BIOS version, make note of the date, name...
..., and then select the HP Support Assistant app. - Select My PC, and then select Specifications. - or - ▲ Use Setup Utility (BIOS). Start Setup Utility (BIOS) (see Downloading a BIOS update on -screen instructions to reliable external power using the AC adapter. During the download and installation, follow these steps: a. If the update is connected to download your hard drive designation. Make a note of damage to an optional power source. The hard drive designation is running on your BIOS version, make note of the date, name...
Maintenance and Service Guide
Page 73
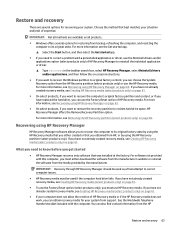
... have replaced the hard drive, you either download the software from the manufacturer's website or reinstall the software from the media provided by using the HP Recovery media that was installed at the factory. You can use the Reinstall drivers and/or applications option (select products only) of HP Recovery media or if the HP Recovery media does not work, you want to recover the Windows partition to reclaim hard drive space, HP Recovery Manager offers the Remove Recovery Partition option. For more information, see Creating HP Recovery media...
... have replaced the hard drive, you either download the software from the manufacturer's website or reinstall the software from the media provided by using the HP Recovery media that was installed at the factory. You can use the Reinstall drivers and/or applications option (select products only) of HP Recovery media or if the HP Recovery media does not work, you want to recover the Windows partition to reclaim hard drive space, HP Recovery Manager offers the Remove Recovery Partition option. For more information, see Creating HP Recovery media...

Maintenance and Service Guide
Page 80
... A AC adapter light 10 AC adapter, spare part numbers 20 action keys 6 antenna location 4 removal 52 spare part numbers 19, 53 audio, product description 1 audio-in jack 9 audio-out jack 9 B backups 61 battery removal 28 spare part number 17, 28 BIOS determining version 55 downloading an update 56 starting the Setup Utility 55 updating 55 boot order changing 65 bottom components 11 bottom cover removal 26 spare part numbers 17, 26 button components 5 buttons power 5 TouchPad 8 C caps lock light 7 chipset, product description 1 components bottom 11 buttons 5 display 4 fingerprint reader 5 keys...
... A AC adapter light 10 AC adapter, spare part numbers 20 action keys 6 antenna location 4 removal 52 spare part numbers 19, 53 audio, product description 1 audio-in jack 9 audio-out jack 9 B backups 61 battery removal 28 spare part number 17, 28 BIOS determining version 55 downloading an update 56 starting the Setup Utility 55 updating 55 boot order changing 65 bottom components 11 bottom cover removal 26 spare part numbers 17, 26 button components 5 buttons power 5 TouchPad 8 C caps lock light 7 chipset, product description 1 components bottom 11 buttons 5 display 4 fingerprint reader 5 keys...

Maintenance and Service Guide
Page 81
... description audio 1 chipset 1 display panel 1 Ethernet 1 external media cards 2 graphics 1 keyboard 2 memory module 1 microphone 1 operating system 2 pointing device 2 ports 2 power requirements 2 processors 1 product name 1 security 2 serviceability 2 solid-state drive 1 video 1 wireless 1, 2 product name 1 R recover options 63 recovery discs 62, 64 HP Recovery Manager 63 media 64 starting 64 supported discs 62 system 63 USB flash drive 64 using HP Recovery media 62 recovery media creating 61 creating using HP Recovery Manager 62 recovery partition removing 66 removal/replacement procedures...
... description audio 1 chipset 1 display panel 1 Ethernet 1 external media cards 2 graphics 1 keyboard 2 memory module 1 microphone 1 operating system 2 pointing device 2 ports 2 power requirements 2 processors 1 product name 1 security 2 serviceability 2 solid-state drive 1 video 1 wireless 1, 2 product name 1 R recover options 63 recovery discs 62, 64 HP Recovery Manager 63 media 64 starting 64 supported discs 62 system 63 USB flash drive 64 using HP Recovery media 62 recovery media creating 61 creating using HP Recovery Manager 62 recovery partition removing 66 removal/replacement procedures...
User Guide
Page 5
...Locating hardware ...4 Locating software ...4 Right side ...5 Left side ...6 Display ...7 Top ...8 TouchPad ...8 Lights ...9 Buttons, speakers, and fingerprint reader 10 Keys ...11 Using the action keys ...11 Bottom ...13 Labels ...14 3 Connecting to a network ...15 Connecting to a wireless network ...15 Using the wireless controls ...15 Airplane mode key ...15 Operating system controls 15 Connecting to a WLAN ...16 Using HP Mobile Broadband (select products only 16 Using GPS (select products only) ...17 Using Bluetooth wireless devices (select products only 17 Connecting Bluetooth devices...
...Locating hardware ...4 Locating software ...4 Right side ...5 Left side ...6 Display ...7 Top ...8 TouchPad ...8 Lights ...9 Buttons, speakers, and fingerprint reader 10 Keys ...11 Using the action keys ...11 Bottom ...13 Labels ...14 3 Connecting to a network ...15 Connecting to a wireless network ...15 Using the wireless controls ...15 Airplane mode key ...15 Operating system controls 15 Connecting to a WLAN ...16 Using HP Mobile Broadband (select products only 16 Using GPS (select products only) ...17 Using Bluetooth wireless devices (select products only 17 Connecting Bluetooth devices...
User Guide
Page 7
... your wireless network ...41 Backing up your software applications and information 41 Using an optional security cable (select products only 41 9 Using Setup Utility (BIOS) ...42 Starting Setup Utility (BIOS) ...42 Updating Setup Utility (BIOS) ...42 Determining the BIOS version ...42 Downloading a BIOS update ...43 10 Using HP PC Hardware Diagnostics (UEFI) ...44 Downloading HP PC Hardware Diagnostics (UEFI) to a USB device 44 11 Backing up, restoring, and recovering ...46 Creating recovery media and backups ...46 Creating HP Recovery media (select products only 46 Using Windows tools...
... your wireless network ...41 Backing up your software applications and information 41 Using an optional security cable (select products only 41 9 Using Setup Utility (BIOS) ...42 Starting Setup Utility (BIOS) ...42 Updating Setup Utility (BIOS) ...42 Determining the BIOS version ...42 Downloading a BIOS update ...43 10 Using HP PC Hardware Diagnostics (UEFI) ...44 Downloading HP PC Hardware Diagnostics (UEFI) to a USB device 44 11 Backing up, restoring, and recovering ...46 Creating recovery media and backups ...46 Creating HP Recovery media (select products only 46 Using Windows tools...

User Guide
Page 23
... cameras. Operating system controls The Network and Sharing Center allows you to set up a connection or network, connect to a network, and diagnose and repair network problems. Connecting to that world. 3 Connecting to a network Your computer can travel with a wireless router or a wireless access point. ● HP Mobile Broadband Module-Gives you wireless connectivity over a wireless wide area network (WWAN), a much larger area. In a PAN, each other Bluetooth-enabled devices such as Wi-Fi networks, wireless LANs, or WLANs) in your wireless devices...
... cameras. Operating system controls The Network and Sharing Center allows you to set up a connection or network, connect to a network, and diagnose and repair network problems. Connecting to that world. 3 Connecting to a network Your computer can travel with a wireless router or a wireless access point. ● HP Mobile Broadband Module-Gives you wireless connectivity over a wireless wide area network (WWAN), a much larger area. In a PAN, each other Bluetooth-enabled devices such as Wi-Fi networks, wireless LANs, or WLANs) in your wireless devices...
User Guide
Page 28
Follow the device manufacturer's instructions. Connecting video devices using an HDMI cable (select products only) NOTE: To connect an HDMI device to your system. - Right-click the Start button, select Control Panel, select Hardware and Sound, and then select Sound. or - Connect one of the HDMI cable to the HDMI port on a high-definition TV or monitor, connect the high-definition device according to the following instructions: 1. Your computer may include advanced audio features that enables you to watch streaming...
Follow the device manufacturer's instructions. Connecting video devices using an HDMI cable (select products only) NOTE: To connect an HDMI device to your system. - Right-click the Start button, select Control Panel, select Hardware and Sound, and then select Sound. or - Connect one of the HDMI cable to the HDMI port on a high-definition TV or monitor, connect the high-definition device according to the following instructions: 1. Your computer may include advanced audio features that enables you to watch streaming...
User Guide
Page 42
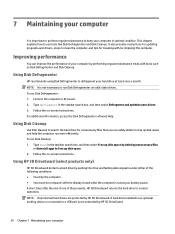
... normal operation. It also provides instructions for traveling with (or shipping) the computer. For additional information, access the Disk Defragmenter software Help. Using HP 3D DriveGuard (select products only) HP 3D DriveGuard protects a hard drive by HP 3D DriveGuard. A hard drive installed in the taskbar search box, and then select Defragment and optimize your hard drive at least once a month. Type defragment in an optional docking device or connected to a USB port...
... normal operation. It also provides instructions for traveling with (or shipping) the computer. For additional information, access the Disk Defragmenter software Help. Using HP 3D DriveGuard (select products only) HP 3D DriveGuard protects a hard drive by HP 3D DriveGuard. A hard drive installed in the taskbar search box, and then select Defragment and optimize your hard drive at least once a month. Type defragment in an optional docking device or connected to a USB port...
User Guide
Page 47
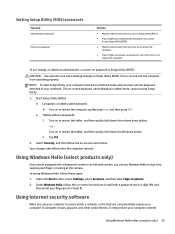
... to access email, a network, or the Internet, you potentially expose your computer, Internet Using Windows Hello (select products only) 39 The on-screen keyboard, which displays in options. 2. Under Windows Hello, follow the on-screen instructions to sign in by swiping your fingerprint or facial ID. To set , change, or delete an administrator or power-on password in Setup Utility (BIOS): CAUTION: Use extreme care when making changes in Setup Utility (BIOS). Select the Start button, select Settings, select...
... to access email, a network, or the Internet, you potentially expose your computer, Internet Using Windows Hello (select products only) 39 The on-screen keyboard, which displays in options. 2. Under Windows Hello, follow the on-screen instructions to sign in by swiping your fingerprint or facial ID. To set , change, or delete an administrator or power-on password in Setup Utility (BIOS): CAUTION: Use extreme care when making changes in Setup Utility (BIOS). Select the Start button, select Settings, select...

User Guide
Page 48
... change the settings: 1. Installing software updates HP, Windows, and third-party software installed on your computer and/or network, or it is monitored and compared with a set of your choice in order to date. Click the question mark icon in the taskbar search box, and then select the HP Support Assistant app. - CAUTION: Microsoft sends out alerts regarding Windows updates, which may be a combination of firewalls to function...
... change the settings: 1. Installing software updates HP, Windows, and third-party software installed on your computer and/or network, or it is monitored and compared with a set of your choice in order to date. Click the question mark icon in the taskbar search box, and then select the HP Support Assistant app. - CAUTION: Microsoft sends out alerts regarding Windows updates, which may be a combination of firewalls to function...
User Guide
Page 51
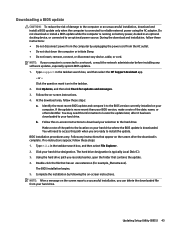
... any device, cable, or cord. NOTE: After a message on your hard drive. During the download and installation, follow these steps: 1. Do not download or install a BIOS update while the computer is running on the screen after it to the hard drive. You may need to access this information to locate the update later, after the download is complete. Type file in an optional docking device, or connected to reliable external power using the AC adapter. Identify...
... any device, cable, or cord. NOTE: After a message on your hard drive. During the download and installation, follow these steps: 1. Do not download or install a BIOS update while the computer is running on the screen after it to the hard drive. You may need to access this information to locate the update later, after the download is complete. Type file in an optional docking device, or connected to reliable external power using the AC adapter. Identify...

User Guide
Page 64
... 16 IMEI number 16 MEID number 16 HP PC Hardware Diagnostics (UEFI) using 44 HP Recovery Manager correcting boot problems 50 starting 49 HP Recovery media creating 46 recovery 49 HP Recovery partition recovery 49 removing 51 HP resources 2 HP Touchpoint Manager 41 I IMEI number 16 initiating Sleep and Hibernation 27 input power 52 installing optional security cable 41 internal display switch, identifying 7 internal microphones, identifying 7 Internet security software, using 39 J jacks audio-out (headphone)/audio-in (microphone) 6 K keyboard and optional mouse using 26 keys action 11 airplane...
... 16 IMEI number 16 MEID number 16 HP PC Hardware Diagnostics (UEFI) using 44 HP Recovery Manager correcting boot problems 50 starting 49 HP Recovery media creating 46 recovery 49 HP Recovery partition recovery 49 removing 51 HP resources 2 HP Touchpoint Manager 41 I IMEI number 16 initiating Sleep and Hibernation 27 input power 52 installing optional security cable 41 internal display switch, identifying 7 internal microphones, identifying 7 Internet security software, using 39 J jacks audio-out (headphone)/audio-in (microphone) 6 K keyboard and optional mouse using 26 keys action 11 airplane...
User Guide
Page 65
... 49 starting 49 supported discs 47 system 48 USB flash drive 49 using HP Recovery media 47 recovery media creating 46 creating using HP Recovery Manager 47 recovery partition removing 51 regulatory information regulatory label 14 wireless certification labels 14 S security cable slot, identifying 6 security cable, installing 41 serial number 14 serial number, computer 14 service labels, locating 14 setting password protection on wakeup 28 Setup Utility (BIOS) passwords 39 shipping the computer 36 shutdown 32 Sleep exiting 28 initiating 28 Sleep and Hibernation initiating 27 slots memory card...
... 49 starting 49 supported discs 47 system 48 USB flash drive 49 using HP Recovery media 47 recovery media creating 46 creating using HP Recovery Manager 47 recovery partition removing 51 regulatory information regulatory label 14 wireless certification labels 14 S security cable slot, identifying 6 security cable, installing 41 serial number 14 serial number, computer 14 service labels, locating 14 setting password protection on wakeup 28 Setup Utility (BIOS) passwords 39 shipping the computer 36 shutdown 32 Sleep exiting 28 initiating 28 Sleep and Hibernation initiating 27 slots memory card...


